2012 CHEVROLET MALIBU ignition
[x] Cancel search: ignitionPage 43 of 398
Black plate (13,1)Chevrolet Malibu Owner Manual - 2012
Keys, Doors, and Windows 2-13
damaged. See your dealer who can
service the theft-deterrent system
and have a new key made.
It is possible for the theft-deterrent
system decoder to learn the
transponder value of a new or
replacement key. Up to 10 keys can
be programmed for the vehicle.
The following procedure is for
programming additional keys only.
To program the new key:
1. Verify that the new key hasa
1stamped on it.
2. Insert the already programmed key in the ignition and start the
engine. If the engine will not
start, see your dealer for service.
3. After the engine has started, turn the key to LOCK/OFF, and
remove the key. 4. Insert the key to be programmed
and turn it to ON/RUN within
five seconds of the original key
being turned to LOCK/OFF in
Step 3.
The security light will turn off
once the key has been
programmed. It may not be
apparent that the security light
went on due to how quickly the
key is programmed.
5. Repeat Steps 1 through 4 if additional keys are to be
programmed.
Do not leave the key or device that
disarms or deactivates the theft
deterrent system in the vehicle.
Exterior Mirrors
Convex Mirrors
{WARNING
A convex mirror can make things,
like other vehicles, look farther
away than they really are. If you
cut too sharply into the right lane,
you could hit a vehicle on the
right. Check the inside mirror or
glance over your shoulder before
changing lanes.
The passenger side mirror is convex
shaped. A convex mirror's surface is
curved so more can be seen from
the driver seat.
Page 46 of 398
Black plate (16,1)Chevrolet Malibu Owner Manual - 2012
2-16 Keys, Doors, and Windows
Power Windows
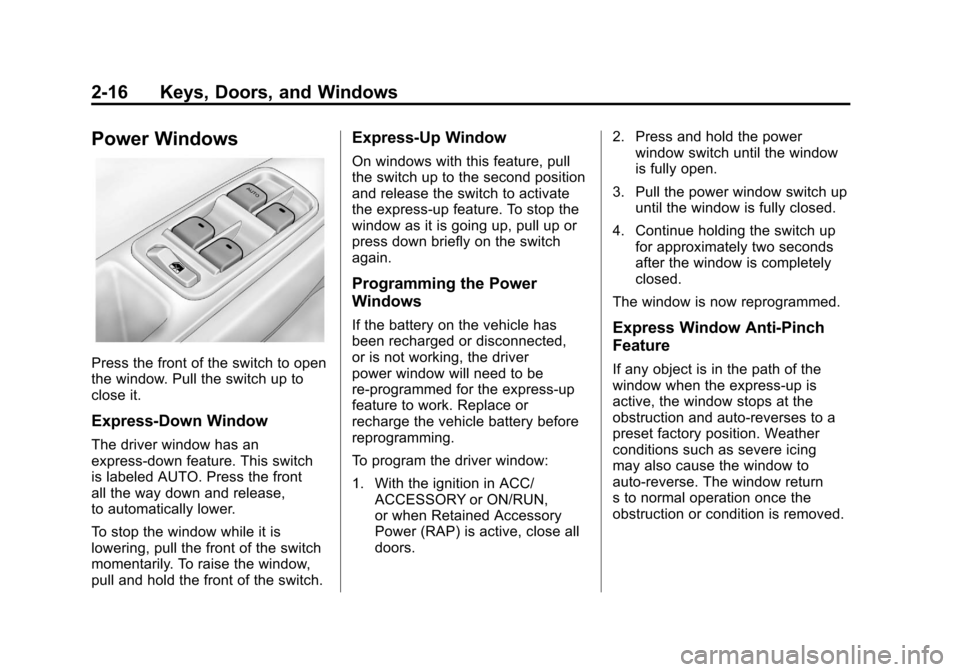
Press the front of the switch to open
the window. Pull the switch up to
close it.
Express-Down Window
The driver window has an
express-down feature. This switch
is labeled AUTO. Press the front
all the way down and release,
to automatically lower.
To stop the window while it is
lowering, pull the front of the switch
momentarily. To raise the window,
pull and hold the front of the switch.
Express-Up Window
On windows with this feature, pull
the switch up to the second position
and release the switch to activate
the express-up feature. To stop the
window as it is going up, pull up or
press down briefly on the switch
again.
Programming the Power
Windows
If the battery on the vehicle has
been recharged or disconnected,
or is not working, the driver
power window will need to be
re-programmed for the express-up
feature to work. Replace or
recharge the vehicle battery before
reprogramming.
To program the driver window:
1. With the ignition in ACC/ACCESSORY or ON/RUN,
or when Retained Accessory
Power (RAP) is active, close all
doors. 2. Press and hold the power
window switch until the window
is fully open.
3. Pull the power window switch up until the window is fully closed.
4. Continue holding the switch up for approximately two seconds
after the window is completely
closed.
The window is now reprogrammed.Express Window Anti-Pinch
Feature
If any object is in the path of the
window when the express‐up is
active, the window stops at the
obstruction and auto‐reverses to a
preset factory position. Weather
conditions such as severe icing
may also cause the window to
auto‐reverse. The window return
s to normal operation once the
obstruction or condition is removed.
Page 48 of 398
Black plate (18,1)Chevrolet Malibu Owner Manual - 2012
2-18 Keys, Doors, and Windows
Roof
Sunroof
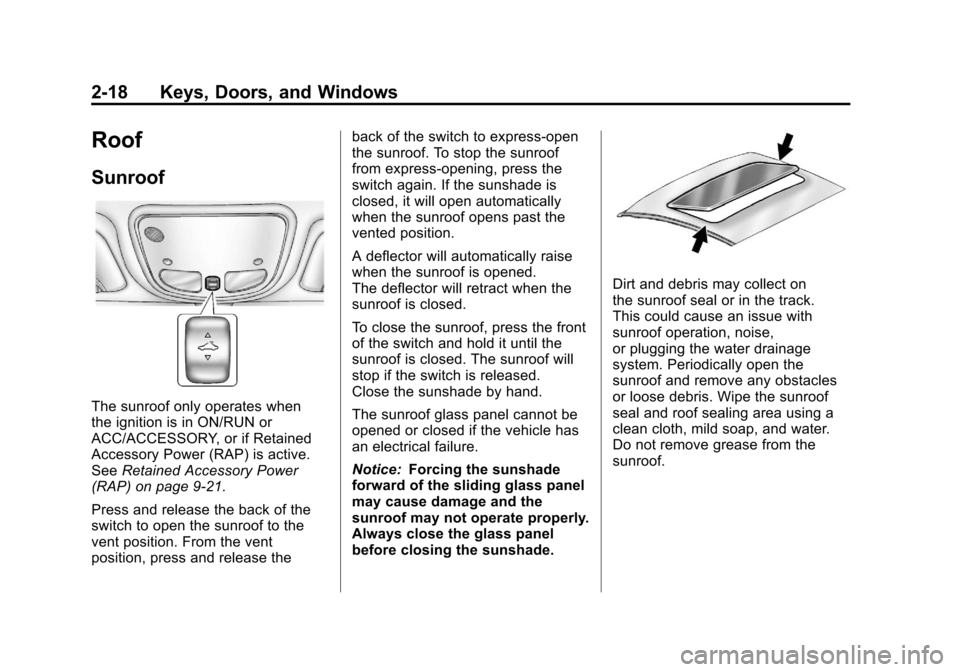
The sunroof only operates when
the ignition is in ON/RUN or
ACC/ACCESSORY, or if Retained
Accessory Power (RAP) is active.
SeeRetained Accessory Power
(RAP) on page 9‑21.
Press and release the back of the
switch to open the sunroof to the
vent position. From the vent
position, press and release the back of the switch to express-open
the sunroof. To stop the sunroof
from express-opening, press the
switch again. If the sunshade is
closed, it will open automatically
when the sunroof opens past the
vented position.
A deflector will automatically raise
when the sunroof is opened.
The deflector will retract when the
sunroof is closed.
To close the sunroof, press the front
of the switch and hold it until the
sunroof is closed. The sunroof will
stop if the switch is released.
Close the sunshade by hand.
The sunroof glass panel cannot be
opened or closed if the vehicle has
an electrical failure.
Notice:
Forcing the sunshade
forward of the sliding glass panel
may cause damage and the
sunroof may not operate properly.
Always close the glass panel
before closing the sunshade.
Dirt and debris may collect on
the sunroof seal or in the track.
This could cause an issue with
sunroof operation, noise,
or plugging the water drainage
system. Periodically open the
sunroof and remove any obstacles
or loose debris. Wipe the sunroof
seal and roof sealing area using a
clean cloth, mild soap, and water.
Do not remove grease from the
sunroof.
Page 55 of 398
Black plate (7,1)Chevrolet Malibu Owner Manual - 2012
Seats and Restraints 3-7
Power Reclining Seatbacks
To adjust a power seatback,
if equipped:
.Tilt the top of the control
rearward to recline.
.Tilt the top of the control forward
to raise.
Heated Front Seats
{WARNING
If you cannot feel temperature
change or pain to the skin, the
seat heater may cause burns
even at low temperatures. To
reduce the risk of burns, people
with such a condition should use
care when using the seat heater,
especially for long periods of
time. Do not place anything on
the seat that insulates against
heat, such as a blanket, cushion,
cover, or similar item. This may
cause the seat heater to
overheat. An overheated seat
heater may cause a burn or may
damage the seat.
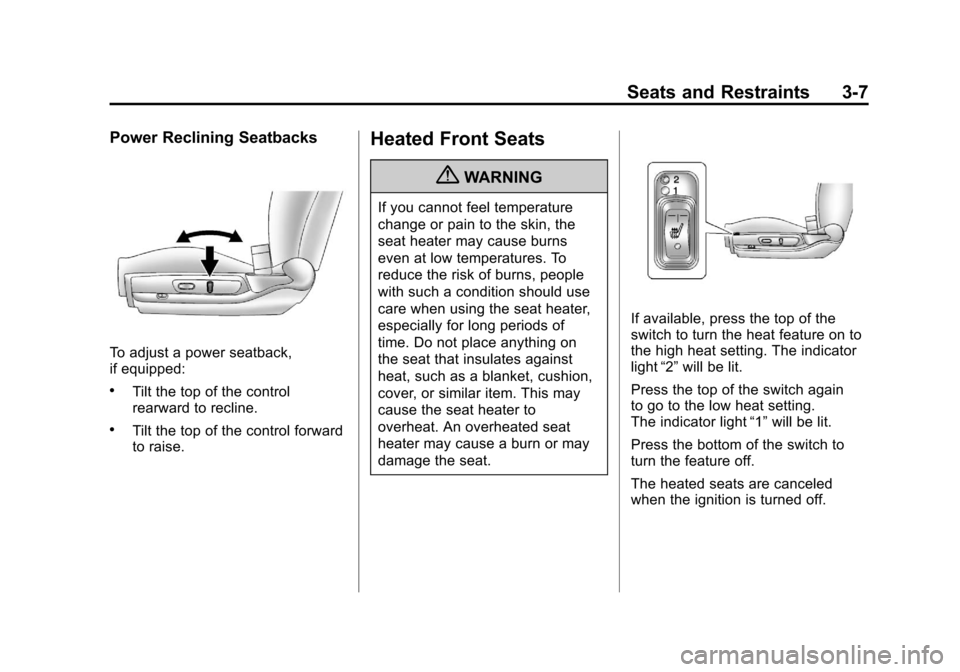
If available, press the top of the
switch to turn the heat feature on to
the high heat setting. The indicator
light“2”will be lit.
Press the top of the switch again
to go to the low heat setting.
The indicator light “1”will be lit.
Press the bottom of the switch to
turn the feature off.
The heated seats are canceled
when the ignition is turned off.
Page 111 of 398
Black plate (5,1)Chevrolet Malibu Owner Manual - 2012
Instruments and Controls 5-5
Compass
Compass Operation
PressOon the rearview mirror to
turn the compass display on or off.
When the ignition and the compass
feature are on, the compass
displays the current compass
direction after a few seconds.
Compass Calibration
If after a few seconds the display
does not show a compass direction,
(N for North for example), there
may be a strong magnetic field
interfering with the compass.
Interference can be caused
by a magnetic antenna mount,
note pad holder, or similar object. If the letter C appears in the
compass window, the compass
may need to be reset or calibrated.
The mirror can be calibrated by
driving the vehicle very slowly, in
circles, until the display reads a
direction.
Compass Variance
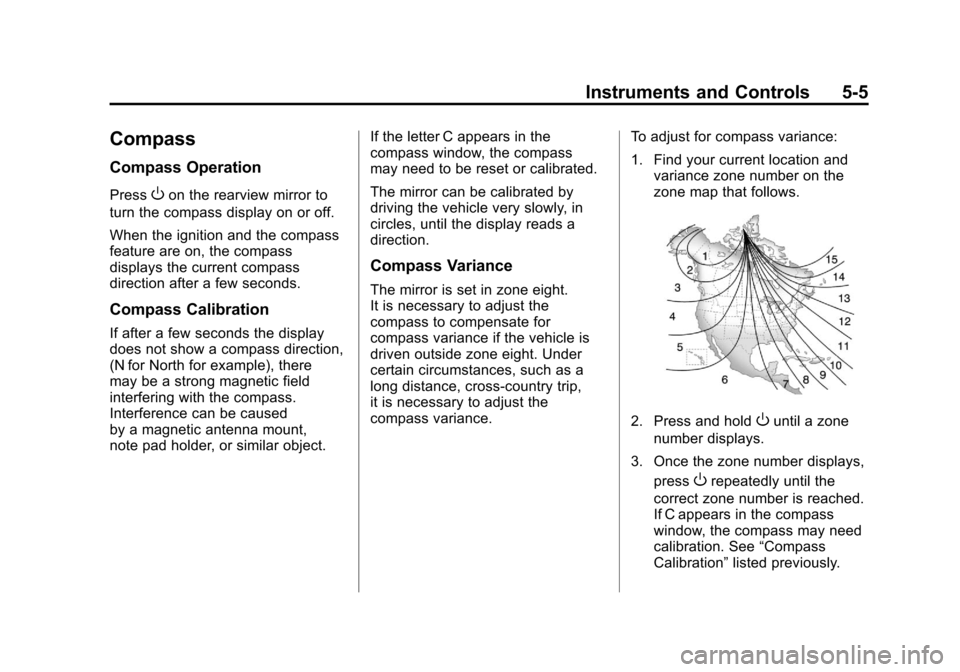
The mirror is set in zone eight.
It is necessary to adjust the
compass to compensate for
compass variance if the vehicle is
driven outside zone eight. Under
certain circumstances, such as a
long distance, cross-country trip,
it is necessary to adjust the
compass variance.
To adjust for compass variance:
1. Find your current location and
variance zone number on the
zone map that follows.
2. Press and holdOuntil a zone
number displays.
3. Once the zone number displays, press
Orepeatedly until the
correct zone number is reached.
If C appears in the compass
window, the compass may need
calibration. See “Compass
Calibration” listed previously.
Page 112 of 398
Black plate (6,1)Chevrolet Malibu Owner Manual - 2012
5-6 Instruments and Controls
Clock
Without Date Display
AM/FM Base Radio with a
Single CD Player
To set the time:
1. Turn the ignition key toACC/ACCESSORY or ON/RUN.
Press the
Oknob to turn the
radio on.
2. Press the
Hbutton until the hour
begins flashing on the display.
Press the
Hbutton a second
time and the minute begins
flashing on the display.
3. While either the hour or the minute numbers are flashing,
turn the
fknob to increase or
decrease the time.
4. Press the
Hbutton again until
the clock display stops flashing
to set the currently displayed
time; otherwise, the flashing
stops after five seconds and
the current time displayed is
automatically set. To change the time default setting
from 12 hour to 24 hour, press
the
Hbutton until 12H or 24H is
displayed. Once 12H or 24H is
displayed, turn the
fknob to the
desired option to select the setting.
Press the
Hbutton again to apply
the setting, or let the screen
time out.
With Date Display
Radio with CD (MP3) and
USB Port, and Radio with
Single CD (MP3) Player
To set the time and date:
1. Turn the ignition key to ACC/ACCESSORY or ON/RUN.
Press the
Oknob to turn the
radio on.
2. Press the
Hbutton and the HR,
MIN, MM, DD, YYYY (hour,
minute, month, day, and year)
displays. 3. Press the softkey located below
any one of the tabs that you
want to change.
4. To increase the time or date do one of the following:
.Press the softkey located
below the selected tab.
.Press the¨SEEK, or
\FWD button.
.Turn thefknob clockwise.
5. To decrease the time or date do one of the following:
.Press the©SEEK or
sREV button.
.Turn thefknob
counterclockwise.
Page 114 of 398

Black plate (8,1)Chevrolet Malibu Owner Manual - 2012
5-8 Instruments and Controls
Power Outlet 110 Volt
Alternating Current
The vehicle may have a power
outlet that can be used to plug in
electrical equipment that uses a
maximum limit of 150 watts.
The power outlet is located on the
rear of the center console.An indicator light on the outlet
comes on when in use. The ignition
must be in ON/RUN and equipment
requiring less than 150 watts is
plugged into the outlet, and no
system fault is detected.
If you try to connect equipment
using more than 150 watts or a
system fault is detected, a
protection circuit shuts off the power
supply and the indicator light turns
off. To reset the circuit, unplug the
item and plug it back in or turn the
Remote Accessory Power (RAP) off
and then back on. See
Retained
Accessory Power (RAP) on
page 9‑21. The power restarts when
equipment that operates within the
limit is plugged into the outlet and a
system fault is not detected. The power outlet is not designed for
and may not work properly if the
following are plugged in:
.Equipment with high initial
peak wattage such as:
compressor-driven refrigerators
and electric power tools.
.Other equipment requiring
an extremely stable
power supply such as:
microcomputer-controlled
electric blankets, touch sensor
lamps, etc.
Page 118 of 398

Black plate (12,1)Chevrolet Malibu Owner Manual - 2012
5-12 Instruments and Controls
Fuel Gauge
Metric
English
When the ignition is on, the fuel
gauge shows how much fuel is left
in the fuel tank. When the indicator
nears empty, a message in the
Driver Information Center (DIC)
displays. See Fuel System
Messages on page 5‑28 for more
information. The vehicle still has a
little fuel left, but the vehicle should
be fueled soon. An arrow on the fuel
gauge indicates the side of the
vehicle the fuel door is on. Here are four things that some
owners ask about. These are
normal and do not indicate a
problem with the fuel gauge:
.At the service station, the gas
pump shuts off before the gauge
reads full.
.It takes a little more or less fuel
to fill up than the gauge
indicated. For example, the
gauge may have indicated the
fuel tank was half full, but it
actually took a little more or less
than half the fuel tank's capacity
to fill it.
.The indicator moves a little while
turning a corner or speeding up.
.The gauge goes back to empty
when the ignition is turned off.