2012 CHEVROLET IMPALA lights
[x] Cancel search: lightsPage 1 of 374

Black plate (1,1)Chevrolet Impala Owner Manual - 2012
2012 Chevrolet Impala Owner ManualM
In Brief. . . . . . . . . . . . . . . . . . . . . . . . 1-1
Instrument Panel . . . . . . . . . . . . . . 1-2
Initial Drive Information . . . . . . . . 1-3
Vehicle Features . . . . . . . . . . . . . 1-13
Performance and Maintenance . . . . . . . . . . . . . . . . 1-17
Keys, Doors, and Windows . . . . . . . . . . . . . . . . . . . . 2-1
Keys and Locks . . . . . . . . . . . . . . . 2-2
Doors . . . . . . . . . . . . . . . . . . . . . . . . 2-10
Vehicle Security . . . . . . . . . . . . . . 2-11
Exterior Mirrors . . . . . . . . . . . . . . . 2-14
Interior Mirrors . . . . . . . . . . . . . . . . 2-15
Windows . . . . . . . . . . . . . . . . . . . . . 2-16
Roof . . . . . . . . . . . . . . . . . . . . . . . . . . 2-18
Seats and Restraints . . . . . . . . . 3-1
Head Restraints . . . . . . . . . . . . . . . 3-2
Front Seats . . . . . . . . . . . . . . . . . . . . 3-3
Rear Seats . . . . . . . . . . . . . . . . . . . . 3-8
Safety Belts . . . . . . . . . . . . . . . . . . 3-10
Airbag System . . . . . . . . . . . . . . . . 3-20
Child Restraints . . . . . . . . . . . . . . 3-36 Storage
. . . . . . . . . . . . . . . . . . . . . . . 4-1
Storage Compartments . . . . . . . . 4-1
Additional Storage Features . . . 4-2
Instruments and Controls . . . . 5-1
Controls . . . . . . . . . . . . . . . . . . . . . . . 5-2
Warning Lights, Gauges, and
Indicators . . . . . . . . . . . . . . . . . . . . 5-9
Information Displays . . . . . . . . . . 5-24
Vehicle Messages . . . . . . . . . . . . 5-29
Vehicle Personalization . . . . . . . 5-37
Universal Remote System . . . . 5-43
Lighting . . . . . . . . . . . . . . . . . . . . . . . 6-1
Exterior Lighting . . . . . . . . . . . . . . . 6-1
Interior Lighting . . . . . . . . . . . . . . . . 6-5
Lighting Features . . . . . . . . . . . . . . 6-7
Infotainment System . . . . . . . . . 7-1
Introduction . . . . . . . . . . . . . . . . . . . . 7-1
Radio . . . . . . . . . . . . . . . . . . . . . . . . . . 7-6
Audio Players . . . . . . . . . . . . . . . . 7-14
Phone . . . . . . . . . . . . . . . . . . . . . . . . 7-20 Climate Controls
. . . . . . . . . . . . . 8-1
Climate Control Systems . . . . . . 8-1
Air Vents . . . . . . . . . . . . . . . . . . . . . . . 8-5
Maintenance . . . . . . . . . . . . . . . . . . . 8-5
Driving and Operating . . . . . . . . 9-1
Driving Information . . . . . . . . . . . . . 9-2
Starting and Operating . . . . . . . 9-16
Engine Exhaust . . . . . . . . . . . . . . 9-24
Automatic Transmission . . . . . . 9-26
Brakes . . . . . . . . . . . . . . . . . . . . . . . 9-29
Ride Control Systems . . . . . . . . 9-30
Cruise Control . . . . . . . . . . . . . . . . 9-34
Fuel . . . . . . . . . . . . . . . . . . . . . . . . . . 9-36
Towing . . . . . . . . . . . . . . . . . . . . . . . 9-42
Conversions and Add-Ons . . . 9-49
Vehicle Care . . . . . . . . . . . . . . . . . 10-1
General Information . . . . . . . . . . 10-2
Vehicle Checks . . . . . . . . . . . . . . . 10-4
Headlamp Aiming . . . . . . . . . . . 10-25
Bulb Replacement . . . . . . . . . . 10-25
Page 15 of 374
Black plate (9,1)Chevrolet Impala Owner Manual - 2012
In Brief 1-9
Interior Mirror
Vehicles with a manual rearview
mirror can be adjusted by holding
the mirror in the center to move it for
a clearer view behind the vehicle.
Adjust the mirror to avoid glare from
the headlamps behind. Pull the
lever, located at the bottom of the
mirror for nighttime use. Return the
lever to its original position for the
day position.
SeeManual Rearview Mirror on
page 2‑15.
On vehicles with an automatic
dimming rearview mirror, the mirror
will automatically adjust to reduce
the glare of lights from behind the
vehicle. See Automatic Dimming
Rearview Mirror on page 2‑15.
Steering Wheel
Adjustment
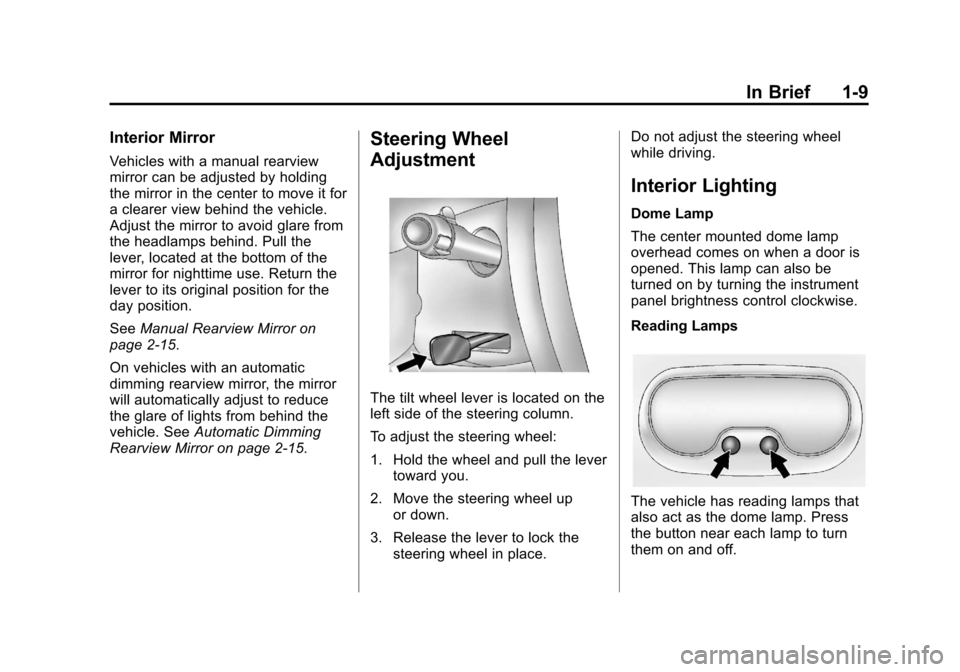
The tilt wheel lever is located on the
left side of the steering column.
To adjust the steering wheel:
1. Hold the wheel and pull the lever toward you.
2. Move the steering wheel up or down.
3. Release the lever to lock the steering wheel in place. Do not adjust the steering wheel
while driving.
Interior Lighting
Dome Lamp
The center mounted dome lamp
overhead comes on when a door is
opened. This lamp can also be
turned on by turning the instrument
panel brightness control clockwise.
Reading Lamps
The vehicle has reading lamps that
also act as the dome lamp. Press
the button near each lamp to turn
them on and off.
Page 52 of 374
Black plate (8,1)Chevrolet Impala Owner Manual - 2012
3-8 Seats and Restraints
Press the button once for the
highest setting. With each press of
the button, the heated seat will
change to the next lower setting,
and then to the off setting. The
lights indicate two for the highest
setting and one for the lowest.
The passenger seat may take
longer to heat up.
The heated seat are canceled each
time the ignition is turned off. To use
this feature after restarting the
vehicle, press the desired button
again.Rear Seats
Rear Seats (Split Folding)
Flip and Fold Feature
On vehicles with this feature, the
seat cushions flip forward and the
seatbacks fold down to create an
extended flat cargo area.
To flip the seat cushion and fold the
seatback:
1. Make sure the front seats arenot reclined. The seat cushion
will not flip forward completely if
the front seats are reclined.
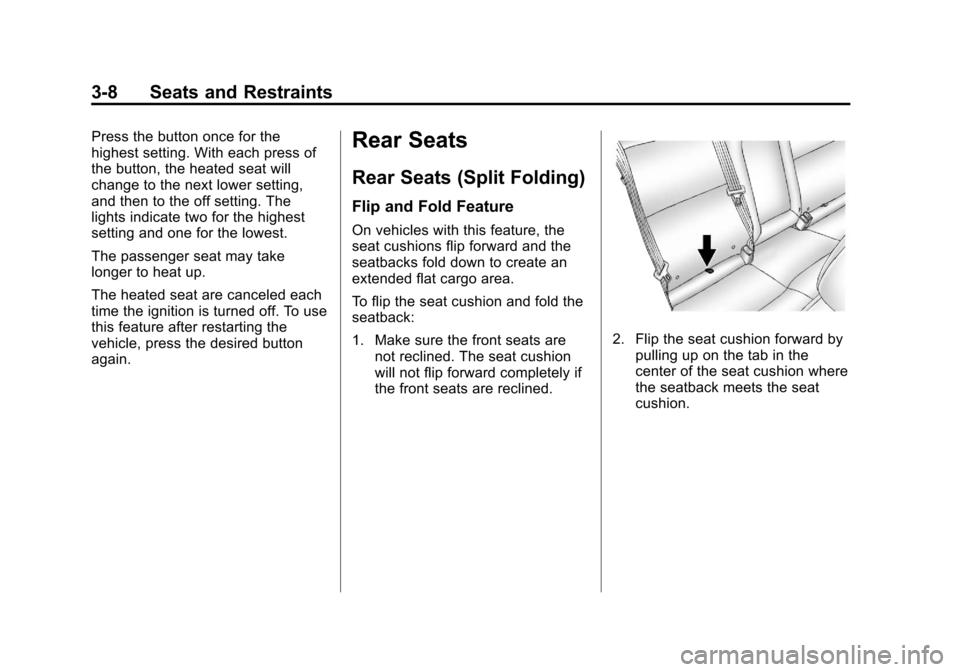
2. Flip the seat cushion forward bypulling up on the tab in the
center of the seat cushion where
the seatback meets the seat
cushion.
Page 103 of 374

Black plate (1,1)Chevrolet Impala Owner Manual - 2012
Instruments and Controls 5-1
Instruments and
Controls
Controls
Steering Wheel Adjustment . . . 5-2
Steering Wheel Controls . . . . . . 5-3
Horn . . . . . . . . . . . . . . . . . . . . . . . . . . 5-3
Windshield Wiper/Washer . . . . . 5-4
Compass . . . . . . . . . . . . . . . . . . . . . 5-5
Clock . . . . . . . . . . . . . . . . . . . . . . . . . 5-6
Power Outlets . . . . . . . . . . . . . . . . . 5-8
Cigarette Lighter . . . . . . . . . . . . . . 5-8
Ashtrays . . . . . . . . . . . . . . . . . . . . . . 5-9
Warning Lights, Gauges, and
Indicators
Warning Lights, Gauges, andIndicators . . . . . . . . . . . . . . . . . . . . 5-9
Instrument Cluster . . . . . . . . . . . 5-10
Speedometer . . . . . . . . . . . . . . . . 5-11
Odometer . . . . . . . . . . . . . . . . . . . . 5-11
Tachometer . . . . . . . . . . . . . . . . . . 5-11
Fuel Gauge . . . . . . . . . . . . . . . . . . 5-11
Engine Coolant Temperature Gauge . . . . . . . . . . . . . . . . . . . . . . 5-12
Safety Belt Reminders . . . . . . . 5-13
Airbag Readiness Light . . . . . . 5-14 Passenger Airbag Status
Indicator . . . . . . . . . . . . . . . . . . . . 5-15
Charging System Light . . . . . . 5-16
Malfunction Indicator Lamp . . . . . . . . . . . . . 5-16
Brake System Warning Light . . . . . . . . . . . . . . . . . . . . . . . 5-19
Antilock Brake System (ABS) Warning Light . . . . . . . . . . . . . . 5-20
Electronic Stability Control (ESC) Off Light . . . . . . . . . . . . . 5-20
Electronic Stability Control (ESC)/Traction Control
System (TCS) Indicator/
Warning Light . . . . . . . . . . . . . . 5-21
Engine Coolant Temperature Warning Light . . . . . . . . . . . . . . 5-21
Tire Pressure Light . . . . . . . . . . 5-22
Engine Oil Pressure Light . . . . 5-22
Security Light . . . . . . . . . . . . . . . . 5-23
High-Beam On Light . . . . . . . . . 5-23
Front Fog Lamp Light . . . . . . . . 5-24
Cruise Control Light . . . . . . . . . 5-24
Information Displays
Driver Information Center (DIC) . . . . . . . . . . . . . . . 5-24
Vehicle Messages
Vehicle Messages . . . . . . . . . . . 5-29
Battery Voltage and ChargingMessages . . . . . . . . . . . . . . . . . . 5-29
Brake System Messages . . . . 5-29
Door Ajar Messages . . . . . . . . . 5-30
Engine Cooling System Messages . . . . . . . . . . . . . . . . . . 5-30
Engine Oil Messages . . . . . . . . 5-31
Engine Power Messages . . . . 5-32
Fuel System Messages . . . . . . 5-32
Key and Lock Messages . . . . . 5-33
Lamp Messages . . . . . . . . . . . . . 5-33
Ride Control System Messages . . . . . . . . . . . . . . . . . . 5-33
Airbag System Messages . . . . 5-34
Anti-theft Alarm System Messages . . . . . . . . . . . . . . . . . . 5-35
Service Vehicle Messages . . . 5-35
Tire Messages . . . . . . . . . . . . . . . 5-36
Transmission Messages . . . . . 5-36
Vehicle Reminder Messages . . . . . . . . . . . . . . . . . . 5-37
Washer Fluid Messages . . . . . 5-37
Page 111 of 374

Black plate (9,1)Chevrolet Impala Owner Manual - 2012
Instruments and Controls 5-9
Notice:Holding a cigarette lighter
in while it is heating does not let
the lighter back away from the
heating element when it is hot.
Damage from overheating can
occur to the lighter or heating
element, or a fuse could be
blown. Do not hold a cigarette
lighter in while it is heating.
To use the lighter, just push it in all
the way and let go. When it is ready,
it will pop back out by itself.
Ashtrays
The vehicle may have an ashtray.
The ashtray may be located in the
console, if the vehicle has one;
otherwise, it may be located in the
center armrest of the front seat.
Notice: If papers, pins, or other
flammable items are put in the
ashtray, hot cigarettes or other
smoking materials could ignite
them and possibly damage the
vehicle. Never put flammable
items in the ashtray.
Warning Lights,
Gauges, and
Indicators
Warning lights and gauges can
signal that something is wrong
before it becomes serious enough
to cause an expensive repair or
replacement. Paying attention to the
warning lights and gauges could
prevent injury.
Warning lights come on when there
could be a problem with a vehicle
function. Some warning lights come
on briefly when the engine is started
to indicate they are working. Gauges can indicate when there
could be a problem with a vehicle
function. Often gauges and warning
lights work together to indicate a
problem with the vehicle.
When one of the warning lights
comes on and stays on while
driving, or when one of the gauges
shows there may be a problem,
check the section that explains what
to do. Follow this manual's advice.
Waiting to do repairs can be costly
and even dangerous.
Page 117 of 374
Black plate (15,1)Chevrolet Impala Owner Manual - 2012
Instruments and Controls 5-15
Passenger Airbag Status
Indicator
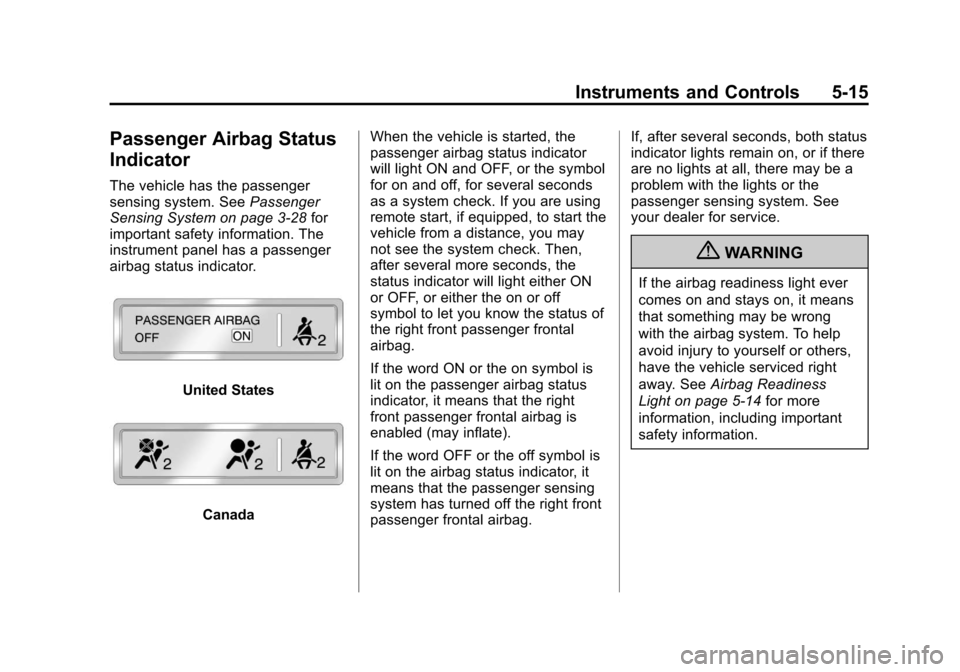
The vehicle has the passenger
sensing system. SeePassenger
Sensing System on page 3‑28 for
important safety information. The
instrument panel has a passenger
airbag status indicator.
United States
Canada When the vehicle is started, the
passenger airbag status indicator
will light ON and OFF, or the symbol
for on and off, for several seconds
as a system check. If you are using
remote start, if equipped, to start the
vehicle from a distance, you may
not see the system check. Then,
after several more seconds, the
status indicator will light either ON
or OFF, or either the on or off
symbol to let you know the status of
the right front passenger frontal
airbag.
If the word ON or the on symbol is
lit on the passenger airbag status
indicator, it means that the right
front passenger frontal airbag is
enabled (may inflate).
If the word OFF or the off symbol is
lit on the airbag status indicator, it
means that the passenger sensing
system has turned off the right front
passenger frontal airbag. If, after several seconds, both status
indicator lights remain on, or if there
are no lights at all, there may be a
problem with the lights or the
passenger sensing system. See
your dealer for service.
{WARNING
If the airbag readiness light ever
comes on and stays on, it means
that something may be wrong
with the airbag system. To help
avoid injury to yourself or others,
have the vehicle serviced right
away. See
Airbag Readiness
Light on page 5‑14 for more
information, including important
safety information.
Page 141 of 374
Black plate (39,1)Chevrolet Impala Owner Manual - 2012
Instruments and Controls 5-39
AUTO DOOR UNLOCK
This feature allows you to select
whether or not to turn off the
automatic door unlocking feature.
It also allows you to select which
doors and when the doors will
automatically unlock. See
“Programmable Automatic Door
Unlock”underAutomatic Door
Locks on page 2‑8 for more
information.
Press the customization button until
AUTO DOOR UNLOCK appears on
the DIC display. Press the set/reset
button once to access the settings
for this feature. Then press the
customization button to scroll
through the following settings:
OFF: None of the doors will
automatically unlock.
DRIVER AT KEY OUT: Only the
driver door will unlock when the key
is taken out of the ignition. DRIVER IN PARK:
Only the driver
door will unlock when the vehicle is
shifted into P (Park) .
ALL AT KEY OUT: All of the doors
will unlock when the key is taken
out of the ignition.
ALL IN PARK (default): All of the
doors will unlock when the vehicle is
shifted into P (Park).
NO CHANGE: No change will be
made to this feature. The current
setting will remain.
To select a setting, press the set/
reset button while the desired
setting is displayed on the DIC.
REMOTE DOOR LOCK
This feature allows you to select the
type of feedback you will receive
when locking the vehicle with the
Remote Keyless Entry (RKE)
transmitter. You will not receive
feedback when locking the vehicle with the RKE transmitter if any of
the doors are open. See
Remote
Keyless Entry (RKE) System
Operation on page 2‑3 for more
information.
Press the customization button until
REMOTE DOOR LOCK appears on
the DIC display. Press the set/reset
button once to access the settings
for this feature. Then press the
customization button to scroll
through the following settings:
HORN & LIGHTS OFF: There will
be no feedback when you press the
lock button on the RKE transmitter.
LIGHTS ONLY: The exterior lamps
will flash when you press the lock
button on the RKE transmitter.
HORN ONLY: The horn will sound
on the second press of the lock
button on the RKE transmitter.
Page 142 of 374
Black plate (40,1)Chevrolet Impala Owner Manual - 2012
5-40 Instruments and Controls
HORN & LIGHTS ON (default):
The exterior lamps will flash when
you press the lock button on the
RKE transmitter, and the horn will
sound when the lock button is
pressed again within five seconds of
the previous command.
NO CHANGE:No change will be
made to this feature. The current
setting will remain.
To select a setting, press the set/
reset button while the desired
setting is displayed on the DIC.
REMOTE DOOR UNLOCK
This feature allows you to select the
type of feedback you will receive
when unlocking the vehicle with the
Remote Keyless Entry (RKE)
transmitter. You will not receive
feedback when unlocking the
vehicle with the RKE transmitter if
the doors are open. See Remote
Keyless Entry (RKE) System
Operation on page 2‑3 for more
information. Press the customization button until
REMOTE DOOR UNLOCK appears
on the DIC display. Press the set/
reset button once to access the
settings for this feature. Then press
the customization button to scroll
through the following settings:
LIGHTS OFF:
The exterior lamps
will not flash when you press the
unlock button on the RKE
transmitter.
LIGHTS ON (default): The exterior
lamps will flash when you press the
unlock button on the RKE
transmitter.
NO CHANGE: No change will be
made to this feature. The current
setting will remain.
To select a setting, press the set/
reset button while the desired
setting is displayed on the DIC. EXIT LIGHTING
This feature allows you to select the
amount of time you want the
exterior lamps to remain on when it
is dark enough outside. This
happens after the key is turned from
ON/RUN to LOCK/OFF.
Press the customization button until
EXIT LIGHTING appears on the DIC
display. Press the set/reset button
once to access the settings for this
feature. Then press the
customization button to scroll
through the following settings:
OFF:
The exterior lamps will not
turn on.
30 SECONDS (default): The
exterior lamps will stay on for
30 seconds.
1 MINUTE: The exterior lamps will
stay on for one minute.
2 MINUTES: The exterior lamps will
stay on for two minutes.