2012 CHEVROLET EQUINOX display
[x] Cancel search: displayPage 1 of 428

Black plate (1,1)Chevrolet Equinox Owner Manual - 2012
2012 Chevrolet Equinox Owner ManualM
In Brief. . . . . . . . . . . . . . . . . . . . . . . . 1-1
Instrument Panel . . . . . . . . . . . . . . 1-2
Initial Drive Information . . . . . . . . 1-4
Vehicle Features . . . . . . . . . . . . . 1-19
Performance and Maintenance . . . . . . . . . . . . . . . . 1-25
Keys, Doors, and Windows . . . . . . . . . . . . . . . . . . . . 2-1
Keys and Locks . . . . . . . . . . . . . . . 2-2
Doors . . . . . . . . . . . . . . . . . . . . . . . . . . 2-9
Vehicle Security . . . . . . . . . . . . . . 2-13
Exterior Mirrors . . . . . . . . . . . . . . . 2-14
Interior Mirrors . . . . . . . . . . . . . . . . 2-17
Windows . . . . . . . . . . . . . . . . . . . . . 2-18
Roof . . . . . . . . . . . . . . . . . . . . . . . . . . 2-20
Seats and Restraints . . . . . . . . . 3-1
Head Restraints . . . . . . . . . . . . . . . 3-2
Front Seats . . . . . . . . . . . . . . . . . . . . 3-3
Rear Seats . . . . . . . . . . . . . . . . . . . 3-10
Safety Belts . . . . . . . . . . . . . . . . . . 3-12
Airbag System . . . . . . . . . . . . . . . . 3-21
Child Restraints . . . . . . . . . . . . . . 3-35 Storage
. . . . . . . . . . . . . . . . . . . . . . . 4-1
Storage Compartments . . . . . . . . 4-1
Additional Storage Features . . . 4-2
Roof Rack System . . . . . . . . . . . . . 4-2
Instruments and Controls . . . . 5-1
Controls . . . . . . . . . . . . . . . . . . . . . . . 5-2
Warning Lights, Gauges, and
Indicators . . . . . . . . . . . . . . . . . . . . 5-8
Information Displays . . . . . . . . . . 5-24
Vehicle Messages . . . . . . . . . . . . 5-27
Vehicle Personalization . . . . . . . 5-34
Lighting . . . . . . . . . . . . . . . . . . . . . . . 6-1
Exterior Lighting . . . . . . . . . . . . . . . 6-1
Interior Lighting . . . . . . . . . . . . . . . . 6-4
Lighting Features . . . . . . . . . . . . . . 6-5
Infotainment System . . . . . . . . . 7-1
Introduction . . . . . . . . . . . . . . . . . . . . 7-1
Radio . . . . . . . . . . . . . . . . . . . . . . . . . 7-14
Audio Players . . . . . . . . . . . . . . . . 7-23
Rear Seat Infotainment . . . . . . . 7-34
Phone . . . . . . . . . . . . . . . . . . . . . . . . 7-36
Trademarks and License Agreements . . . . . . . . . . . . . . . . . 7-48 Climate Controls
. . . . . . . . . . . . . 8-1
Climate Control Systems . . . . . . 8-1
Air Vents . . . . . . . . . . . . . . . . . . . . . . . 8-5
Maintenance . . . . . . . . . . . . . . . . . . . 8-6
Driving and Operating . . . . . . . . 9-1
Driving Information . . . . . . . . . . . . . 9-2
Starting and Operating . . . . . . . 9-20
Engine Exhaust . . . . . . . . . . . . . . 9-28
Automatic Transmission . . . . . . 9-29
Drive Systems . . . . . . . . . . . . . . . . 9-32
Brakes . . . . . . . . . . . . . . . . . . . . . . . 9-32
Ride Control Systems . . . . . . . . 9-35
Cruise Control . . . . . . . . . . . . . . . . 9-38
Object Detection Systems . . . . 9-40
Fuel . . . . . . . . . . . . . . . . . . . . . . . . . . 9-51
Towing . . . . . . . . . . . . . . . . . . . . . . . 9-56
Conversions and Add-Ons . . . 9-64
Vehicle Care . . . . . . . . . . . . . . . . . 10-1
General Information . . . . . . . . . . 10-2
Vehicle Checks . . . . . . . . . . . . . . . 10-4
Headlamp Aiming . . . . . . . . . . . 10-30
Bulb Replacement . . . . . . . . . . 10-32
Electrical System . . . . . . . . . . . . 10-36
Wheels and Tires . . . . . . . . . . . 10-42
Page 9 of 428

Black plate (3,1)Chevrolet Equinox Owner Manual - 2012
In Brief 1-3
A.Air Vents on page 8‑5.
B. Turn and Lane‐Change Lever. See Turn and Lane-Change
Signals on page 6‑3.
Exterior Lamp Controls on
page 6‑1.
Fog Lamps on page 6‑4 (If
Equipped).
C. Instrument Cluster on page 5‑9.
D. Windshield Wiper/Washer on
page 5‑3.
Rear Window Wiper/Washer on
page 5‑4.
E. Power Door Locks on page 2‑7.
F. Instrument Panel Storage on
page 4‑1 (If Equipped).
Forward Collision Alert (FCA)
Display (If Equipped). See
Forward Collision Alert (FCA)
System on page 9‑40.
Lane Departure Warning (LDW)
Indicator (If Equipped). See
Lane Departure Warning (LDW)
on page 9‑48. G. Navigation Screen (If
Equipped).
H. Safety Locks on page 2‑8.
I. Infotainment on page 7‑1.
Navigation System (If
Equipped). See Navigation
System Manual.
J. Hood Release. See Hood on
page 10‑5.
K. Data Link Connector (DLC) (Out of View). See Malfunction
Indicator Lamp on page 5‑14.
L. Cruise Control on page 9‑38.
Forward Collision Alert (FCA)
System on page 9‑40 (If
Equipped).
Lane Departure Warning (LDW)
on page 9‑48 (If Equipped).
M. Instrument Panel Illumination
Control on page 6‑4.
N. Steering Wheel Adjustment on
page 5‑2.
O. Horn on page 5‑3. P.
Steering Wheel Controls on
page 5‑2.
Q. Ignition Positions on page 9‑21.
R. Climate Control Systems on
page 8‑1 (If Equipped).
Automatic Climate Control
System on page 8‑3 (If
Equipped).
S. Shift Lever. See Shifting Into
Park on page 9‑26.
T. Fuel Economy Mode on
page 9‑31 (If Equipped).
U. StabiliTrak
®System on
page 9‑36.
V. Power Outlets on page 5‑7.
W. CD Player on page 7‑23.
X. Driver Information Center Buttons (If Equipped). See
Driver Information Center (DIC)
on page 5‑24.
Y. Hazard Warning Flashers on
page 6‑3.
Page 24 of 428
Black plate (18,1)Chevrolet Equinox Owner Manual - 2012
1-18 In Brief
To release the parking brake, hold
the regular brake pedal down, then
push down momentarily on the
parking brake pedal until you feel
the pedal release. Slowly pull your
foot up off the park brake pedal.
SeeParking Brake on page 9‑33.
Transmission
Electronic Range Select
(ERS) Mode
ERS or manual mode allows for the
selection of the range of gear
positions. Use this mode when
driving down hill or towing a trailer
to limit the top gear and vehicle
speed. To use this feature:
1. Move the shift lever to
M (Manual Mode).
2. Press the plus/minus button on the shift lever, to increase or
decrease the gear range
available.
See Manual Mode on page 9‑31 for
more information.
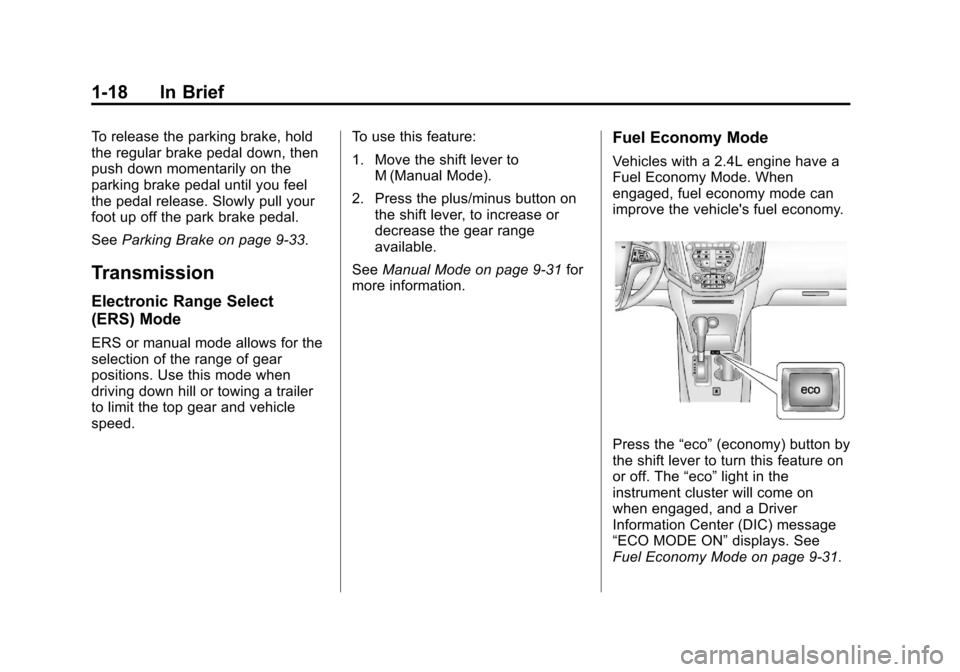
Fuel Economy Mode
Vehicles with a 2.4L engine have a
Fuel Economy Mode. When
engaged, fuel economy mode can
improve the vehicle's fuel economy.
Press the “eco”(economy) button by
the shift lever to turn this feature on
or off. The “eco”light in the
instrument cluster will come on
when engaged, and a Driver
Information Center (DIC) message
“ECO MODE ON” displays. See
Fuel Economy Mode on page 9‑31.
Page 25 of 428
Black plate (19,1)Chevrolet Equinox Owner Manual - 2012
In Brief 1-19
Vehicle Features
Radio(s)
VOL/O:Press to turn the system
on and off. Turn to increase or
decrease the volume.
RADIO/BAND or SOURCE: Press
to choose between FM, AM, XM™,
if equipped, CD, or AUX.
MENU/SEL: Turn to select radio
stations.
Press to show available information
about the current station or track.
D: Press to go to the main menu.
gSEEK: Press to seek the
previous station or track.
lSEEK: Press to seek the next
station or track.
Buttons 1 ‐6: Press to save and
select favorite stations
For more information about these
and other radio features, see
Operation on page 7‑10. For more information about the Rear
Seat Audio (RSA) System, see
Rear
Seat Audio (RSA) System on
page 7‑34.
Storing a Favorite Station
Stations from all bands can be
stored in the favorite lists in any
order. Up to six stations can be
stored in each favorite page and the
number of available favorite pages
can be set.
To store the station to a position in
the list, press the corresponding
numeric button 1-6 until the station
can be heard again.
For more information, see “Storing
and Retrieving Favorites” inAM-FM
Radio (Radio with CD) on page 7‑14
or AM-FM Radio (Radio with CD
and Touchscreen) on page 7‑16.
Setting the Clock
The vehicle has a digital and an
analog clock.
For detailed instructions on setting
either clock, see Clock on page 5‑5.
Turning the Digital Clock On or Off
1. Press the CONFIG button.
2. Select Time and Date Settings.
3. Select Clock Displayed.
4. Press the MENU/SEL button to turn the clock on or off.
Setting the Time and Date
1. Press the CONFIG button.
2. Select Time and Date Settings.
3. Select Set Time or Set Date.
4. Turn the MENU/SEL knob to adjust the highlighted value.
Page 26 of 428
Black plate (20,1)Chevrolet Equinox Owner Manual - 2012
1-20 In Brief
5. Press the MENU/SEL knob toselect the next value.
6. To save the time or date and return to the Time and Date
Settings menu, press the
E
BACK button at any time or
press the MENU/SEL knob after
adjusting the minutes or year.
Setting the 12/24 Hour Format
1. Press the CONFIG button.
2. Select Time and Date Settings.
3. Highlight 12/24 Hour Format.
4. Press the MENU/SEL button to select the 12 hour or 24 hour
display format.
Setting the Month & Day Format
1. Press the CONFIG button.
2. Select Time and Date Settings.
3. Highlight Month & Day Format.
4. Press the MENU/SEL knob to select MM/DD (month/day) or
DD/MM (day/month). Setting the Auto Time Adjust
1. Press the CONFIG button.
2. Select Time and Date Settings.
3. Highlight Auto Time Adjust.
4. Press the MENU/SEL knob to
turn Auto Time Adjust on or off.
Satellite Radio
Vehicles with an XM™ satellite radio
tuner and a valid XM satellite radio
subscription can receive XM
programming.
XM Satellite Radio Service
XM is a satellite radio service based
in the 48 contiguous United States
and 10 Canadian provinces. XM
satellite radio has a wide variety of
programming and commercial-free
music, coast to coast, and in
digital-quality sound. A fee is
required to receive the XM service. For more information refer to:
.www.xmradio.com or call
1-800-929-2100 (U.S.).
.www.xmradio.ca or call
1-877-438-9677 (Canada).
For more information, see Satellite
Radio on page 7‑19.
Portable Audio Devices
Some vehicles have a 3.5 mm
(1/8 in) auxiliary input and a USB
port located in the center console.
External devices such as iPods
®,
laptop computers, MP3 players, CD
changers, and USB storage devices
may be connected, depending on
the audio system.
For more information, see Auxiliary
Devices on page 7‑28.
Page 28 of 428
Black plate (22,1)Chevrolet Equinox Owner Manual - 2012
1-22 In Brief
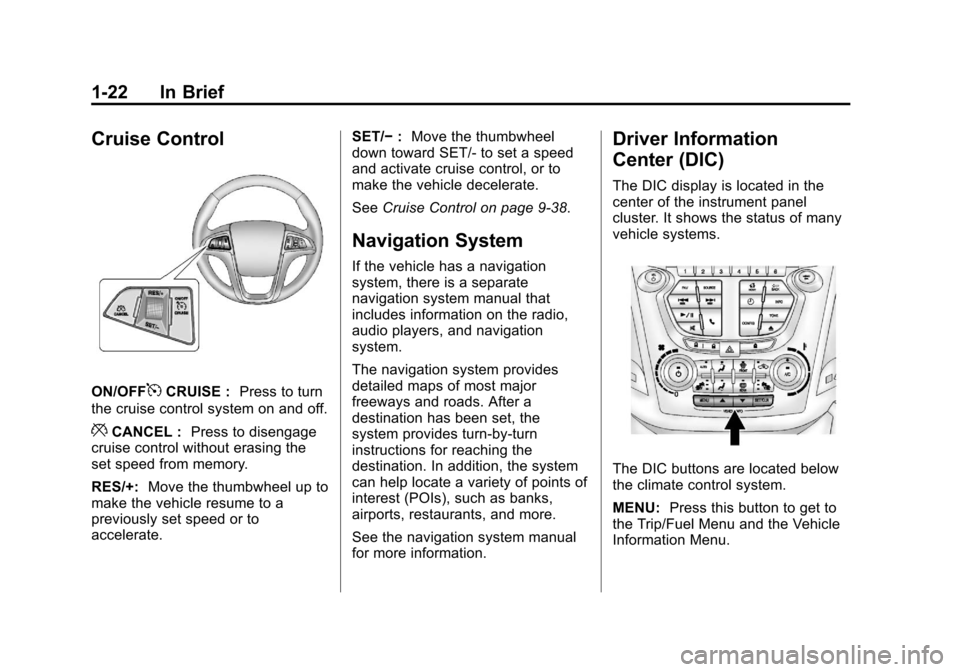
Cruise Control
ON/OFF5CRUISE :Press to turn
the cruise control system on and off.
*CANCEL : Press to disengage
cruise control without erasing the
set speed from memory.
RES/+: Move the thumbwheel up to
make the vehicle resume to a
previously set speed or to
accelerate. SET/−
:Move the thumbwheel
down toward SET/- to set a speed
and activate cruise control, or to
make the vehicle decelerate.
See Cruise Control on page 9‑38.
Navigation System
If the vehicle has a navigation
system, there is a separate
navigation system manual that
includes information on the radio,
audio players, and navigation
system.
The navigation system provides
detailed maps of most major
freeways and roads. After a
destination has been set, the
system provides turn-by-turn
instructions for reaching the
destination. In addition, the system
can help locate a variety of points of
interest (POIs), such as banks,
airports, restaurants, and more.
See the navigation system manual
for more information.
Driver Information
Center (DIC)
The DIC display is located in the
center of the instrument panel
cluster. It shows the status of many
vehicle systems.
The DIC buttons are located below
the climate control system.
MENU: Press this button to get to
the Trip/Fuel Menu and the Vehicle
Information Menu.
Page 29 of 428
Black plate (23,1)Chevrolet Equinox Owner Manual - 2012
In Brief 1-23
QorR:Use these buttons to
scroll through the items in each
menu. A small marker will move
along the page as you scroll through
the items. This shows where each
page is in the menu.
SET/CLR: Use this button to set or
clear the menu item when it is
displayed.
For more information, see Driver
Information Center (DIC) on
page 5‑24.
Forward Collision
Alert (FCA) System
For vehicles with FCA, this system
is intended to help avoid or reduce
the harm caused by front-end
crashes. FCA provides a flashing
visual alert and beeps when
approaching a vehicle directly
ahead too quickly. FCA also
provides a visual alert if following
another vehicle much too closely. The forward-looking FCA camera
sensor is on the windshield ahead
of the rearview mirror. FCA detects
vehicles within a distance of
approximately 60 m (197 ft) and
operates at speeds above 40 km/h
(25 mph).
See
Forward Collision Alert (FCA)
System on page 9‑40 for more
information.
Lane Departure
Warning (LDW)
For vehicles with LDW, it is intended
to help avoid unintentional lane
departures. It may provide a
warning if the vehicle is crossing a
lane without using a turn signal.
LDW uses a camera sensor to
detect the lane markings. It only
operates at speeds of 56 km
(35 mph) or greater. The LDW indicator,
@, appears
green if a lane marking is detected.
It changes to amber, flashes, and
sounds three chimes if the vehicle
crosses a detected lane marking
without using the turn signal.
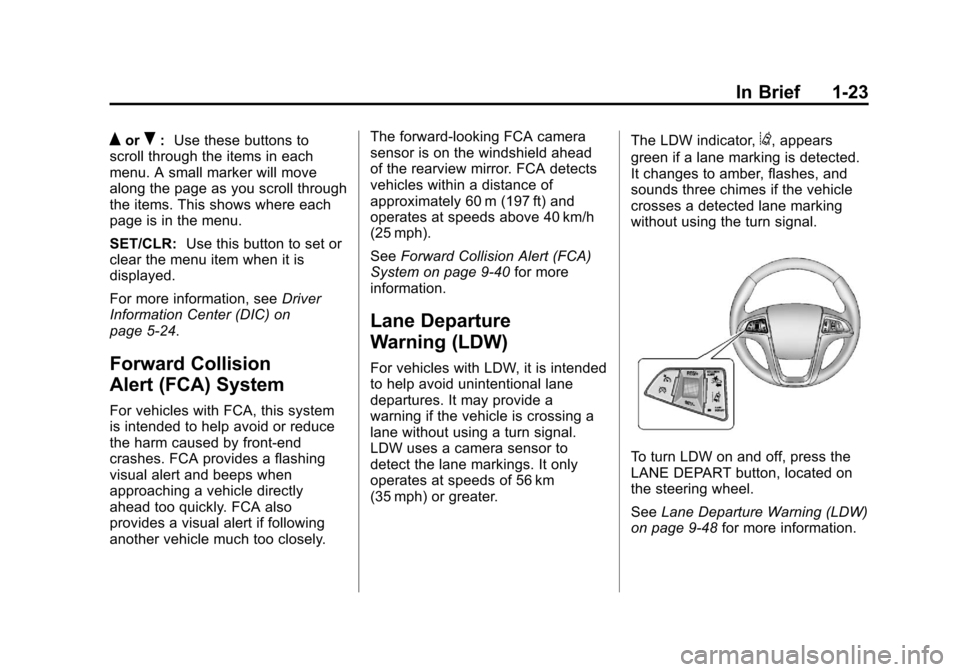
To turn LDW on and off, press the
LANE DEPART button, located on
the steering wheel.
See Lane Departure Warning (LDW)
on page 9‑48 for more information.
Page 30 of 428
Black plate (24,1)Chevrolet Equinox Owner Manual - 2012
1-24 In Brief
Rear Vision
Camera (RVC)
If available, the rear vision camera
displays a view of the area behind
the vehicle when the vehicle is
shifted into R (Reverse). The
display will appear on the radio
screen.
To clean the camera lens, located
above the license plate, rinse it with
water and wipe it with a soft cloth.
SeeRear Vision Camera (RVC) on
page 9‑45.
Ultrasonic Parking Assist
If available, Ultrasonic Rear Parking
Assist (URPA) system uses sensors
on the rear bumper to assist with
parking and avoiding objects while
in R (Reverse). It operates at
speeds less than 8 km/h (5 mph).
URPA uses audible beeps to
provide distance and system
information. Keep the sensors on the vehicle's
rear bumper clean to ensure proper
operation.
See
Ultrasonic Parking Assist on
page 9‑43 for more information.
Roof Rack System
The roof rack cross rails can be
locked in four positions along the
roof rack side rails. Lift the lever to
release and move the cross rail.
Push the lever down to completely
engage into the side rail holes. Slide
the cross rails back and forth until
the lock pins engage in the holes
and a click is heard.
When the roof rack is not in use,
lock one cross rail at the furthest
forward position and lock the other
cross rail at the furthest rearward
position to reduce wind noise. See
Roof Rack System on page 4‑2.
Power Outlets
The accessory power outlets can be
used to connect electrical
equipment, such as a cell phone or
MP3 player.
There are four accessory power
outlets in the following locations:
below the CD slot, inside the center
console storage, on the rear of the
center console storage, and in the
rear cargo compartment.
To use the outlets, remove the cover
and close when not in use.
SeePower Outlets on page 5‑7.