2012 CHEVROLET EQUINOX battery
[x] Cancel search: batteryPage 37 of 428
Black plate (3,1)Chevrolet Equinox Owner Manual - 2012
Keys, Doors, and Windows 2-3
With an active OnStar subscription,
an OnStar Advisor may remotely
unlock the vehicle. SeeOnStar
Overview on page 14‑1.
Remote Keyless Entry
(RKE) System
See Radio Frequency Statement on
page 13‑17 for information
regarding Part 15 of the Federal
Communications Commission (FCC)
rules and Industry Canada
Standards RSS-GEN/210/220/310.
If there is a decrease in the RKE
operating range:
.Check the distance. The
transmitter may be too far from
the vehicle.
.Check the location. Other
vehicles or objects may be
blocking the signal.
.Check the transmitter's battery.
See “Battery Replacement” later
in this section.
.If the transmitter is still not
working correctly, see your
dealer or a qualified technician
for service.
Remote Keyless
Entry (RKE) System
Operation
The Remote Keyless Entry (RKE)
transmitter will work up to 60 m
(195 ft) away from the vehicle.
There are other conditions which
can affect the performance of the
transmitter. See Remote Keyless
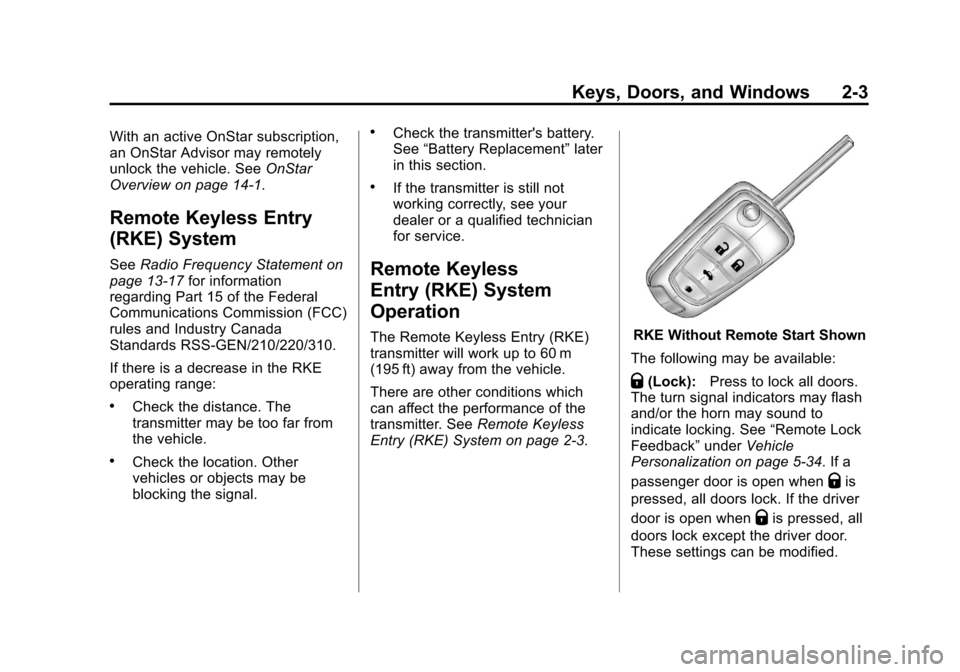
Entry (RKE) System on page 2‑3.RKE Without Remote Start Shown
The following may be available:
Q(Lock): Press to lock all doors.
The turn signal indicators may flash
and/or the horn may sound to
indicate locking. See “Remote Lock
Feedback” underVehicle
Personalization on page 5‑34. If a
passenger door is open when
Qis
pressed, all doors lock. If the driver
door is open when
Qis pressed, all
doors lock except the driver door.
These settings can be modified.
Page 38 of 428
Black plate (4,1)Chevrolet Equinox Owner Manual - 2012
2-4 Keys, Doors, and Windows
See“Unlocked Door Anti Lock Out”
under Vehicle Personalization on
page 5‑34.
Pressing
Qmay also arm the
theft-deterrent system. See
Anti-theft Alarm System on
page 2‑13.
K(Unlock): Press to unlock the
driver door or all doors. See
“Remote Door Unlock” under
Vehicle Personalization on
page 5‑34. The turn signal
indicators flash to indicate unlocking
has occurred. For more information
see “Remote Unlock Light
Feedback” underVehicle
Personalization on page 5‑34.
Pressing
Kmay also disarm the
theft-deterrent system. See
Anti-theft Alarm System on
page 2‑13.
V(Remote Liftgate Release):
First press
K, then press and hold
Vto unlock the liftgate. For
vehicles with the power liftgate,
press and hold
Vuntil the liftgate
begins to move to open the liftgate.
7(Vehicle Locator/Panic
Alarm): Press and release one
time to locate the vehicle. The
exterior lamps flash and the horn
chirps. Press and hold
7for at least
two seconds to sound the panic
alarm. The horn sounds and the
turn signals flash until
7is pressed
again or the key is placed in the
ignition and turned to ON/RUN.
/(Remote Vehicle Start): For
vehicles with this feature, first press
Qthen press and hold/to start
the engine from outside the vehicle
using the RKE transmitter. See
Remote Vehicle Start on page 2‑5
for additional information.
The buttons on the keys are
disabled when there is a key in the
ignition.
Programming Transmitters to
the Vehicle
Only RKE transmitters programmed
to this vehicle will work. If a
transmitter is lost or stolen, a
replacement can be purchased and
programmed through your dealer.
When the replacement transmitter is
programmed to this vehicle, all
remaining transmitters must also be
reprogrammed. Any lost or stolen
transmitters will no longer work
once the new transmitter is
programmed.
Battery Replacement
Replace the battery if the REPLACE
BATTERY IN REMOTE KEY
message displays in the DIC. See
“Replace Battery in Remote Key”
under Key and Lock Messages on
page 5‑30.
Page 39 of 428
Black plate (5,1)Chevrolet Equinox Owner Manual - 2012
Keys, Doors, and Windows 2-5
The battery is not rechargeable. To
replace the battery:
1. Push the button on thetransmitter to extend the key.
2. Remove the battery cover by prying with a finger.
3. Remove the battery by pushing on the battery and sliding it
toward the key blade.
4. Insert the new battery, positive side facing up. Push the battery
down until it is held in place.
Replace with a CR2032 or
equivalent battery.
5. Snap the battery cover back on to the transmitter.
Remote Vehicle Start
The vehicle may have this feature
that allows you to start the engine
from outside the vehicle.
/(Remote Vehicle Start): This
button will be on the RKE
transmitter if the vehicle has remote
start. Vehicles with an automatic climate
control system will default to a
heating or cooling mode depending
on the outside temperature during a
remote start. Once the key is turned
to ON/RUN, the system will turn on
at the setting the vehicle was last
set to. If the vehicle has heated
seats, they may come on during a
remote start. See
Heated Front
Seats on page 3‑9 for more
information.
Laws in some local communities
may restrict the use of remote
starters. For example, some laws
require a person using remote start
to have the vehicle in view. Check
local regulations for any
requirements.
There are other conditions which
can affect the performance of the
transmitter. See Remote Keyless
Entry (RKE) System on page 2‑3 for
additional information. Starting the Engine Using Remote
Start
To start the engine using the remote
start feature:
1. Press and release
Qon the
RKE transmitter.
2. Press and hold /for about
two seconds. The turn signal
lamps will briefly flash to confirm
the vehicle has been started.
The parking lamps will turn on
and remain on as long as the
engine is running. The vehicle's
doors will be locked.
3. The key must be inserted and turned to ON/RUN before
driving.
The engine will shut off after
10 minutes unless a time
extension is done or the key is
inserted and turned to ON/RUN.
Page 45 of 428
Black plate (11,1)Chevrolet Equinox Owner Manual - 2012
Keys, Doors, and Windows 2-11
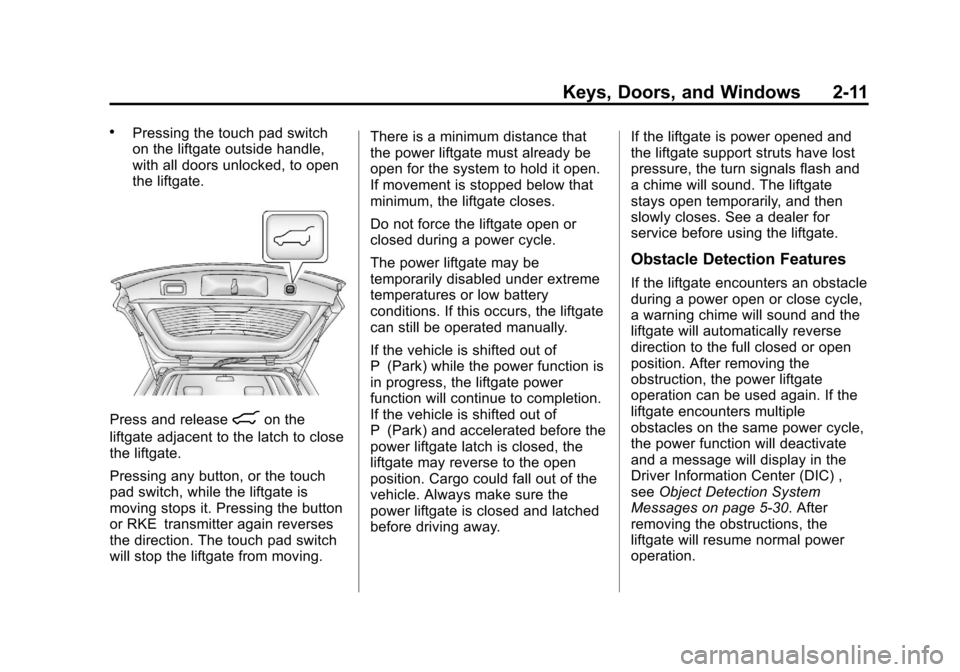
.Pressing the touch pad switch
on the liftgate outside handle,
with all doors unlocked, to open
the liftgate.
Press and release8on the
liftgate adjacent to the latch to close
the liftgate.
Pressing any button, or the touch
pad switch, while the liftgate is
moving stops it. Pressing the button
or RKE transmitter again reverses
the direction. The touch pad switch
will stop the liftgate from moving. There is a minimum distance that
the power liftgate must already be
open for the system to hold it open.
If movement is stopped below that
minimum, the liftgate closes.
Do not force the liftgate open or
closed during a power cycle.
The power liftgate may be
temporarily disabled under extreme
temperatures or low battery
conditions. If this occurs, the liftgate
can still be operated manually.
If the vehicle is shifted out of
P (Park) while the power function is
in progress, the liftgate power
function will continue to completion.
If the vehicle is shifted out of
P (Park) and accelerated before the
power liftgate latch is closed, the
liftgate may reverse to the open
position. Cargo could fall out of the
vehicle. Always make sure the
power liftgate is closed and latched
before driving away.
If the liftgate is power opened and
the liftgate support struts have lost
pressure, the turn signals flash and
a chime will sound. The liftgate
stays open temporarily, and then
slowly closes. See a dealer for
service before using the liftgate.
Obstacle Detection Features
If the liftgate encounters an obstacle
during a power open or close cycle,
a warning chime will sound and the
liftgate will automatically reverse
direction to the full closed or open
position. After removing the
obstruction, the power liftgate
operation can be used again. If the
liftgate encounters multiple
obstacles on the same power cycle,
the power function will deactivate
and a message will display in the
Driver Information Center (DIC) ,
see
Object Detection System
Messages on page 5‑30. After
removing the obstructions, the
liftgate will resume normal power
operation.
Page 46 of 428
Black plate (12,1)Chevrolet Equinox Owner Manual - 2012
2-12 Keys, Doors, and Windows
Pinch sensors are located on the
side edges of the liftgate. If an
object is caught between the liftgate
and the vehicle and presses against
this sensor, the liftgate will reverse
direction and open fully. The liftgate
will remain open until it is activated
again or closed manually.
Power Liftgate 3/4 Mode
To program the liftgate opening
height:
1. Turn the liftgate switch to eitherthe MAX , or the 3/4 mode
position and power open the
liftgate.
2. Stop the liftgate movement at the desired height by pressing
any liftgate switch. Manually
adjust the liftgate position if
required.
3. Press and hold the button on the liftgate adjacent to the latch until
the turn signals flash and a beep
sounds to indicate that the new
setting is recorded. When power opened with the
3/4 mode selected, the liftgate stops
at the new set position.
If there is no audible and visual
feedback when setting the
intermediate stop position, the
liftgate height is being set below the
3/4 open height minimum
(approximately 1.5 m or 5 ft). The
liftgate cannot be set below that
minimum and the new setting will
not be recorded.
Manual Operation of Power
Liftgate
To change the liftgate to manual
operation, turn the mode switch to
the OFF position.
With the power liftgate disabled and
all of the doors unlocked, the liftgate
can be manually opened and
closed. Manual operation of a
liftgate that also has power
operation requires more effort than
a standard manual liftgate.
To open the liftgate, press the touch
pad on the handle on the outside of
the liftgate, and lift the gate open. To
close the liftgate, use the pull cup to
lower the liftgate and close. With the
power liftgate disabled, the liftgate
electric latch will still power latch
once contact is made with the
striker. Always close the liftgate
before driving.
If
Von the RKE transmitter is
pressed while power operation is
disabled, the turn signals flash and
the liftgate will not move.
The liftgate has an electric latch.
If the battery is disconnected or has
low voltage, the liftgate will not
open. The liftgate will resume
operation when the battery is
reconnected and charged.
Page 88 of 428
Black plate (32,1)Chevrolet Equinox Owner Manual - 2012
3-32 Seats and Restraints
A wet seat can affect the
performance of the passenger
sensing system. Here is how:
.The passenger sensing system
may turn off the passenger
airbag when liquid is soaked into
the seat. If this happens, the off
indicator will be lit, and the
airbag readiness light on the
instrument panel will also be lit.
.Liquid pooled on the seat that
has not soaked in may make it
more likely that the passenger
sensing system will enable (turn
on) the passenger airbag while a
child restraint or child occupant
is on the seat. If the passenger
airbag is turned on, the on
indicator will be lit.
If the passenger seat gets wet, dry
the seat immediately. If the airbag
readiness light is lit, do not install a
child restraint or allow anyone to
occupy the seat. See Airbag
Readiness Light on page 5‑12 for
important safety information. The on indicator may be lit if an
object, such as a briefcase,
handbag, grocery bag, laptop or
other electronic device, is put on an
unoccupied seat. If this is not
desired remove the object from
the seat.
{WARNING
Stowing of articles under the
passenger seat or between the
passenger seat cushion and
seatback may interfere with the
proper operation of the passenger
sensing system.
Servicing the
Airbag-Equipped Vehicle
Airbags affect how the vehicle
should be serviced. There are parts
of the airbag system in several
places around the vehicle. Your
dealer and the service manual have
information about servicing the
vehicle and the airbag system. Topurchase a service manual, see
Service Publications Ordering
Information on page 13‑13.
{WARNING
For up to 10 seconds after the
vehicle is turned off and the
battery is disconnected, an airbag
can still inflate during improper
service. You can be injured if you
are close to an airbag when it
inflates. Avoid yellow connectors.
They are probably part of the
airbag system. Be sure to follow
proper service procedures, and
make sure the person performing
work for you is qualified to do so.
Page 117 of 428
Black plate (1,1)Chevrolet Equinox Owner Manual - 2012
Instruments and Controls 5-1
Instruments and
Controls
Controls
Steering Wheel Adjustment . . . 5-2
Steering Wheel Controls . . . . . . 5-2
Horn . . . . . . . . . . . . . . . . . . . . . . . . . . 5-3
Windshield Wiper/Washer . . . . . 5-3
Rear Window Wiper/Washer . . . . . . . . . . . . . . . . . . . . . . 5-4
Compass . . . . . . . . . . . . . . . . . . . . . 5-5
Clock . . . . . . . . . . . . . . . . . . . . . . . . . 5-5
Power Outlets . . . . . . . . . . . . . . . . . 5-7
Warning Lights, Gauges, and
Indicators
Warning Lights, Gauges, and Indicators . . . . . . . . . . . . . . . . . . . . 5-8
Instrument Cluster . . . . . . . . . . . . 5-9
Speedometer . . . . . . . . . . . . . . . . 5-10
Odometer . . . . . . . . . . . . . . . . . . . . 5-10
Tachometer . . . . . . . . . . . . . . . . . . 5-10
Fuel Gauge . . . . . . . . . . . . . . . . . . 5-10
Engine Coolant Temperature Gauge . . . . . . . . . . . . . . . . . . . . . . 5-11
Safety Belt Reminders . . . . . . . 5-12
Airbag Readiness Light . . . . . . 5-12 Passenger Airbag Status
Indicator . . . . . . . . . . . . . . . . . . . . 5-13
Charging System Light . . . . . . 5-14
Malfunction Indicator Lamp . . . . . . . . . . . . . 5-14
Brake System Warning Light . . . . . . . . . . . . . . . . . . . . . . . 5-17
Antilock Brake System (ABS) Warning Light . . . . . . . . . . . . . . 5-18
Lane Departure Warning (LDW) Light . . . . . . . . . . . . . . . . 5-18
Forward Collision Alert (FCA) Warning Light . . . . . . . . . . . . . . 5-19
Traction Off Light . . . . . . . . . . . . 5-19
StabiliTrak
®OFF Light . . . . . . . 5-20
Traction Control System (TCS)/StabiliTrak
®Light . . . . 5-20
Tire Pressure Light . . . . . . . . . . 5-21
Engine Oil Pressure Light . . . . 5-21
Fuel Economy Light . . . . . . . . . 5-22
Low Fuel Warning Light . . . . . . 5-22
Security Light . . . . . . . . . . . . . . . . 5-22
High-Beam On Light . . . . . . . . . 5-23
Front Fog Lamp Light . . . . . . . . 5-23
Lamps On Reminder . . . . . . . . . 5-23
Cruise Control Light . . . . . . . . . 5-23
Information Displays
Driver Information Center (DIC) . . . . . . . . . . . . . . . 5-24
Vehicle Messages
Vehicle Messages . . . . . . . . . . . 5-27
Battery Voltage and ChargingMessages . . . . . . . . . . . . . . . . . . 5-27
Brake System Messages . . . . 5-28
Compass Messages . . . . . . . . . 5-28
Cruise Control Messages . . . . 5-28
Door Ajar Messages . . . . . . . . . 5-28
Engine Cooling System Messages . . . . . . . . . . . . . . . . . . 5-29
Engine Oil Messages . . . . . . . . 5-29
Engine Power Messages . . . . 5-30
Fuel System Messages . . . . . . 5-30
Key and Lock Messages . . . . . 5-30
Object Detection System Messages . . . . . . . . . . . . . . . . . . 5-30
Ride Control System Messages . . . . . . . . . . . . . . . . . . 5-31
Airbag System Messages . . . . 5-32
Safety Belt Messages . . . . . . . 5-32
Anti-theft Alarm System Messages . . . . . . . . . . . . . . . . . . 5-32
Service Vehicle Messages . . . 5-32
Page 123 of 428
Black plate (7,1)Chevrolet Equinox Owner Manual - 2012
Instruments and Controls 5-7
To set the 12/24 hour format:
1. Turn the infotainment system on.
2. Press the CONFIG button andselect Time Settings, or press
the
Hbutton.
3. Highlight 12/24 Hour Format.
4. Press the MENU/SEL knob to select the 12 hour or 24 hour
display format.
Setting the Clock (Radio with
CD and Touchscreen)
To set the time:
1. Press the CONFIG button to
enter the menu options. Turn the
TUNE/MENU knob to scroll
through the available setup
features. Press the TUNE/MENU
knob or press the Time screen
button to display other options
within that feature. 2. Press + or
−to decrease or
increase the Hours and Minutes
displayed on the clock.
12/24 HR Format: Press the 12 HR
screen button for standard time;
press the 24 HR screen button for
military time.
Day + or Day −:Press the Day +
or Day −display buttons to increase
or decrease the day.
Display: Press Display to turn the
display of the time on the screen on
or off.
Power Outlets
The accessory power outlets can be
used to connect electrical
equipment, such as a cell phone or
MP3 player.
There are four accessory power
outlets in the following locations:
below the CD slot, inside the center
console storage, on the rear of the
center console storage, and in the
rear cargo compartment. To use the outlets, remove the cover
and close when not in use.
Notice:
Leaving electrical
equipment plugged in for an
extended period of time while the
vehicle is off will drain the
battery. Always unplug electrical
equipment when not in use and
do not plug in equipment that
exceeds the maximum 20 ampere
rating.
Certain accessory plugs may not be
compatible with the accessory
power outlets and could overload
vehicle and adapter fuses. If a
problem is experienced, see your
dealer.