2012 CHEVROLET CRUZE display
[x] Cancel search: displayPage 36 of 400
Black plate (6,1)Chevrolet Cruze Owner Manual - 2012
2-6 Keys, Doors, and Windows
Programming Transmitters to
the Vehicle
Only RKE transmitters programmed
to the vehicle will work. If a
transmitter is lost or stolen, a
replacement can be purchased and
programmed through your dealer.
The vehicle can be reprogrammed
so that lost or stolen transmitters no
longer work. Any remaining
transmitters will need to be
reprogrammed. Each vehicle can
have up to five transmitters matched
to it.
Programming with a Recognized
Transmitter (Keyless Access
Vehicles Only)
A new transmitter can be
programmed to the vehicle when
there is one recognized transmitter.
To program, the vehicle must be off
and all of the transmitters, both
currently recognized and new, must
be with you.
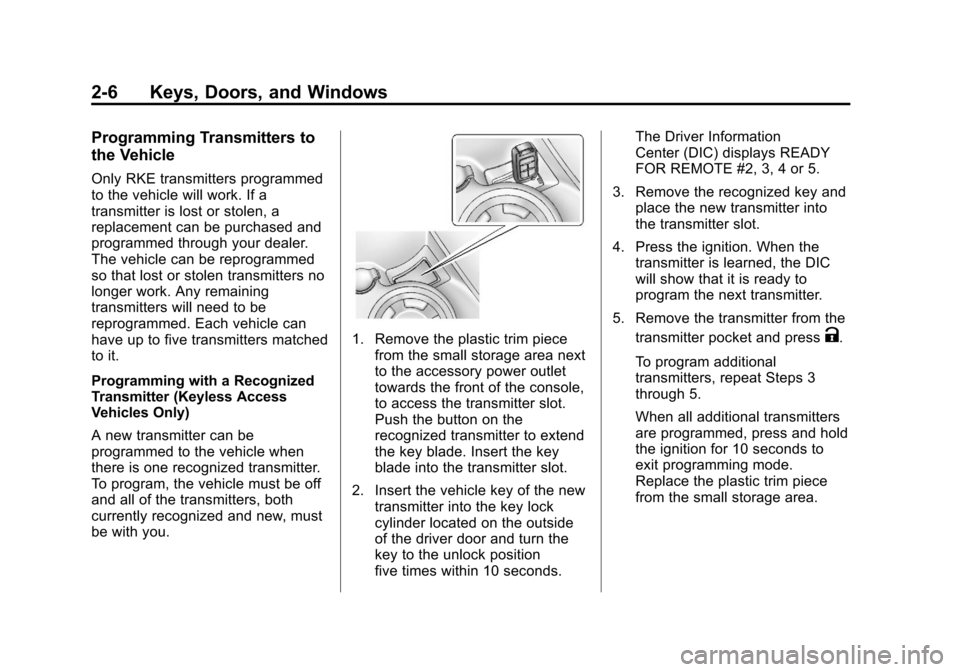
1. Remove the plastic trim piecefrom the small storage area next
to the accessory power outlet
towards the front of the console,
to access the transmitter slot.
Push the button on the
recognized transmitter to extend
the key blade. Insert the key
blade into the transmitter slot.
2. Insert the vehicle key of the new transmitter into the key lock
cylinder located on the outside
of the driver door and turn the
key to the unlock position
five times within 10 seconds. The Driver Information
Center (DIC) displays READY
FOR REMOTE #2, 3, 4 or 5.
3. Remove the recognized key and place the new transmitter into
the transmitter slot.
4. Press the ignition. When the transmitter is learned, the DIC
will show that it is ready to
program the next transmitter.
5. Remove the transmitter from the transmitter pocket and pressK.
To program additional
transmitters, repeat Steps 3
through 5.
When all additional transmitters
are programmed, press and hold
the ignition for 10 seconds to
exit programming mode.
Replace the plastic trim piece
from the small storage area.
Page 37 of 400
Black plate (7,1)Chevrolet Cruze Owner Manual - 2012
Keys, Doors, and Windows 2-7
Programming without a
Recognized Transmitter
(Keyless Access Vehicles Only)
If there are no currently recognized
transmitters available, follow this
procedure to program up to five
transmitters. This feature is not
available in Canada. This procedure
will take approximately 30 minutes
to complete. The vehicle must be off
and all of the transmitters you wish
to program must be with you.
1. Insert the vehicle key of thetransmitter into the key lock
cylinder located on the outside
of the driver door and turn the
key to the unlock position five
times within 10 seconds.
The Driver Information Center
(DIC) displays REMOTE LEARN
PENDING, PLEASE WAIT.
2. Wait for 10 minutes until the DIC displays PRESS ENGINE
START BUTTON TO LEARN
and then press the ignition. The DIC displays will again
show REMOTE LEARN
PENDING, PLEASE WAIT.
3. Repeat Step 2 two additional times. After the third time all
previously known transmitters
will no longer work with the
vehicle. Remaining transmitters
can be relearned during the
next steps.
The DIC display should
now show READY FOR
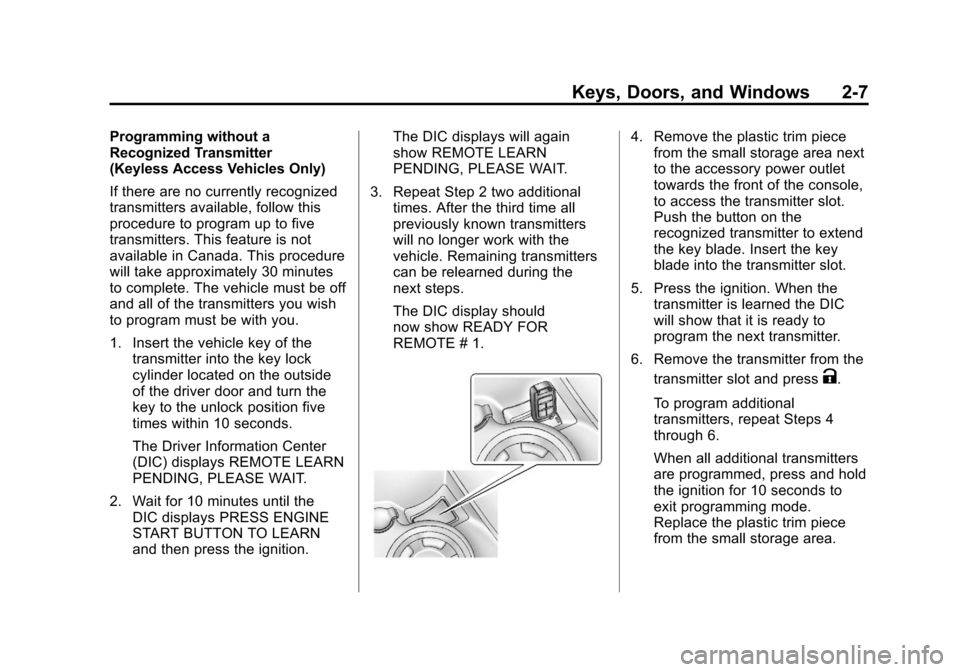
REMOTE # 1.4. Remove the plastic trim piecefrom the small storage area next
to the accessory power outlet
towards the front of the console,
to access the transmitter slot.
Push the button on the
recognized transmitter to extend
the key blade. Insert the key
blade into the transmitter slot.
5. Press the ignition. When the transmitter is learned the DIC
will show that it is ready to
program the next transmitter.
6. Remove the transmitter from the transmitter slot and press
K.
To program additional
transmitters, repeat Steps 4
through 6.
When all additional transmitters
are programmed, press and hold
the ignition for 10 seconds to
exit programming mode.
Replace the plastic trim piece
from the small storage area.
Page 38 of 400
Black plate (8,1)Chevrolet Cruze Owner Manual - 2012
2-8 Keys, Doors, and Windows
Starting the Vehicle with a Low
Transmitter Battery
If the transmitter battery is weak, the
DIC may display NO REMOTE
DETECTED when you try to start
the vehicle. The REPLACE
BATTERY IN REMOTE KEY
message may also be displayed
at this time.
To start the vehicle:
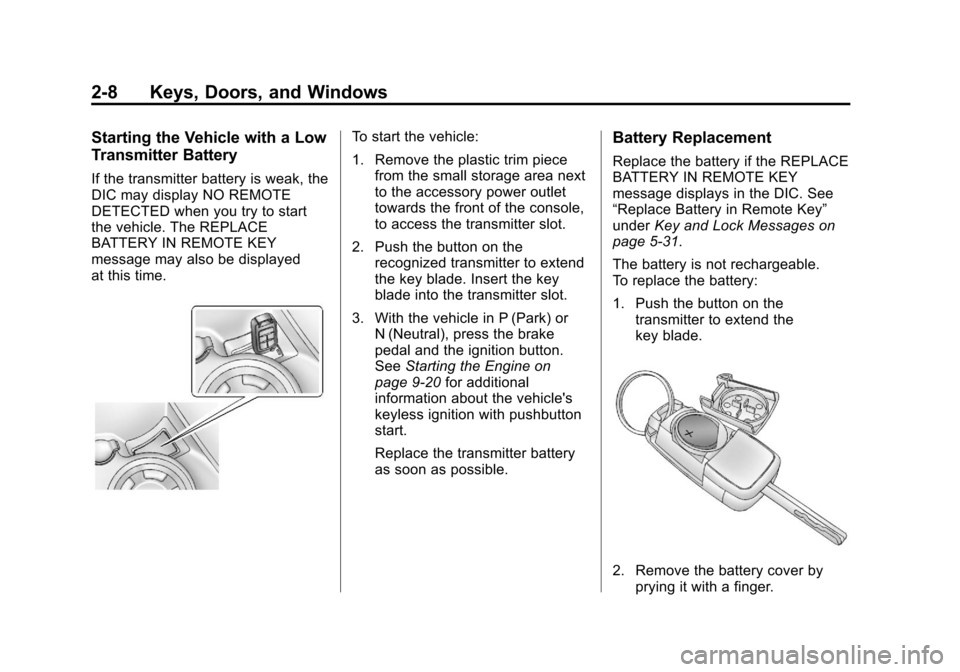
1. Remove the plastic trim piecefrom the small storage area next
to the accessory power outlet
towards the front of the console,
to access the transmitter slot.
2. Push the button on the recognized transmitter to extend
the key blade. Insert the key
blade into the transmitter slot.
3. With the vehicle in P (Park) or N (Neutral), press the brake
pedal and the ignition button.
See Starting the Engine on
page 9‑20 for additional
information about the vehicle's
keyless ignition with pushbutton
start.
Replace the transmitter battery
as soon as possible.Battery Replacement
Replace the battery if the REPLACE
BATTERY IN REMOTE KEY
message displays in the DIC. See
“Replace Battery in Remote Key”
under Key and Lock Messages on
page 5‑31.
The battery is not rechargeable.
To replace the battery:
1. Push the button on the transmitter to extend the
key blade.
2. Remove the battery cover byprying it with a finger.
Page 109 of 400

Black plate (1,1)Chevrolet Cruze Owner Manual - 2012
Instruments and Controls 5-1
Instruments and
Controls
Controls
Steering Wheel Adjustment . . . 5-2
Steering Wheel Controls . . . . . . 5-2
Horn . . . . . . . . . . . . . . . . . . . . . . . . . . 5-3
Windshield Wiper/Washer . . . . . 5-3
Compass . . . . . . . . . . . . . . . . . . . . . 5-4
Clock . . . . . . . . . . . . . . . . . . . . . . . . . 5-5
Power Outlets . . . . . . . . . . . . . . . . . 5-5
Cigarette Lighter . . . . . . . . . . . . . . 5-6
Ashtrays . . . . . . . . . . . . . . . . . . . . . . 5-7
Warning Lights, Gauges, and
Indicators
Warning Lights, Gauges, andIndicators . . . . . . . . . . . . . . . . . . . . 5-7
Instrument Cluster . . . . . . . . . . . . 5-8
Speedometer . . . . . . . . . . . . . . . . . 5-9
Odometer . . . . . . . . . . . . . . . . . . . . . 5-9
Trip Odometer . . . . . . . . . . . . . . . . . 5-9
Tachometer . . . . . . . . . . . . . . . . . . . 5-9
Fuel Gauge . . . . . . . . . . . . . . . . . . . 5-9
Engine Coolant Temperature Gauge . . . . . . . . . . . . . . . . . . . . . . 5-10
Safety Belt Reminders . . . . . . . 5-10 Airbag Readiness Light . . . . . . 5-11
Passenger Airbag Status
Indicator . . . . . . . . . . . . . . . . . . . . 5-12
Charging System Light . . . . . . 5-13
Malfunction Indicator Lamp . . . . . . . . . . . . . 5-13
Service Vehicle Soon Light . . . . . . . . . . . . . . . . . . . . . . . 5-16
Brake System Warning Light . . . . . . . . . . . . . . . . . . . . . . . 5-16
Antilock Brake System (ABS) Warning Light . . . . . . . . . . . . . . 5-17
Up-Shift Light . . . . . . . . . . . . . . . . 5-17
Power Steering Warning Light . . . . . . . . . . . . . . . . . . . . . . . 5-17
Traction Off Light . . . . . . . . . . . . 5-18
StabiliTrak
®OFF Light . . . . . . . 5-18
Traction Control System (TCS)/StabiliTrak
®Light . . . . 5-18
Tire Pressure Light . . . . . . . . . . 5-19
Engine Oil Pressure Light . . . . 5-20
Low Fuel Warning Light . . . . . . 5-20
Security Light . . . . . . . . . . . . . . . . 5-21
Reduced Engine Power Light . . . . . . . . . . . . . . . . . . . . . . . 5-21
High-Beam On Light . . . . . . . . . 5-21
Daytime Running Lamps (DRL) Indicator Light . . . . . . . 5-22
Front Fog Lamp Light . . . . . . . . 5-22 Lamps On Reminder . . . . . . . . . 5-22
Cruise Control Light . . . . . . . . . 5-23
Door Ajar Light . . . . . . . . . . . . . . 5-23
Information Displays
Driver Information
Center (DIC) . . . . . . . . . . . . . . . 5-23
Vehicle Messages
Vehicle Messages (CanadaBase Level) . . . . . . . . . . . . . . . . 5-28
Vehicle Messages (Canada Uplevel and United
States) . . . . . . . . . . . . . . . . . . . . . 5-28
Battery Voltage and Charging Messages . . . . . . . . . . . . . . . . . . 5-28
Brake System Messages . . . . 5-29
Compass Messages . . . . . . . . . 5-29
Cruise Control Messages . . . . 5-29
Door Ajar Messages . . . . . . . . . 5-29
Engine Cooling System Messages . . . . . . . . . . . . . . . . . . 5-30
Engine Oil Messages . . . . . . . . 5-30
Engine Power Messages . . . . 5-30
Fuel System Messages . . . . . . 5-31
Key and Lock Messages . . . . . 5-31
Lamp Messages . . . . . . . . . . . . . 5-31
Object Detection System Messages . . . . . . . . . . . . . . . . . . 5-32
Page 112 of 400
Black plate (4,1)Chevrolet Cruze Owner Manual - 2012
5-4 Instruments and Controls
Wipe Parking
If the ignition is turned to LOCK/
OFF while the wipers are on 1, 2,
or
3, they will immediately stop.
If the windshield wiper lever is then
moved to
9before the driver door
is opened, or within 10 minutes, the
wipers will restart and move to the
base of the windshield.
If the ignition is turned to LOCK/
OFF during a windshield wash, the
wipers will stop when they reach the
base of the windshield.
Windshield Washer
Pull the windshield wiper lever
toward you to spray windshield
washer fluid and activate the wipers.
The wipers will continue until the
lever is released or the maximum
wash time is reached.
When the windshield wiper lever is
released, additional wipes may
occur depending on how long the
windshield washer had been
activated. See Washer Fluid on
page 10‑22 for information on filling
the windshield washer fluid
reservoir.
{WARNING
In freezing weather, do not use
the washer until the windshield is
warmed. Otherwise the washer
fluid can form ice on the
windshield, blocking your vision.
Compass
The vehicle may have a compass
display in the Driver Information
Center (DIC). The compass receives
its heading and other information
from the Global Positioning
System (GPS) antenna, StabiliTrak,
and vehicle speed information.
Avoid covering the GPS antenna,
located on the roof, for long periods
of time with objects that may
interfere with the antenna's ability to
receive a satellite signal. The
compass system is designed to
operate for a certain number of
miles or degrees of turn before
needing a signal from the GPS
satellites. When the compass
display shows CAL, drive the
vehicle for a short distance in an
open area where it can receive a
GPS signal. The compass system
will automatically determine when
the GPS signal is restored and
provide a heading again.
Page 113 of 400
Black plate (5,1)Chevrolet Cruze Owner Manual - 2012
Instruments and Controls 5-5
SeeCompass Messages on
page 5‑29 for more information on
the messages that may be
displayed for the compass.
Clock
The infotainment system controls
are used to access the time and
date settings through the menu
system. The clock menu can be
only be used with the radio on while
in ON/RUN or ACC/ACCESSORY.
See Operation on page 7‑6 for
information about how to use the
menu system. For vehicles with a
navigation system, see the separate
navigation manual.
Setting the Time
1. Press the CONFIG button and select Time Settings.
2. Select Set Time. 3. Turn the MENU or MENU/SEL
knob to adjust the highlighted
number.
4. Press the MENU or MENU/SEL knob to select the next number.
5. To save the time and return to the Time Settings menu, press
the BACK button at any time or
press the MENU or MENU/SEL
knob after adjusting the minutes.
Setting the 12/24 Hour Format
1. Press the CONFIG button andselect Time Settings.
2. Highlight 12/24 Hour Format.
3. Press the MENU or MENU/SEL knob to select the 12 hour or
24 hour display format.
Power Outlets
The accessory power outlets can be
used to plug in electrical equipment,
such as a cell phone or MP3 player.
There is one accessory power outlet
located on the center floor console
and one on the rear of the center
floor console. These outlets are
powered when the key is in ON/
RUN or ACC/ACCESSORY, or until
the driver door is opened within
10 minutes of turning off the vehicle.
See Retained Accessory Power
(RAP) on page 9‑23.
Page 117 of 400

Black plate (9,1)Chevrolet Cruze Owner Manual - 2012
Instruments and Controls 5-9
Speedometer
The speedometer shows the
vehicle's speed in either kilometers
per hour (km/h) or miles per
hour (mph).
Odometer
The odometer shows how far the
vehicle has been driven, in either
kilometers or miles.
This vehicle has a tamper‐resistant
odometer. The digital odometer will
read 999,999 if it is turned back.
If the vehicle needs a new odometer
installed, it must be set to the
mileage total of the old odometer.
If that is not possible, then it must
be set at zero and a label must be
put on the driver door to show the
old mileage reading when the new
odometer was installed.
Trip Odometer
The trip odometer can show how far
the vehicle has been driven since
the trip odometer was last reset.
The trip odometer is accessed and
reset through the Driver Information
Center (DIC). SeeDriver
Information Center (DIC) on
page 5‑23 for more information.
Tachometer
The tachometer displays the engine
speed in revolutions per
minute (rpm).
Notice:If the engine is operated
with the tachometer in the shaded
warning area, the vehicle could
be damaged, and the damages
would not be covered by the
vehicle warranty. Do not operate
the engine with the tachometer in
the shaded warning area.
Fuel Gauge
When the ignition is on, the fuel
gauge indicates about how much
fuel is left in the tank.
An arrow on the fuel gauge
indicates the side of the vehicle the
fuel door is on.
A FUEL LEVEL LOW message may
appear in the Driver Information
Center (DIC) and a single chime
sounds. See Fuel System
Messages on page 5‑31 for
more information.
Page 124 of 400
Black plate (16,1)Chevrolet Cruze Owner Manual - 2012
5-16 Instruments and Controls
Service Vehicle Soon
Light
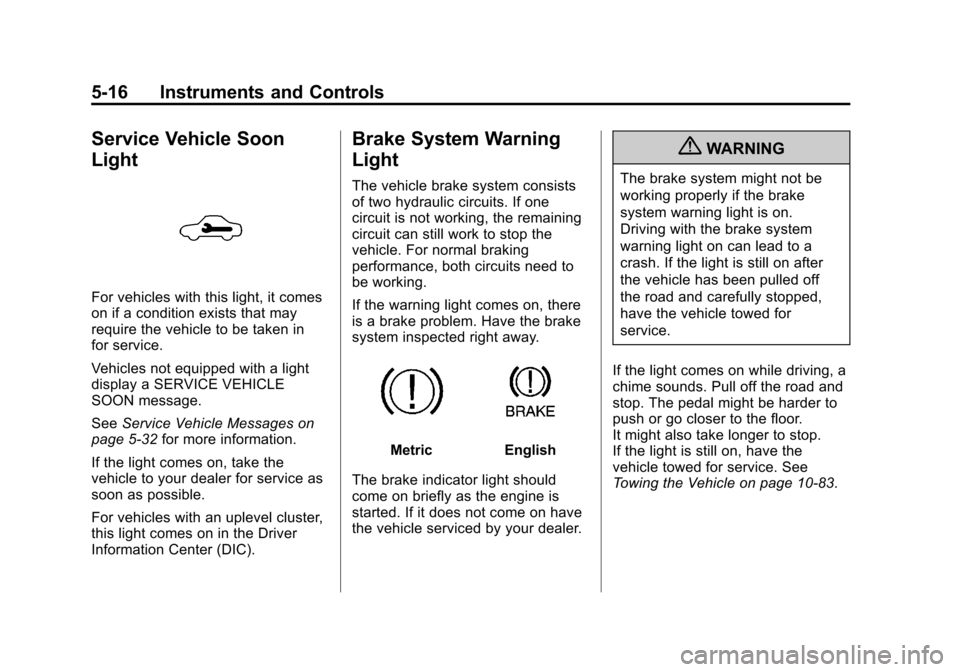
For vehicles with this light, it comes
on if a condition exists that may
require the vehicle to be taken in
for service.
Vehicles not equipped with a light
display a SERVICE VEHICLE
SOON message.
SeeService Vehicle Messages on
page 5‑32 for more information.
If the light comes on, take the
vehicle to your dealer for service as
soon as possible.
For vehicles with an uplevel cluster,
this light comes on in the Driver
Information Center (DIC).
Brake System Warning
Light
The vehicle brake system consists
of two hydraulic circuits. If one
circuit is not working, the remaining
circuit can still work to stop the
vehicle. For normal braking
performance, both circuits need to
be working.
If the warning light comes on, there
is a brake problem. Have the brake
system inspected right away.
MetricEnglish
The brake indicator light should
come on briefly as the engine is
started. If it does not come on have
the vehicle serviced by your dealer.
{WARNING
The brake system might not be
working properly if the brake
system warning light is on.
Driving with the brake system
warning light on can lead to a
crash. If the light is still on after
the vehicle has been pulled off
the road and carefully stopped,
have the vehicle towed for
service.
If the light comes on while driving, a
chime sounds. Pull off the road and
stop. The pedal might be harder to
push or go closer to the floor.
It might also take longer to stop.
If the light is still on, have the
vehicle towed for service. See
Towing the Vehicle on page 10‑83.