2012 CHEVROLET CORVETTE automatic
[x] Cancel search: automaticPage 2 of 434

Black plate (2,1)Chevrolet Corvette Owner Manual - 2012
2012 Chevrolet Corvette Owner ManualM
Driving and Operating. . . . . . . . 9-1
Driving Information . . . . . . . . . . . . . 9-2
Starting and Operating . . . . . . . 9-18
Engine Exhaust . . . . . . . . . . . . . . 9-26
Automatic Transmission . . . . . . 9-27
Manual Transmission . . . . . . . . . 9-32
Brakes . . . . . . . . . . . . . . . . . . . . . . . 9-35
Ride Control Systems . . . . . . . . 9-36
Cruise Control . . . . . . . . . . . . . . . . 9-45
Fuel . . . . . . . . . . . . . . . . . . . . . . . . . . 9-48
Towing . . . . . . . . . . . . . . . . . . . . . . . 9-54
Conversions and Add-Ons . . . 9-54 Vehicle Care
. . . . . . . . . . . . . . . . . 10-1
General Information . . . . . . . . . . 10-3
Vehicle Checks . . . . . . . . . . . . . . . 10-8
Headlamp Aiming . . . . . . . . . . . 10-48
Bulb Replacement . . . . . . . . . . 10-48
Electrical System . . . . . . . . . . . . 10-50
Wheels and Tires . . . . . . . . . . . 10-58
Jump Starting . . . . . . . . . . . . . . . 10-82
Towing . . . . . . . . . . . . . . . . . . . . . . 10-86
Appearance Care . . . . . . . . . . . 10-86
Service and Maintenance . . . 11-1
General Information . . . . . . . . . . 11-1
Maintenance Schedule . . . . . . . 11-3
Special Application
Services . . . . . . . . . . . . . . . . . . . . 11-8
Additional Maintenance
and Care . . . . . . . . . . . . . . . . . . . . 11-8
Recommended Fluids, Lubricants, and Parts . . . . . . 11-12
Maintenance Records . . . . . . . 11-15 Technical Data
. . . . . . . . . . . . . . . 12-1
Vehicle Identification . . . . . . . . . 12-1
Vehicle Data . . . . . . . . . . . . . . . . . . 12-2
Customer Information . . . . . . . 13-1
Customer Information . . . . . . . . 13-1
Reporting Safety Defects . . . . 13-18
Vehicle Data Recording and
Privacy . . . . . . . . . . . . . . . . . . . . 13-20
OnStar . . . . . . . . . . . . . . . . . . . . . . . 14-1
OnStar Overview . . . . . . . . . . . . . 14-1
OnStar Services . . . . . . . . . . . . . . 14-2
OnStar Additional Information . . . . . . . . . . . . . . . . . . 14-5
Index . . . . . . . . . . . . . . . . . . . . . i-1
Page 9 of 434

Black plate (3,1)Chevrolet Corvette Owner Manual - 2012
In Brief 1-3
A.Air Vents on page 8‑6.
B. Head‐Up Display Controls (If Equipped). See Head-Up
Display (HUD) on page 5‑32.
C. Turn and Lane‐Change Lever. See Turn and Lane-Change
Signals on page 6‑4.
Cruise Control on page 9‑45.
Fog Lamps on page 6‑5.
Exterior Lamp Controls on
page 6‑1.
D. Manual Shift Paddles (If Equipped). See Automatic
Transmission on page 9‑27.
E. Driver Information Center (DIC)
on page 5‑28.
F. Instrument Cluster on page 5‑9.
G. Windshield Wiper/Washer on
page 5‑4.
H. Driver Information Center (DIC) Buttons. See Driver Information
Center (DIC) on page 5‑28. I.
Hazard Warning Flashers on
page 6‑4.
J. Infotainment on page 7‑1.
K. Dual Automatic Climate Control
System on page 8‑1.
L. Fuel Door Release Button. See Filling the Tank on page 9‑51.
Hatch/Trunk Release Button.
See “Hatch/Trunk Lid Release”
under Hatch on page 2‑11.
M. Instrument Panel Illumination
Control on page 6‑5.
N. Power Folding Top Switch (If Equipped). See Convertible
Top on page 2‑24.
O. Data Link Connector (DLC) (Out of View). See Malfunction
Indicator Lamp on page 5‑19.
P. Bluetooth Controls (If Equipped). See Bluetooth on
page 7‑18.
Steering Wheel Controls on
page 5‑3 (If Equipped). Q.
Steering Wheel Adjustment on
page 5‑2.
R. Horn on page 5‑4.
S. Telescopic Steering Column Control (If Equipped). See
Steering Wheel Adjustment on
page 5‑2.
T. Ignition Positions on page 9‑19.
U. Heated Front Seats on page 3‑8
(If Equipped).
V. Shift Lever (Automatic Shown). See Automatic Transmission on
page 9‑27 orManual
Transmission on page 9‑32.
W. Active Handling System on
page 9‑38.
X. Power Outlets on page 5‑6.
Y. Selective Ride Control on
page 9‑43 (If Equipped).
Z. Parking Brake on page 9‑36.
Page 12 of 434
Black plate (6,1)Chevrolet Corvette Owner Manual - 2012
1-6 In Brief
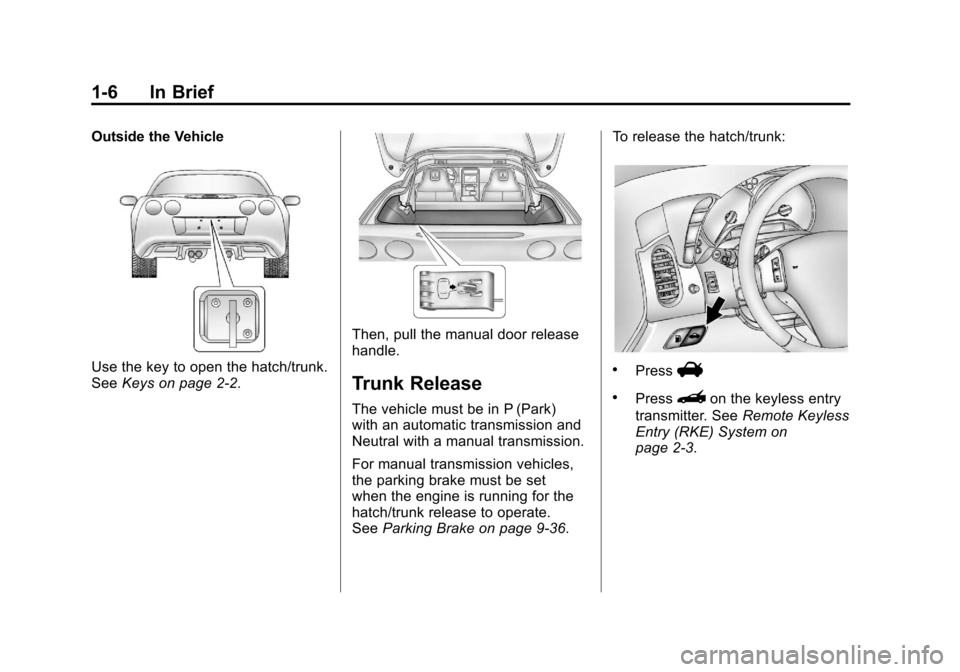
Outside the Vehicle
Use the key to open the hatch/trunk.
SeeKeys on page 2‑2.
Then, pull the manual door release
handle.
Trunk Release
The vehicle must be in P (Park)
with an automatic transmission and
Neutral with a manual transmission.
For manual transmission vehicles,
the parking brake must be set
when the engine is running for the
hatch/trunk release to operate.
SeeParking Brake on page 9‑36. To release the hatch/trunk:
.PressV
.Press}on the keyless entry
transmitter. See Remote Keyless
Entry (RKE) System on
page 2‑3.
Page 16 of 434
Black plate (10,1)Chevrolet Corvette Owner Manual - 2012
1-10 In Brief
Storing Memory Positions
To save into memory:
1. Adjust the driver seat, bothoutside mirrors, and the
telescopic steering column.
2. Press and hold “1”until
two beeps sound.
3. Repeat for a second driver position using “2.”
To recall:
.On vehicles with an automatic
transmission, press and
release “1”or“2.”
If the vehicle is in P (Park), a
single beep sounds and the
memory position is recalled after
a brief delay.
If the vehicle is not in P (Park),
three beeps sound and the
memory position is not recalled.
.On vehicles with a manual
transmission, when the vehicle
is on, the parking brake must be
set to recall a memory position.
Press and release “1”or“2.”
A single beep sounds and the
memory position is recalled after
a brief delay.
If the vehicle is on and the
parking brake is not set,
three beeps sound and the
memory position is not recalled.
See Memory Seats on page 3‑5 for
more information.
Easy Exit Driver Seat
This feature can move the seat
rearward and the telescopic steering
column out of the way to allow extra
room to exit the vehicle.
B: Press to save and recall the
easy exit seat position. To save into memory:
1. Recall the desired driving
position by pressing “1.”
2. Adjust the seat and the telescopic steering column to
the desired exit position.
3. Press and hold Buntil
two beeps sound.
4. Repeat for a second driver position using “2.”
To recall, press and release B.
The vehicle must be in P (Park) for
an automatic transmission or the
parking brake must be set for a
manual transmission. A single beep
sounds. The seat and telescopic
steering column will move to the
position previously stored for the
identified driver.
See Memory Seats on page 3‑5 for
more information.
Page 18 of 434

Black plate (12,1)Chevrolet Corvette Owner Manual - 2012
1-12 In Brief
Mirror Adjustment
Exterior Mirrors
To adjust mirrors:
1. Press
}or|to select a mirror.
2. Press the control pad to adjust the mirror.
3. Return the switch to the center to deselect the mirror.
See Power Mirrors on page 2‑16. If the vehicle has the memory
feature, a preferred mirror position
can be stored. See
Power Seat
Adjustment on page 3‑3.
To fold, pull the mirror toward the
vehicle. Push the mirror outward, to
return it to the original position.
Interior Mirror
An automatic dimming rearview
mirror will automatically reduce
headlamp glare coming from
vehicles that are traveling
behind you.
See Automatic Dimming Rearview
Mirror on page 2‑17.
Steering Wheel
Adjustment
The lever is located on the left side
of the steering column.
To adjust the steering wheel:
1. Pull the lever toward you.
2. Move the steering wheel up
or down.
3. Release the lever to lock the steering wheel in place.
Page 20 of 434

Black plate (14,1)Chevrolet Corvette Owner Manual - 2012
1-14 In Brief
Exterior Lighting
Exterior Lamps
The exterior lamp control is located
to the left of the steering wheel, on
the multifunction lever.
O:Turn the band with this
symbol on it to operate the
exterior lamps.
O: Turns off all lamps.
AUTO: Sets the exterior lamps to
automatic mode. AUTO mode turns
the exterior lamps on and off
depending on how much light is
available outside the vehicle.
;: Turns on the parking lamps
together with the sidemarker lamps,
taillamps, license plate lamps, and
instrument panel lights.
5: Turns on the headlamps
together with the parking lamps,
sidemarker lamps, taillamps,
license plate lamps, and instrument
panel lights.
For more information, see:
.Exterior Lamp Controls on
page 6‑1.
.Turn and Lane-Change Signals
on page 6‑4.
Windshield Wiper/Washer
The windshield wiper/washer lever
is located on the right side of the
steering column.
1: Use for fast wipes.
6:Use for slow wipes.
3:Use to set a delay between
wipes.
x: Use for a delayed wiping
cycle. Turn the intermittent adjust
band down for a longer delay or
up for a shorter delay.
Page 21 of 434
Black plate (15,1)Chevrolet Corvette Owner Manual - 2012
In Brief 1-15
9:Use to turn off the windshield
wipers.
8: Use for a for a single wiping
cycle. For more wipes, hold the
band longer.
Windshield Washer: Press and
hold the button at the end of the
lever to spray washer fluid on the
windshield.
See Windshield Wiper/Washer on
page 5‑4.
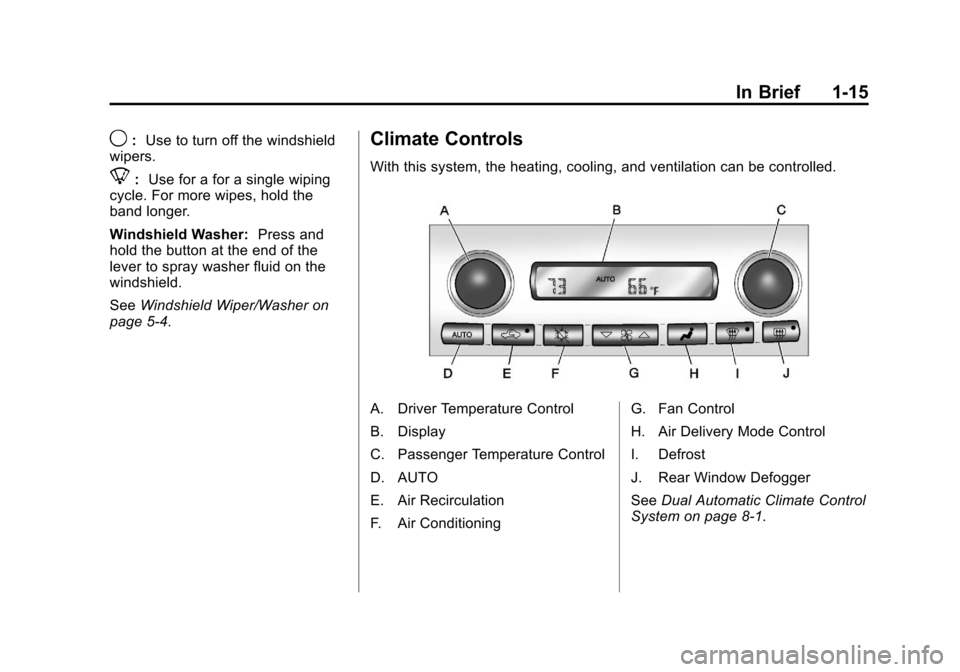
Climate Controls
With this system, the heating, cooling, and ventilation can be controlled.
A. Driver Temperature Control
B. Display
C. Passenger Temperature Control
D. AUTO
E. Air Recirculation
F. Air Conditioning G. Fan Control
H. Air Delivery Mode Control
I. Defrost
J. Rear Window Defogger
See
Dual Automatic Climate Control
System on page 8‑1.
Page 22 of 434
Black plate (16,1)Chevrolet Corvette Owner Manual - 2012
1-16 In Brief
Transmission
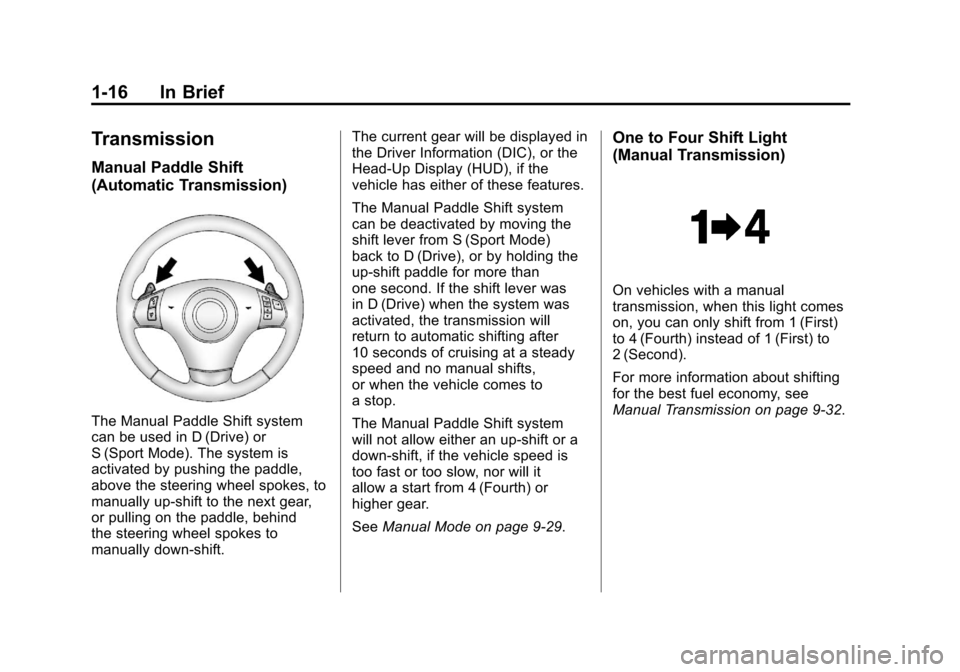
Manual Paddle Shift
(Automatic Transmission)
The Manual Paddle Shift system
can be used in D (Drive) or
S (Sport Mode). The system is
activated by pushing the paddle,
above the steering wheel spokes, to
manually up-shift to the next gear,
or pulling on the paddle, behind
the steering wheel spokes to
manually down-shift.The current gear will be displayed in
the Driver Information (DIC), or the
Head-Up Display (HUD), if the
vehicle has either of these features.
The Manual Paddle Shift system
can be deactivated by moving the
shift lever from S (Sport Mode)
back to D (Drive), or by holding the
up‐shift paddle for more than
one second. If the shift lever was
in D (Drive) when the system was
activated, the transmission will
return to automatic shifting after
10 seconds of cruising at a steady
speed and no manual shifts,
or when the vehicle comes to
a stop.
The Manual Paddle Shift system
will not allow either an up-shift or a
down-shift, if the vehicle speed is
too fast or too slow, nor will it
allow a start from 4 (Fourth) or
higher gear.
See
Manual Mode on page 9‑29.
One to Four Shift Light
(Manual Transmission)
On vehicles with a manual
transmission, when this light comes
on, you can only shift from 1 (First)
to 4 (Fourth) instead of 1 (First) to
2 (Second).
For more information about shifting
for the best fuel economy, see
Manual Transmission on page 9‑32.