2012 CHEVROLET CORVETTE ignition
[x] Cancel search: ignitionPage 186 of 434

Black plate (6,1)Chevrolet Corvette Owner Manual - 2012
6-6 Lighting
Be sure not to have this knob turned
all the way down with the lamps on
during the day. The Driver
Information Center (DIC) may
not be visible.
Courtesy Lamps
When any door or the hatch/trunk lid
is opened, the interior lamps will go
on unless it is bright outside.
You can also turn the courtesy
lamps on and off by pressing the
instrument panel brightness knob.
Reading Lamps
The inside rearview mirror includes
two reading lamps. The lamps will
go on when a door is opened. When
the doors are closed, press each
lamp switch to turn them on
individually.
Lighting Features
Entry/Exit Lighting
With entry lighting, the interior
lamps will come on when entering
the vehicle. To illuminate your exit,
the interior lamps come on for about
20 seconds when the engine is
turned off.
To turn the entry and exit lighting off,
quickly turn the courtesy lamps on
and off by pressing the instrument
panel brightness knob.
Battery Power Protection
This vehicle has a feature to help
prevent the battery from being
drained in case any of the following
lamps are left on: the underhood
lamp, if your vehicle has this
feature, vanity mirror lamps, cargo
lamps, reading lamps, console,
or glove box lamps. If any of these
lamps are left on, they will
automatically time-out after about10 minutes. To reset it, all of the
above lamps must be turned off or
the ignition key on.
Exterior Lighting Battery
Saver
If the manual parking lamps or
headlamps have been left on, the
exterior lamps will turn off as soon
as the ignition is turned off or
Retained Accessory Power (RAP) is
active. This protects against
draining the battery in case you
have accidentally left the headlamps
or parking lamps on. The battery
saver does not work if the
headlamps are turned on after the
ignition switch is turned to off.
If you need to leave the lamps on,
use the exterior lamp control to turn
the lamps back on.
Page 187 of 434
Black plate (1,1)Chevrolet Corvette Owner Manual - 2012
Infotainment System 7-1
Infotainment
System
Introduction
Infotainment . . . . . . . . . . . . . . . . . . . 7-1
Theft-Deterrent Feature . . . . . . . 7-2
Operation . . . . . . . . . . . . . . . . . . . . . 7-2
Radio
AM-FM Radio . . . . . . . . . . . . . . . . . 7-5
Satellite Radio . . . . . . . . . . . . . . . . 7-8
Radio Reception . . . . . . . . . . . . . 7-10
Diversity Antenna System . . . . 7-11
Satellite Radio Antenna . . . . . . 7-11
Audio Players
CD Player . . . . . . . . . . . . . . . . . . . 7-12
Auxiliary Devices . . . . . . . . . . . . 7-17
Phone
Bluetooth . . . . . . . . . . . . . . . . . . . . 7-18
Trademarks and License
Agreements
Trademarks and LicenseAgreements . . . . . . . . . . . . . . . . 7-25
Introduction
Infotainment
Determine which radio the vehicle
has and read the following pages to
become familiar with its features.
{WARNING
Taking your eyes off the road
for extended periods could cause
a crash resulting in injury or
death to you or others. Do not
give extended attention to
entertainment tasks while driving.
This system provides access to
many audio and non‐audio listings.
To minimize taking your eyes off the
road while driving, do the following
while the vehicle is parked:
.Become familiar with the
operation and controls of the
audio system.
.Set up the tone, speaker
adjustments, and preset
radio stations.
For more information, see Defensive
Driving on page 9‑3.
Notice: Contact your dealer
before adding any equipment.
Adding audio or communication
equipment could interfere with
the operation of the engine, radio,
or other systems, and could
damage them. Follow federal
rules covering mobile radio and
telephone equipment.
The vehicle has Retained
Accessory Power (RAP). With RAP,
the audio system can be played
even after the ignition is turned off.
See Retained Accessory Power
(RAP) on page 9‑23 for more
information.
Page 188 of 434
Black plate (2,1)Chevrolet Corvette Owner Manual - 2012
7-2 Infotainment System
Navigation/Radio System
For vehicles with a navigation radio
system, see the separate Navigation
System Manual.
Theft-Deterrent Feature
TheftLock®is designed to
discourage theft of the vehicle's
radio by learning a portion of the
Vehicle Identification Number (VIN).
The radio does not operate and
LOCKED displays if the radio
is stolen or moved to a different
vehicle.
When the when the ignition is in the
off position, a blinking red light on
the upper left side of the radio
indicates that TheftLock
®is armed.
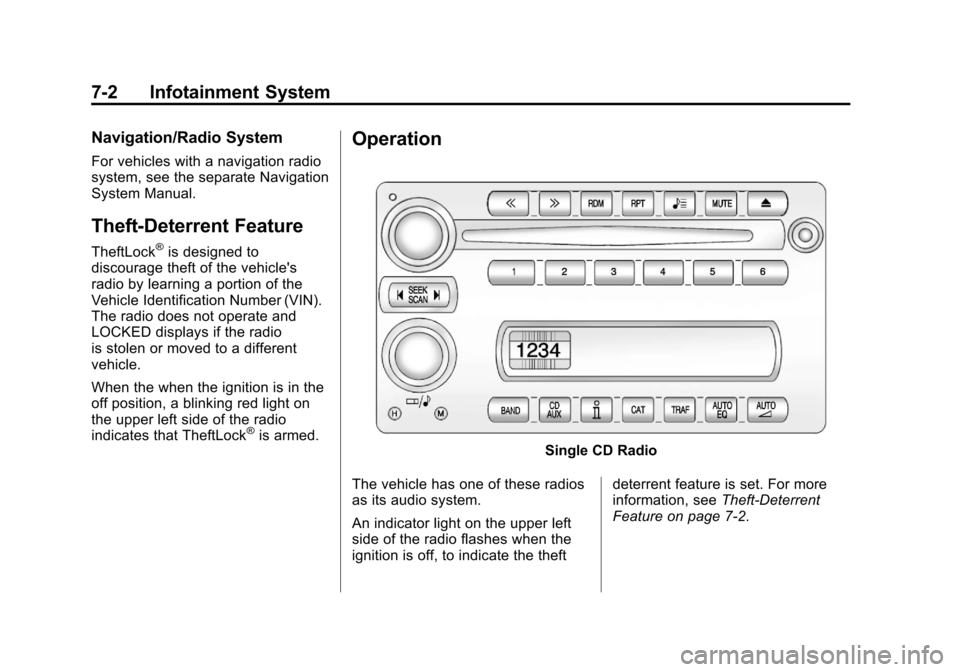
Operation
Single CD Radio
The vehicle has one of these radios
as its audio system.
An indicator light on the upper left
side of the radio flashes when the
ignition is off, to indicate the theft deterrent feature is set. For more
information, see
Theft-Deterrent
Feature on page 7‑2.
Page 198 of 434
Black plate (12,1)Chevrolet Corvette Owner Manual - 2012
7-12 Infotainment System
Audio Players
CD Player
Care of the CD Player
Do not add labels to a CD; it could
get caught in the CD player. Use a
marking pen to write on the top of
the CD if a description is needed.
Do not use CD lens cleaners, they
could damage the CD player.
Notice:If a label is added to a
CD, more than one CD is inserted
into the slot at a time, or an
attempt is made to play scratched
or damaged CDs, the CD player
could be damaged. While using
the CD player, use only CDs in
good condition without any label,
load one CD at a time, and keep
the CD player and the loading slot
free of foreign materials, liquids,
and debris.
If an error displays, see “CD
Messages” later in this section.
Care of CDs
Store CDs in their original cases or
other protective cases and away
from direct sunlight and dust. The
CD player scans the bottom of the
disc. If the bottom of a CD is
damaged it may not play properly or
at all. Do not touch the bottom of a
CD while handling it. Pick up CDs
by grasping the outer edges or the
edge of the hole and the outer edge.
If the surface of a CD is dirty, take a
soft, lint‐free cloth or dampen a
clean, soft cloth in a mild, neutral
detergent solution mixed with water,
and clean it. Make sure the wiping
process starts from the center to
the edge.
Using the CD Player
The CD player can play smaller
8 cm (3 in) single CDs with an
adapter ring.
A CD in the player stays in the
player when the ignition is turned
off. When the ignition or radio is
turned on, the CD starts to play
where it stopped, if it was the
last selected audio source.
Loading a CD
Insert the CD partway into the slot,
label side up, until the player pulls
the CD in. The CD begins playing
automatically.
The CD symbol displays when a
CD is inserted, and the track
number displays when each
new track starts to play.
M(Load):Press to load CD into
the CD player.
Page 201 of 434
Black plate (15,1)Chevrolet Corvette Owner Manual - 2012
Infotainment System 7-15
Root Directory:
The root directory is treated as a
folder. Files are stored in the root
directory when the disc or storage
device does not contain folders.
Files accessed from the root
directory display as F1 ROOT.
Empty Folder:
Folders that do not contain files are
skipped, and the player advances to
the next folder that contains files.
Supported Bit Rates
The following bit rates are
supported: 32 kbps, 40 kbps,
56 kbps, 64 kbps, 80 kbps, 96 kbps,
112 kbps, 128 kbps, 160 kbps,
192 kbps, 224 kbps, 256 kbps, and
320 kbps or a variable bit rate.File Naming
ID3v1 and ID3v2 tags are
supported. The track name
contained in the ID3 tag is shown
on the display. The display only
shows up to 32 characters for
track and file names.
If the track name is not contained in
the ID3 tag, the display shows the
file name without the file extension.
Playlists
Playlists that do not have a .m3u or
.wpl extension may not work.
Preprogrammed playlists created
by WinAmp™, MusicMatch™,
or Real Jukebox™
software are
supported and cannot be edited
using the radio.Playing an MP3
Insert a CD partway into the slot,
label side up. The player pulls it in,
and READING displays. The CD
should begin playing and the CD
symbol displays.
If the ignition or radio is turned off
with a CD-R in the player, it stays in
the player. When the ignition or
radio is turned on, the CD-R starts
to play where it stopped, if it was
the last selected audio source.
As each new track starts to play, the
track number displays.
Page 209 of 434
Black plate (23,1)Chevrolet Corvette Owner Manual - 2012
Infotainment System 7-23
Receiving a Call
When an incoming call is received,
the audio system mutes and a ring
tone is heard in the vehicle.
.Pressb/gto answer the call.
.Pressito ignore a call.
Call Waiting
Call waiting must be supported on
the cell phone and enabled by the
wireless service carrier.
.Pressb/gto answer an
incoming call when another call
is active. The original call is
placed on hold.
.Pressb/gagain to return to
the original call.
.To ignore the incoming call, no
action is required.
.Pressito disconnect the
current call and switch to the call
on hold.
Three‐Way Calling
Three‐way calling must be
supported on the cell phone and
enabled by the wireless service
carrier.
1. While on a call, press
b/g.
2. Say “Three‐way call.”
3. Use the dial or call command to dial the number of the third party
to be called.
4. Once the call is connected, press
b/gto link all
callers together.
Ending a Call
Pressito end a call.
Muting a Call
During a call, all sounds from inside
the vehicle can be muted so that the
person on the other end of the call
cannot hear them.
.To mute a call, pressb/g, and
then say “Mute call.”
.To cancel mute, pressb/g,
and then say “Un‐mute call.”
Transferring a Call
Audio can be transferred
between the Bluetooth system
and the cell phone.
The cell phone must be paired and
connected with the Bluetooth
system before a call can be
transferred. The connection process
can take up to two minutes after the
ignition is turned to ON/RUN.
Page 217 of 434

Black plate (5,1)Chevrolet Corvette Owner Manual - 2012
Climate Controls 8-5
Do not cover the solar sensor
located on the top of the instrument
panel near the windshield or the
system will not work properly.
There is also a sensor located
behind the front bumper. This
sensor reads the outside air
temperature and helps to maintain
the temperature inside the vehicle.
Any cover on the front of the vehicle
could give a false reading in the
temperature.
If the outside temperature goes up,
the displayed temperature will not
change until:
.The vehicle's speed is above
19 km/h (12 mph) for
five minutes.
.The vehicle's speed is above
52 km/h (32 mph) for two and
one‐half minutes.
These delays prevent false
readings. If the temperature goes
down, the outside temperature will
be shown when you start the
vehicle. If it has been turned off for less than three hours, the
temperature will be recalled from the
previous vehicle operation.
There is also an inside temperature
sensor located to the left of the
ignition switch. The automatic
climate control system uses this
sensor to receive information, so if
you block or cover it, the system will
not function properly.
Rear Window Defogger
The rear window defogger uses a
warming grid to remove fog or frost
from the rear window.
The rear window defogger only
works when the engine is running.
=(Rear Window Defogger):
Press to turn the rear window
defogger on or off. Be sure to clear
as much snow from the rear window
as possible. An indicator light
comes on to show that the rear
window defogger is on.
The rear window defogger turns off
about 10 minutes after the button is
pressed when traveling less than 48 km/h (30 mph). If turned on
again, the defogger only runs for
about five minutes before turning
off. The defogger can also be turned
off by turning off the engine.
The vehicle has heated outside
rearview mirrors. The mirrors will
heat to help clear fog or frost from
the surface of the mirrors when the
rear window defogger button is
pressed.
For vehicles with a power
convertible top, the rear window
defogger and heated mirrors are
automatically disabled when the
power convertible top is moving
or down.
Notice:
Do not use anything
sharp on the inside of the rear
window. If you do, you could cut
or damage the warming grid, and
the repairs would not be covered
by the vehicle warranty. Do not
attach a temporary vehicle
license, tape, a decal, or anything
similar to the defogger grid.
Page 221 of 434
Black plate (1,1)Chevrolet Corvette Owner Manual - 2012
Driving and Operating 9-1
Driving and
Operating
Driving Information
Distracted Driving . . . . . . . . . . . . . 9-2
Defensive Driving . . . . . . . . . . . . . 9-3
Drunk Driving . . . . . . . . . . . . . . . . . 9-3
Control of a Vehicle . . . . . . . . . . . 9-4
Braking . . . . . . . . . . . . . . . . . . . . . . . 9-4
Steering . . . . . . . . . . . . . . . . . . . . . . . 9-4
Off-Road Recovery . . . . . . . . . . . . 9-5
Loss of Control . . . . . . . . . . . . . . . . 9-5
Racing or Other CompetitiveDriving . . . . . . . . . . . . . . . . . . . . . . . 9-6
Driving on Wet Roads . . . . . . . . . 9-9
Highway Hypnosis . . . . . . . . . . . 9-10
Hill and Mountain Roads . . . . . 9-10
Winter Driving . . . . . . . . . . . . . . . . 9-11
If the Vehicle Is Stuck . . . . . . . . 9-13
Vehicle Load Limits . . . . . . . . . . 9-14
Starting and Operating
New Vehicle Break-In . . . . . . . . 9-18
Front Air Dam . . . . . . . . . . . . . . . 9-18
Ignition Positions . . . . . . . . . . . . 9-19
Starting the Engine . . . . . . . . . . 9-21
Retained Accessory Power (RAP) . . . . . . . . . . . . . . . 9-23
Shifting Into Park (Automatic Transmission) . . . . . . . . . . . . . . 9-23
Shifting out of Park . . . . . . . . . . 9-25
Parking (Manual Transmission) . . . . . . . . . . . . . . 9-25
Parking over Things That Burn . . . . . . . . . . . . . . . . . . 9-25
Engine Exhaust
Engine Exhaust . . . . . . . . . . . . . . 9-26
Running the Vehicle WhileParked . . . . . . . . . . . . . . . . . . . . . 9-26
Automatic Transmission
Automatic Transmission . . . . . 9-27
Manual Mode . . . . . . . . . . . . . . . . 9-29
Manual Transmission
Manual Transmission . . . . . . . . 9-32
Brakes
Antilock BrakeSystem (ABS) . . . . . . . . . . . . . . 9-35
Parking Brake . . . . . . . . . . . . . . . 9-36
Brake Assist . . . . . . . . . . . . . . . . . 9-36
Ride Control Systems
Traction Control System (TCS) . . . . . . . . . . . . . . 9-36
Active Handling System . . . . . 9-38
Competitive Driving Mode . . . 9-39
Limited-Slip Rear Axle . . . . . . . 9-42
Selective Ride Control . . . . . . . 9-43