2012 CHEVROLET CORVETTE remote start
[x] Cancel search: remote startPage 176 of 434

Black plate (66,1)Chevrolet Corvette Owner Manual - 2012
5-66 Instruments and Controls
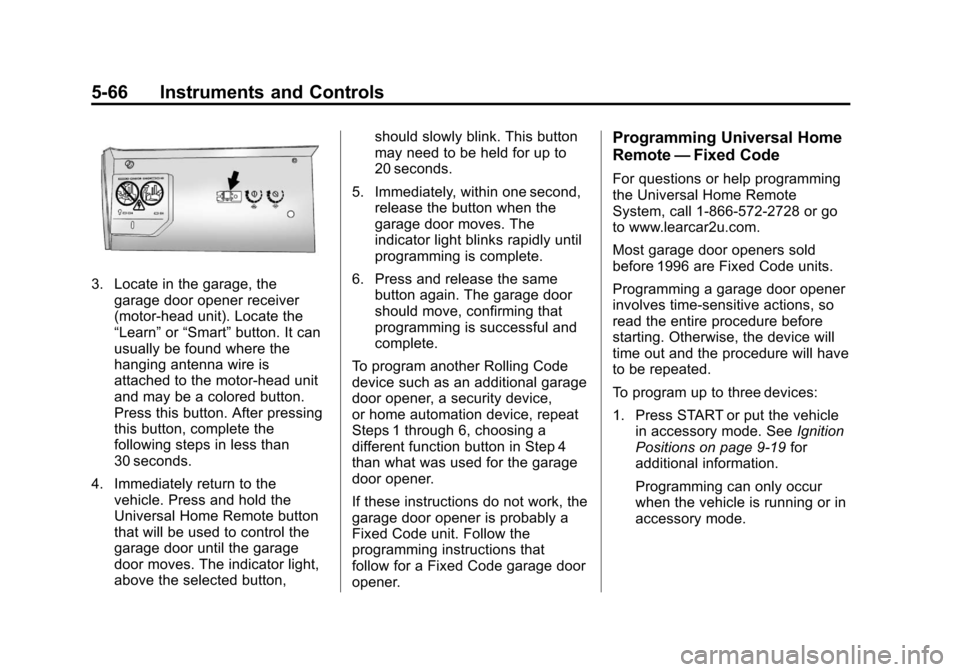
3. Locate in the garage, thegarage door opener receiver
(motor-head unit). Locate the
“Learn” or“Smart” button. It can
usually be found where the
hanging antenna wire is
attached to the motor-head unit
and may be a colored button.
Press this button. After pressing
this button, complete the
following steps in less than
30 seconds.
4. Immediately return to the vehicle. Press and hold the
Universal Home Remote button
that will be used to control the
garage door until the garage
door moves. The indicator light,
above the selected button, should slowly blink. This button
may need to be held for up to
20 seconds.
5. Immediately, within one second, release the button when the
garage door moves. The
indicator light blinks rapidly until
programming is complete.
6. Press and release the same button again. The garage door
should move, confirming that
programming is successful and
complete.
To program another Rolling Code
device such as an additional garage
door opener, a security device,
or home automation device, repeat
Steps 1 through 6, choosing a
different function button in Step 4
than what was used for the garage
door opener.
If these instructions do not work, the
garage door opener is probably a
Fixed Code unit. Follow the
programming instructions that
follow for a Fixed Code garage door
opener.
Programming Universal Home
Remote —Fixed Code
For questions or help programming
the Universal Home Remote
System, call 1-866-572-2728 or go
to www.learcar2u.com.
Most garage door openers sold
before 1996 are Fixed Code units.
Programming a garage door opener
involves time-sensitive actions, so
read the entire procedure before
starting. Otherwise, the device will
time out and the procedure will have
to be repeated.
To program up to three devices:
1. Press START or put the vehicle
in accessory mode. See Ignition
Positions on page 9‑19 for
additional information.
Programming can only occur
when the vehicle is running or in
accessory mode.
Page 199 of 434

Black plate (13,1)Chevrolet Corvette Owner Manual - 2012
Infotainment System 7-13
To insert CD:
1. Press
M.
2. Load a CD and insert the CD partway into the slot, label side
up when INSERT CD displays.
The player pulls the CD in.
Playing a CD
O/e(Tune): Turn to go to the
next or previous track.
{(Reverse): Press and hold to
reverse within the current track.
|(Fast Forward): Press and hold
to fast forward through the current
track.
tSEEKu: Press the left arrow
to go to the start of the current track
if more than eight seconds have
played. Press the right arrow to go
to the start of the next track. If either
arrow is held or pressed more than
once, the player continues moving
backward or forward through
the CD.
tSCANu: To scan one CD,
press and hold either arrow for
more than two seconds until SCAN
displays and a beep sounds. The
radio goes to the next track, plays
for 10 seconds, then goes to the
next track. Press either arrow again
to stop scanning.
AUTO EQ (Automatic
Equalization): Press to select the
equalization setting while playing a
CD. The equalization is stored
when a CD is played. For more
information on AUTO EQ, see
“AUTO EQ” listed previously in
this section.
BAND: Press to listen to the radio
when a CD is playing. The inactive
CD remains inside the radio for
future listening.
CD AUX (Auxiliary): Press to play
a CD when listening to the radio.
CD displays when a CD is in the
player. If your system has a remote
playback device, pressing this
button a second time allows the
remote device to play.X(Eject): Press to eject a
CD from the CD Radio.
CD Radio: Press
Xto eject a CD.
RPT (Repeat): Press to hear a
track or an entire CD over again.
Single CD Radio:
Press RPT to hear a track over
again; REPEAT displays. Press
again to turn off repeat; REPEAT
OFF displays.
RDM (Random): Press to hear
the tracks in random, rather than
sequential order.
CD Radio:
Press and release RDM until
RANDOM DISC PLAY displays.
Press and release RDM until
RANDOM OFF displays to turn off
random play.
Page 239 of 434

Black plate (19,1)Chevrolet Corvette Owner Manual - 2012
Driving and Operating 9-19
{WARNING
ZR1s, and Z06s with RPO CFZ,
contain parts made from carbon
fiber.
When damaged, the exposed
edges can be very sharp.
A person could be injured by
these sharp edges. Use caution
when washing the vehicle,
coming in contact with,
or removing damaged carbon
fiber parts. See your dealer for
replacement.
Under normal operation, these
components will occasionally
contact some road surfaces
(speed bumps, driveway
ramps, etc.). This can be heard
inside the vehicle as a scraping
noise. This is normal and does not
indicate a problem.
Use care when approaching bumps
or objects on road surfaces and
avoid them when possible.
Ignition Positions
The vehicle has an electronic
keyless ignition with a push-button
start.
In order to shift out of P (Park),
the vehicle must be running or in
Acc. mode and the regular brake
pedal must be applied.
/(START): Press this button
while your foot is on the brake for
an automatic transmission, or while
pressing in the clutch for a manual
transmission, to start the engine.
If the vehicle is in OFF or Retained Accessory Power (RAP) mode, the
Remote Keyless Entry (RKE)
transmitter must be inside the
vehicle to start the engine.
9Acc. (STOPPING THE ENGINE/
OFF/ACCESSORY): When the
vehicle is stopped with the engine
on, press the button once to turn
the engine off.
Do not turn the engine off when the
vehicle is moving. This will cause a
loss of power assist in the brake
and steering systems and disable
the airbags.
If the vehicle must be shut off in
an emergency:
1. Brake using a firm and steady pressure. Do not pump the
brakes repeatedly. This may
deplete power assist, requiring
increased brake pedal force.
2. Shift the vehicle to neutral. This can be done while the vehicle is
moving. After shifting to neutral,
firmly apply the brakes and steer
the vehicle to a safe location.
Page 241 of 434

Black plate (21,1)Chevrolet Corvette Owner Manual - 2012
Driving and Operating 9-21
Starting the Engine
Move the shift lever to P (Park) or
N (Neutral) for an automatic
transmission. For a manual
transmission the vehicle can be
started in Neutral or any other gear
as long as the clutch pedal is
pressed. To restart a vehicle with a
manual transmission when you are
already moving, use the Neutral
position only. To restart a vehicle
with an automatic transmission
when you are already moving, use
N (Neutral).
Notice:Do not try to shift to
P (Park) if the vehicle is moving.
If you do, you could damage the
transmission. Shift to P (Park)
only when the vehicle is stopped.
The RKE transmitter must be inside
the vehicle for the ignition to work. Cell phone chargers can interfere
with the operation of the Keyless
Access System. Battery chargers
should not be plugged in when
starting or turning off the engine.
To start the vehicle, do the following:
1. For vehicles with an automatic
transmission, with your foot on
the brake pedal, press the
START button located on the
instrument panel. For vehicles
with a manual transmission, you
must also press in the clutch
pedal while pressing the
START button.
If there is not an RKE transmitter
in the vehicle or if there is
something causing interference
with it, the DIC will display
NO FOBS DETECTED.
See Key and Lock Messages on
page 5‑43 for more information. 2. When the engine begins
cranking, let go of the button and
the engine cranks automatically
until it starts. If the battery in the
RKE transmitter is weak, the
DIC displays FOB BATTERY
LOW. You can still drive the
vehicle.
See “Battery Replacement”
under Remote Keyless Entry
(RKE) System Operation on
page 2‑3 for more information.
If the fob battery is dead, you
need to insert the fob into the
fob slot to enable engine
starting. See “NO FOBS
DETECTED” underKey and
Lock Messages on page 5‑43.
3. Do not race the engine immediately after starting it.
Operate the engine and
transmission gently until the oil
warms up and lubricates all
moving parts.
Page 287 of 434

Black plate (13,1)Chevrolet Corvette Owner Manual - 2012
Vehicle Care 10-13
A. Intercooler. SeeCooling System
(Engine) on page 10‑28 or
Cooling System (Intercooler) on
page 10‑29.
B. Engine Air Cleaner/Filter on
page 10‑25.
C. Power Steering Fluid Reservoir and Cap. See Power Steering
Fluid on page 10‑36.
D. Coolant Surge Tank and Pressure Cap. See Engine
Coolant on page 10‑30.
E. Windshield Washer Fluid Reservoir. See “Adding Washer
Fluid” under Washer Fluid on
page 10‑38. F. Clutch Master Cylinder
Reservoir (If Equipped).
See Hydraulic Clutch on
page 10‑24.
G. Brake Fluid Reservoir. See “Brake Fluid” under
Brakes on page 10‑38.
H. Passenger Compartment Air Filter (Out of View).
See Passenger Compartment
Air Filter on page 8‑6.
I. Engine Oil Fill Cap. See “When
to Add Engine Oil” under
Engine Oil on page 10‑16.
J. Dry Sump Engine Oil Tank. See “Changing Engine Oil
and Filter” Brake Fluid on
page 10‑42. K. Engine Oil Dipstick. See
“Checking Engine Oil” under
Engine Oil on page 10‑16.
L. Remote Positive (+) Terminal (Out of View). See Jump
Starting on page 10‑82.
M. Engine Compartment Fuse
Block on page 10‑52.
If the vehicle has the 6.2 L LS9
Supercharged V8 engine and you
are facing the front of the vehicle.
Page 289 of 434

Black plate (15,1)Chevrolet Corvette Owner Manual - 2012
Vehicle Care 10-15
A.Engine Air Cleaner/Filter on
page 10‑25.
B. Power Steering Fluid Reservoir. See Power Steering Fluid on
page 10‑36.
C. Engine Compartment Fuse
Block on page 10‑52.
D. Remote Positive (+) Terminal (Out of View). See Jump
Starting on page 10‑82.
E. Engine Oil Dipstick. See “Checking Engine Oil” under
Engine Oil on page 10‑16. F. Dry Sump Engine Oil Tank.
See “Changing Engine Oil and
Filter” under Engine Oil on
page 10‑16.
G. Engine Oil Fill Cap. See “When
to Add Engine Oil” under
Engine Oil on page 10‑16.
H. Coolant Surge Tank and Pressure Cap. See Engine
Coolant on page 10‑30.
I. Windshield Washer Fluid Reservoir. See “Adding Washer
Fluid” under Washer Fluid on
page 10‑38. J. Brake Fluid Reservoir.
See “Brake Fluid” under
Brake Fluid on page 10‑42.
K. Clutch Master Cylinder Reservoir. See Hydraulic Clutch
on page 10‑24.
If the vehicle has the 6.2 L LS3
V8 engine with the manual
transmission (with the dry sump
engine oil tank) or the 7.0 L LS7
V8 engine and you are facing the
driver side of the vehicle.
Page 357 of 434

Black plate (83,1)Chevrolet Corvette Owner Manual - 2012
Vehicle Care 10-83
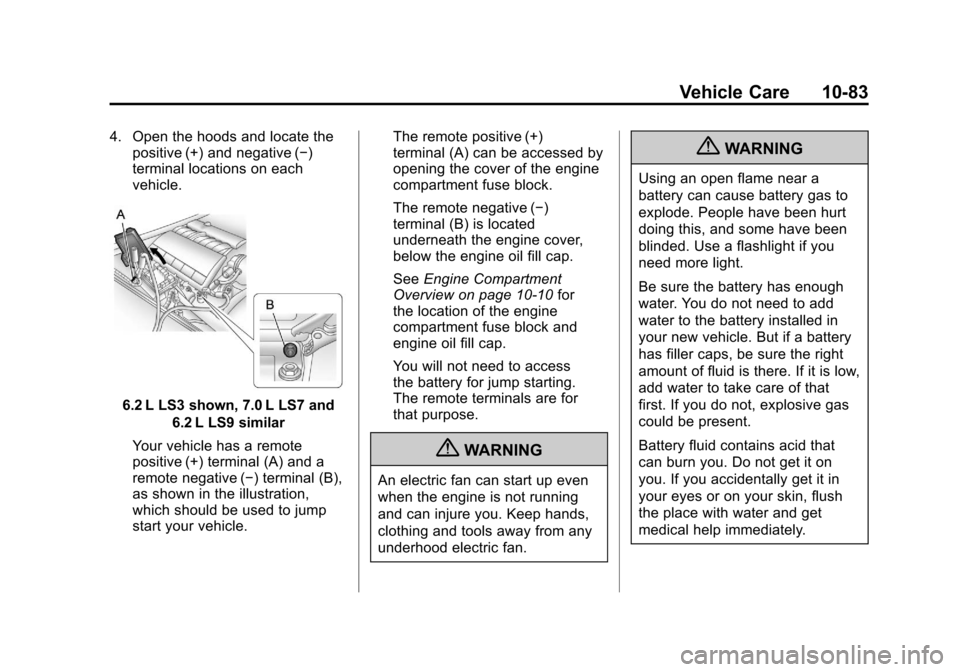
4. Open the hoods and locate thepositive (+) and negative (−)
terminal locations on each
vehicle.
6.2 L LS3 shown, 7.0 L LS7 and
6.2 L LS9 similar
Your vehicle has a remote
positive (+) terminal (A) and a
remote negative (−) terminal (B),
as shown in the illustration,
which should be used to jump
start your vehicle. The remote positive (+)
terminal (A) can be accessed by
opening the cover of the engine
compartment fuse block.
The remote negative (−)
terminal (B) is located
underneath the engine cover,
below the engine oil fill cap.
See
Engine Compartment
Overview on page 10‑10 for
the location of the engine
compartment fuse block and
engine oil fill cap.
You will not need to access
the battery for jump starting.
The remote terminals are for
that purpose.
{WARNING
An electric fan can start up even
when the engine is not running
and can injure you. Keep hands,
clothing and tools away from any
underhood electric fan.
{WARNING
Using an open flame near a
battery can cause battery gas to
explode. People have been hurt
doing this, and some have been
blinded. Use a flashlight if you
need more light.
Be sure the battery has enough
water. You do not need to add
water to the battery installed in
your new vehicle. But if a battery
has filler caps, be sure the right
amount of fluid is there. If it is low,
add water to take care of that
first. If you do not, explosive gas
could be present.
Battery fluid contains acid that
can burn you. Do not get it on
you. If you accidentally get it in
your eyes or on your skin, flush
the place with water and get
medical help immediately.
Page 359 of 434

Black plate (85,1)Chevrolet Corvette Owner Manual - 2012
Vehicle Care 10-85
10. Now start the vehicle with thegood battery and run the
engine for a while.
11. Try to start the vehicle that had the dead battery. If it will not
start after a few tries, it
probably needs service.
Notice: If the jumper cables are
connected or removed in the
wrong order, electrical shorting
may occur and damage the
vehicle. The repairs would not be
covered by the vehicle warranty.
Always connect and remove the
jumper cables in the correct
order, making sure that the
cables do not touch each other
or other metal.
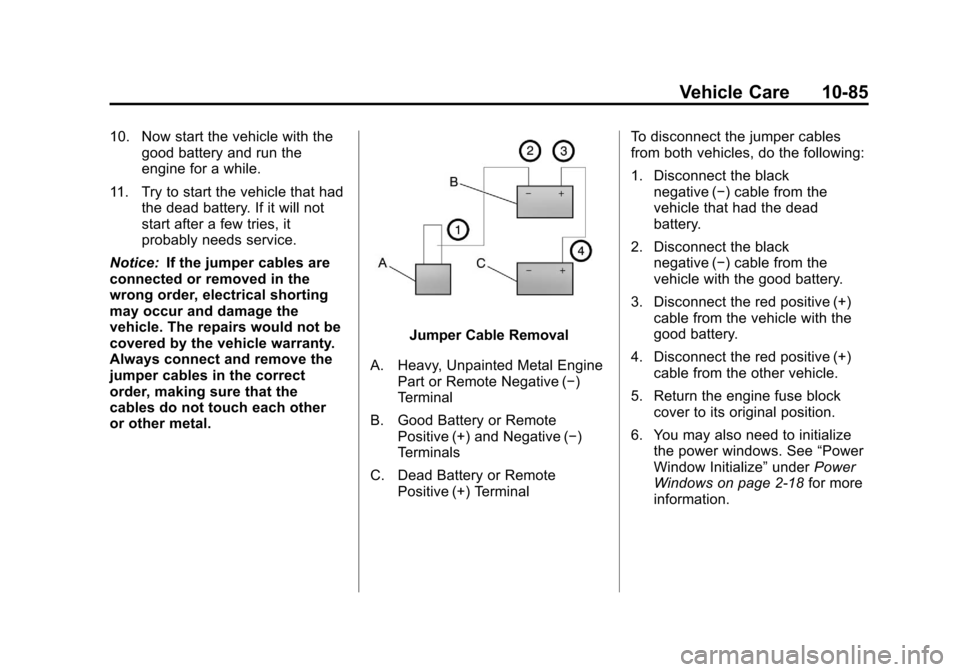
Jumper Cable Removal
A. Heavy, Unpainted Metal Engine Part or Remote Negative (−)
Terminal
B. Good Battery or Remote Positive (+) and Negative (−)
Terminals
C. Dead Battery or Remote Positive (+) Terminal To disconnect the jumper cables
from both vehicles, do the following:
1. Disconnect the black
negative (−) cable from the
vehicle that had the dead
battery.
2. Disconnect the black negative (−) cable from the
vehicle with the good battery.
3. Disconnect the red positive (+) cable from the vehicle with the
good battery.
4. Disconnect the red positive (+) cable from the other vehicle.
5. Return the engine fuse block cover to its original position.
6. You may also need to initialize the power windows. See “Power
Window Initialize” underPower
Windows on page 2‑18 for more
information.