2012 CHEVROLET CORVETTE engine
[x] Cancel search: enginePage 337 of 434

Black plate (63,1)Chevrolet Corvette Owner Manual - 2012
Vehicle Care 10-63
Tire Designations
Tire Size
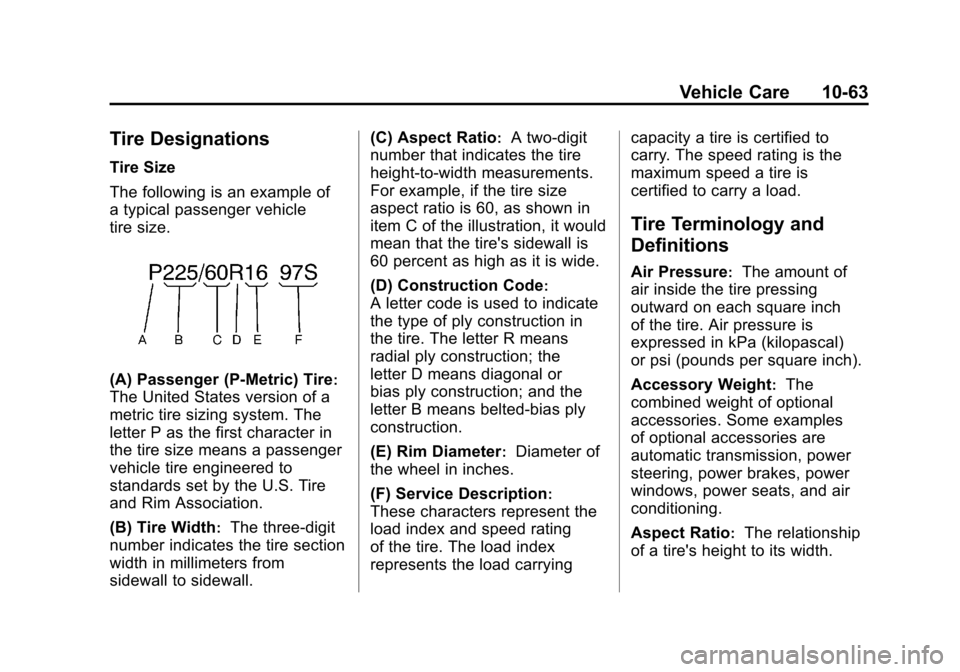
The following is an example of
a typical passenger vehicle
tire size.
(A) Passenger (P‐Metric) Tire:
The United States version of a
metric tire sizing system. The
letter P as the first character in
the tire size means a passenger
vehicle tire engineered to
standards set by the U.S. Tire
and Rim Association.
(B) Tire Width
:The three‐digit
number indicates the tire section
width in millimeters from
sidewall to sidewall. (C) Aspect Ratio
:A two‐digit
number that indicates the tire
height‐to‐width measurements.
For example, if the tire size
aspect ratio is 60, as shown in
item C of the illustration, it would
mean that the tire's sidewall is
60 percent as high as it is wide.
(D) Construction Code
:
A letter code is used to indicate
the type of ply construction in
the tire. The letter R means
radial ply construction; the
letter D means diagonal or
bias ply construction; and the
letter B means belted‐bias ply
construction.
(E) Rim Diameter
:Diameter of
the wheel in inches.
(F) Service Description
:
These characters represent the
load index and speed rating
of the tire. The load index
represents the load carrying capacity a tire is certified to
carry. The speed rating is the
maximum speed a tire is
certified to carry a load.
Tire Terminology and
Definitions
Air Pressure:The amount of
air inside the tire pressing
outward on each square inch
of the tire. Air pressure is
expressed in kPa (kilopascal)
or psi (pounds per square inch).
Accessory Weight
:The
combined weight of optional
accessories. Some examples
of optional accessories are
automatic transmission, power
steering, power brakes, power
windows, power seats, and air
conditioning.
Aspect Ratio
:The relationship
of a tire's height to its width.
Page 357 of 434

Black plate (83,1)Chevrolet Corvette Owner Manual - 2012
Vehicle Care 10-83
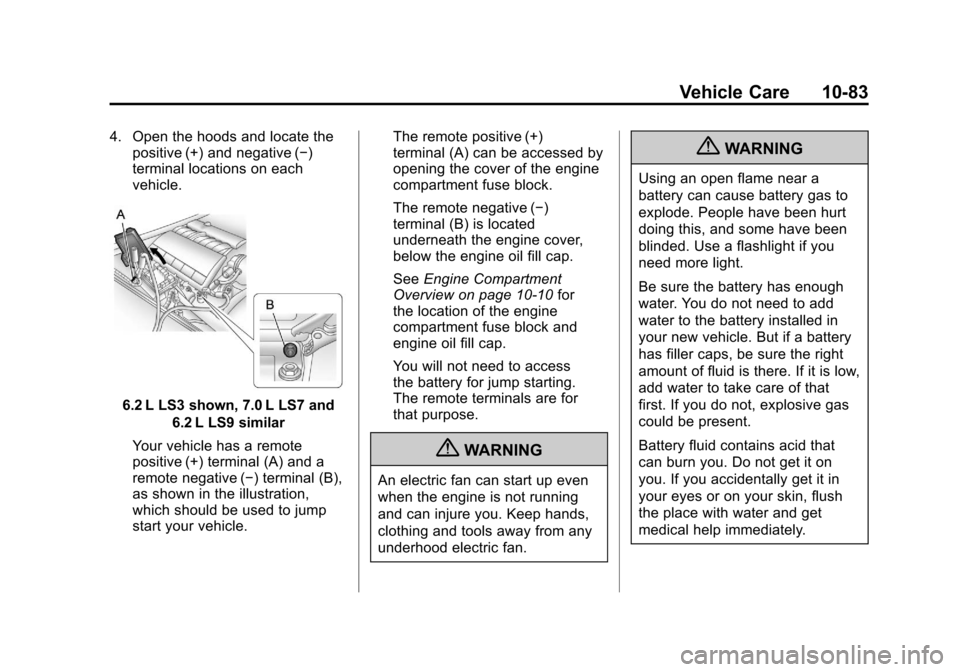
4. Open the hoods and locate thepositive (+) and negative (−)
terminal locations on each
vehicle.
6.2 L LS3 shown, 7.0 L LS7 and
6.2 L LS9 similar
Your vehicle has a remote
positive (+) terminal (A) and a
remote negative (−) terminal (B),
as shown in the illustration,
which should be used to jump
start your vehicle. The remote positive (+)
terminal (A) can be accessed by
opening the cover of the engine
compartment fuse block.
The remote negative (−)
terminal (B) is located
underneath the engine cover,
below the engine oil fill cap.
See
Engine Compartment
Overview on page 10‑10 for
the location of the engine
compartment fuse block and
engine oil fill cap.
You will not need to access
the battery for jump starting.
The remote terminals are for
that purpose.
{WARNING
An electric fan can start up even
when the engine is not running
and can injure you. Keep hands,
clothing and tools away from any
underhood electric fan.
{WARNING
Using an open flame near a
battery can cause battery gas to
explode. People have been hurt
doing this, and some have been
blinded. Use a flashlight if you
need more light.
Be sure the battery has enough
water. You do not need to add
water to the battery installed in
your new vehicle. But if a battery
has filler caps, be sure the right
amount of fluid is there. If it is low,
add water to take care of that
first. If you do not, explosive gas
could be present.
Battery fluid contains acid that
can burn you. Do not get it on
you. If you accidentally get it in
your eyes or on your skin, flush
the place with water and get
medical help immediately.
Page 358 of 434

Black plate (84,1)Chevrolet Corvette Owner Manual - 2012
10-84 Vehicle Care
{WARNING
Fans or other moving engine
parts can injure you badly. Keep
your hands away from moving
parts once the engine is running.
5. Check that the jumper cables do not have loose or missing
insulation. If they do, you could
get a shock. The vehicles could
be damaged too.
Before you connect the cables,
here are some basic things you
should know. Positive (+) will go
to positive (+) or to a remote
positive (+) terminal if the vehicle
has one. Negative (−) will go to a
heavy, unpainted metal engine
part or to a remote negative (−)
terminal if the vehicle has one. Do not connect positive (+) to
negative (−) or you will get a
short that would damage the
battery and maybe other parts
too. And do not connect the
negative (−) cable to the
negative (−) terminal on the
dead battery because this can
cause sparks.
6. Connect the red positive (+) cable to the positive (+) terminal
of the dead battery. Use a
remote positive (+) terminal if the
vehicle has one.
7. Do not let the other end touch metal. Connect it to the
positive (+) terminal of the
good battery. Use a remote
positive (+) terminal if the
vehicle has one. 8. Now connect the black
negative (−) cable to the
negative (−) terminal of the
good battery. Use a remote
negative (−) terminal if the
vehicle has one.
Do not let the other end touch
anything until the next step.
The other end of the negative (−)
cable does not go to the dead
battery. It goes to a heavy,
unpainted metal engine part or
to a remote negative (−) terminal
on the vehicle with the dead
battery.
9. Connect the other end of the negative (−) cable at least 45 cm
(18 inches) away from the dead
battery, but not near engine
parts that move. The electrical
connection is just as good there,
and the chance of sparks getting
back to the battery is much less.
Your vehicle has a remote
negative (−) terminal for this
purpose.
Page 359 of 434

Black plate (85,1)Chevrolet Corvette Owner Manual - 2012
Vehicle Care 10-85
10. Now start the vehicle with thegood battery and run the
engine for a while.
11. Try to start the vehicle that had the dead battery. If it will not
start after a few tries, it
probably needs service.
Notice: If the jumper cables are
connected or removed in the
wrong order, electrical shorting
may occur and damage the
vehicle. The repairs would not be
covered by the vehicle warranty.
Always connect and remove the
jumper cables in the correct
order, making sure that the
cables do not touch each other
or other metal.
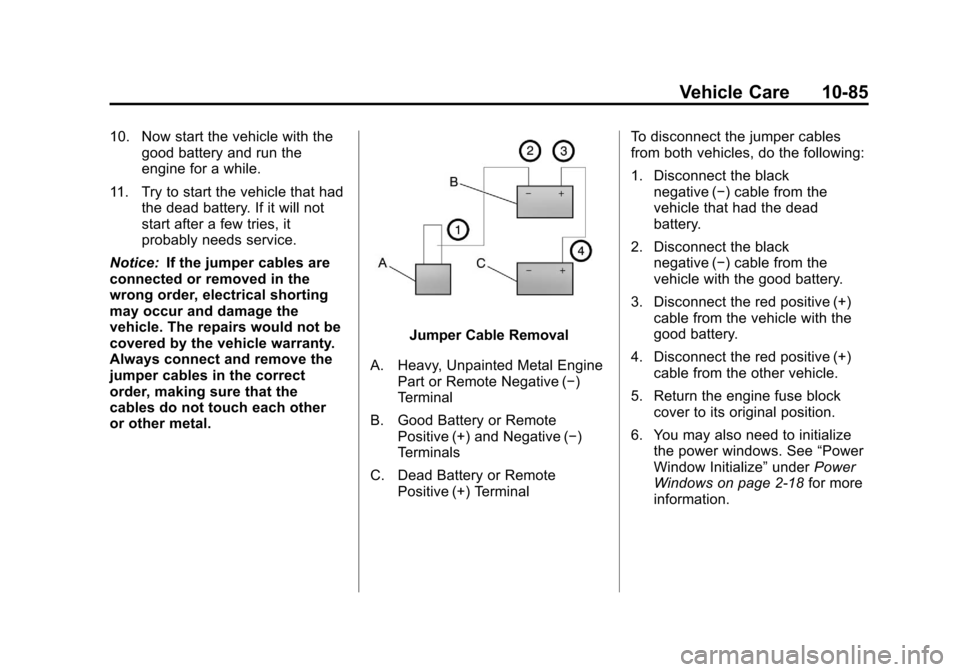
Jumper Cable Removal
A. Heavy, Unpainted Metal Engine Part or Remote Negative (−)
Terminal
B. Good Battery or Remote Positive (+) and Negative (−)
Terminals
C. Dead Battery or Remote Positive (+) Terminal To disconnect the jumper cables
from both vehicles, do the following:
1. Disconnect the black
negative (−) cable from the
vehicle that had the dead
battery.
2. Disconnect the black negative (−) cable from the
vehicle with the good battery.
3. Disconnect the red positive (+) cable from the vehicle with the
good battery.
4. Disconnect the red positive (+) cable from the other vehicle.
5. Return the engine fuse block cover to its original position.
6. You may also need to initialize the power windows. See “Power
Window Initialize” underPower
Windows on page 2‑18 for more
information.
Page 363 of 434

Black plate (89,1)Chevrolet Corvette Owner Manual - 2012
Vehicle Care 10-89
Keep the wheels clean using a soft,
clean cloth with mild soap and
water. Rinse with clean water.
After rinsing thoroughly, dry with a
soft, clean towel. A wax may then
be applied.
Notice:Chrome wheels and other
chrome trim may be damaged if
the vehicle is not washed after
driving on roads that have been
sprayed with magnesium,
calcium, or sodium chloride.
These chlorides are used on
roads for conditions such as ice
and dust. Always wash the
chrome with soap and water after
exposure.
Notice: To avoid surface damage,
do not use strong soaps,
chemicals, abrasive polishes,
cleaners, brushes, or cleaners
that contain acid on aluminum or
chrome-plated wheels. Use only
approved cleaners. Also, never
drive a vehicle with aluminum or
chrome-plated wheels through an automatic car wash that uses
silicone carbide tire cleaning
brushes. Damage could occur
and the repairs would not be
covered by the vehicle warranty.
Steering, Suspension, and
Chassis Components
Visually inspect front and rear
suspension and steering system for
damaged, loose, or missing parts or
signs of wear. Inspect power
steering lines and hoses for proper
hook-up, binding, leaks, cracks,
chafing, etc. Visually check constant
velocity joints, rubber boots, and
axle seals for leaks.
Body Component Lubrication
Lubricate all key lock cylinders,
hood hinges, liftgate hinges, and
steel fuel door hinge unless the
components are plastic. Applying
silicone grease on weatherstrips
with a clean cloth will make them
last longer, seal better, and not stick
or squeak.
Underbody Maintenance
Use plain water to flush dirt and
debris from the vehicle's underbody.
Your dealer or an underbody car
washing system can do this. If not
removed, rust and corrosion can
develop.
Fiberglass Springs
(Composite Springs)
Notice:
Do not use acidic or
corrosive cleaning products,
engine degreasers, or aluminum
cleaning agents on fiberglass
springs as it may cause damage.
The repairs would not be
covered by the vehicle's warranty.
Use only approved cleaners.
Sheet Metal Damage
If the vehicle is damaged and
requires sheet metal repair or
replacement, make sure the body
repair shop applies anti-corrosion
material to parts repaired or
replaced to restore corrosion
protection.
Page 371 of 434

Black plate (3,1)Chevrolet Corvette Owner Manual - 2012
Service and Maintenance 11-3
Maintenance
Schedule
Owner Checks and Services
At Each Fuel Stop
.Check the engine oil level.
SeeEngine Oil on page 10‑16.
Once a Month
.Check the tire inflation
pressures. See Tire Pressure on
page 10‑66.
.Inspect the tires for wear. See
Tire Inspection on page 10‑72.
.Check the windshield washer
fluid level. See Washer Fluid on
page 10‑38.
Engine Oil Change
When the CHANGE ENGINE OIL
SOON message displays, have the
engine oil and filter changed within
the next 1 000 km/600 mi. If driven
under the best conditions, the
engine oil life system might not
indicate the need for vehicle service
for more than a year. The engine oil
and filter must be changed at least
once a year and the oil life system
must be reset. Your trained dealer
technician can perform this work.
If the engine oil life system is reset
accidentally, service the vehicle
within 5 000 km/3,000 mi since the
last service. Reset the oil life
system when the oil is changed.
See Engine Oil Life System on
page 10‑22.
Required Services Every
12 000 km/7,500 mi
.Check engine oil level and oil
life percentage. If needed,
change engine oil and filter, and
reset oil life system. See Engine
Oil on page 10‑16 andEngine
Oil Life System on page 10‑22.
.Check engine coolant level. See
Engine Coolant on page 10‑30.
.Check windshield washer fluid
level. See Washer Fluid on
page 10‑38.
.Visually inspect windshield wiper
blades for wear, cracking,
or contamination. See Exterior
Care on page 10‑86. Replace
worn or damaged wiper blades.
See Wiper Blade Replacement
on page 10‑47.
Page 372 of 434

Black plate (4,1)Chevrolet Corvette Owner Manual - 2012
11-4 Service and Maintenance
.Check tire inflation pressures.
SeeTire Pressure on
page 10‑66.
.Inspect tire wear. See Tire
Inspection on page 10‑72.
.Visually check for fluid leaks.
.Inspect engine air cleaner filter.
See Engine Air Cleaner/Filter on
page 10‑25.
.Inspect brake system.
.Visually inspect steering,
suspension, and chassis
components for damaged, loose,
or missing parts or signs of
wear. See Exterior Care on
page 10‑86.
.Check restraint system
components. See Safety System
Check on page 3‑14.
.Visually inspect fuel system for
damage or leaks.
.Visually inspect exhaust system
and nearby heat shields for
loose or damaged parts.
.Lubricate body components. See
Exterior Care on page 10‑86.
.Check starter switch. See Starter
Switch Check on page 10‑45.
.Check automatic transmission
shift lock control function. See
Automatic Transmission Shift
Lock Control Function Check on
page 10‑46.
.Check parking brake and
automatic transmission park
mechanism. See Park Brake and
P (Park) Mechanism Check on
page 10‑46.
.Check accelerator pedal for
damage, high effort, or binding.
Replace if needed.
.Visually inspect gas strut for
signs of wear, cracks, or other
damage. Check the hold open
ability of the strut. See your
dealer if service is required.
Page 374 of 434

Black plate (6,1)Chevrolet Corvette Owner Manual - 2012
11-6 Service and Maintenance
Footnotes—Maintenance
Schedule Additional Required
Services —Normal
a) Or every two years, whichever
comes first. More frequent
replacement may be needed if the
vehicle is driven in areas with heavy
traffic, areas with poor air quality,
or areas with high dust levels.
Replacement may also be needed if
there is a reduction in air flow,
excessive window fogging, or odors.
b) Check all fuel and vapor lines
and hoses for proper hook‐up,
routing, and condition. Check that
the purge valve, if the vehicle
has one, works properly.
Replace as needed. c)
Or every four years, whichever
comes first.
d) Or every five years, whichever
comes first. See Cooling System
(Engine) on page 10‑28 orCooling
System (Intercooler) on page 10‑29.
e) Or every 10 years, whichever
comes first. Inspect for fraying,
excessive cracking, or damage;
replace, if needed.