2012 CHEVROLET CORVETTE brake
[x] Cancel search: brakePage 355 of 434
Black plate (81,1)Chevrolet Corvette Owner Manual - 2012
Vehicle Care 10-81
If a Tire Goes Flat
It is unusual for a tire to blowout
while driving, especially if the tires
are maintained properly. If air
goes out of a tire, it is much more
likely to leak out slowly. SeeTires
on page 10‑58 for additional
information. But if there ever is a
blowout, here are a few tips about
what to expect and what to do:
If a front tire fails, the flat tire
creates a drag that pulls the vehicle
toward that side. Take your foot off
the accelerator pedal and grip the
steering wheel firmly. Steer to
maintain lane position, and then
gently brake to a stop, well off the
road, if possible.
A rear blowout, particularly on a
curve, acts much like a skid and
may require the same correction
as used in a skid. Stop pressing the accelerator pedal and steer to
straighten the vehicle. It may be
very bumpy and noisy. Gently brake
to a stop, well off the road,
if possible.
The vehicle has no spare tire, no
tire changing equipment, and no
place to store a tire.
The vehicle, when new, had run-flat
tires. This type of tire can operate
effectively with no air pressure so
there is no need to stop on the side
of the road to change a flat tire.
If driving on a deflated run-flat tire
for 40 km (25 mi) or less and at
speeds of 90 km/h (55 mph) or less,
there is a good chance the tire can
be repaired. The Tire Pressure
Monitor System (TPMS) will show
if a tire has lost pressure. See
Run-Flat Tires on page 10‑59
and
Tire Pressure Monitor System on
page 10‑68.{WARNING
Special tools and procedures are
required to service a run-flat tire.
If these special tools and
procedures are not used, injury or
vehicle damage may occur.
Always be sure the proper tools
and procedures, as described in
the service manual, are used.
To order a service manual, see
Service Publications Ordering
Information on page 13‑17.
Page 356 of 434
Black plate (82,1)Chevrolet Corvette Owner Manual - 2012
10-82 Vehicle Care
Jump Starting
For more information about the
vehicle battery, seeBattery on
page 10‑43.
If your battery has run down, you
may want to use another vehicle
and some jumper cables to start
your vehicle. Be sure to use the
following steps to do it safely.
{WARNING
Batteries can hurt you. They can
be dangerous because:
.They contain acid that can
burn you.
.They contain gas that can
explode or ignite.
.They contain enough
electricity to burn you.
If you do not follow these steps
exactly, some or all of these
things can hurt you. Notice:
If you try to start your
vehicle by pushing or pulling it,
you could damage your vehicle.
Do not push or pull your vehicle
to start it; instead, use the jump
starting procedure in this manual
to start your vehicle when the
battery has run down.
1. Check the other vehicle. It must
have a 12-volt battery with a
negative ground system.
Notice: Only use a vehicle that
has a 12-volt system with a
negative ground for jump
starting. If the other vehicle does
not have a 12-volt system with a
negative ground, both vehicles
can be damaged.
2. Get the vehicles close enough so the jumper cables can reach,
but be sure the vehicles are not
touching each other. If they are,
it could cause a ground
connection you do not want.
You would not be able to start
your vehicle, and the bad
grounding could damage the
electrical systems. To avoid the possibility of the
vehicles rolling, set the parking
brake firmly on both vehicles
involved in the jump start
procedure. Put an automatic
transmission in P (Park) or a
manual transmission in Neutral
before setting the parking
brakes.
Notice: If the radio or other
accessories are left on during the
jump starting procedure, they
could be damaged. The repairs
would not be covered by the
warranty. Always turn off the
radio and other accessories when
jump starting the vehicle.
3. Turn off the ignition on both vehicles. Unplug unnecessary
accessories plugged into the
cigarette lighter or the accessory
power outlet. Turn off the radio
and all lamps that are not
needed. This will avoid sparks
and help save both batteries.
And it could save the radio!
Page 367 of 434
Black plate (93,1)Chevrolet Corvette Owner Manual - 2012
Vehicle Care 10-93
Floor Mats
{WARNING
If a floor mat is the wrong size or
is not properly installed, it can
interfere with the accelerator
pedal and/or brake pedal.
Interference with the pedals can
cause unintended acceleration
and/or increased stopping
distance which can cause a crash
and injury. Make sure the floor
mat does not interfere with the
pedals.
Use the following guidelines for
proper floor mat usage.
.The original equipment floor
mats were designed for your
vehicle. If the floor mats need
replacing, it is recommended
that GM certified floor mats be purchased. Non-GM floor mats
may not fit properly and may
interefere with the accelerator or
brake pedal. Always check that
the floor mats do not interfere
with the pedals.
.Use the floor mat with the
correct side up. Do not turn
it over.
.Do not place anything on top of
the driver side floor mat.
.Use only a single floor mat on
the driver side.
.Do not place one floor mat on
top of another.
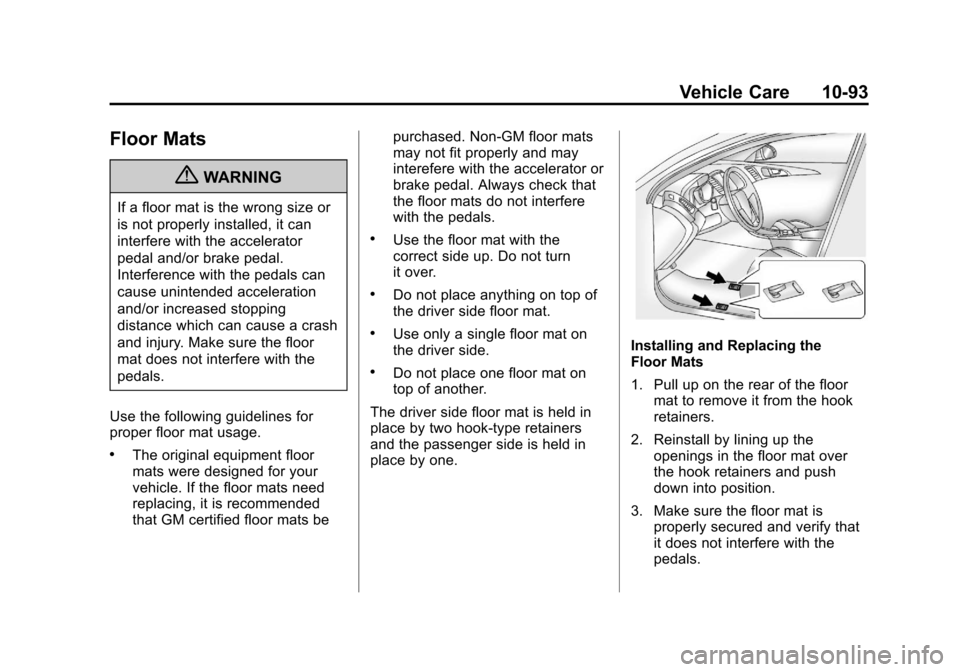
The driver side floor mat is held in
place by two hook-type retainers
and the passenger side is held in
place by one.
Installing and Replacing the
Floor Mats
1. Pull up on the rear of the floor mat to remove it from the hook
retainers.
2. Reinstall by lining up the openings in the floor mat over
the hook retainers and push
down into position.
3. Make sure the floor mat is properly secured and verify that
it does not interfere with the
pedals.
Page 369 of 434
Black plate (1,1)Chevrolet Corvette Owner Manual - 2012
Service and Maintenance 11-1
Service and
Maintenance
General Information
General Information . . . . . . . . . . 11-1
Maintenance Schedule
Maintenance Schedule . . . . . . . 11-3
Special Application Services
Special ApplicationServices . . . . . . . . . . . . . . . . . . . . 11-8
Additional Maintenance
and Care
Additional Maintenanceand Care . . . . . . . . . . . . . . . . . . . 11-8
Recommended Fluids,
Lubricants, and Parts
Recommended Fluids andLubricants . . . . . . . . . . . . . . . . . 11-12
Maintenance Replacement Parts . . . . . . . . . . . . . . . . . . . . . . 11-14
Maintenance Records
Maintenance Records . . . . . . 11-15
General Information
Your vehicle is an important
investment. This section describes
the required maintenance for the
vehicle. Follow this schedule to
help protect against major repair
expenses resulting from neglect or
inadequate maintenance. It may
also help to maintain the value of
the vehicle if it is sold. It is the
responsibility of the owner to have
all required maintenance performed.
Your dealer has trained
technicians who can perform
required maintenance using genuine
replacement parts. They have up‐to‐
date tools and equipment for fast
and accurate diagnostics. Many
dealers have extended evening
and Saturday hours, courtesy
transportation, and online
scheduling to assist with
service needs. Your dealer recognizes the
importance of providing
competitively priced maintenance
and repair services. With trained
technicians, the dealer is the place
for routine maintenance such as oil
changes and tire rotations and
additional maintenance items
like tires, brakes, batteries, and
wiper blades.
Notice:
Damage caused by
improper maintenance can lead to
costly repairs and may not be
covered by the vehicle warranty.
Maintenance intervals, checks,
inspections, recommended fluids,
and lubricants are important to
keep the vehicle in good working
condition.
The Required Services are the
responsibility of the vehicle owner.
It is recommended to have your
dealer perform these services every
12 000 km/7,500 mi. Proper vehicle
maintenance helps to keep the
vehicle in good working condition,
improves fuel economy, and
reduces vehicle emissions.
Page 372 of 434

Black plate (4,1)Chevrolet Corvette Owner Manual - 2012
11-4 Service and Maintenance
.Check tire inflation pressures.
SeeTire Pressure on
page 10‑66.
.Inspect tire wear. See Tire
Inspection on page 10‑72.
.Visually check for fluid leaks.
.Inspect engine air cleaner filter.
See Engine Air Cleaner/Filter on
page 10‑25.
.Inspect brake system.
.Visually inspect steering,
suspension, and chassis
components for damaged, loose,
or missing parts or signs of
wear. See Exterior Care on
page 10‑86.
.Check restraint system
components. See Safety System
Check on page 3‑14.
.Visually inspect fuel system for
damage or leaks.
.Visually inspect exhaust system
and nearby heat shields for
loose or damaged parts.
.Lubricate body components. See
Exterior Care on page 10‑86.
.Check starter switch. See Starter
Switch Check on page 10‑45.
.Check automatic transmission
shift lock control function. See
Automatic Transmission Shift
Lock Control Function Check on
page 10‑46.
.Check parking brake and
automatic transmission park
mechanism. See Park Brake and
P (Park) Mechanism Check on
page 10‑46.
.Check accelerator pedal for
damage, high effort, or binding.
Replace if needed.
.Visually inspect gas strut for
signs of wear, cracks, or other
damage. Check the hold open
ability of the strut. See your
dealer if service is required.
Page 377 of 434

Black plate (9,1)Chevrolet Corvette Owner Manual - 2012
Service and Maintenance 11-9
Battery
The battery supplies power to start
the engine and operate any
additional electrical accessories.
.To avoid break‐down or failure to
start the vehicle, maintain a
battery with full cranking power.
.Trained dealer technicians have
the diagnostic equipment to test
the battery and ensure that the
connections and cables are
corrosion‐free.
Belts
.Belts may need replacing if
they squeak or show signs of
cracking or splitting.
.Trained dealer technicians
can inspect the belts and
recommend replacement
when necessary. Brakes
Brakes stop the vehicle and are
crucial to safe driving.
.Signs of brake wear may include
chirping, grinding, or squealing
noises, or difficulty stopping.
.Trained dealer technicians have
access to tools and equipment
to inspect the brakes and
recommend quality parts
engineered for the vehicle.
Fluids
Proper fluid levels and approved
fluids protect the vehicle’s systems
and components. See
Recommended Fluids and
Lubricants on page 11‑12 for
GM approved fluids.
.Engine oil and windshield
washer fluid levels should be
checked at every fuel fill.
.Instrument cluster lights may
come on to indicate that
fluids may be low and need
to be filled. Hoses
Hoses transport fluids and should
be regularly inspected to ensure
that there are no cracks or leaks.
With a multi‐point inspection, your
dealer can inspect the hoses and
advise if replacement is needed.
Lamps
Properly working headlamps,
taillamps, and brake lamps are
important to see and be seen on
the road.
.Signs that the headlamps need
attention include dimming, failure
to light, cracking, or damage.
The brake lamps need to be
checked periodically to ensure
that they light when braking.
.With a multi‐point inspection,
your dealer can check the lamps
and note any concerns.
Page 380 of 434
Black plate (12,1)Chevrolet Corvette Owner Manual - 2012
11-12 Service and Maintenance
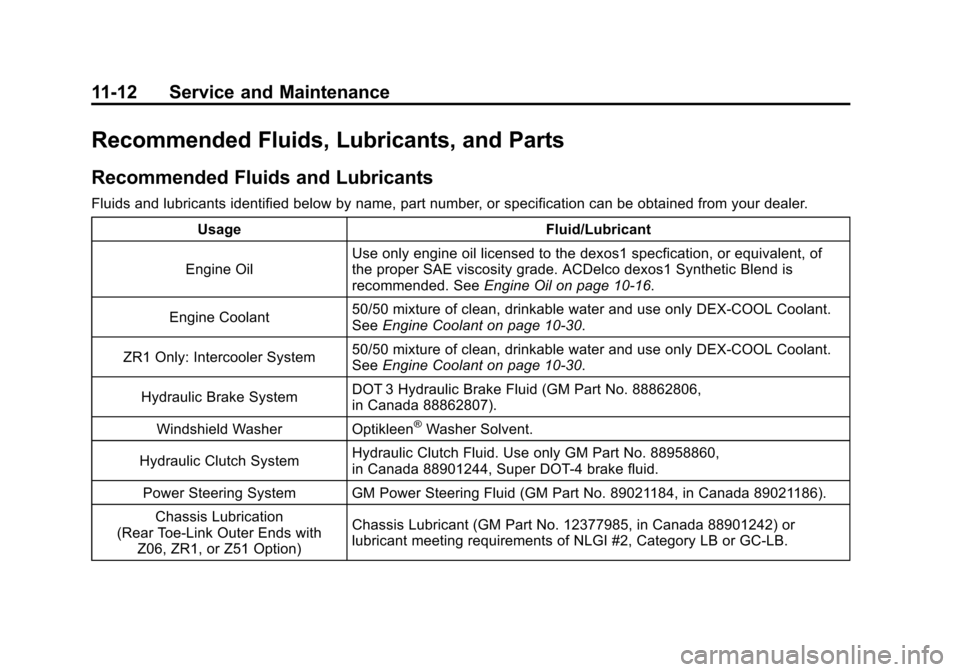
Recommended Fluids, Lubricants, and Parts
Recommended Fluids and Lubricants
Fluids and lubricants identified below by name, part number, or specification can be obtained from your dealer.Usage Fluid/Lubricant
Engine Oil Use only engine oil licensed to the dexos1 specfication, or equivalent, of
the proper SAE viscosity grade. ACDelco dexos1 Synthetic Blend is
recommended. See
Engine Oil on page 10‑16.
Engine Coolant 50/50 mixture of clean, drinkable water and use only DEX-COOL Coolant.
See
Engine Coolant on page 10‑30.
ZR1 Only: Intercooler System 50/50 mixture of clean, drinkable water and use only DEX-COOL Coolant.
See
Engine Coolant on page 10‑30.
Hydraulic Brake System DOT 3 Hydraulic Brake Fluid (GM Part No. 88862806,
in Canada 88862807).
Windshield Washer Optikleen
®Washer Solvent.
Hydraulic Clutch System Hydraulic Clutch Fluid. Use only GM Part No. 88958860,
in Canada 88901244, Super DOT-4 brake fluid.
Power Steering System GM Power Steering Fluid (GM Part No. 89021184, in Canada 89021186). Chassis Lubrication
(Rear Toe‐Link Outer Ends with Z06, ZR1, or Z51 Option) Chassis Lubricant (GM Part No. 12377985, in Canada 88901242) or
lubricant meeting requirements of NLGI #2, Category LB or GC-LB.
Page 409 of 434
Black plate (17,1)Chevrolet Corvette Owner Manual - 2012
Customer Information 13-17
.Vehicle make, model, and
model year.
.Vehicle Identification
Number (VIN).
.Insurance company and policy
number.
.General description of the
damage to the other vehicle.
Choose a reputable repair facility
that uses quality replacement parts.
See “Collision Parts” earlier in this
section.
If the airbag has inflated, see What
Will You See after an Airbag
Inflates? on page 3‑20.
Managing the Vehicle Damage
Repair Process
In the event that the vehicle requires
damage repairs, GM recommends
that you take an active role in its
repair. If you have a pre-determined
repair facility of choice, take the
vehicle there, or have it towed there. Specify to the facility that any
required replacement collision parts
be original equipment parts, either
new Genuine GM parts or recycled
original GM parts. Remember,
recycled parts will not be covered by
the GM vehicle warranty.
Insurance pays the bill for the repair,
but you must live with the repair.
Depending on your policy limits,
your insurance company may
initially value the repair using
aftermarket parts. Discuss this with
the repair professional, and insist on
Genuine GM parts. Remember,
if the vehicle is leased, you may be
obligated to have the vehicle
repaired with Genuine GM parts,
even if your insurance coverage
does not pay the full cost.
If another party's insurance
company is paying for the repairs,
you are not obligated to accept a
repair valuation based on that
insurance company's collision policy
repair limits, as you have no
contractual limits with that company.In such cases, you can have control
of the repair and parts choices as
long as the cost stays within
reasonable limits.
Service Publications
Ordering Information
Service Manuals
Service Manuals have the diagnosis
and repair information on the
engines, transmission, axle,
suspension, brakes, electrical,
steering, body, etc.
Service Bulletins
Service Bulletins give additional
technical service information
needed to knowledgeably service
General Motors cars and trucks.
Each bulletin contains instructions
to assist in the diagnosis and
service of the vehicle.