2012 CHEVROLET CORVETTE mirror controls
[x] Cancel search: mirror controlsPage 1 of 434

Black plate (1,1)Chevrolet Corvette Owner Manual - 2012
2012 Chevrolet Corvette Owner ManualM
In Brief. . . . . . . . . . . . . . . . . . . . . . . . 1-1
Instrument Panel . . . . . . . . . . . . . . 1-2
Initial Drive Information . . . . . . . . 1-4
Vehicle Features . . . . . . . . . . . . . 1-17
Performance and Maintenance . . . . . . . . . . . . . . . . 1-21
Keys, Doors, and Windows . . . . . . . . . . . . . . . . . . . . 2-1
Keys and Locks . . . . . . . . . . . . . . . 2-2
Doors . . . . . . . . . . . . . . . . . . . . . . . . . 2-11
Vehicle Security . . . . . . . . . . . . . . 2-13
Exterior Mirrors . . . . . . . . . . . . . . . 2-16
Interior Mirrors . . . . . . . . . . . . . . . . 2-17
Windows . . . . . . . . . . . . . . . . . . . . . 2-18
Roof . . . . . . . . . . . . . . . . . . . . . . . . . . 2-20 Seats and Restraints
. . . . . . . . . 3-1
Head Restraints . . . . . . . . . . . . . . . 3-2
Front Seats . . . . . . . . . . . . . . . . . . . . 3-2
Safety Belts . . . . . . . . . . . . . . . . . . . . 3-8
Airbag System . . . . . . . . . . . . . . . . 3-15
Child Restraints . . . . . . . . . . . . . . 3-28
Storage . . . . . . . . . . . . . . . . . . . . . . . 4-1
Storage Compartments . . . . . . . . 4-1
Additional Storage Features . . . 4-3
Instruments and Controls . . . . 5-1
Controls . . . . . . . . . . . . . . . . . . . . . . . 5-2
Warning Lights, Gauges, and Indicators . . . . . . . . . . . . . . . . . . . . 5-8
Information Displays . . . . . . . . . . 5-28
Vehicle Messages . . . . . . . . . . . . 5-36
Vehicle Personalization . . . . . . . 5-55
Universal Remote System . . . . 5-64 Lighting
. . . . . . . . . . . . . . . . . . . . . . . 6-1
Exterior Lighting . . . . . . . . . . . . . . . 6-1
Interior Lighting . . . . . . . . . . . . . . . . 6-5
Lighting Features . . . . . . . . . . . . . . 6-6
Infotainment System . . . . . . . . . 7-1
Introduction . . . . . . . . . . . . . . . . . . . . 7-1
Radio . . . . . . . . . . . . . . . . . . . . . . . . . . 7-5
Audio Players . . . . . . . . . . . . . . . . 7-12
Phone . . . . . . . . . . . . . . . . . . . . . . . . 7-18
Trademarks and License
Agreements . . . . . . . . . . . . . . . . . 7-25
Climate Controls . . . . . . . . . . . . . 8-1
Climate Control Systems . . . . . . 8-1
Air Vents . . . . . . . . . . . . . . . . . . . . . . . 8-6
Maintenance . . . . . . . . . . . . . . . . . . . 8-6
Page 7 of 434
Black plate (1,1)Chevrolet Corvette Owner Manual - 2012
In Brief 1-1
In Brief
Instrument Panel
Instrument Panel . . . . . . . . . . . . . . 1-2
Initial Drive Information
Initial Drive Information . . . . . . . . 1-4
Remote Keyless Entry (RKE)System . . . . . . . . . . . . . . . . . . . . . . 1-4
Door Locks . . . . . . . . . . . . . . . . . . . 1-5
Trunk Release . . . . . . . . . . . . . . . . 1-6
Windows . . . . . . . . . . . . . . . . . . . . . . 1-7
Seat Adjustment . . . . . . . . . . . . . . 1-8
Memory Features . . . . . . . . . . . . . 1-9
Safety Belts . . . . . . . . . . . . . . . . . . 1-11
Passenger Sensing System . . . . . . . . . . . . . . . . . . . . . 1-11
Mirror Adjustment . . . . . . . . . . . . 1-12 Steering Wheel
Adjustment . . . . . . . . . . . . . . . . . 1-12
Interior Lighting . . . . . . . . . . . . . . 1-13
Exterior Lighting . . . . . . . . . . . . . 1-14
Windshield Wiper/Washer . . . . 1-14
Climate Controls . . . . . . . . . . . . . 1-15
Transmission . . . . . . . . . . . . . . . . 1-16Vehicle Features
Radio(s) . . . . . . . . . . . . . . . . . . . . . 1-17
Satellite Radio . . . . . . . . . . . . . . . 1-18
Portable Audio Devices . . . . . . 1-18
Bluetooth
®. . . . . . . . . . . . . . . . . . . 1-18
Steering Wheel Controls . . . . . 1-19
Cruise Control . . . . . . . . . . . . . . . 1-19
Navigation System . . . . . . . . . . . 1-19
Driver Information Center (DIC) . . . . . . . . . . . . . . . 1-20
Power Outlets . . . . . . . . . . . . . . . 1-21
Roof Panel . . . . . . . . . . . . . . . . . . 1-21
Convertible . . . . . . . . . . . . . . . . . . 1-21
Performance and Maintenance
Traction Control System (TCS) . . . . . . . . . . . . . . 1-21
Tire Pressure Monitor . . . . . . . . 1-22
Z06, Z16, and ZR1 Features . . . . . . . . . . . . . . . . . . . 1-22
Engine Oil Life System . . . . . . 1-23
Driving for Better Fuel Economy . . . . . . . . . . . . . . . . . . . 1-24
Battery . . . . . . . . . . . . . . . . . . . . . . . 1-24
Roadside Assistance Program . . . . . . . . . . . . . . . . . . . . 1-25
OnStar
®. . . . . . . . . . . . . . . . . . . . . 1-25
Page 15 of 434
Black plate (9,1)Chevrolet Corvette Owner Manual - 2012
In Brief 1-9
Reclining Seatbacks
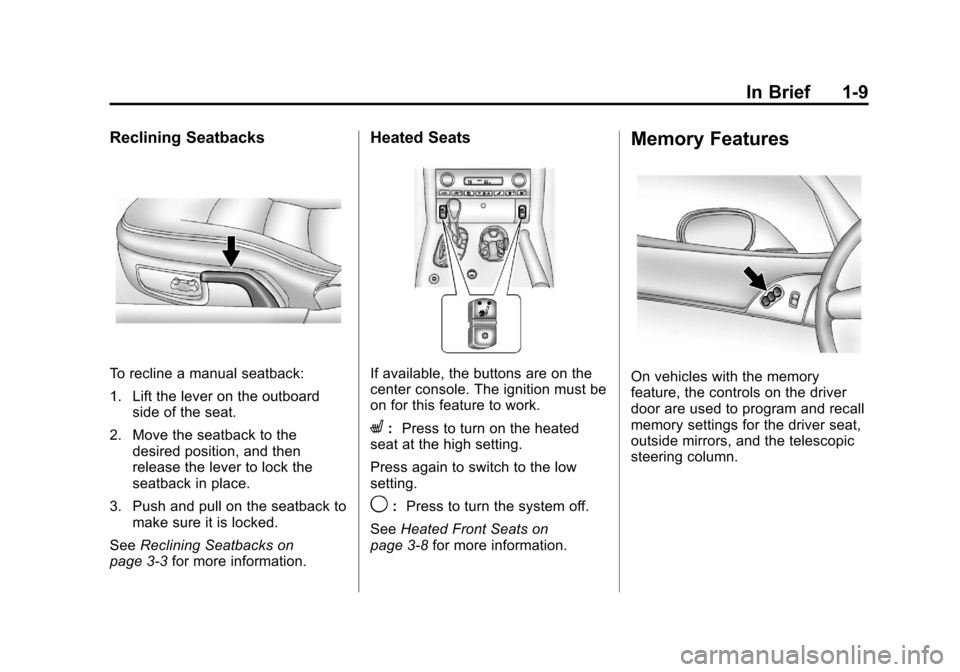
To recline a manual seatback:
1. Lift the lever on the outboardside of the seat.
2. Move the seatback to the desired position, and then
release the lever to lock the
seatback in place.
3. Push and pull on the seatback to make sure it is locked.
See Reclining Seatbacks on
page 3‑3 for more information.
Heated Seats
If available, the buttons are on the
center console. The ignition must be
on for this feature to work.
L:Press to turn on the heated
seat at the high setting.
Press again to switch to the low
setting.
9: Press to turn the system off.
See Heated Front Seats on
page 3‑8 for more information.
Memory Features
On vehicles with the memory
feature, the controls on the driver
door are used to program and recall
memory settings for the driver seat,
outside mirrors, and the telescopic
steering column.
Page 69 of 434
Black plate (5,1)Chevrolet Corvette Owner Manual - 2012
Seats and Restraints 3-5
Memory Seats
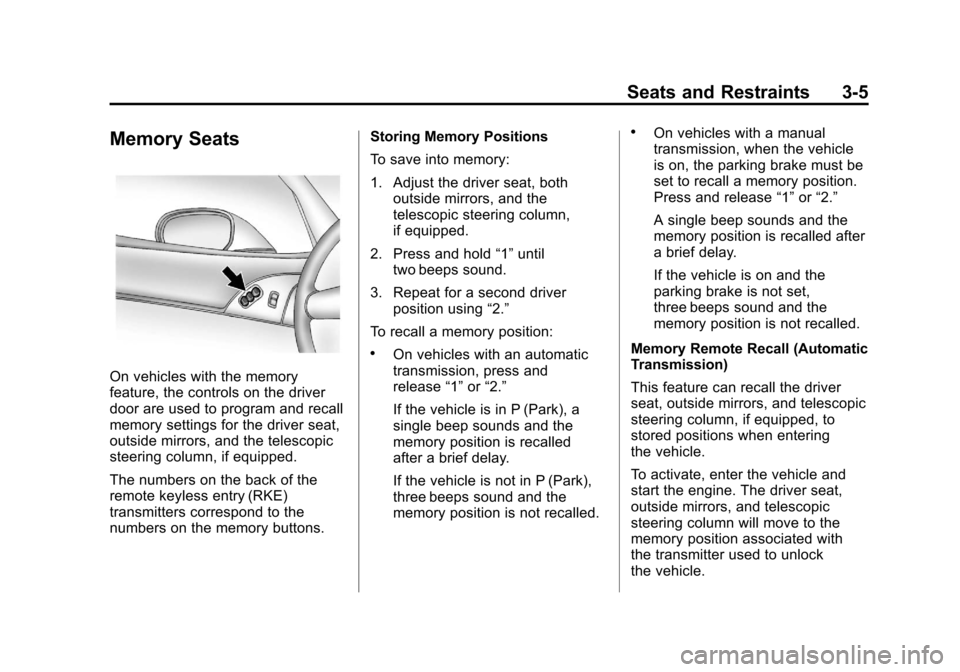
On vehicles with the memory
feature, the controls on the driver
door are used to program and recall
memory settings for the driver seat,
outside mirrors, and the telescopic
steering column, if equipped.
The numbers on the back of the
remote keyless entry (RKE)
transmitters correspond to the
numbers on the memory buttons.Storing Memory Positions
To save into memory:
1. Adjust the driver seat, both
outside mirrors, and the
telescopic steering column,
if equipped.
2. Press and hold “1”until
two beeps sound.
3. Repeat for a second driver position using “2.”
To recall a memory position:
.On vehicles with an automatic
transmission, press and
release “1”or“2.”
If the vehicle is in P (Park), a
single beep sounds and the
memory position is recalled
after a brief delay.
If the vehicle is not in P (Park),
three beeps sound and the
memory position is not recalled.
.On vehicles with a manual
transmission, when the vehicle
is on, the parking brake must be
set to recall a memory position.
Press and release “1”or“2.”
A single beep sounds and the
memory position is recalled after
a brief delay.
If the vehicle is on and the
parking brake is not set,
three beeps sound and the
memory position is not recalled.
Memory Remote Recall (Automatic
Transmission)
This feature can recall the driver
seat, outside mirrors, and telescopic
steering column, if equipped, to
stored positions when entering
the vehicle.
To activate, enter the vehicle and
start the engine. The driver seat,
outside mirrors, and telescopic
steering column will move to the
memory position associated with
the transmitter used to unlock
the vehicle.
Page 70 of 434
Black plate (6,1)Chevrolet Corvette Owner Manual - 2012
3-6 Seats and Restraints
This feature is turned on or off using
the vehicle personalization menu.
See“Auto Memory Recall” under
Vehicle Personalization on
page 5‑55 for more information.
To stop recall movement, press one
of the power seat controls, power
mirror or memory buttons, or the
telescopic steering column switch.
If something has blocked the driver
seat while recalling a memory
position, the recall may stop.
Remove the obstruction; then press
and hold the appropriate manual
control for the memory item that is
not recalling for two seconds. Try
recalling the memory position again
by pressing the appropriate memory
button. If the memory position is still
not recalling, see your dealer for
service.
Easy Exit Driver Seat
This feature can move the seat
rearward and the telescopic steering
column, if equipped, out of the way
to allow extra room to exit the
vehicle.B(Easy Exit Driver Seat):
Press to save and recall the easy
exit seat position.
To save into memory:
1. Recall the desired driving position by pressing “1.”
2. Adjust the seat and the telescopic steering column to
the desired exit position.
3. Press and hold Buntil
two beeps sound.
4. Repeat for a second driver position using “2.”
To recall, press and release B.
The vehicle must be in P (Park) for
an automatic transmission or the
parking brake must be set for a
manual transmission. A single beep
sounds. The seat and telescopic
steering column will move to the
position previously stored for the
identified driver. If the easy exit seat feature is
programmed on in the vehicle
personalization menu, automatic
recall occurs when one of the
following conditions is met:
.The vehicle is turned off, in
Retained Accessory
Power (RAP) or accessory
mode, and the driver door is
opened.
.The vehicle is turned off, or in
RAP, and the unlock button on
the RKE transmitter is pressed.
If something has blocked the driver
seat while recalling the exit position,
the recall may stop. Remove the
obstruction; then press and hold the
power seat control rearward for
two seconds. Try recalling the exit
position again. If the exit position is
still not recalling, see your dealer
for service.
See “Auto Exit Recall” underVehicle
Personalization on page 5‑55 for
more information.
Page 113 of 434
Black plate (3,1)Chevrolet Corvette Owner Manual - 2012
Instruments and Controls 5-3
The telescopic steering column
position can be stored with your
memory settings. See“Memory
Seat, Mirrors, and Steering Wheel”
under Power Seat Adjustment on
page 3‑3 for more information.
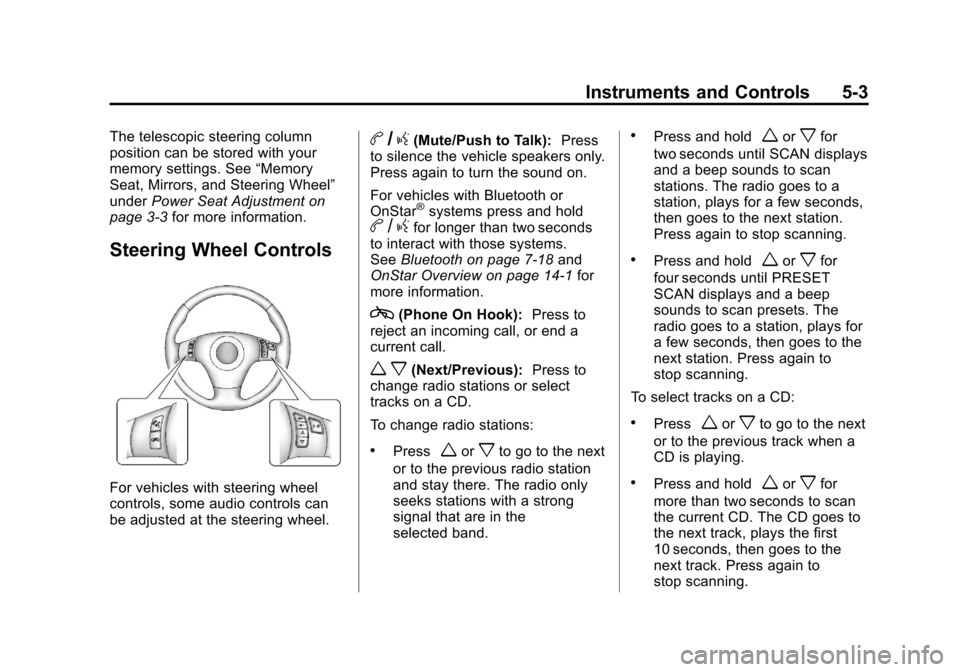
Steering Wheel Controls
For vehicles with steering wheel
controls, some audio controls can
be adjusted at the steering wheel.
b/g(Mute/Push to Talk): Press
to silence the vehicle speakers only.
Press again to turn the sound on.
For vehicles with Bluetooth or
OnStar
®systems press and holdb /gfor longer than two seconds
to interact with those systems.
See Bluetooth on page 7‑18 and
OnStar Overview on page 14‑1 for
more information.
c(Phone On Hook): Press to
reject an incoming call, or end a
current call.
w x(Next/Previous): Press to
change radio stations or select
tracks on a CD.
To change radio stations:
.Pressworxto go to the next
or to the previous radio station
and stay there. The radio only
seeks stations with a strong
signal that are in the
selected band.
.Press and holdworxfor
two seconds until SCAN displays
and a beep sounds to scan
stations. The radio goes to a
station, plays for a few seconds,
then goes to the next station.
Press again to stop scanning.
.Press and holdworxfor
four seconds until PRESET
SCAN displays and a beep
sounds to scan presets. The
radio goes to a station, plays for
a few seconds, then goes to the
next station. Press again to
stop scanning.
To select tracks on a CD:
.Pressworxto go to the next
or to the previous track when a
CD is playing.
.Press and holdworxfor
more than two seconds to scan
the current CD. The CD goes to
the next track, plays the first
10 seconds, then goes to the
next track. Press again to
stop scanning.
Page 115 of 434

Black plate (5,1)Chevrolet Corvette Owner Manual - 2012
Instruments and Controls 5-5
Windshield Washer
Press and hold the button at the end
of the lever to spray washer fluid on
the windshield. The washer will
spray until the button is released.
The wipers will continue to clear the
window for about six seconds after
the button is released and then stop
or return to your preset speed.
{WARNING
In freezing weather, do not use
the washer until the windshield is
warmed. Otherwise the washer
fluid can form ice on the
windshield, blocking your vision.
If the fluid in the windshield washer
fluid reservoir is low, the message
CHECK WASHER FLUID will
appear on the Driver Information
Center (DIC) display. It will take
15 seconds after the bottle is refilled
for this message to turn off. For information on the correct
washer fluid to use, see
Washer
Fluid on page 10‑38 and
Recommended Fluids and
Lubricants on page 11‑12.
Compass
Compass Operation
With the compass feature on, each
time the vehicle is started, the
compass will take a few seconds to
adjust and display the current
compass heading. For example,
NE is displayed for north-east.
Compass Calibration
PressPonce to turn the compass
display on or off.
If after several seconds the display
does not show a compass heading,
there may be a strong magnetic
field interfering with the compass.
Interference can be caused by a
magnetic antenna mount, note pad
holder, or similar object. If the letter C or CAL appears in the
compass window, the compass
needs calibration.
Depending on the mirror, in order
to calibrate, CAL must be displayed
in the mirror compass windows.
If CAL is not displayed, press
Pfor
several seconds or until CAL is
displayed.
If the compass has map lamps, it
can be placed in calibration mode
by pressing and holding the left map
light button until a C appears on the
compass display.
The mirror compass can be
calibrated by driving the vehicle in
circles at 8 km/h (5 mph) or less until
the display reads a direction.
Page 116 of 434
Black plate (6,1)Chevrolet Corvette Owner Manual - 2012
5-6 Instruments and Controls
Compass Variance
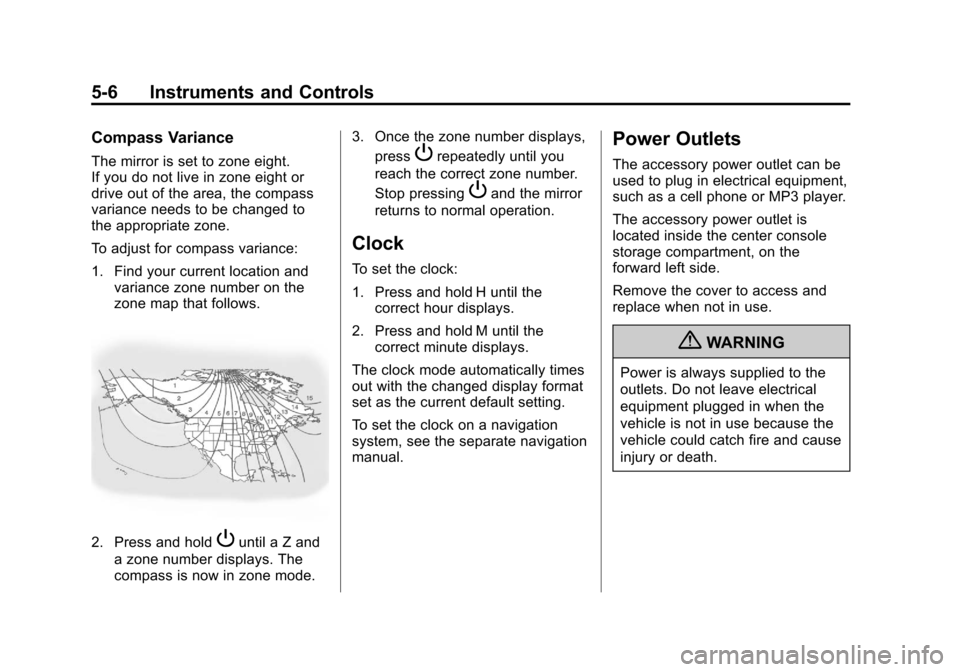
The mirror is set to zone eight.
If you do not live in zone eight or
drive out of the area, the compass
variance needs to be changed to
the appropriate zone.
To adjust for compass variance:
1. Find your current location andvariance zone number on the
zone map that follows.
2. Press and holdPuntil a Z and
a zone number displays. The
compass is now in zone mode. 3. Once the zone number displays,
press
Prepeatedly until you
reach the correct zone number.
Stop pressing
Pand the mirror
returns to normal operation.
Clock
To set the clock:
1. Press and hold H until the correct hour displays.
2. Press and hold M until the correct minute displays.
The clock mode automatically times
out with the changed display format
set as the current default setting.
To set the clock on a navigation
system, see the separate navigation
manual.
Power Outlets
The accessory power outlet can be
used to plug in electrical equipment,
such as a cell phone or MP3 player.
The accessory power outlet is
located inside the center console
storage compartment, on the
forward left side.
Remove the cover to access and
replace when not in use.
{WARNING
Power is always supplied to the
outlets. Do not leave electrical
equipment plugged in when the
vehicle is not in use because the
vehicle could catch fire and cause
injury or death.