2012 CHEVROLET CORVETTE manual radio set
[x] Cancel search: manual radio setPage 23 of 434
Black plate (17,1)Chevrolet Corvette Owner Manual - 2012
In Brief 1-17
Vehicle Features
Radio(s)
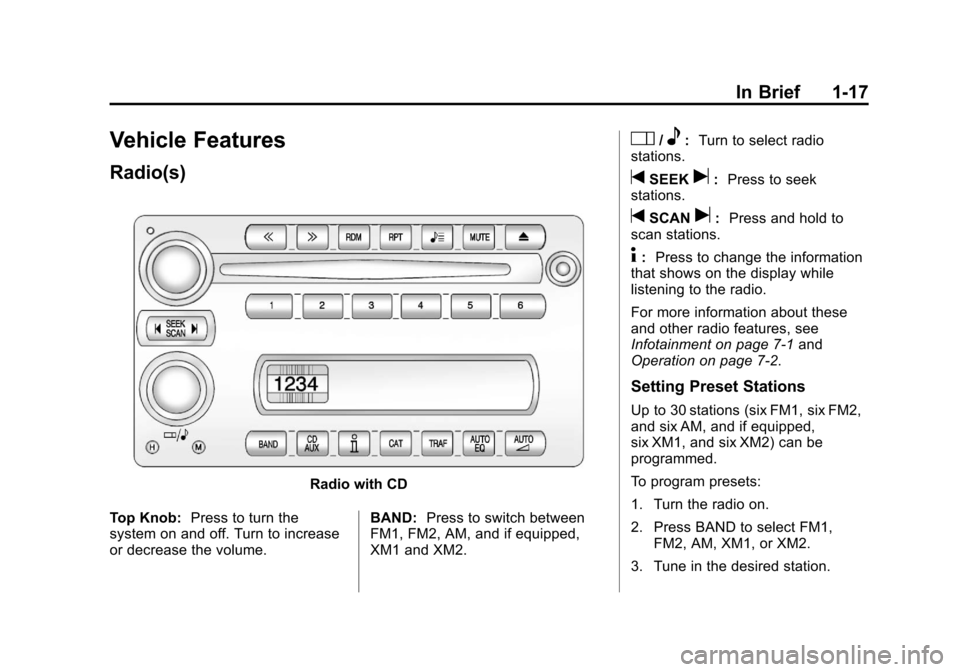
Radio with CD
Top Knob: Press to turn the
system on and off. Turn to increase
or decrease the volume. BAND:
Press to switch between
FM1, FM2, AM, and if equipped,
XM1 and XM2.
O/e: Turn to select radio
stations.
tSEEKu: Press to seek
stations.
tSCANu: Press and hold to
scan stations.
4: Press to change the information
that shows on the display while
listening to the radio.
For more information about these
and other radio features, see
Infotainment on page 7‑1 and
Operation on page 7‑2.
Setting Preset Stations
Up to 30 stations (six FM1, six FM2,
and six AM, and if equipped,
six XM1, and six XM2) can be
programmed.
To program presets:
1. Turn the radio on.
2. Press BAND to select FM1, FM2, AM, XM1, or XM2.
3. Tune in the desired station.
Page 24 of 434
Black plate (18,1)Chevrolet Corvette Owner Manual - 2012
1-18 In Brief
4. Press AUTO EQ to select theequalization.
5. Press and hold one of the six numbered pushbuttons until
the radio beeps once.
6. Repeat the steps for each pushbutton.
See Operation on page 7‑2.
Setting the Clock
To set the clock:
1. Press and hold H until the
correct hour displays.
2. Press and hold M until the correct minute displays.
See Clock on page 5‑6.
Satellite Radio
XM is a satellite radio service based
in the 48 contiguous United States
and 10 Canadian provinces.
XM satellite radio has a wide
variety of programming and
commercial-free music, coast to
coast, and in digital-quality sound. A fee is required to receive the
XM service.
For more information, refer to:
.www.xmradio.com or call
1-800-929-2100 (U.S.)
.www.xmradio.ca or call
1-877-438-9677 (Canada)
See Satellite Radio on page 7‑8.
Portable Audio Devices
This vehicle may have an auxiliary
input jack, located on the audio
faceplate. External devices such as
iPod
®, MP3 players, etc. can be
connected to the auxiliary input jack
using a 3.5 mm (1/8 in) input jack
cable.
See “Using the Auxiliary Input Jack”
under Auxiliary Devices on
page 7‑17.
Bluetooth®
For vehicles with a Bluetooth
system, it allows users with a
Bluetooth‐enabled cell phone to
make and receive hands-free calls
using the vehicle’ s audio system
and controls.
The Bluetooth‐enabled cell phone
must be paired with the Bluetooth
system before it can be used in the
vehicle. Not all phones will support
all functions. For more information,
visit www.gm.com/bluetooth.
For more information, see Bluetooth
on page 7‑18.
Page 25 of 434
Black plate (19,1)Chevrolet Corvette Owner Manual - 2012
In Brief 1-19
Steering Wheel Controls
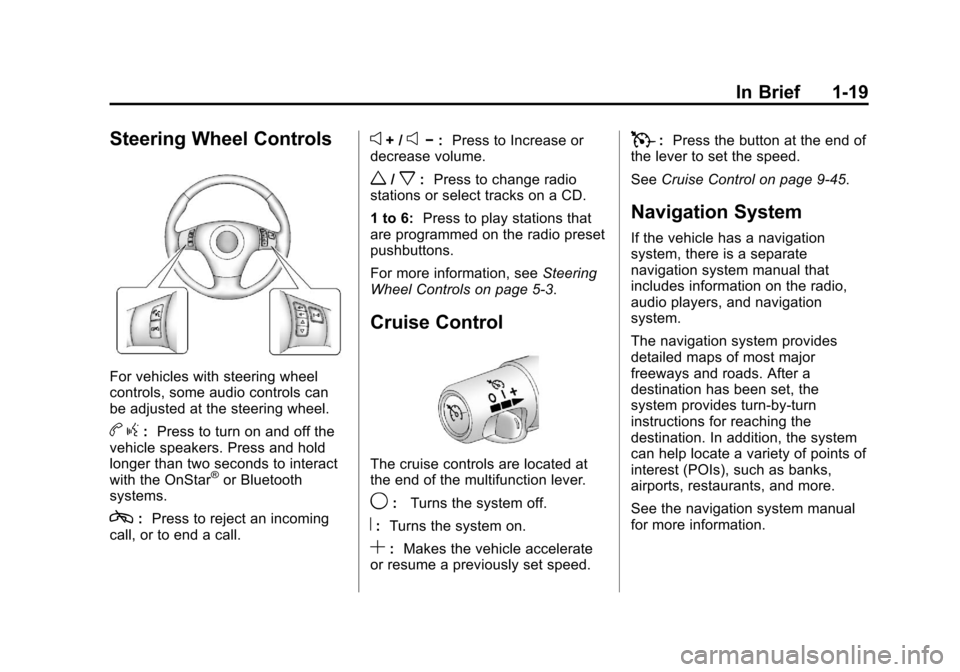
For vehicles with steering wheel
controls, some audio controls can
be adjusted at the steering wheel.
bg: Press to turn on and off the
vehicle speakers. Press and hold
longer than two seconds to interact
with the OnStar
®or Bluetooth
systems.
c: Press to reject an incoming
call, or to end a call.
e+ /e− : Press to Increase or
decrease volume.
w/x: Press to change radio
stations or select tracks on a CD.
1 to 6: Press to play stations that
are programmed on the radio preset
pushbuttons.
For more information, see Steering
Wheel Controls on page 5‑3.
Cruise Control
The cruise controls are located at
the end of the multifunction lever.
9: Turns the system off.
R:Turns the system on.
S:Makes the vehicle accelerate
or resume a previously set speed.
T: Press the button at the end of
the lever to set the speed.
See Cruise Control on page 9‑45.
Navigation System
If the vehicle has a navigation
system, there is a separate
navigation system manual that
includes information on the radio,
audio players, and navigation
system.
The navigation system provides
detailed maps of most major
freeways and roads. After a
destination has been set, the
system provides turn-by-turn
instructions for reaching the
destination. In addition, the system
can help locate a variety of points of
interest (POIs), such as banks,
airports, restaurants, and more.
See the navigation system manual
for more information.
Page 62 of 434
Black plate (30,1)Chevrolet Corvette Owner Manual - 2012
2-30 Keys, Doors, and Windows
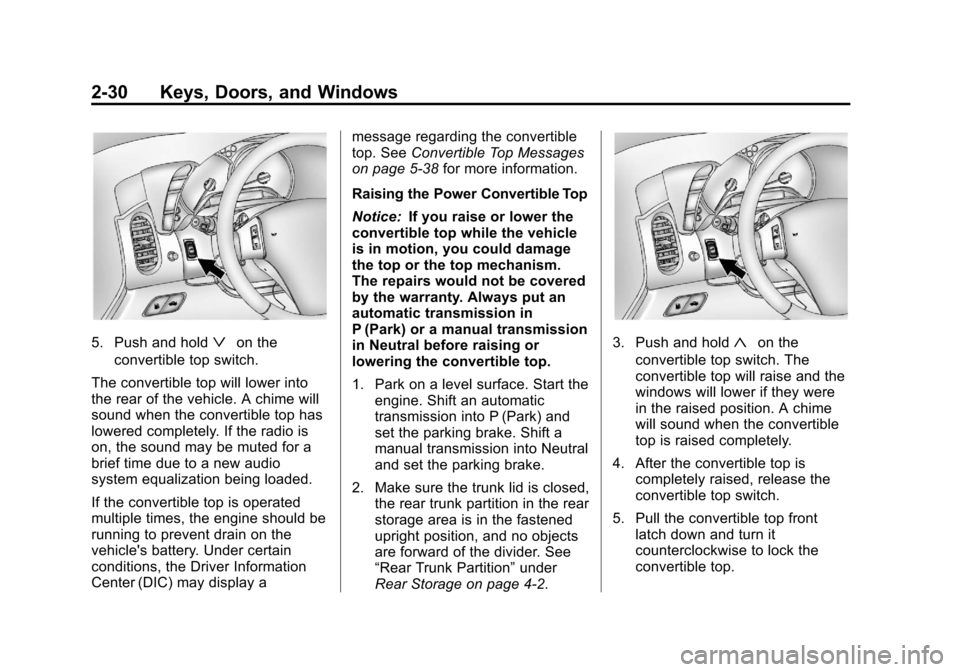
5. Push and holdªon the
convertible top switch.
The convertible top will lower into
the rear of the vehicle. A chime will
sound when the convertible top has
lowered completely. If the radio is
on, the sound may be muted for a
brief time due to a new audio
system equalization being loaded.
If the convertible top is operated
multiple times, the engine should be
running to prevent drain on the
vehicle's battery. Under certain
conditions, the Driver Information
Center (DIC) may display a message regarding the convertible
top. See
Convertible Top Messages
on page 5‑38 for more information.
Raising the Power Convertible Top
Notice: If you raise or lower the
convertible top while the vehicle
is in motion, you could damage
the top or the top mechanism.
The repairs would not be covered
by the warranty. Always put an
automatic transmission in
P (Park) or a manual transmission
in Neutral before raising or
lowering the convertible top.
1. Park on a level surface. Start the engine. Shift an automatic
transmission into P (Park) and
set the parking brake. Shift a
manual transmission into Neutral
and set the parking brake.
2. Make sure the trunk lid is closed, the rear trunk partition in the rear
storage area is in the fastened
upright position, and no objects
are forward of the divider. See
“Rear Trunk Partition” under
Rear Storage on page 4‑2.3. Push and hold«on the
convertible top switch. The
convertible top will raise and the
windows will lower if they were
in the raised position. A chime
will sound when the convertible
top is raised completely.
4. After the convertible top is completely raised, release the
convertible top switch.
5. Pull the convertible top front latch down and turn it
counterclockwise to lock the
convertible top.
Page 113 of 434
Black plate (3,1)Chevrolet Corvette Owner Manual - 2012
Instruments and Controls 5-3
The telescopic steering column
position can be stored with your
memory settings. See“Memory
Seat, Mirrors, and Steering Wheel”
under Power Seat Adjustment on
page 3‑3 for more information.
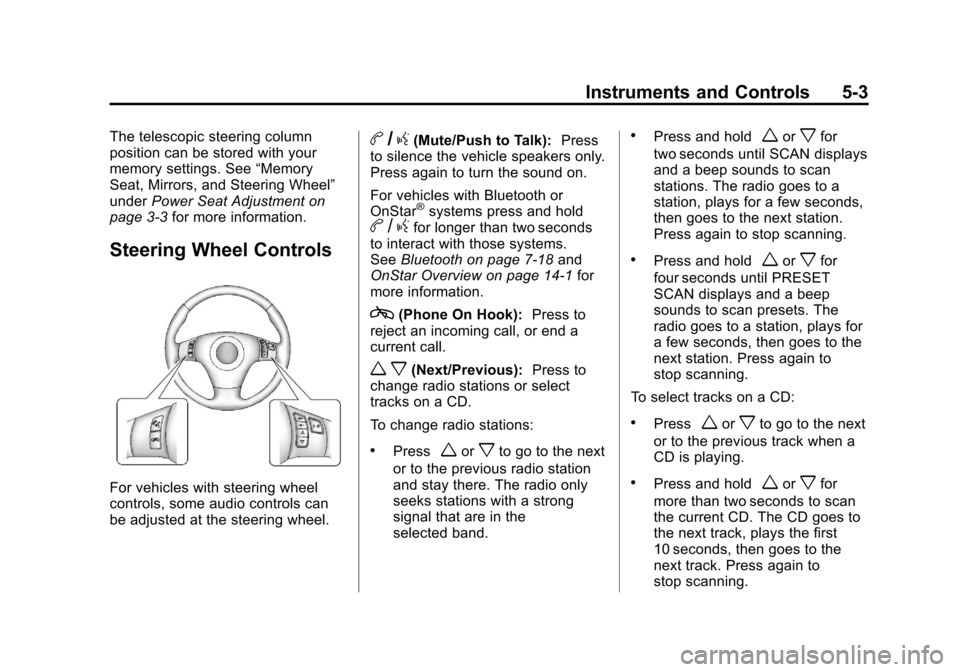
Steering Wheel Controls
For vehicles with steering wheel
controls, some audio controls can
be adjusted at the steering wheel.
b/g(Mute/Push to Talk): Press
to silence the vehicle speakers only.
Press again to turn the sound on.
For vehicles with Bluetooth or
OnStar
®systems press and holdb /gfor longer than two seconds
to interact with those systems.
See Bluetooth on page 7‑18 and
OnStar Overview on page 14‑1 for
more information.
c(Phone On Hook): Press to
reject an incoming call, or end a
current call.
w x(Next/Previous): Press to
change radio stations or select
tracks on a CD.
To change radio stations:
.Pressworxto go to the next
or to the previous radio station
and stay there. The radio only
seeks stations with a strong
signal that are in the
selected band.
.Press and holdworxfor
two seconds until SCAN displays
and a beep sounds to scan
stations. The radio goes to a
station, plays for a few seconds,
then goes to the next station.
Press again to stop scanning.
.Press and holdworxfor
four seconds until PRESET
SCAN displays and a beep
sounds to scan presets. The
radio goes to a station, plays for
a few seconds, then goes to the
next station. Press again to
stop scanning.
To select tracks on a CD:
.Pressworxto go to the next
or to the previous track when a
CD is playing.
.Press and holdworxfor
more than two seconds to scan
the current CD. The CD goes to
the next track, plays the first
10 seconds, then goes to the
next track. Press again to
stop scanning.
Page 114 of 434
Black plate (4,1)Chevrolet Corvette Owner Manual - 2012
5-4 Instruments and Controls
.Press and holdworxfor
more than four seconds to scan
all of the CDs loaded. The CD
goes to the next CD, plays the
first 10 seconds of each track,
then goes to the next CD.
Press again to stop scanning.
+
e−e(Volume): Press to
increase or to decrease the radio
volume.
1 to 6 (Preset Pushbuttons):
Press to play stations that are
programmed on the radio preset
pushbuttons.
Horn
Press near or on the horn symbols
on the steering wheel pad to sound
the horn.
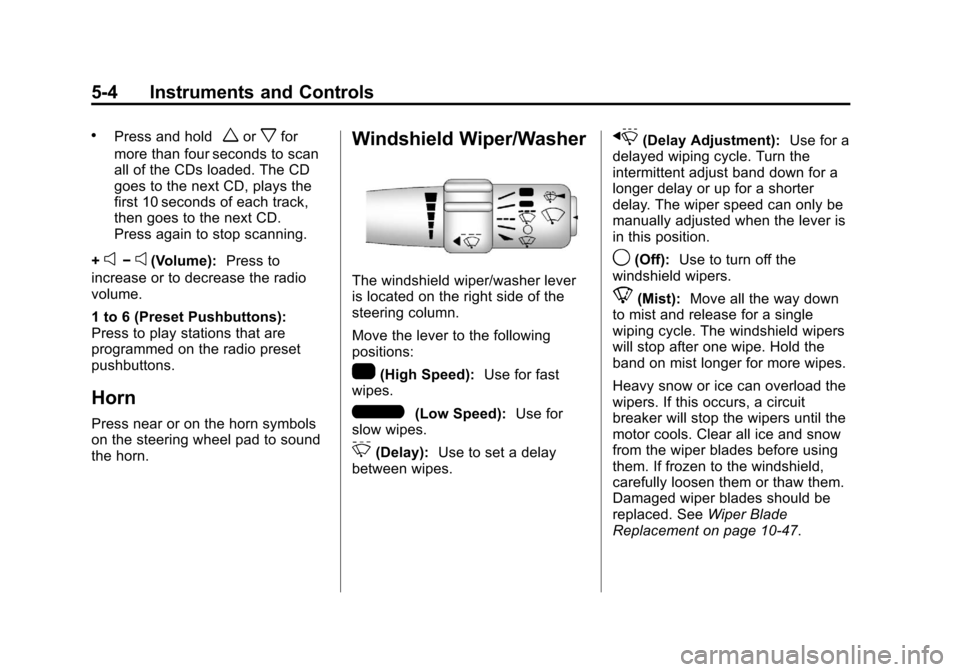
Windshield Wiper/Washer
The windshield wiper/washer lever
is located on the right side of the
steering column.
Move the lever to the following
positions:
1(High Speed): Use for fast
wipes.
6(Low Speed): Use for
slow wipes.
3(Delay): Use to set a delay
between wipes.
x(Delay Adjustment): Use for a
delayed wiping cycle. Turn the
intermittent adjust band down for a
longer delay or up for a shorter
delay. The wiper speed can only be
manually adjusted when the lever is
in this position.
9(Off): Use to turn off the
windshield wipers.
8(Mist): Move all the way down
to mist and release for a single
wiping cycle. The windshield wipers
will stop after one wipe. Hold the
band on mist longer for more wipes.
Heavy snow or ice can overload the
wipers. If this occurs, a circuit
breaker will stop the wipers until the
motor cools. Clear all ice and snow
from the wiper blades before using
them. If frozen to the windshield,
carefully loosen them or thaw them.
Damaged wiper blades should be
replaced. See Wiper Blade
Replacement on page 10‑47.
Page 143 of 434

Black plate (33,1)Chevrolet Corvette Owner Manual - 2012
Instruments and Controls 5-33
The information may be displayed in
English or metric units and appears
as an image focused out toward the
front of the vehicle. The HUD
consists of the following information:
.Speedometer
.Turn Signal Indicators
.High-Beam Indicator Symbol
.Tachometer
.Manual Paddle Shift Gear
Indicator (If Equipped)
These displays on the HUD are
for use when using the manual
paddle shift controls to shift the
transmission. See“Manual
Paddle Shift” inAutomatic
Transmission on page 9‑27.
.Shift Light
This light is used for
performance driving to indicate
that the vehicle's best
performance level has been
reached to shift the transmission
into the next higher gear. An arrow pointing up will light
up on the display just prior to
reaching the engine fuel cut-off
mode. This cut-off is about 6,500
rpm for the LS3 engine, 6,600
rpm for the LS9 & ZR1 engines,
and 7,000 rpm for the
LS7 engine.
.Check Gauges Warning
.Engine Coolant Temperature
Gauge
.Transmission Fluid Temperature
Gauge, (Automatic Transmission
Vehicles Only)
.Engine Oil Temperature Gauge
.Engine Oil Pressure Gauge
.G-Force Gauge
.Boost Gauge (If Equipped)
.Audio Functions, Street
Mode Only
.Navigation, Only with Navigation
Radio, Turn-by-Turn Guidance.
Street Mode Only
There are three HUD modes that
can be viewed in the HUD display.
Press the MODE button to scroll
through these modes in the
following order:
English
Metric
Street Mode supports audio and
navigation functions with your
choice of tachometer settings.
Page 147 of 434

Black plate (37,1)Chevrolet Corvette Owner Manual - 2012
Instruments and Controls 5-37
Battery Voltage and
Charging Messages
BATTERY SAVER ACTIVE
This message displays when the
vehicle has detected that the battery
voltage is dropping beyond a
reasonable point. The battery saver
system starts reducing certain
features of the vehicle that you may
be able to notice. At the point that
features are disabled, this message
is displayed. It means that the
vehicle is trying to save the charge
in the battery. Turn off unnecessary
accessories to allow the battery to
recharge.
BATTERY VOLTAGE HIGH
SeeVoltmeter Gauge on page 5‑17.
BATTERY VOLTAGE LOW
SeeVoltmeter Gauge on page 5‑17.
SERVICE CHARGING SYSTEM
If this message displays while you
are driving, there may be a problem
with the electrical charging system. It could mean that there is a loose
or broken drive belt or that there is
another electrical problem. Have the
vehicle checked right away by your
dealer. Driving while this message is
on could drain the battery.
If you must drive a short distance
with the message on, be certain to
turn off the vehicle's accessories,
such as the radio and air
conditioner.
Multiple chimes sound when this
message is displayed.
To acknowledge the message, press
the RESET button. The message
reappears every 10 minutes until
this condition changes.
Brake System Messages
ABS (Antilock Brake System)
ACTIVE
This message displays when the
Antilock Brake System (ABS) is
adjusting brake pressure to help
avoid a braking skid.
Slippery road conditions may exist if
this message is displayed, so adjust
your driving accordingly. The
message stays on for a few
seconds after the system stops
adjusting brake pressure. See
Antilock Brake System (ABS) on
page 9‑35
for more information.
CHANGE BRAKE PADS
On vehicles with electronic brake
pad wear sensors, this message will
be displayed when the pads are
worn. See your dealer for service.
CHECK BRAKE FLUID
This message displays, a sound will
be heard, and the brake system
warning light on the instrument
panel cluster turns on if the ignition
is on to inform the driver that the
brake fluid level is low. See Brake
System Warning Light on
page 5‑22. Have the brake system
serviced by your dealer as soon as
possible. See Brakes on
page 10‑38.