2012 CHEVROLET AVALANCHE key
[x] Cancel search: keyPage 369 of 508

Black plate (25,1)Chevrolet Avalanche Owner Manual - 2012
Vehicle Care 10-25
Notice:After driving in the
overheated engine protection
operating mode, to avoid engine
damage, allow the engine to cool
before attempting any repair. The
engine oil will be severely
degraded. Repair the cause of
coolant loss, change the oil and
reset the oil life system. See
Engine Oil on page 10‑8.
Engine Fan
The vehicle has electric cooling
fans. The fans spinning at low
speed during most everyday driving
might be heard. The fans can turn
off if no cooling is required. Under
heavy vehicle loading, trailer towing,
and/or high outside temperatures,
or if operating the air conditioning
system, the fans can change to high
speed and an increase in fan noise
might be heard. This is normal and
indicates that the cooling system is
functioning properly. The fans
change to low speed when
additional cooling is no longer
required.
Power Steering Fluid
See Engine Compartment Overview
on page 10‑6 for reservoir location.
When to Check Power Steering
Fluid
It is not necessary to regularly
check power steering fluid unless
there is a leak suspected in the
system or an unusual noise is
heard. A fluid loss in this system
could indicate a problem. Have the
system inspected and repaired.
How to Check Power Steering
Fluid
Notice:Extremely small amounts
of contamination can cause
steering system damage and
cause it to not work properly. Do
not allow contaminants to contact
the fluid side of the reservoir cap/
dipstick or from entering the
reservoir.
To check the power steering fluid:
1. Turn the key off and let the engine compartment cool down.
2. Wipe the cap and the top of the reservoir clean.
3. Unscrew the cap and wipe the dipstick with a clean rag.
4. Replace the cap and completely tighten it.
5. Remove the cap again and look at the fluid level on the dipstick.
The level should be at the FULL
COLD mark. If necessary, add only
enough fluid to bring the level up to
the mark.
Page 378 of 508

Black plate (34,1)Chevrolet Avalanche Owner Manual - 2012
10-34 Vehicle Care
Ignition Transmission
Lock Check
While parked, and with the parking
brake set, try to turn the ignition to
LOCK/OFF in each shift lever
position.
.The ignition should turn to
LOCK/OFF only when the shift
lever is in P (Park).
.The ignition key should come
out only in LOCK/OFF.
Contact your dealer if service is
required.
Park Brake and P (Park)
Mechanism Check
{WARNING
When you are doing this check,
the vehicle could begin to move.
You or others could be injured
and property could be damaged.
Make sure there is room in front
of the vehicle in case it begins to
roll. Be ready to apply the regular
brake at once should the vehicle
begin to move. Park on a fairly steep hill, with the
vehicle facing downhill. Keeping
your foot on the regular brake, set
the parking brake.
.To check the parking brake's
holding ability: With the engine
running and the transmission in
N (Neutral), slowly remove foot
pressure from the regular brake
pedal. Do this until the vehicle is
held by the parking brake only.
.To check the P (Park)
mechanism's holding ability:
With the engine running, shift to
P (Park). Then release the
parking brake followed by the
regular brake.
Contact your dealer if service is
required.
Page 388 of 508

Black plate (44,1)Chevrolet Avalanche Owner Manual - 2012
10-44 Vehicle Care
FusesUsage
28 Fog Lamps
29 Horn
30 Passenger Side
High-Beam
Headlamp
31 Daytime Running
Lamps (DRL)
(If Equipped)
32 Driver Side
High-Beam
Headlamp
33 Daytime Running
Lamps 2
(If Equipped)
34 Sunroof
35 Key Ignition
System,
Theft‐Deterrent
System Fuses
Usage
36 Windshield Wiper
37 SEO B2 Upfitter
Usage (Battery)
38 Electric Adjustable
Pedals
39 Climate Controls
(Battery)
40 Airbag System
(Ignition)
41 Amplifier
42 Audio System
43 Miscellaneous
(Ignition), Cruise
Control
44 Liftgate Release
45 Airbag System
(Battery) Fuses
Usage
46 Instrument Panel
Cluster
47 Not Used
48 Auxiliary Climate
Control (Ignition)
49 Center
High-Mounted
Stoplamp (CHMSL)
50 Rear Defogger
51 Heated Mirrors
52 SEO B1 Upfitter
Usage (Battery)
53 Auxiliary Power
Outlet
54 Automatic Level
Control
Compressor Relay
Page 391 of 508

Black plate (47,1)Chevrolet Avalanche Owner Manual - 2012
Vehicle Care 10-47
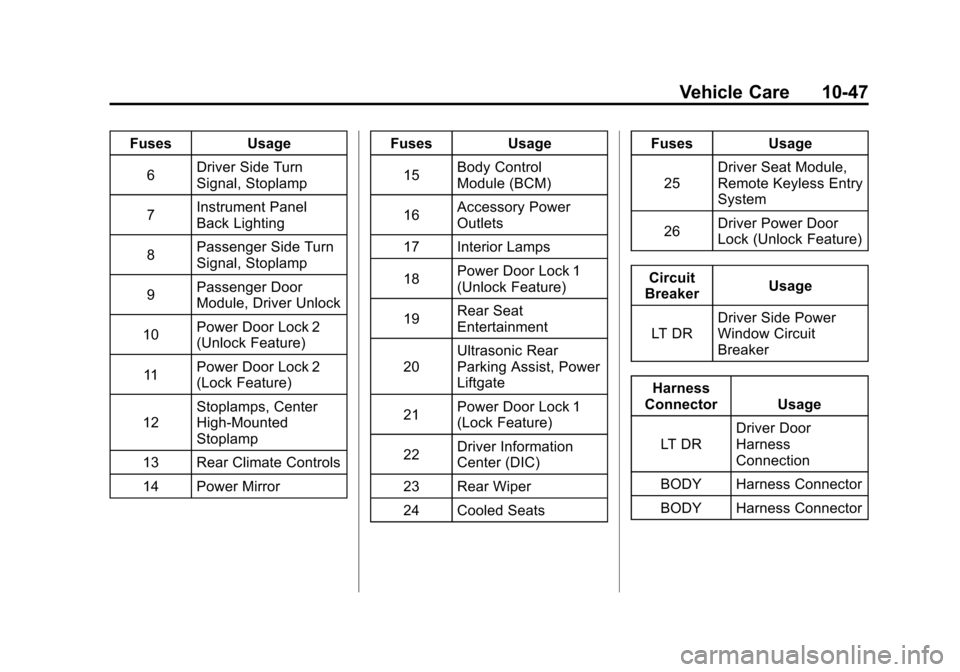
FusesUsage
6 Driver Side Turn
Signal, Stoplamp
7 Instrument Panel
Back Lighting
8 Passenger Side Turn
Signal, Stoplamp
9 Passenger Door
Module, Driver Unlock
10 Power Door Lock 2
(Unlock Feature)
11 Power Door Lock 2
(Lock Feature)
12 Stoplamps, Center
High‐Mounted
Stoplamp
13 Rear Climate Controls
14 Power Mirror Fuses
Usage
15 Body Control
Module (BCM)
16 Accessory Power
Outlets
17 Interior Lamps
18 Power Door Lock 1
(Unlock Feature)
19 Rear Seat
Entertainment
20 Ultrasonic Rear
Parking Assist, Power
Liftgate
21 Power Door Lock 1
(Lock Feature)
22 Driver Information
Center (DIC)
23 Rear Wiper
24 Cooled Seats Fuses
Usage
25 Driver Seat Module,
Remote Keyless Entry
System
26 Driver Power Door
Lock (Unlock Feature)
Circuit
Breaker Usage
LT DR Driver Side Power
Window Circuit
Breaker
Harness
Connector Usage
LT DR Driver Door
Harness
Connection
BODY Harness Connector
BODY Harness Connector
Page 405 of 508

Black plate (61,1)Chevrolet Avalanche Owner Manual - 2012
Vehicle Care 10-61
.Operating electronic devices or
being near facilities using radio
wave frequencies similar to the
TPMS could cause the TPMS
sensors to malfunction.
If the TPMS is not functioning
properly, it cannot detect or signal a
low tire condition. See your dealer
for service if the TPMS malfunction
light and DIC message come on
and stay on.
TPMS Sensor Matching
Process
Each TPMS sensor has a unique
identification code. The identification
code needs to be matched to a new
tire/wheel position after rotating the
vehicle’s tires or replacing one or
more of the TPMS sensors. Also,
the TPMS sensor matching process
should be performed after replacing
a spare tire with a road tire
containing the TPMS sensor. The
malfunction light and the DIC
message should go off at the next
ignition cycle. The sensors are
matched to the tire/wheel positions, using a TPMS relearn tool, in the
following order: driver side front tire,
passenger side front tire, passenger
side rear tire, and driver side rear.
See your dealer for service or to
purchase a relearn tool.
There are two minutes to match
the first tire/wheel position, and
five minutes overall to match all
four tire/wheel positions. If it takes
longer, the matching process stops
and must be restarted.
The TPMS sensor matching
process is:
1. Set the parking brake.
2. Turn the ignition to ON/RUN with
the engine off.
3. Press the Remote Keyless Entry (RKE) transmitter's
Qand"
buttons at the same time for
approximately five seconds. The
horn sounds twice to signal the
receiver is in relearn mode and
the TIRE LEARNING ACTIVE
message displays on the DIC
screen. 4. Start with the driver side
front tire.
5. Place the relearn tool against the tire sidewall, near the valve
stem. Then press the button to
activate the TPMS sensor.
A horn chirp confirms that the
sensor identification code has
been matched to this tire and
wheel position.
6. Proceed to the passenger side front tire, and repeat the
procedure in Step 5.
7. Proceed to the passenger side rear tire, and repeat the
procedure in Step 5.
8. Proceed to the driver side rear tire, and repeat the procedure in
Step 5. The horn sounds two
times to indicate the sensor
identification code has been
matched to the driver side rear
tire, and the TPMS sensor
matching process is no longer
active. The TIRE LEARNING
ACTIVE message on the DIC
display screen goes off.
Page 417 of 508

Black plate (73,1)Chevrolet Avalanche Owner Manual - 2012
Vehicle Care 10-73
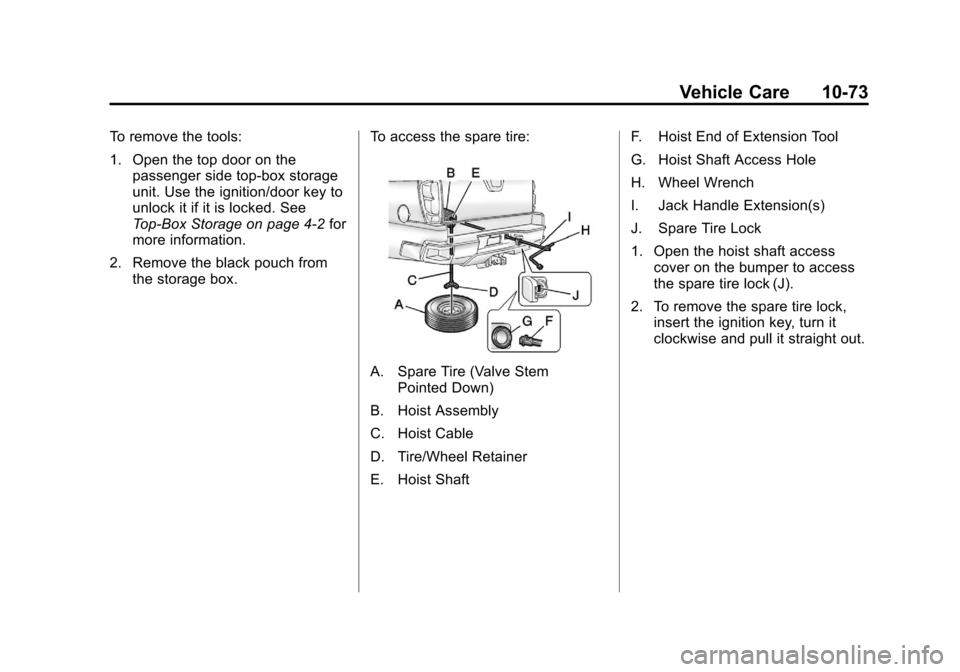
To remove the tools:
1. Open the top door on thepassenger side top-box storage
unit. Use the ignition/door key to
unlock it if it is locked. See
Top-Box Storage on page 4‑2 for
more information.
2. Remove the black pouch from the storage box. To access the spare tire:
A. Spare Tire (Valve Stem
Pointed Down)
B. Hoist Assembly
C. Hoist Cable
D. Tire/Wheel Retainer
E. Hoist Shaft F. Hoist End of Extension Tool
G. Hoist Shaft Access Hole
H. Wheel Wrench
I. Jack Handle Extension(s)
J. Spare Tire Lock
1. Open the hoist shaft access
cover on the bumper to access
the spare tire lock (J).
2. To remove the spare tire lock, insert the ignition key, turn it
clockwise and pull it straight out.
Page 437 of 508

Black plate (93,1)Chevrolet Avalanche Owner Manual - 2012
Vehicle Care 10-93
{WARNING
Shifting a four-wheel-drive
vehicle's transfer case into
N (Neutral) can cause the vehicle
to roll even if the transmission is
in P (Park). The driver or others
could be injured. Make sure the
parking brake is firmly set before
the transfer case is shifted to
N (Neutral).
4. Shift the transfer case to N (Neutral). See “Shifting into
Neutral” under“Four-Wheel
Drive” for the proper procedure
to select the Neutral position for
the vehicle.
5. Release the parking brake only after the vehicle being towed is
firmly attached to the towing
vehicle.
6. Turn the ignition to LOCK/OFF and remove the key —the
steering wheel will still turn. After towing, see
“Shifting Out of
Neutral” under“Four-Wheel Drive”
for the proper procedure to take the
vehicle out of the Neutral position.
Dolly Towing
Front Towing (Front Wheels Off
the Ground) –Two-Wheel-Drive
Vehicles and Four-Wheel Drive
Vehicles with a Single Speed
Automatic Transfer Case
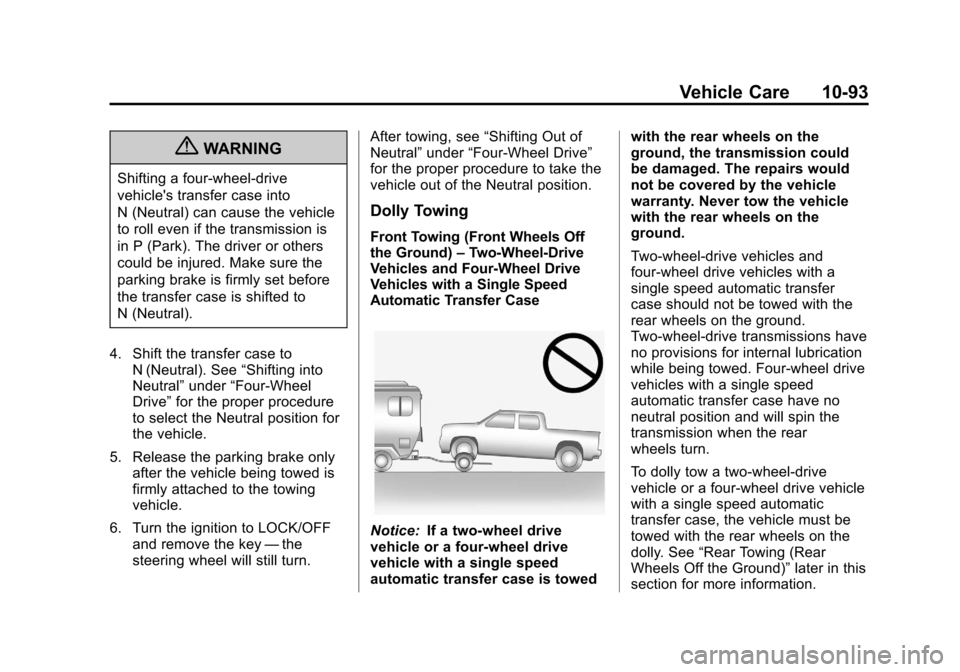
Notice: If a two-wheel drive
vehicle or a four-wheel drive
vehicle with a single speed
automatic transfer case is towed with the rear wheels on the
ground, the transmission could
be damaged. The repairs would
not be covered by the vehicle
warranty. Never tow the vehicle
with the rear wheels on the
ground.
Two-wheel-drive vehicles and
four-wheel drive vehicles with a
single speed automatic transfer
case should not be towed with the
rear wheels on the ground.
Two-wheel-drive transmissions have
no provisions for internal lubrication
while being towed. Four-wheel drive
vehicles with a single speed
automatic transfer case have no
neutral position and will spin the
transmission when the rear
wheels turn.
To dolly tow a two‐wheel‐drive
vehicle or a four-wheel drive vehicle
with a single speed automatic
transfer case, the vehicle must be
towed with the rear wheels on the
dolly. See
“Rear Towing (Rear
Wheels Off the Ground)” later in this
section for more information.
Page 443 of 508

Black plate (99,1)Chevrolet Avalanche Owner Manual - 2012
Vehicle Care 10-99
Body Component Lubrication
Lubricate all key lock cylinders,
hood hinges, liftgate hinges, and
steel fuel door hinge unless the
components are plastic. Applying
silicone grease on weatherstrips
with a clean cloth will make them
last longer, seal better, and not stick
or squeak.
Underbody Maintenance
Use plain water to flush dirt and
debris from the vehicle's underbody.
Your dealer or an underbody car
washing system can do this. If not
removed, rust and corrosion can
develop.
Sheet Metal Damage
If the vehicle is damaged and
requires sheet metal repair or
replacement, make sure the body
repair shop applies anti-corrosion
material to parts repaired or
replaced to restore corrosion
protection.Original manufacturer replacement
parts will provide the corrosion
protection while maintaining the
vehicle warranty.
Finish Damage
Quickly repair minor chips and
scratches with touch-up materials
available from your dealer to avoid
corrosion. Larger areas of finish
damage can be corrected in your
dealer's body and paint shop.
Chemical Paint Spotting
Airborne pollutants can fall upon
and attack painted vehicle surfaces
causing blotchy, ring-shaped
discolorations, and small, irregular
dark spots etched into the paint
surface.
Interior Care
To prevent dirt particle abrasions,
regularly clean the vehicle's interior.
Immediately remove any soils. Note
that newspapers or dark garments
that can transfer color to home
furnishings can also permanently
transfer color to the vehicle's
interior.
Use a soft bristle brush to remove
dust from knobs and crevices on the
instrument cluster. Using a mild
soap solution, immediately remove
hand lotions, sunscreen, and insect
repellant from all interior surfaces or
permanent damage may result.
Your dealer may have products for
cleaning the interior. Use cleaners
specifically designed for the
surfaces being cleaned to prevent
permanent damage. To prevent
overspray, apply all cleaners directly
to the cleaning cloth. Cleaners
should be removed quickly. Never
allow cleaners to remain on the
surface being cleaned for extended
periods of time.