Page 424 of 512
Black plate (86,1)Buick LaCrosse Owner Manual - 2012
10-86 Vehicle Care
11. Press the on/off button (B) toturn the tire sealant and
compressor kit off.
Be careful while handling the
tire sealant and compressor kit
as it could be warm after
usage.
12. Unplug the power plug (H) from the accessory power outlet in
the vehicle.
13. Disconnect the air only hose (G) from the tire valve
stem by turning it
counterclockwise, and replace
the tire valve stem cap.
14. Replace the air only hose (G) and the power plug (H) and
cord back in their original
locations.
15. Place the equipment in the original storage location in the
vehicle.
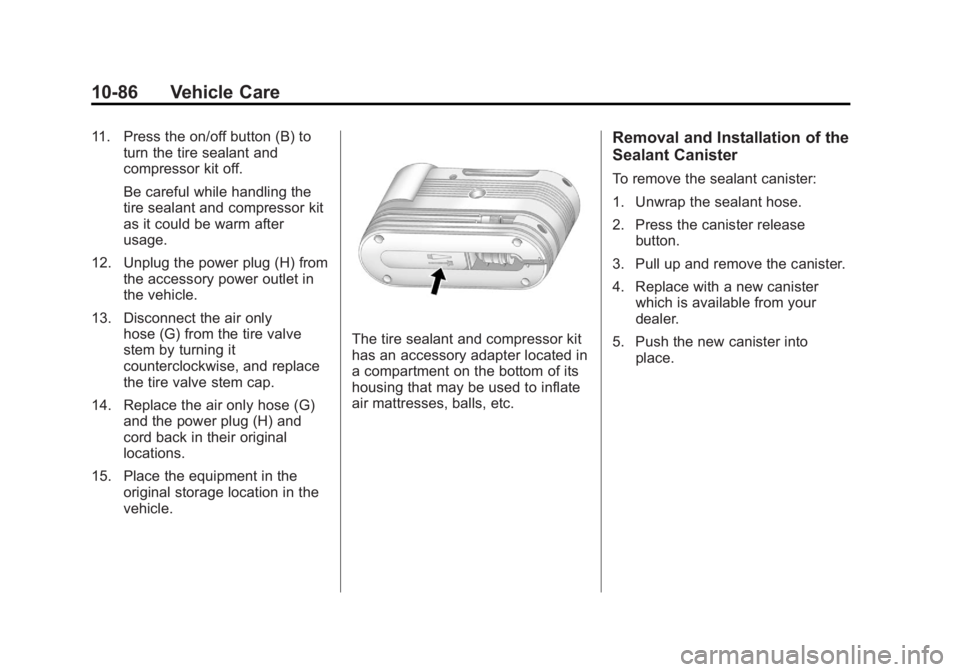
The tire sealant and compressor kit
has an accessory adapter located in
a compartment on the bottom of its
housing that may be used to inflate
air mattresses, balls, etc.
Removal and Installation of the
Sealant Canister
To remove the sealant canister:
1. Unwrap the sealant hose.
2. Press the canister releasebutton.
3. Pull up and remove the canister.
4. Replace with a new canister which is available from your
dealer.
5. Push the new canister into place.
Page 425 of 512
Black plate (87,1)Buick LaCrosse Owner Manual - 2012
Vehicle Care 10-87
Storing the Tire Sealant
and Compressor Kit
To access the tire sealant and
compressor kit:
1. Open the trunk. SeeTrunk on
page 2‑13.
2. Lift the cover.
With Pressure Relief Button
With Pressure Deflation Button
3. Turn the wing nut counterclockwise to remove it.
4. Remove the tire sealant and compressor kit.
To store the tire sealant and
compressor kit, reverse the steps.
Tire Changing
Removing the Spare Tire and
Tools
The equipment you need is located
in the trunk.
1. Open the trunk.
2. Remove the spare tire cover.
3. Turn the retainer nut counterclockwise and remove
the spare tire.
4. Place the spare tire next to the tire being changed.
Page 426 of 512
Black plate (88,1)Buick LaCrosse Owner Manual - 2012
10-88 Vehicle Care
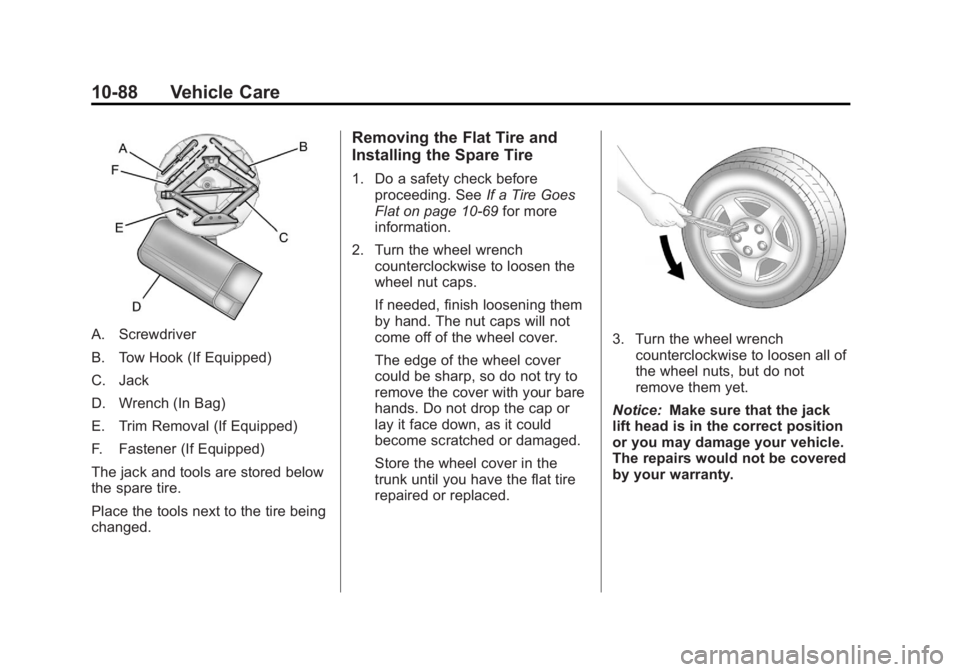
A. Screwdriver
B. Tow Hook (If Equipped)
C. Jack
D. Wrench (In Bag)
E. Trim Removal (If Equipped)
F. Fastener (If Equipped)
The jack and tools are stored below
the spare tire.
Place the tools next to the tire being
changed.
Removing the Flat Tire and
Installing the Spare Tire
1. Do a safety check beforeproceeding. See If a Tire Goes
Flat on page 10‑69 for more
information.
2. Turn the wheel wrench counterclockwise to loosen the
wheel nut caps.
If needed, finish loosening them
by hand. The nut caps will not
come off of the wheel cover.
The edge of the wheel cover
could be sharp, so do not try to
remove the cover with your bare
hands. Do not drop the cap or
lay it face down, as it could
become scratched or damaged.
Store the wheel cover in the
trunk until you have the flat tire
repaired or replaced.
3. Turn the wheel wrenchcounterclockwise to loosen all of
the wheel nuts, but do not
remove them yet.
Notice: Make sure that the jack
lift head is in the correct position
or you may damage your vehicle.
The repairs would not be covered
by your warranty.
Page 427 of 512
Black plate (89,1)Buick LaCrosse Owner Manual - 2012
Vehicle Care 10-89
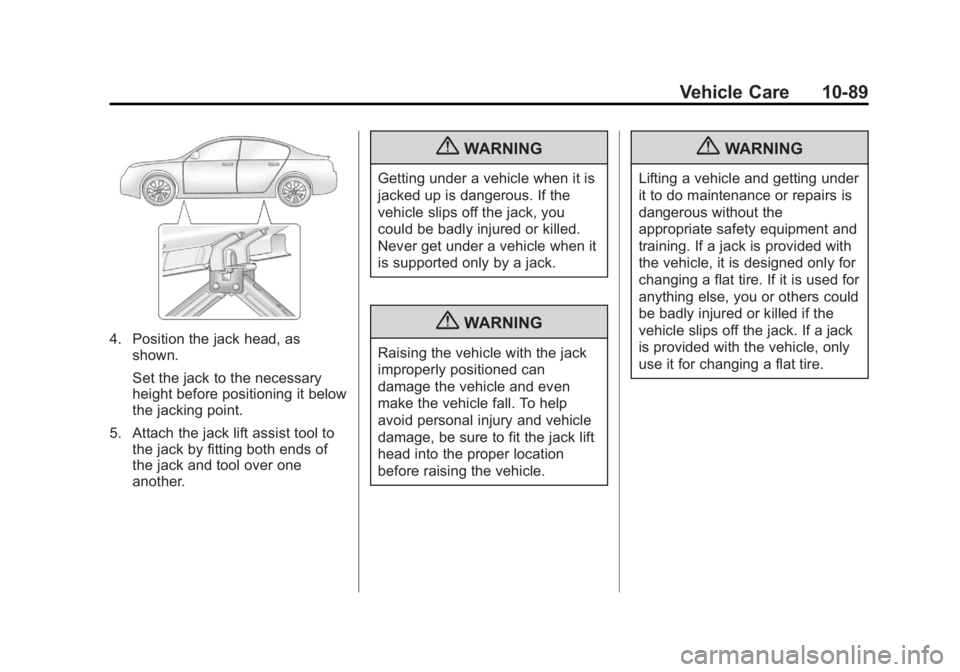
4. Position the jack head, asshown.
Set the jack to the necessary
height before positioning it below
the jacking point.
5. Attach the jack lift assist tool to the jack by fitting both ends of
the jack and tool over one
another.
{WARNING
Getting under a vehicle when it is
jacked up is dangerous. If the
vehicle slips off the jack, you
could be badly injured or killed.
Never get under a vehicle when it
is supported only by a jack.
{WARNING
Raising the vehicle with the jack
improperly positioned can
damage the vehicle and even
make the vehicle fall. To help
avoid personal injury and vehicle
damage, be sure to fit the jack lift
head into the proper location
before raising the vehicle.
{WARNING
Lifting a vehicle and getting under
it to do maintenance or repairs is
dangerous without the
appropriate safety equipment and
training. If a jack is provided with
the vehicle, it is designed only for
changing a flat tire. If it is used for
anything else, you or others could
be badly injured or killed if the
vehicle slips off the jack. If a jack
is provided with the vehicle, only
use it for changing a flat tire.
Page 428 of 512
Black plate (90,1)Buick LaCrosse Owner Manual - 2012
10-90 Vehicle Care
6. Turn the jack handle clockwiseto raise the vehicle far enough
off the ground for the compact
spare to fit under the vehicle.7. Remove all of the wheel nuts.
8. Remove the flat tire.
{WARNING
Rust or dirt on a wheel, or on the
parts to which it is fastened, can
make wheel nuts become loose
after time. The wheel could come
off and cause an accident. When
changing a wheel, remove any
rust or dirt from places where the
wheel attaches to the vehicle. In
(Continued)
WARNING (Continued)
an emergency, a cloth or a paper
towel can be used; however, use
a scraper or wire brush later to
remove all rust or dirt.
9. Remove any rust or dirt from thewheel bolts, mounting surfaces,
and spare wheel.
10. Install the compact spare tire.
Page 430 of 512
Black plate (92,1)Buick LaCrosse Owner Manual - 2012
10-92 Vehicle Care
Storing a Flat or Spare Tire
and Tools
{WARNING
Storing a jack, a tire, or other
equipment in the passenger
compartment of the vehicle could
cause injury. In a sudden stop or
collision, loose equipment could
strike someone. Store all these in
the proper place.
Store the spare or flat tire in one of
the ways shown below. Storage
instructions will vary depending on
the bolt that came with the vehicle
and how it attaches to the vehicle.
This vehicle will have a slide in
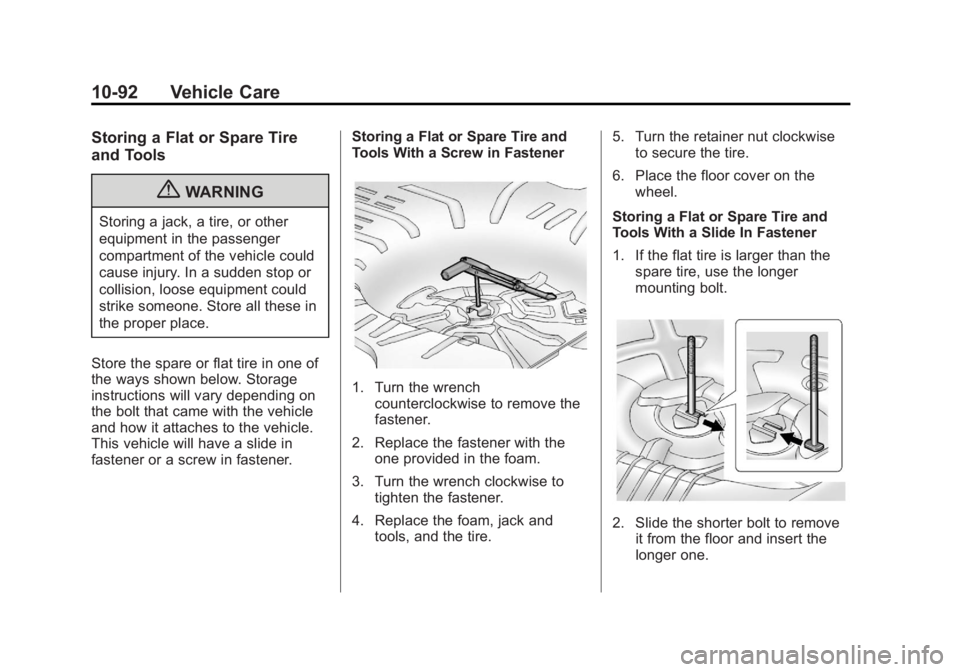
fastener or a screw in fastener. Storing a Flat or Spare Tire and
Tools With a Screw in Fastener
1. Turn the wrench
counterclockwise to remove the
fastener.
2. Replace the fastener with the one provided in the foam.
3. Turn the wrench clockwise to tighten the fastener.
4. Replace the foam, jack and tools, and the tire. 5. Turn the retainer nut clockwise
to secure the tire.
6. Place the floor cover on the wheel.
Storing a Flat or Spare Tire and
Tools With a Slide In Fastener
1. If the flat tire is larger than the spare tire, use the longer
mounting bolt.
2. Slide the shorter bolt to removeit from the floor and insert the
longer one.
Page 431 of 512
Black plate (93,1)Buick LaCrosse Owner Manual - 2012
Vehicle Care 10-93
3. Replace the jack and tools intheir original storage location.
4. Place the tire, lying flat, facing up in the spare tire well.
5. Turn the retainer nut clockwise to secure the tire.
6. Place the floor cover on the wheel.
The compact spare is for temporary
use only. Replace the compact
spare tire with a full-size tire as
soon as you can.Compact Spare Tire
{WARNING
Driving with more than one
compact spare tire at a time could
result in loss of braking and
handling. This could lead to a
crash and you or others could be
injured. Use only one compact
spare tire at a time.
If this vehicle has a compact spare
tire, it was fully inflated when the
vehicle was new; however, it can
lose air after a time. Check the
inflation pressure regularly. It should
be 420 kPa (60 psi).
Stop as soon as possible and check
that the spare tire is correctly
inflated after installing the spare on
the vehicle. The compact spare is
designed to perform well at speeds
up to 105 km/h (65 mph) for
distances up to 5 000 km (3,000 mi),
so a trip can be completed and the
full-size tire repaired or replaced when possible. However, the
compact spare tire will last longer
and be in good shape if it is
replaced as soon as possible.
Notice:
When the compact spare
is installed, do not take the
vehicle through an automatic car
wash with guide rails. The
compact spare can get caught on
the rails which can damage the
tire, wheel, and other parts of the
vehicle.
Do not use the compact spare on
other vehicles.
Do not mix the compact spare tire or
wheel with other wheels or tires.
They will not fit. Keep the spare tire
and its wheel together.
Notice: Tire chains will not fit the
compact spare. Using them can
damage the vehicle and can
damage the chains too. Do not
use tire chains on the compact
spare.
Page 449 of 512

Black plate (3,1)Buick LaCrosse Owner Manual - 2012
Service and Maintenance 11-3
Maintenance
Schedule
Owner Checks and Services
At Each Fuel Stop
.Check the engine oil level. See
Engine Oil on page 10‑9.
Once a Month
.Check the tire inflation
pressures. See Tire Pressure on
page 10‑54.
.Inspect the tires for wear. See
Tire Inspection on page 10‑60.
.Check the windshield washer
fluid level. See Washer Fluid on
page 10‑22.
Engine Oil Change
When the CHANGE ENGINE OIL
SOON message displays, have the
engine oil and filter changed within
the next 1 000 km/600 mi. If driven
under the best conditions, the
engine oil life system might not
indicate the need for vehicle service
for more than a year. The engine oil
and filter must be changed at least
once a year and the oil life system
must be reset. Your trained dealer
technician can perform this work.
If the engine oil life system is reset
accidentally, service the vehicle
within 5 000 km/3,000 mi since the
last service. Reset the oil life
system when the oil is changed.
See Engine Oil Life System on
page 10‑12.
Tire Rotation and Required
Services Every 12 000 km/
7,500 mi
Rotate the tires, if recommended for
the vehicle, and perform the
following services. See Tire
Rotation on page 10‑61.
.Check engine oil level and oil
life percentage. If needed,
change engine oil and filter, and
reset oil life system. See Engine
Oil on page 10‑9 andEngine Oil
Life System on page 10‑12.
.Check engine coolant level. See
Engine Coolant on page 10‑16.
.Check windshield washer fluid
level. See Washer Fluid on
page 10‑22.
.Visually inspect windshield wiper
blades for wear, cracking,
or contamination. See Exterior
Care on page 10‑102. Replace
worn or damaged wiper blades.
See Wiper Blade Replacement
on page 10‑29.