2012 BMW Z4 SDRIVE35I wheel size
[x] Cancel search: wheel sizePage 58 of 220
cient, the forward gears are changed again au‐
tomatically.
Launch Control
Launch Control enables you to drive off with an
optimal vehicle acceleration on a high grip road
surface.
Do not use Launch Control too often
Do not use Launch Control too often, as
the higher loads on the vehicle lead to premature
component wear.◀
Launch Control is available when the engine is
at operating temperature, i.e., after driving con‐
tinuously for at least 6 miles/10 km.1.With the engine running, depress the brake
pedal with your left foot.2.Activate the SPORT+ program of the Dy‐
namic Driving Control, refer to page 82.3.With the vehicle stationary, activate manual
mode and select first gear.4.Press the accelerator all the way down. The
engine speed when driving off is controlled.
A flag symbol appears in the instrument
cluster.5.The vehicle accelerates when you release
the brake pedal. Keep the accelerator
pressed all the way down.6.The transmission shifts up automatically as
long as the accelerator is pressed all the way
down.
Launch Control only becomes available again
after a certain distance has been driven.
Launch Control can only be used after the
break-in phase, refer to page 108.
To maintain driving stability, activate DSC
whenever possible.
Manually releasing and engaging the
transmission lock
If a power failure occurs, e.g., if the battery is
discharged or disconnected, the transmission
lock must be released manually, otherwise the
rear wheels are blocked and the vehicle cannot
be towed.
Release the transmission lock manually for tow‐
ing only and set the parking brake beforehand to
prevent the vehicle from rolling. After parking
the vehicle, engage the transmission lock again
manually, refer to page 59.
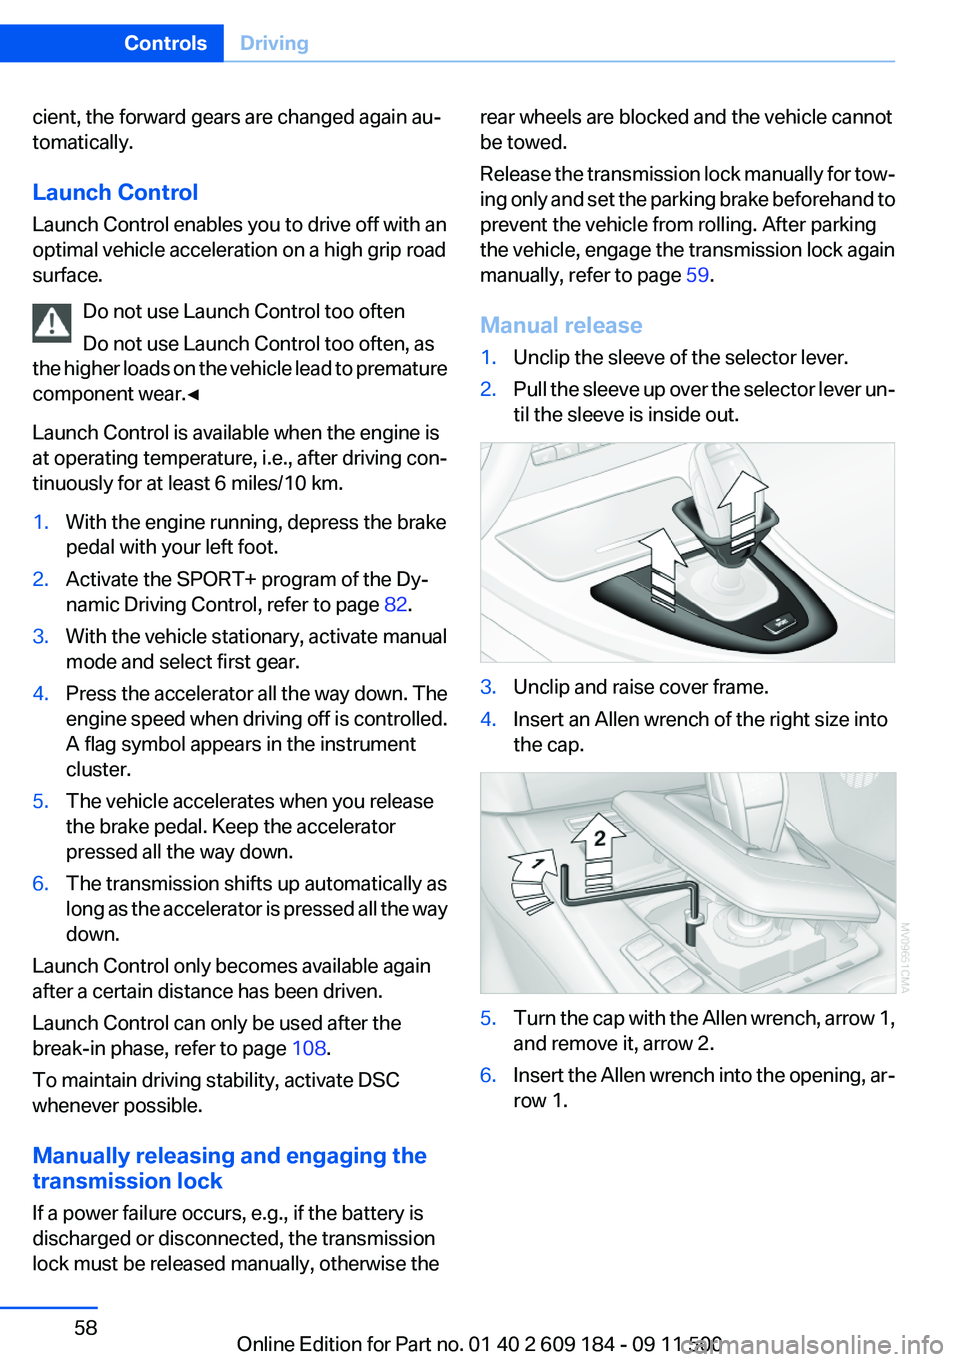
Manual release1.Unclip the sleeve of the selector lever.2.Pull the sleeve up over the selector lever un‐
til the sleeve is inside out.3.Unclip and raise cover frame.4.Insert an Allen wrench of the right size into
the cap.5.Turn the cap with the Allen wrench, arrow 1,
and remove it, arrow 2.6.Insert the Allen wrench into the opening, ar‐
row 1.Seite 58ControlsDriving58
Online Edition for Part no. 01 40 2 609 184 - 09 11 500
Page 75 of 220
The indicator lamp for the front passenger air‐
bags indicates the operating status of the front
and side airbags on the front passenger side de‐
pending on the seat occupation. The indicator
lamp shows whether the passenger airbags are
activated or deactivated.▷The indicator lamp lights up when a child
who is properly seated in a child restraint
system intended for that purpose is de‐
tected on the seat or the seat is empty. The
front and side airbags on the front passen‐
ger side are not activated. Most child seats
are detected by the system, Especially the
child seats required by NHTSA at the time
that the vehicle was manufactured. After in‐
stalling a child seat, make sure that the indi‐
cator lamp for the front passenger airbags
lights up. This indicates that the child seat
has been detected and the front passenger
airbags are not activated.▷The indicator lamp does not light up when,
for example, a person of sufficient size and
in a correct sitting position is detected on
the seat. The front and front passenger air‐
bags on the front passenger side are acti‐
vated.
Operational readiness of airbag system
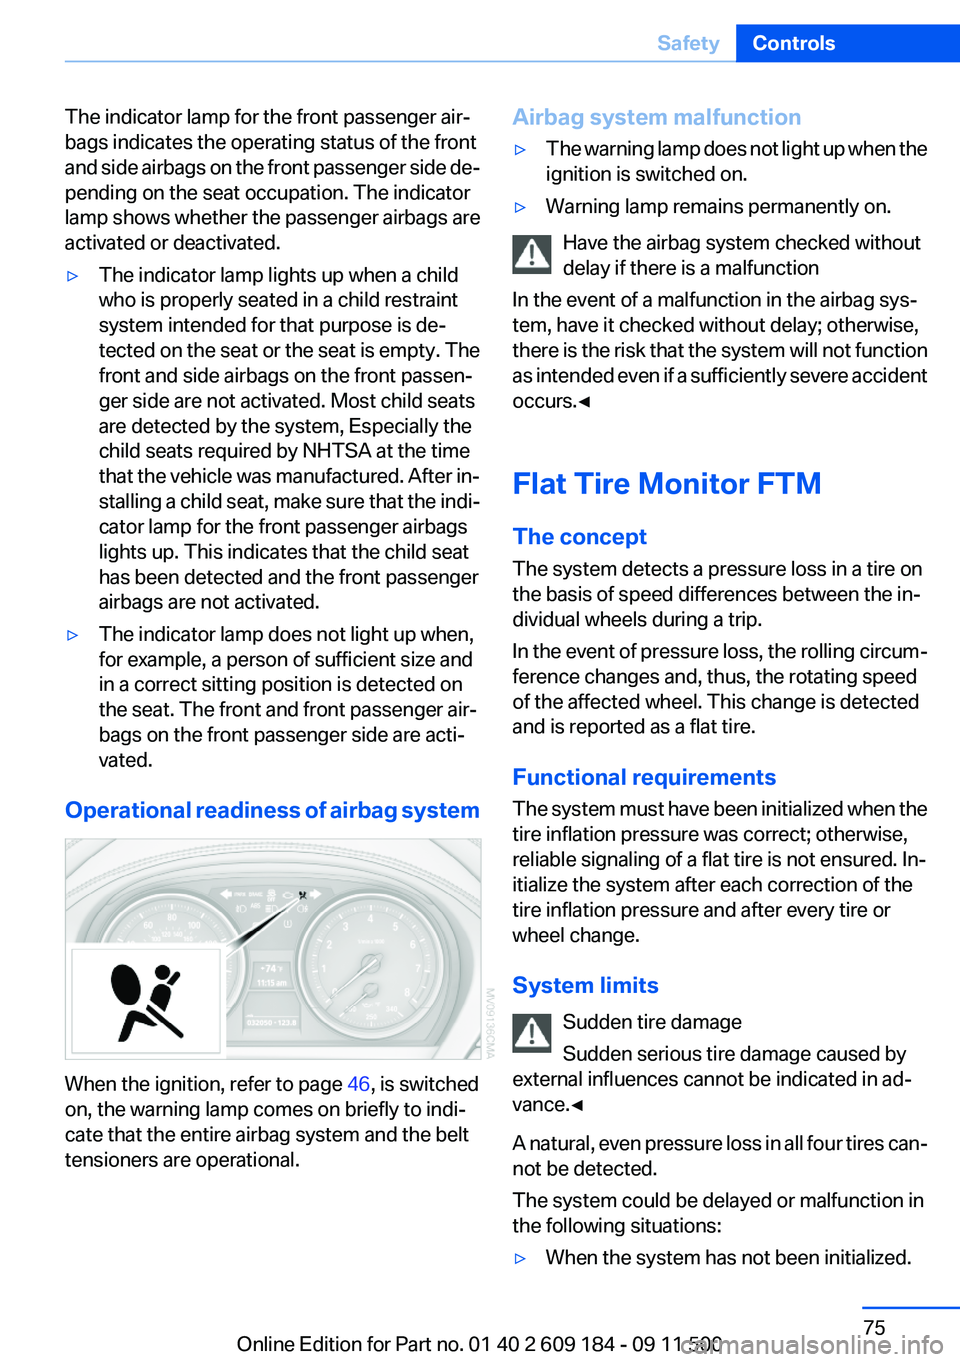
When the ignition, refer to page 46, is switched
on, the warning lamp comes on briefly to indi‐
cate that the entire airbag system and the belt
tensioners are operational.
Airbag system malfunction▷The warning lamp does not light up when the
ignition is switched on.▷Warning lamp remains permanently on.
Have the airbag system checked without
delay if there is a malfunction
In the event of a malfunction in the airbag sys‐
tem, have it checked without delay; otherwise,
there is the risk that the system will not function
as intended even if a sufficiently severe accident
occurs.◀
Flat Tire Monitor FTM
The concept
The system detects a pressure loss in a tire on
the basis of speed differences between the in‐
dividual wheels during a trip.
In the event of pressure loss, the rolling circum‐
ference changes and, thus, the rotating speed
of the affected wheel. This change is detected
and is reported as a flat tire.
Functional requirements
The system must have been initialized when the
tire inflation pressure was correct; otherwise,
reliable signaling of a flat tire is not ensured. In‐
itialize the system after each correction of the
tire inflation pressure and after every tire or
wheel change.
System limits Sudden tire damage
Sudden serious tire damage caused by
external influences cannot be indicated in ad‐
vance.◀
A natural, even pressure loss in all four tires can‐
not be detected.
The system could be delayed or malfunction in
the following situations:
▷When the system has not been initialized.Seite 75SafetyControls75
Online Edition for Part no. 01 40 2 609 184 - 09 11 500
Page 80 of 220

▷A wheel without TPM electronics is fitted:
have the service center check it if necessary.▷Malfunction: have the system checked by
your service center.▷TPM could not be fully reset. Reset the sys‐
tem again.
The small warning lamp flashes in yel‐
low and then lights up continuously;
the larger warning lamp comes on in
yellow. No flat tire can be detected.
Display in the following situations:
▷Disturbance by systems or devices with the
same radio frequency. After leaving the area
of the disturbance, the system automatically
becomes active again.
Declaration according to NHTSA/
FMVSS 138 Tire Pressure Monitoring
Systems
Each tire, including the spare (if provided)
should be checked monthly when cold and in‐
flated to the inflation pressure recommended by
the vehicle manufacturer on the vehicle placard
or tire inflation pressure label (If your vehicle has
tires of a different size than the size indicated on
the vehicle placard or tire inflation pressure la‐
bel, you should determine the proper tire infla‐
tion pressure for those tires.).
As an added safety feature, your vehicle has
been equipped with a tire pressure monitoring
system (TPMS) that illuminates a low tire pres‐
sure telltale when one or more of your tires is
significantly under-inflated. Accordingly, when
the low tire pressure telltale illuminates, you
should stop and check your tires as soon as
possible, and inflate them to the proper pres‐
sure. Driving on a significantly under-inflated tire
causes the tire to overheat and can lead to tire
failure. Under-inflation also reduces fuel effi‐
ciency and tire tread life, and may affect the ve‐
hicle's handling and stopping ability.
Please note that the TPMS is not a substitute for
proper tire maintenance, and it is the driver's re‐
sponsibility to maintain correct tire pressure,
even if under-inflation has not reached the level
to trigger illumination of the TPMS low tire pres‐
sure telltale.
Your vehicle has also been equipped with a
TPMS malfunction indicator to indicate when
the system is not operating properly. The TPMS
malfunction indicator is combined with the low
tire pressure telltale. When the system detects
a malfunction, the telltale will flash for approxi‐
mately one minute and then remain continu‐
ously illuminated. This sequence will continue
upon subsequent vehicle start-ups as long as
the malfunction exists. When the malfunction
indicator is illuminated, the system may not be
able to detect or signal low tire pressure as in‐
tended. TPMS malfunctions may occur for a va‐
riety of reasons, including the installation of re‐
placement or alternate tires or wheels on the
vehicle that prevent the TPMS from functioning
properly. Always check the TPMS malfunction
telltale after replacing one or more tires or
wheels on your vehicle to ensure that the re‐
placement or alternate tires and wheels allow
the TPMS to continue to function properly.
Brake force display
The concept▷During normal brake application, the brake
lamps light up.▷During heavy brake application, the turn sig‐
nals light up in addition.
The brake force display is not activated if the
turn signal function is switched on.
Seite 80ControlsSafety80
Online Edition for Part no. 01 40 2 609 184 - 09 11 500
Page 155 of 220
Wheels and tiresVehicle equipment
This chapter describes all series equipment as
well as country-specific and special equipment
offered for this model series.Therefore, it also
describes equipment that may not be found in
your vehicle, for instance due to the selected
special equipment or the country version. This
also applies to safety-related functions and sys‐
tems.
Tire inflation pressure
Information for your safety
It is not merely the tires' service life, but also
driving comfort and, to a great extent, driving
safety that depend on the condition of the tires
and the maintenance of the specified tire pres‐
sure.
Check the tire inflation pressure regularly
Regularly check the tire inflation pressure
and correct it as needed: at least twice a month
and before a long trip. If you fail to observe this
precaution, you may be driving on tires with in‐
correct tire pressures, a condition that may not
only compromise your vehicle's driving stability,
but also lead to tire damage and the risk of an
accident.◀
Checking the pressure
Only check the tire inflation pressure when the
tires are cold. This means after a maximum of
1.25 miles/2 km driving or when the vehicle has
been parked for at least 2 hours. When the tires
are warm, the tire inflation pressure is higher.
After correcting the tire inflation pressure, rein‐
itialize the Flat Tire Monitor, refer to page 75.
After correcting the tire inflation pressure, reset
the Tire Pressure Monitor, refer to page 78.Pressure specifications
The tables below provide all the correct inflation
pressures for the specified tire sizes at ambient
temperature.
The inflation pressures apply to the tire sizes
approved and tire brands recommended by
BMW; a list of these is available from your serv‐
ice center.
For correct identification of the right tire inflation
pressures, observe the following:▷Tire sizes of your vehicle.▷Maximum allowable driving speed.
Tire inflation pressures for driving up to
100 mph or 160 km/h
For normal driving up to 100 mph/160 km/h, ad‐
just pressures to the respective tire inflation
pressures listed on the following pages in the
column for traveling speeds up to 100 mph/
160 km/h to achieve optimum driving comfort.
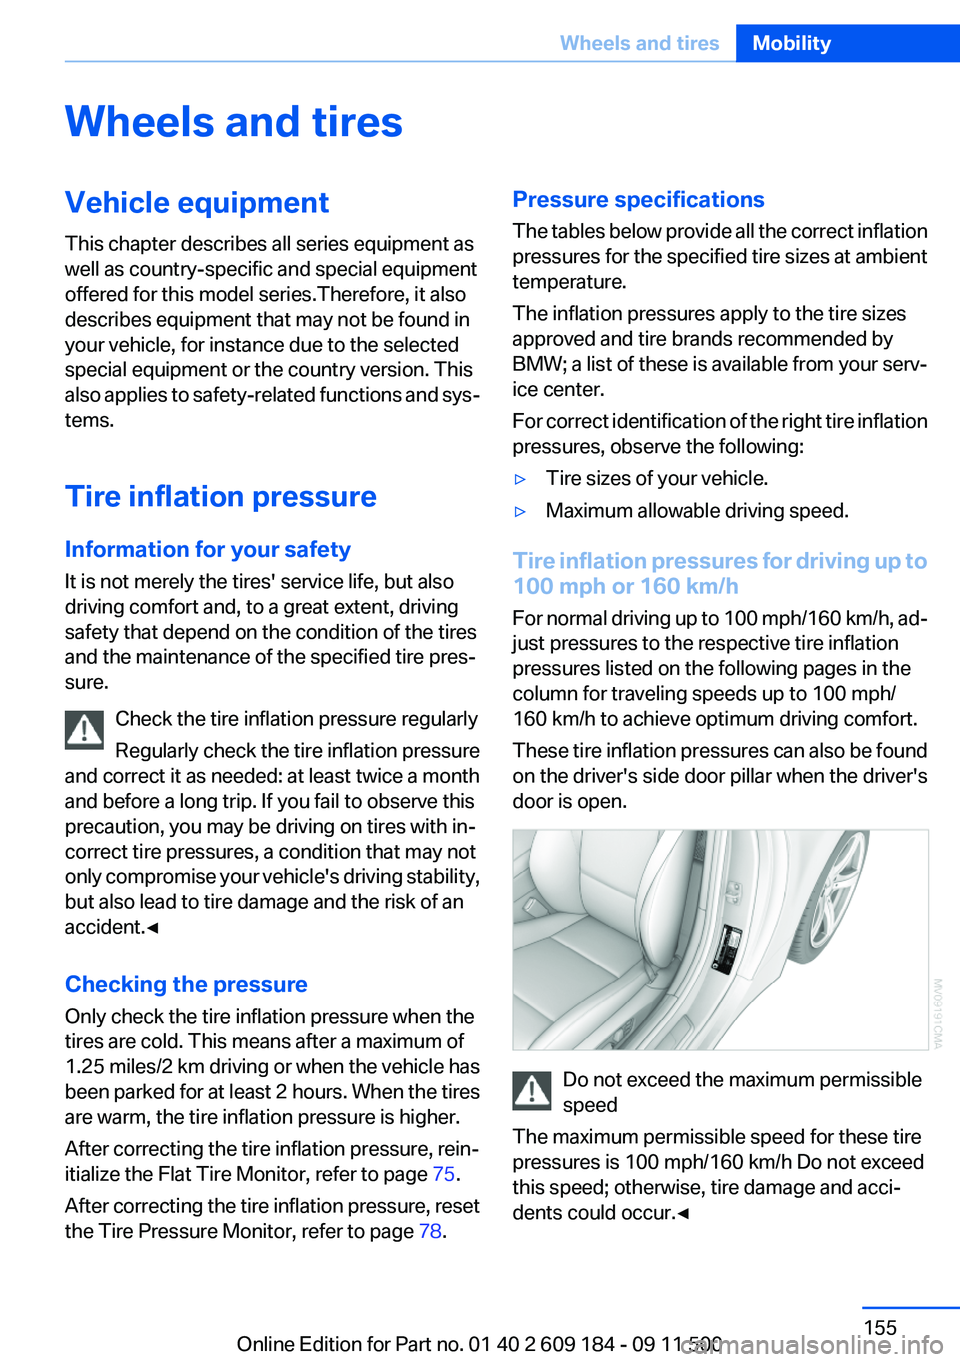
These tire inflation pressures can also be found
on the driver's side door pillar when the driver's
door is open.
Do not exceed the maximum permissible
speed
The maximum permissible speed for these tire
pressures is 100 mph/160 km/h Do not exceed
this speed; otherwise, tire damage and acci‐
dents could occur.◀
Seite 155Wheels and tiresMobility155
Online Edition for Part no. 01 40 2 609 184 - 09 11 500
Page 156 of 220
Tire inflation pressures for driving
above 100 mph or 160 km/h
Adjust the tire inflation pressures
To drive at maximum speeds in excess of
100 mph/160 km/h, adjust pressures to the re‐
spective tire inflation pressures listed on the fol‐
lowing pages in the column for traveling speedsincluding those exceeding 100 mph or 160 km/
h. Otherwise, tire damage and accidents could
occur.◀
Observe all national and local maximum speed
limits; otherwise, violations of the laws could oc‐
cur.
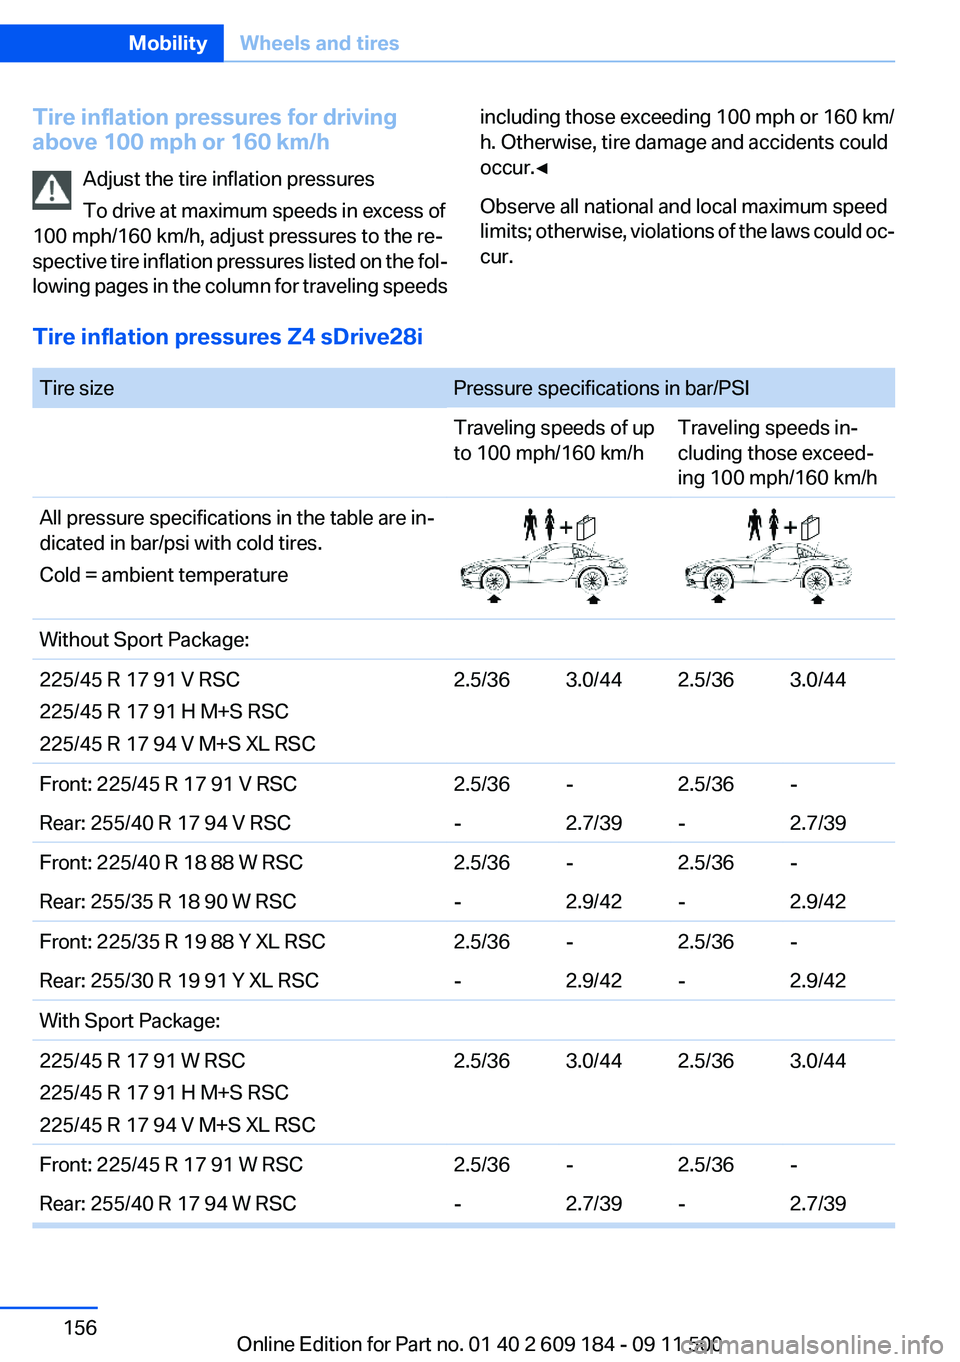
Tire inflation pressures Z4 sDrive28i
Tire sizePressure specifications in bar/PSITraveling speeds of up
to 100 mph/160 km/hTraveling speeds in‐
cluding those exceed‐
ing 100 mph/160 km/hAll pressure specifications in the table are in‐
dicated in bar/psi with cold tires.
Cold = ambient temperatureWithout Sport Package:225/45 R 17 91 V RSC
225/45 R 17 91 H M+S RSC
225/45 R 17 94 V M+S XL RSC2.5/363.0/442.5/363.0/44Front: 225/45 R 17 91 V RSC2.5/36-2.5/36-Rear: 255/40 R 17 94 V RSC-2.7/39-2.7/39Front: 225/40 R 18 88 W RSC2.5/36-2.5/36-Rear: 255/35 R 18 90 W RSC-2.9/42-2.9/42Front: 225/35 R 19 88 Y XL RSC2.5/36-2.5/36-Rear: 255/30 R 19 91 Y XL RSC-2.9/42-2.9/42With Sport Package:225/45 R 17 91 W RSC
225/45 R 17 91 H M+S RSC
225/45 R 17 94 V M+S XL RSC2.5/363.0/442.5/363.0/44Front: 225/45 R 17 91 W RSC2.5/36-2.5/36-Rear: 255/40 R 17 94 W RSC-2.7/39-2.7/39Seite 156MobilityWheels and tires156
Online Edition for Part no. 01 40 2 609 184 - 09 11 500
Page 157 of 220
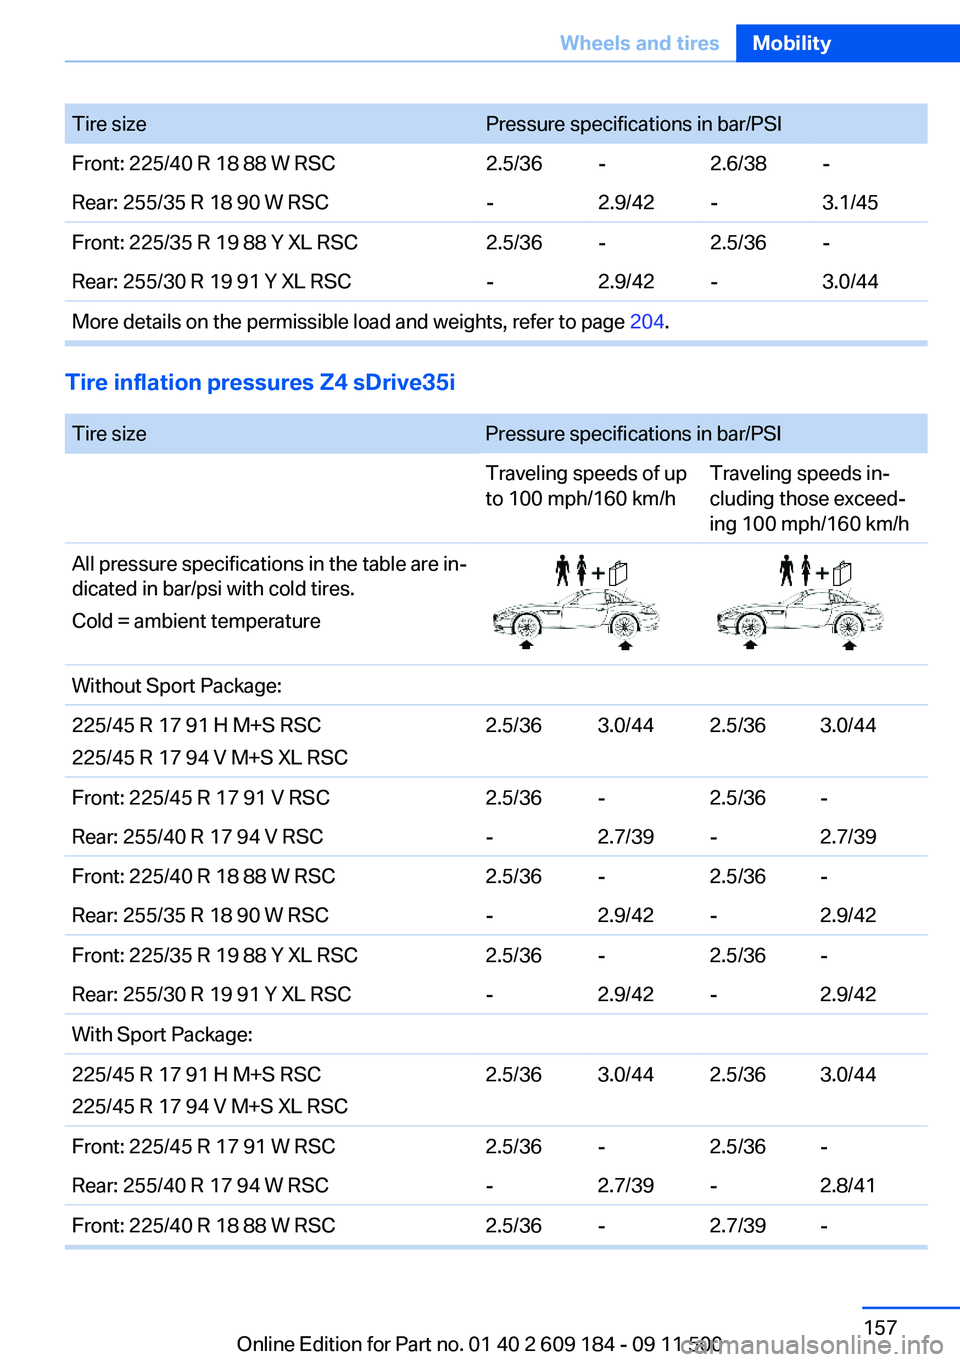
Tire sizePressure specifications in bar/PSIFront: 225/40 R 18 88 W RSC2.5/36-2.6/38-Rear: 255/35 R 18 90 W RSC-2.9/42-3.1/45Front: 225/35 R 19 88 Y XL RSC2.5/36-2.5/36-Rear: 255/30 R 19 91 Y XL RSC-2.9/42-3.0/44More details on the permissible load and weights, refer to page 204.
Tire inflation pressures Z4 sDrive35i
Tire sizePressure specifications in bar/PSITraveling speeds of up
to 100 mph/160 km/hTraveling speeds in‐
cluding those exceed‐
ing 100 mph/160 km/hAll pressure specifications in the table are in‐
dicated in bar/psi with cold tires.
Cold = ambient temperatureWithout Sport Package:225/45 R 17 91 H M+S RSC
225/45 R 17 94 V M+S XL RSC2.5/363.0/442.5/363.0/44Front: 225/45 R 17 91 V RSC2.5/36-2.5/36-Rear: 255/40 R 17 94 V RSC-2.7/39-2.7/39Front: 225/40 R 18 88 W RSC2.5/36-2.5/36-Rear: 255/35 R 18 90 W RSC-2.9/42-2.9/42Front: 225/35 R 19 88 Y XL RSC2.5/36-2.5/36-Rear: 255/30 R 19 91 Y XL RSC-2.9/42-2.9/42With Sport Package:225/45 R 17 91 H M+S RSC
225/45 R 17 94 V M+S XL RSC2.5/363.0/442.5/363.0/44Front: 225/45 R 17 91 W RSC2.5/36-2.5/36-Rear: 255/40 R 17 94 W RSC-2.7/39-2.8/41Front: 225/40 R 18 88 W RSC2.5/36-2.7/39-Seite 157Wheels and tiresMobility157
Online Edition for Part no. 01 40 2 609 184 - 09 11 500
Page 158 of 220

Tire sizePressure specifications in bar/PSIRear: 255/35 R 18 90 W RSC-2.9/42-3.2/46Front: 225/35 R 19 88 Y XL RSC2.5/36-2.5/36-Rear: 255/30 R 19 91 Y XL RSC-2.9/42-3.0/44More details on the permissible load and weights, refer to page 204.
Tire inflation pressures Z4 sDrive35is
Tire sizePressure specifications in bar/PSITraveling speeds of up
to 100 mph/160 km/hTraveling speeds in‐
cluding those exceed‐
ing 100 mph/160 km/hAll pressure specifications in the table are in‐
dicated in bar/psi with cold tires.
Cold = ambient temperature225/45 R 17 91 H M+S RSC
225/45 R 17 94 V M+S XL RSC2.5/363.0/442.5/363.0/44Front: 225/40 R 18 88 W RSC2.7/39-2.7/39-Rear: 255/35 R 18 90 W RSC-3.2/46-3.2/46Front: 225/35 R 19 88 Y XL RSC2.5/36-2.5/36-Rear: 255/30 R 19 91 Y XL RSC-3.0/44-3.0/44More details on the permissible load and weights, refer to page 204.Tire identification marks
Knowledge of the labeling on the side of the tire
makes it easier to identify and choose the right
tires.
Tire size
Example: 225/45 R 17 91 V
225: nominal width in mm
45: aspect ratio in %
R: radial tire code
17: rim diameter in inches91: load rating, not for ZR tires
V: speed rating, before the R on ZR tires
Speed letter
Q = up to 100 mph/160 km/h
T = up to 118 mph/190 km/h
H = up to 131 mph/210 km/h
V = up to 150 mph/240 km/h
W = up to 167 mph/270 km/h
Y = up to 186 mph/300 km/hSeite 158MobilityWheels and tires158
Online Edition for Part no. 01 40 2 609 184 - 09 11 500
Page 159 of 220

Tire Identification Number
Tires with DOT codes meet the guidelines of the
U.S. Department of Transportation.
DOT code:
DOT xxxx xxx 3311
xxxx: manufacturer code for the tire brand
xxx: tire size and tire design
3311: tire age
Tire age
The tire manufacturing date is contained in the
tire identification mark: DOT ... 3311 means that
the tire was manufactured in the week 33 of
2011.
BMW recommends that you replace all tires af‐
ter 6 years at most, even if some tires may last
for 10 years.
Uniform Tire Quality Grading
Quality grades can be found where applicable
on the tire sidewall between tread shoulder and
maximum section width. For example:
Treadwear 200 Traction AA
Temperature A
DOT Quality Grades
Treadwear
Traction AA A B C
Temperature A B C
All passenger car tires must conform to
Federal Safety Requirements in addition
to these grades.◀
Treadwear
The treadwear grade is a comparative rating
based on the wear rate of the tire when tested
under controlled conditions on a specified gov‐
ernment test course. For example, a tire graded
150 would wear one and one-half (11/2) times
as well on the government course as a tire
graded 100. The relative performance of tires
depends upon the actual conditions of their use,however, and may depart significantly from the
norm due to variations in driving habits, service
practices and differences in road characteristics
and climate.
Traction
The traction grades, from highest to lowest, are
AA, A, B, and C.
Those grades represent the tire’s ability to stop
on wet pavement as measured under controlled
conditions on specified government test surfa‐
ces of asphalt and concrete. A tire marked C may
have poor traction performance.
The traction grade assigned to this tire is based
on straight-ahead braking traction tests, and
does not include acceleration, cornering, hydro‐
planing, or peak traction characteristics.
Temperature
The temperature grades are A, the highest, B,
and C, representing the tire’s resistance to the
generation of heat and its ability to dissipate
heat when tested under controlled conditions
on a specified indoor laboratory test wheel. Sus‐
tained high temperature can cause the material
of the tire to degenerate and reduce tire life, and
excessive temperature can lead to sudden tire
failure. The grade C corresponds to a level of
performance which all passenger car tires must
meet under the Federal Motor Vehicle Safety
Standard No. 109. Grades B and A represent
higher levels of performance on the laboratory
test wheel than the minimum required by law.
Temperature grade for this tire
The temperature grade for this tire is es‐
tablished for a tire that is properly inflated and
not overloaded. Excessive speed, underinfla‐
tion, or excessive loading, either separately or in
combination, can cause heat buildup and pos‐
sible tire failure.◀Seite 159Wheels and tiresMobility159
Online Edition for Part no. 01 40 2 609 184 - 09 11 500