2012 BMW Z4 SDRIVE35I parking brake
[x] Cancel search: parking brakePage 84 of 220
Activating COMFORTPress the button repeatedly until COM‐
FORT is selected in the instrument
cluster.
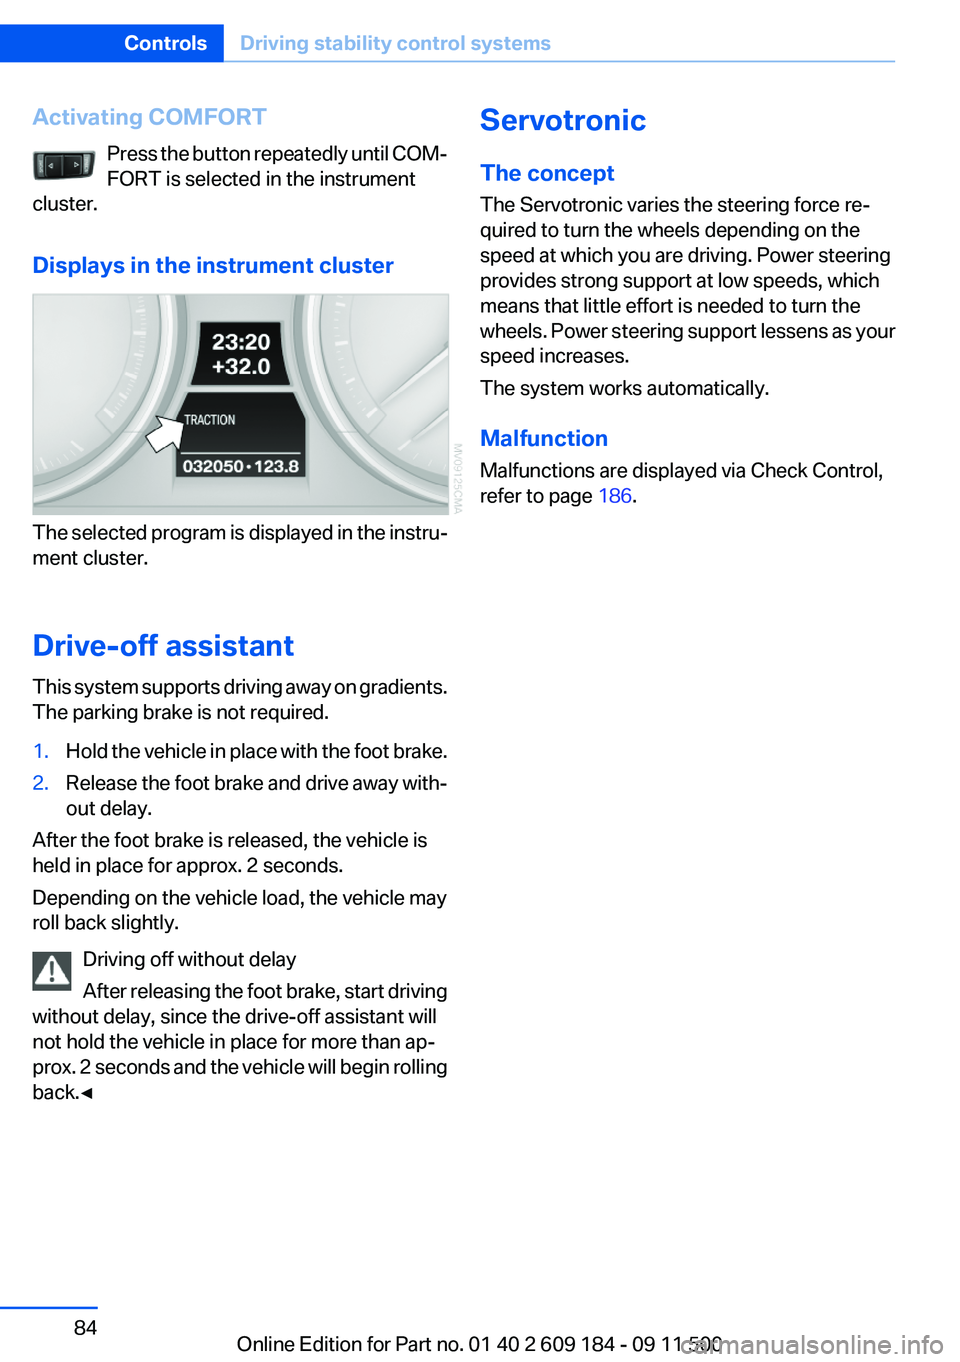
Displays in the instrument cluster
The selected program is displayed in the instru‐
ment cluster.
Drive-off assistant
This system supports driving away on gradients.
The parking brake is not required.
1.Hold the vehicle in place with the foot brake.2.Release the foot brake and drive away with‐
out delay.
After the foot brake is released, the vehicle is
held in place for approx. 2 seconds.
Depending on the vehicle load, the vehicle may
roll back slightly.
Driving off without delay
After releasing the foot brake, start driving
without delay, since the drive-off assistant will
not hold the vehicle in place for more than ap‐
prox. 2 seconds and the vehicle will begin rolling
back.◀
Servotronic
The concept
The Servotronic varies the steering force re‐
quired to turn the wheels depending on the
speed at which you are driving. Power steering
provides strong support at low speeds, which
means that little effort is needed to turn the
wheels. Power steering support lessens as your
speed increases.
The system works automatically.
Malfunction
Malfunctions are displayed via Check Control,
refer to page 186.Seite 84ControlsDriving stability control systems84
Online Edition for Part no. 01 40 2 609 184 - 09 11 500
Page 108 of 220
Things to remember when drivingVehicle equipment
This chapter describes all series equipment as
well as country-specific and special equipment
offered for this model series.Therefore, it also
describes equipment that may not be found in
your vehicle, for instance due to the selected
special equipment or the country version. This
also applies to safety-related functions and sys‐
tems.
Breaking-in period
General information
Moving parts need to be broken in to adjust to
each other.
The following instructions will help achieve a
long vehicle life and good economy.
Engine and differential
Always obey the official speed limits.
Up to 1,200 miles/2,000 km
Do not exceed the maximum engine and road
speeds:▷4,500 rpm and 100 mph/160 km/h.
Do not drive with full-throttle operation, and do
not use the transmission's kickdown mode or
Launch Control.
From 1,200 miles/2,000 km
The engine and vehicle speed can gradually be
increased.
Tires
Due to technical factors associated with their
manufacture, tires do not achieve their full trac‐
tion potential until after an initial breaking-in pe‐
riod.
Drive conservatively for the first 200 miles/
300 km.
Brake system
Brakes require an initial break-in period of ap‐
prox. 300 miles/500 km to achieve optimized
contact and wear patterns between brake pads
and rotors. Drive cautiously during this break-in
period.
Clutch
The clutch requires an initial break-in period of
approx. 300 miles/500 km to function at an op‐
timal level.
During this break-in period, engage the clutch
gently.
Following part replacement
The same breaking in procedures should be ob‐
served if any of the components mentioned
above have to be renewed in the course of the
vehicle's operating life.
General driving notes
Ground clearance Limited ground clearance
Note that the Z4 sDrive35 has limited
ground clearance, for instance when driving into
underground parking garages or over obstacles.
Otherwise, the vehicle may be damaged.◀
Closing the trunk lid Drive with the trunk lid closed
Only operate the vehicle with the trunk lid
closed; otherwise, exhaust fumes could enter
the passenger compartment.◀Seite 108Driving tipsThings to remember when driving108
Online Edition for Part no. 01 40 2 609 184 - 09 11 500
Page 179 of 220
Tow-starting and towing
Tow fitting
The screw-in tow fitting should always be car‐
ried in the vehicle. It can be screwed in at the
front or rear of the BMW.
It is stored in the onboard vehicle tool kit under
the floor panel in the trunk, refer to page 170.
Tow fitting, information on use▷Use only the tow fitting provided with
the vehicle and screw it all the way in.▷Use the tow fitting for towing on paved roads
only.▷Avoid lateral loading of the tow fitting, e.g.,
do not lift the vehicle by the tow fitting.
Otherwise, damage to the tow fitting and the ve‐
hicle can occur.◀
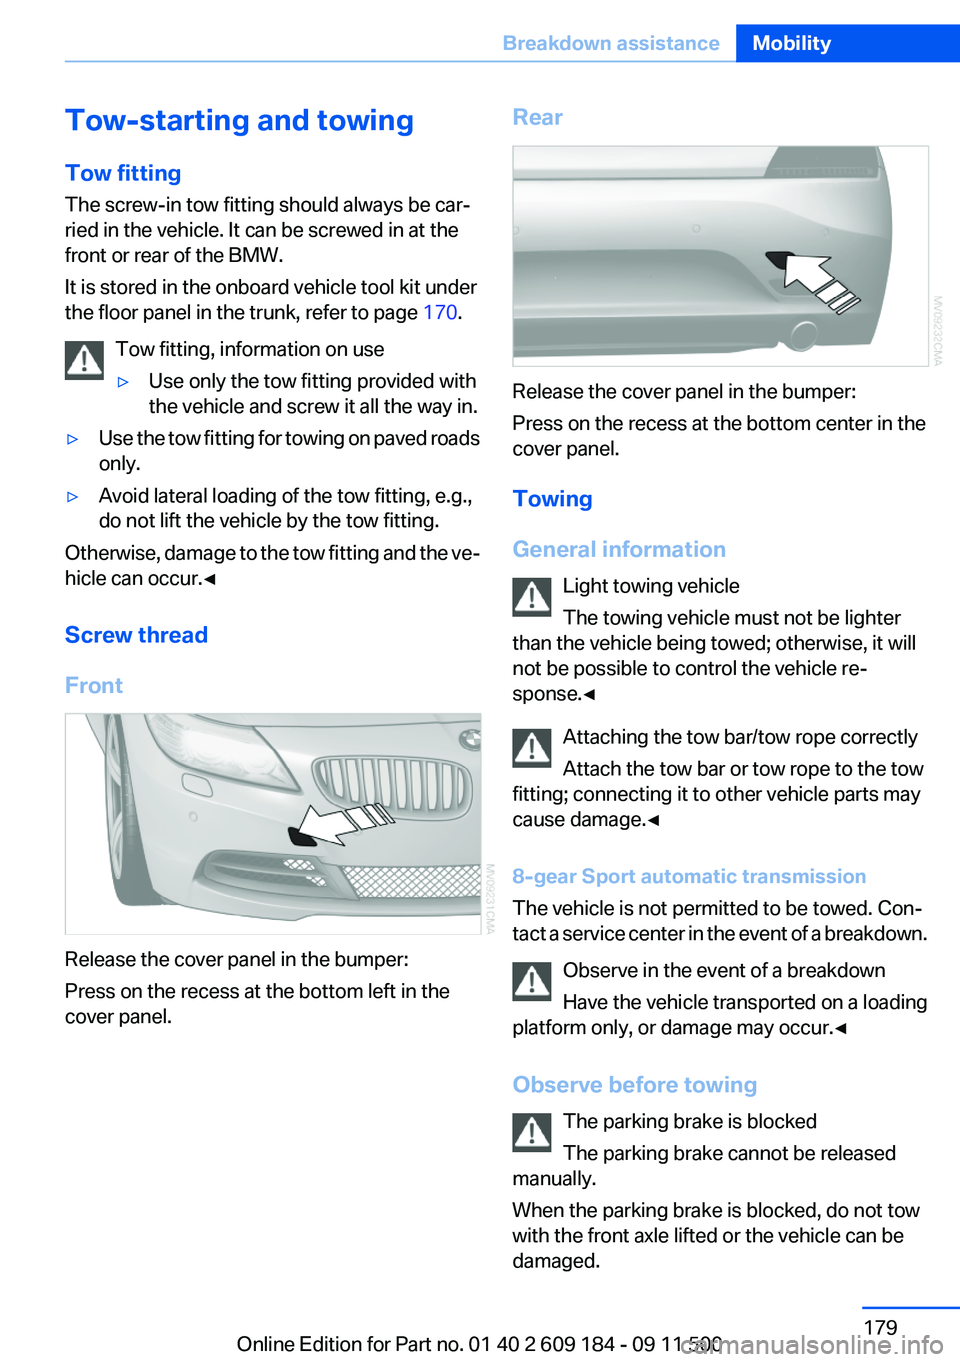
Screw thread
Front
Release the cover panel in the bumper:
Press on the recess at the bottom left in the
cover panel.
Rear
Release the cover panel in the bumper:
Press on the recess at the bottom center in the
cover panel.
Towing
General information Light towing vehicle
The towing vehicle must not be lighter
than the vehicle being towed; otherwise, it will
not be possible to control the vehicle re‐
sponse.◀
Attaching the tow bar/tow rope correctly
Attach the tow bar or tow rope to the tow
fitting; connecting it to other vehicle parts may
cause damage.◀
8-gear Sport automatic transmission
The vehicle is not permitted to be towed. Con‐
tact a service center in the event of a breakdown.
Observe in the event of a breakdown
Have the vehicle transported on a loading
platform only, or damage may occur.◀
Observe before towing The parking brake is blocked
The parking brake cannot be released
manually.
When the parking brake is blocked, do not tow
with the front axle lifted or the vehicle can be
damaged.
Seite 179Breakdown assistanceMobility179
Online Edition for Part no. 01 40 2 609 184 - 09 11 500
Page 180 of 220

Contact your service center.◀
Manual transmission
Gearshift lever in neutral position.
7-gear Sport automatic transmission Manually release the transmission lock
Manually release the transmission lock,
even if there is no malfunction involving the
transmission. Otherwise, there is the danger
that the transmission lock will be engaged au‐
tomatically during towing.◀
Manually release the transmission lock, refer to
page 58.
Adhere to the towing speed and distance
Do not exceed a towing speed of 30 mph/
50 km/h and a towing distance of 30 miles/50 km
or damage to the transmission can occur.◀
Observe during towing Observe the notes on towing
Observe all notes on towing or vehicle
damage or accidents can occur.◀▷Make sure that the ignition is switched on;
otherwise, the low beams, tail lamps, turn
signals, and windshield wipers may be un‐
available.▷When the engine is stopped, there is no
power assist. Consequently, more force
needs to be applied when braking and steer‐
ing.▷Larger steering wheel movements are re‐
quired.▷Switch on the hazard warning system, de‐
pending on local regulations.▷If the electrical system has failed, clearly
identify the vehicle being towed by placing
a sign or a warning triangle in the rear win‐
dow.▷Do not tow the vehicle with the rear axle
tilted, as the front wheels could turn.Towing methods
Do not lift the vehicle
Do not lift the vehicle by the tow fitting or
body and chassis parts; otherwise, damage may
result.◀
Tow bar
The tow fittings used should be on the same
side on both vehicles.
Should it prove impossible to avoid mounting
the tow bar at an offset angle, please observe
the following:▷Clearance and maneuvering capability will
be sharply limited during cornering.▷The tow bar will generate lateral forces if it
is attached offset.
Tow rope
When starting to tow the vehicle, make sure that
the tow rope is taut.
To avoid jerking and the associated stresses on
the vehicle components when towing, always
use nylon ropes or nylon straps.
Attaching the tow rope correctly
Only secure the tow rope on the tow fit‐
ting; otherwise, damage can occur when it is se‐
cured on other parts of the vehicle.◀
Tow truck Do not lift the vehicle
Do not lift the vehicle by the tow fitting or
body and chassis parts; otherwise, damage may
result.◀
Secure the vehicle against rolling off
Apply the parking brake after towing and
secure the vehicle against rolling off if neces‐
sary.
Have the operability of transmission position P
checked by the service center.◀
Seite 180MobilityBreakdown assistance180
Online Edition for Part no. 01 40 2 609 184 - 09 11 500
Page 182 of 220

CareVehicle equipment
This chapter describes all series equipment as
well as country-specific and special equipment
offered for this model series.Therefore, it also
describes equipment that may not be found in
your vehicle, for instance due to the selected
special equipment or the country version. This
also applies to safety-related functions and sys‐
tems.
Car washes
Notes Steam jets or high-pressure washers
When using steam jets or high-pressure
washers, hold them a sufficient distance away
and use a maximum temperature of 140 ℉/
60 ℃.
Holding them too close or using excessively
high pressures or temperatures can cause dam‐
age or preliminary damage that may then lead to
long-term damage.
Follow the operating instructions for the high-
pressure washer.◀
Cleaning sensors/cameras with high-
pressure washers
When using high-pressure washers, do not
spray the seals of the retractable hardtop and
the exterior sensors and cameras, for Park Dis‐
tance Control, for instance, for extended periods
of time and only from a distance of at least 12 in/
30 cm.◀
Wash your vehicle frequently, particularly in win‐
ter.
Intense soiling and road salt can damage the ve‐
hicle.Washing in automatic car washes
Give preference to cloth car washes or those
that use soft brushes in order to avoid paint
damage.
Notes
Note the following:▷Make sure that the wheels and tires are not
damaged by the transport mechanisms.▷Fold in the exterior mirrors; otherwise, they
may be damaged, depending on the width of
the vehicle.▷Deactivate the rain sensor, refer to page 51,
to avoid unintentional wiper activation.▷Unscrew the road antenna.
Guide rails in car washes
Avoid car washes with guide rails higher
than 4 in/10 cm; otherwise, the vehicle body
could be damaged.◀
Before driving into a car wash
The vehicle is able to roll if the following steps
are taken.
Manual transmission
1.Shift to neutral.2.Release the parking brake, refer to page 49.3.Switch the engine off.4.Leave the remote control in the ignition lock.
Sport automatic transmission
1.Insert the remote control into the ignition
lock, even with Comfort Access.2.Engage transmission position N.3.Release the parking brake, refer to page 49.4.Switch the engine off.5.Leave the remote control in the ignition lock
so that the vehicle can roll.Seite 182MobilityCare182
Online Edition for Part no. 01 40 2 609 184 - 09 11 500
Page 186 of 220
Indicator/warning lampsVehicle equipment
This chapter describes all series equipment as
well as country-specific and special equipment
offered for this model series.Therefore, it alsodescribes equipment that may not be found in
your vehicle, for instance due to the selected
special equipment or the country version. This
also applies to safety-related functions and sys‐
tems.
Overview
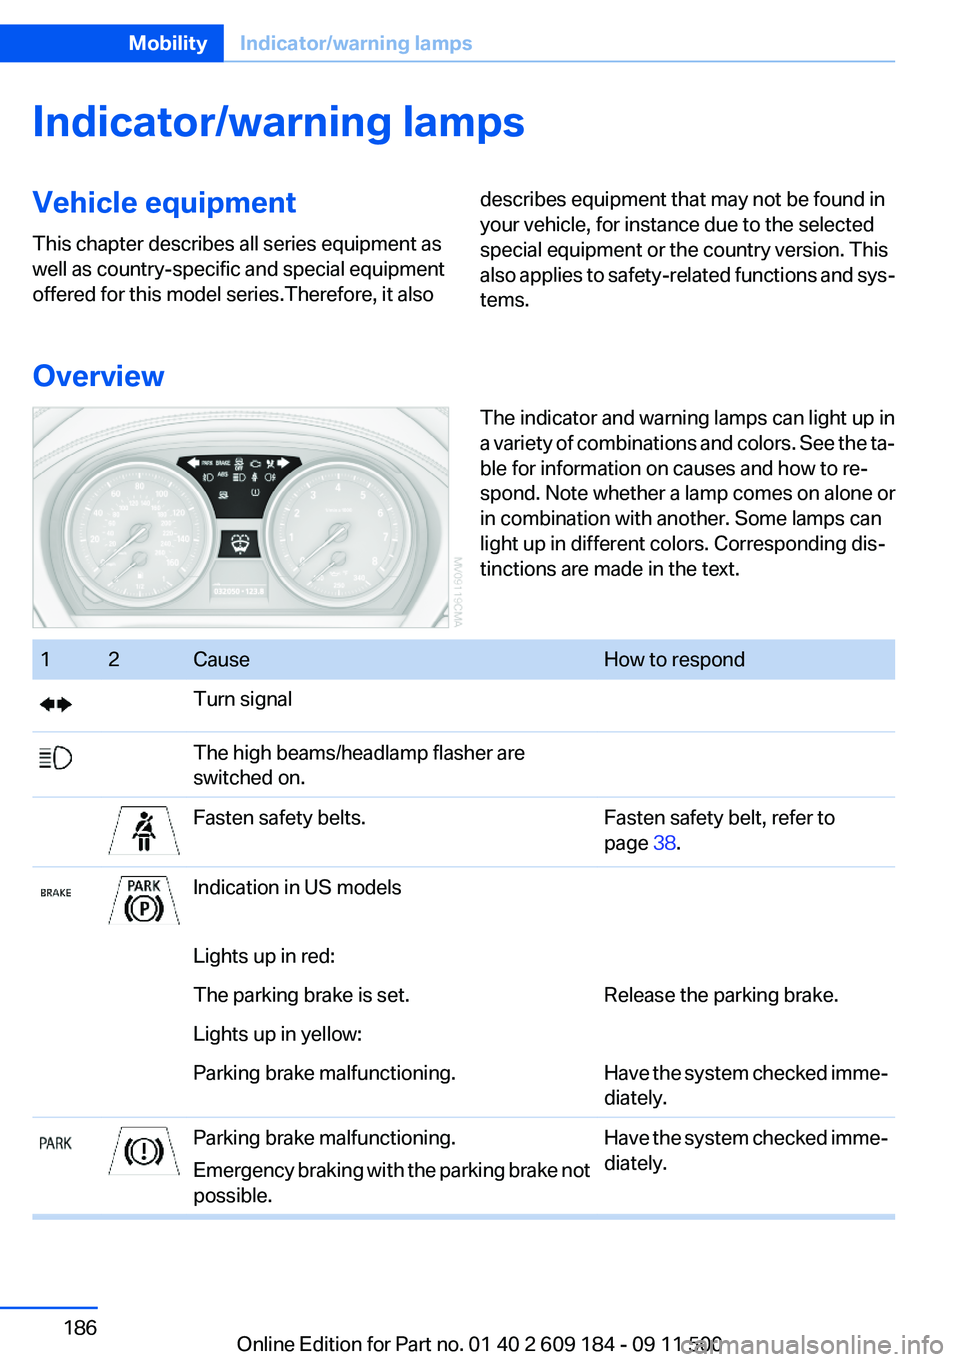
The indicator and warning lamps can light up in
a variety of combinations and colors. See the ta‐
ble for information on causes and how to re‐
spond. Note whether a lamp comes on alone or
in combination with another. Some lamps can
light up in different colors. Corresponding dis‐
tinctions are made in the text. 12CauseHow to respondTurn signalThe high beams/headlamp flasher are
switched on.Fasten safety belts.Fasten safety belt, refer to
page 38.Indication in US modelsLights up in red:The parking brake is set.Release the parking brake.Lights up in yellow:Parking brake malfunctioning.Have the system checked imme‐
diately.Parking brake malfunctioning.
Emergency braking with the parking brake not
possible.Have the system checked imme‐
diately.Seite 186MobilityIndicator/warning lamps186
Online Edition for Part no. 01 40 2 609 184 - 09 11 500
Page 187 of 220
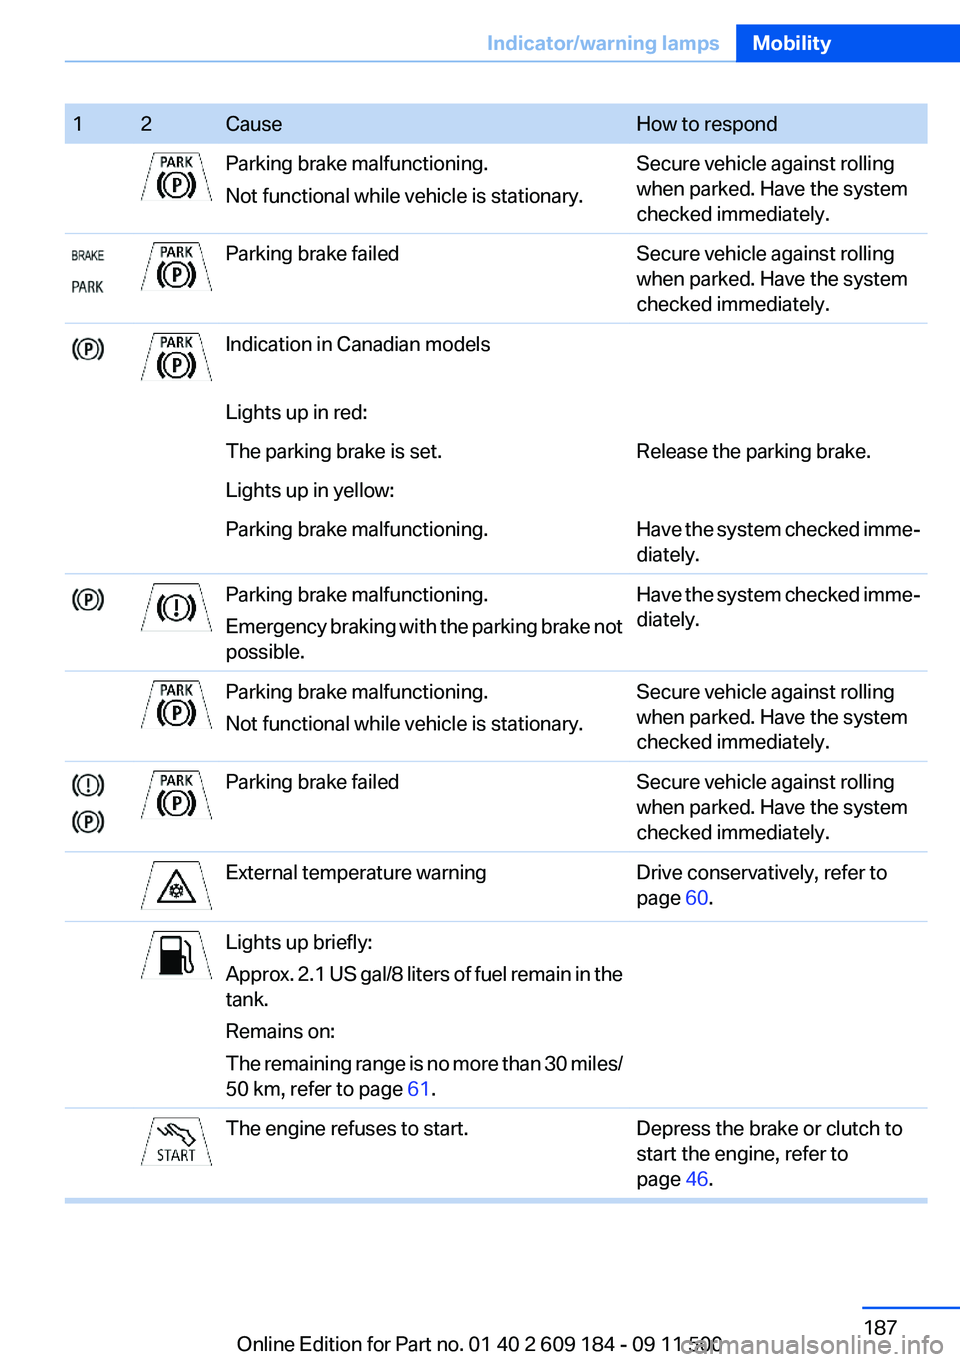
12CauseHow to respondParking brake malfunctioning.
Not functional while vehicle is stationary.Secure vehicle against rolling
when parked. Have the system
checked immediately.Parking brake failedSecure vehicle against rolling
when parked. Have the system
checked immediately.Indication in Canadian modelsLights up in red:The parking brake is set.Release the parking brake.Lights up in yellow:Parking brake malfunctioning.Have the system checked imme‐
diately.Parking brake malfunctioning.
Emergency braking with the parking brake not
possible.Have the system checked imme‐
diately.Parking brake malfunctioning.
Not functional while vehicle is stationary.Secure vehicle against rolling
when parked. Have the system
checked immediately.Parking brake failedSecure vehicle against rolling
when parked. Have the system
checked immediately.External temperature warningDrive conservatively, refer to
page 60.Lights up briefly:
Approx. 2.1 US gal/8 liters of fuel remain in the
tank.
Remains on:
The remaining range is no more than 30 miles/
50 km, refer to page 61.The engine refuses to start.Depress the brake or clutch to
start the engine, refer to
page 46.Seite 187Indicator/warning lampsMobility187
Online Edition for Part no. 01 40 2 609 184 - 09 11 500
Page 191 of 220
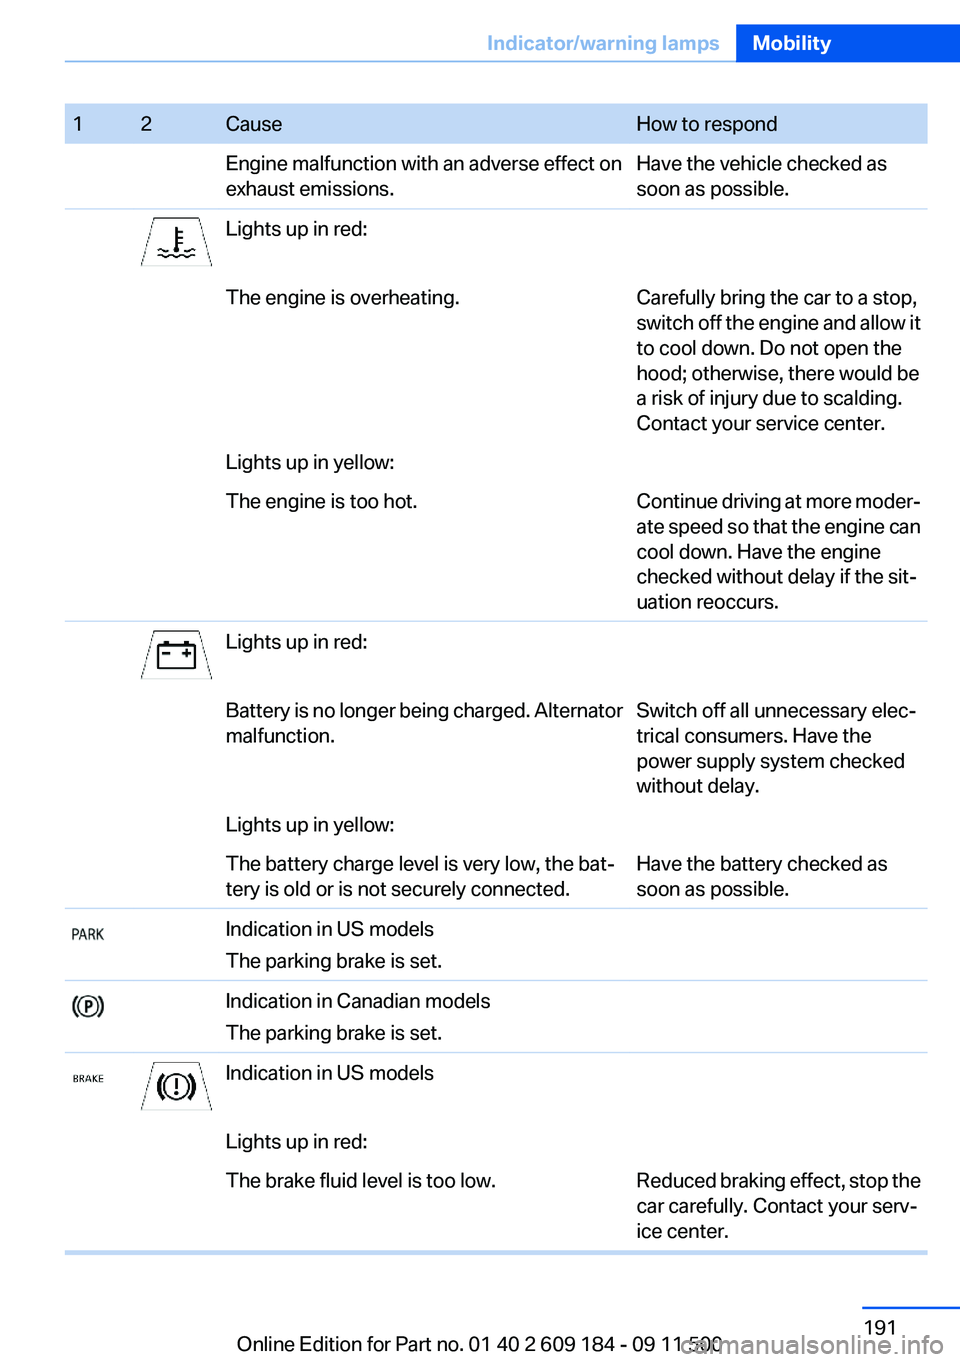
12CauseHow to respondEngine malfunction with an adverse effect on
exhaust emissions.Have the vehicle checked as
soon as possible.Lights up in red:The engine is overheating.Carefully bring the car to a stop,
switch off the engine and allow it
to cool down. Do not open the
hood; otherwise, there would be
a risk of injury due to scalding.
Contact your service center.Lights up in yellow:The engine is too hot.Continue driving at more moder‐
ate speed so that the engine can
cool down. Have the engine
checked without delay if the sit‐
uation reoccurs.Lights up in red:Battery is no longer being charged. Alternator
malfunction.Switch off all unnecessary elec‐
trical consumers. Have the
power supply system checked
without delay.Lights up in yellow:The battery charge level is very low, the bat‐
tery is old or is not securely connected.Have the battery checked as
soon as possible.Indication in US models
The parking brake is set.Indication in Canadian models
The parking brake is set.Indication in US modelsLights up in red:The brake fluid level is too low.Reduced braking effect, stop the
car carefully. Contact your serv‐
ice center.Seite 191Indicator/warning lampsMobility191
Online Edition for Part no. 01 40 2 609 184 - 09 11 500