2012 BMW X6 XDRIVE 50I seats
[x] Cancel search: seatsPage 45 of 317
Adjusting
Sitting safely
The
ideal seating position can make a vital con‐
tribution to relaxed, fatigue-free driving.
The seating position plays an important role in
an accident in combination with:
▷ Safety belts, refer to page 50.
▷ Head restraints, refer to page 51.
▷ Airbags, refer to page 86.
Seats
Note before adjusting Do not adjust the seat while driving
Never attempt to adjust the driver's seat
while driving.
The
seat could respond with unexpected move‐
ment and the ensuing loss of vehicle control
could lead to an accident.◀
Do not incline the backrest too far to the
rear
Do not incline the backrest on the front passen‐
ger side too far to the rear during driving. Oth‐
erwise, there is the danger of sliding under the
safety belt in an accident. This would eliminate
the protection normally provided by the belt.◀ Adjusting manually*
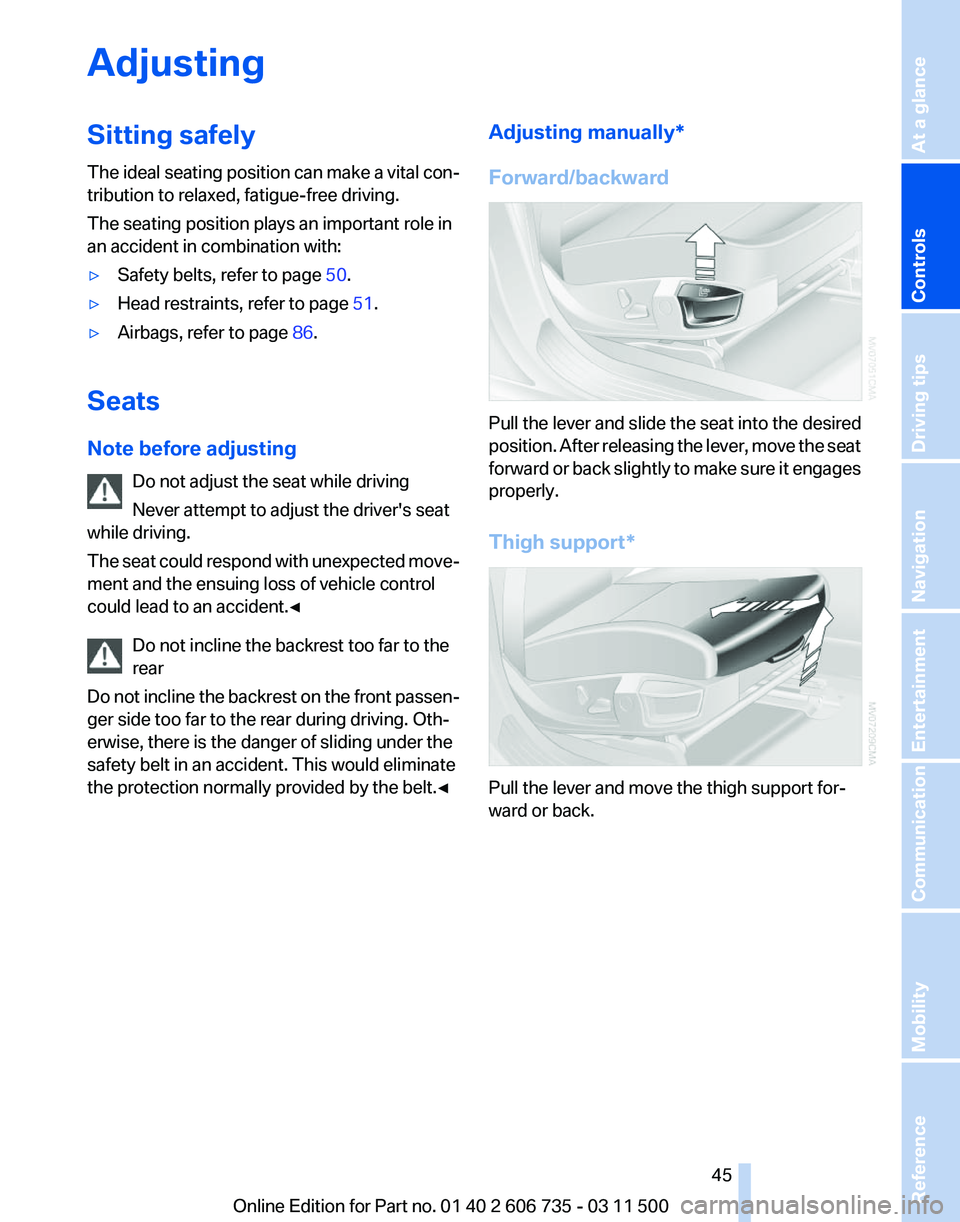
Forward/backward
Pull the lever and slide the seat into the desired
position.
After releasing the lever, move the seat
forward or back slightly to make sure it engages
properly.
Thigh support* Pull the lever and move the thigh support for‐
ward or back.
Seite 45
45Online Edition for Part no. 01 40 2 606 735 - 03 11 500
Reference Mobility Communication Entertainment Navigation Driving tips
Controls At a glance
Page 47 of 317
Press upper or lower section of switch.
BMW X5: rear seats
2nd row seats
If the row of seats is divided
*, each side can be
adjusted separately.
Do not adjust the seat while driving
Never adjust the 2nd row seats while the
vehicle is moving, as otherwise the passengers
on the 3rd row seats could be injured.
Make sure that the locking devices of the 2nd
row seats engage properly. Otherwise the re‐
straining effect of the safety belts during an ac‐
cident could be reduced.◀
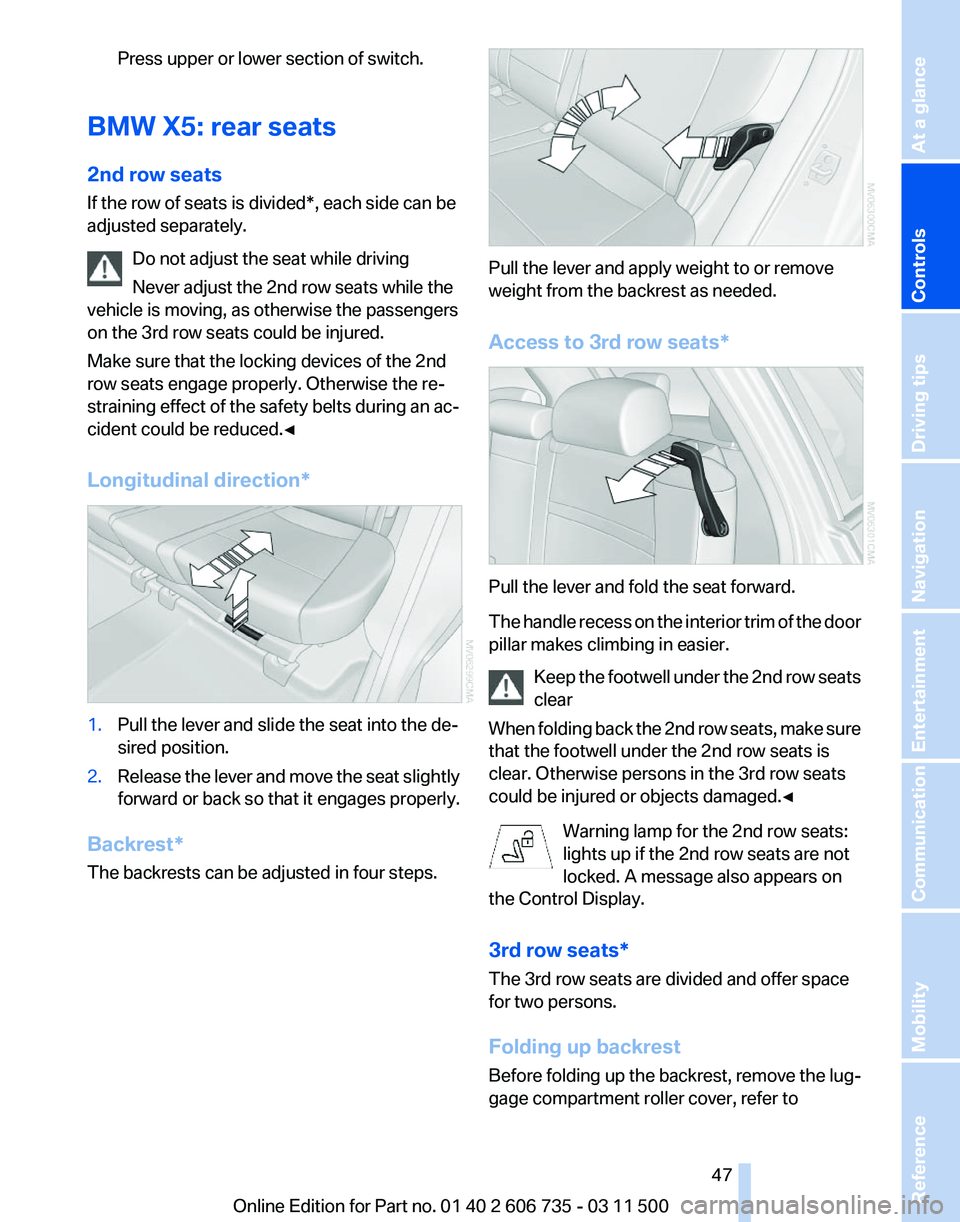
Longitudinal direction* 1.
Pull the lever and slide the seat into the de‐
sired position.
2. Release the lever and move the seat slightly
forward or back so that it engages properly.
Backrest*
The backrests can be adjusted in four steps. Pull the lever and apply weight to or remove
weight from the backrest as needed.
Access to 3rd row seats*
Pull the lever and fold the seat forward.
The
handle recess on the interior trim of the door
pillar makes climbing in easier.
Keep the footwell under the 2nd row seats
clear
When folding back the 2nd row seats, make sure
that the footwell under the 2nd row seats is
clear. Otherwise persons in the 3rd row seats
could be injured or objects damaged.◀
Warning lamp for the 2nd row seats:
lights up if the 2nd row seats are not
locked. A message also appears on
the Control Display.
3rd row seats*
The 3rd row seats are divided and offer space
for two persons.
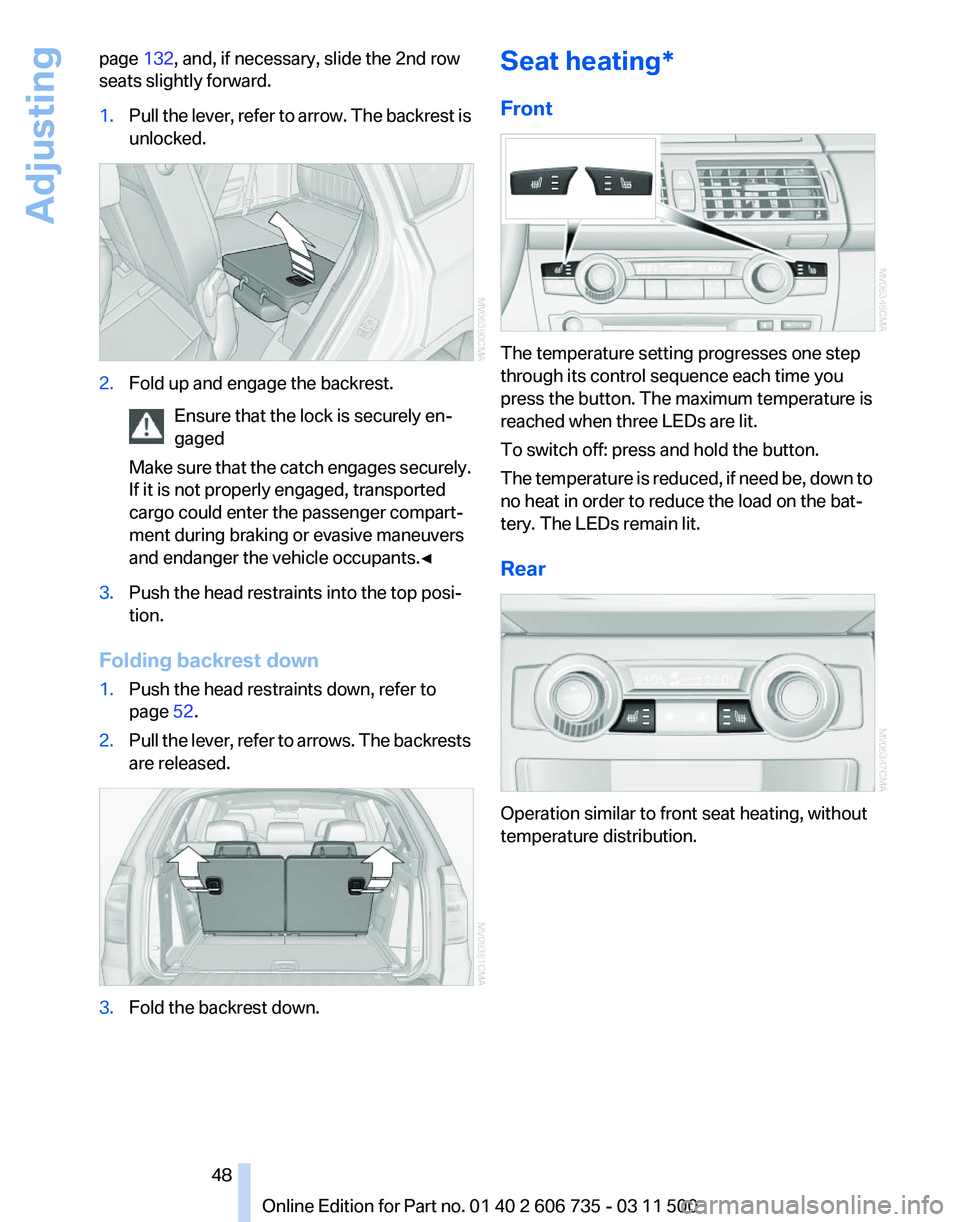
Folding up backrest
Before folding up the backrest, remove the lug‐
gage compartment roller cover, refer to Seite 47
47Online Edition for Part no. 01 40 2 606 735 - 03 11 500
Reference Mobility Communication Entertainment Navigation Driving tips
Controls At a glance
Page 48 of 317
page
132, and, if necessary, slide the 2nd row
seats slightly forward.
1. Pull the lever, refer to arrow. The backrest is
unlocked. 2.
Fold up and engage the backrest.
Ensure that the lock is securely en‐
gaged
Make
sure that the catch engages securely.
If it is not properly engaged, transported
cargo could enter the passenger compart‐
ment during braking or evasive maneuvers
and endanger the vehicle occupants.◀ 3.
Push the head restraints into the top posi‐
tion.
Folding backrest down
1. Push the head restraints down, refer to
page 52.
2. Pull the lever, refer to arrows. The backrests
are released. 3.
Fold the backrest down. Seat heating*
Front
The temperature setting progresses one step
through its control sequence each time you
press the button. The maximum temperature is
reached when three LEDs are lit.
To switch off: press and hold the button.
The
temperature is reduced, if need be, down to
no heat in order to reduce the load on the bat‐
tery. The LEDs remain lit.
Rear Operation similar to front seat heating, without
temperature distribution.
Seite 48
48 Online Edition for Part no. 01 40 2 606 735 - 03 11 500
Adjusting
Page 49 of 317
Active seat ventilation* and
seat heating
*
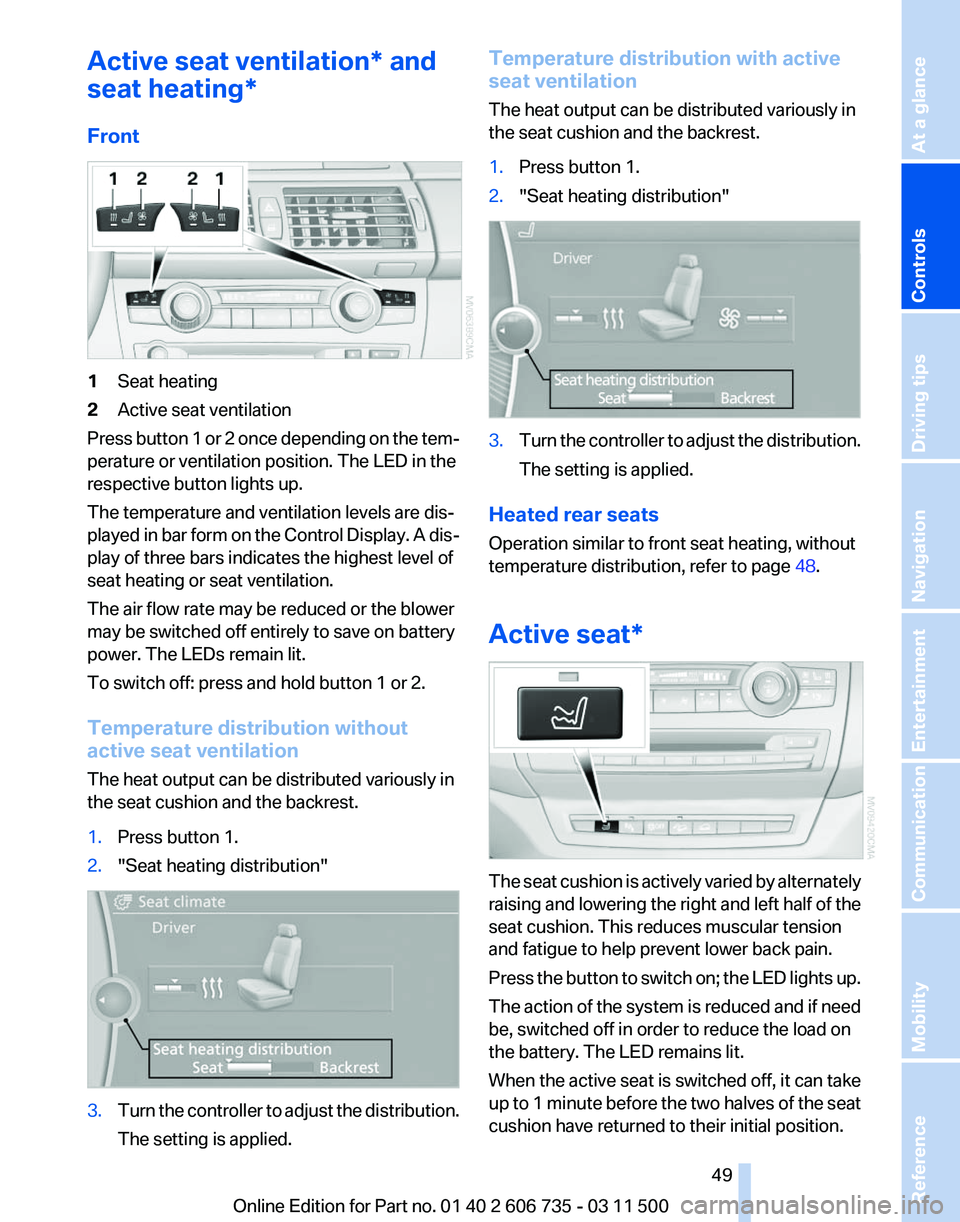
Front 1
Seat heating
2 Active seat ventilation
Press button 1 or 2 once depending on the tem‐
perature or ventilation position. The LED in the
respective button lights up.
The temperature and ventilation levels are dis‐
played
in bar form on the Control Display. A dis‐
play of three bars indicates the highest level of
seat heating or seat ventilation.
The air flow rate may be reduced or the blower
may be switched off entirely to save on battery
power. The LEDs remain lit.
To switch off: press and hold button 1 or 2.
Temperature distribution without
active seat ventilation
The heat output can be distributed variously in
the seat cushion and the backrest.
1. Press button 1.
2. "Seat heating distribution" 3.
Turn the controller to adjust the distribution.
The setting is applied. Temperature distribution with active
seat ventilation
The heat output can be distributed variously in
the seat cushion and the backrest.
1.
Press button 1.
2. "Seat heating distribution" 3.
Turn the controller to adjust the distribution.
The setting is applied.
Heated rear seats
Operation similar to front seat heating, without
temperature distribution, refer to page 48.
Active seat* The seat cushion is actively varied by alternately
raising
and lowering the right and left half of the
seat cushion. This reduces muscular tension
and fatigue to help prevent lower back pain.
Press the button to switch on; the LED lights up.
The action of the system is reduced and if need
be, switched off in order to reduce the load on
the battery. The LED remains lit.
When the active seat is switched off, it can take
up to 1 minute before the two halves of the seat
cushion have returned to their initial position.
Seite 49
49Online Edition for Part no. 01 40 2 606 735 - 03 11 500
Reference Mobility Communication Entertainment Navigation Driving tips
Controls At a glance
Page 51 of 317
Checking and replacing safety belts
Have the work performed only by your
service center; otherwise, it cannot be ensured
that this safety feature will function properly.◀
Belt-force limiter
The
effect of the belt-force limiter on the driver's
seat is dependent on the position of the driver's
seat.
To maintain the long-term accuracy of this func‐
tion, the driver's seat must be calibrated if a cor‐
responding message is displayed on the Control
Display.
Calibrating driver's seat
The warning lamp lights up. A mes‐
sage also appears on the Control Dis‐
play. Please calibrate the driver's seat.
1. Move the driver's seat forward until it stops.
2. Move the driver's seat forward again. It
briefly moves toward the front in the proc‐
ess.
3. Set the desired seating position again.
The calibration is completed when the message
on the Control Display disappears. Should this
message continue to be displayed, repeat the
calibration. If the message does not disappear
even
after repeated calibration, have the system
checked as soon as possible.
Do not carry out calibration while the ve‐
hicle is moving
Never carry out calibration while the vehicle is
moving, as this can cause accidents.
Make sure that no persons or objects become
wedged during the calibration process, as this
can cause injuries or damage.◀
Head restraints
Correctly adjusted head restraints
A correctly adjusted head restraint reduces the
risk of spinal injury in the event of an accident. Adjusting the head restraint
Correctly adjust the head restraints of all
occupied
seats; otherwise, there is an increased
risk of injury in an accident.◀
BMW X5: push the head restraints of the 3rd row
seats* into the top position.
Height
Adjust the head restraint so that its center is ap‐
prox. at ear level.
Distance
Adjust the distance so that the head restraint is
as close as possible to the back of the head.
Active front head restraints
In the event of a rear-end collision of sufficient
severity, the active head restraint reduces the
distance to the head.
Reduced protective function
▷Do not use seat or head restraint cov‐
ers.
▷ Do not hang objects, e.g., clothes hangers,
directly on the head restraints.
▷ Only attach accessories approved by BMW
to the seat or head restraint.
Otherwise, the protective function of the active
head
restraint will be impaired and the personal
safety of the occupants will be endangered.
Have the active head restraints reset after they
are triggered in a rear-end collision. Have this
work performed by the service center only; oth‐
erwise, this safety feature with not be opera‐
tional.◀
Please contact the service center if the front
head restraints need to be removed or installed.
Front seats: adjusting the height
Adjust the head restraint so that its center is ap‐
prox. at ear level. Seite 51
51Online Edition for Part no. 01 40 2 606 735 - 03 11 500
Reference Mobility Communication Entertainment Navigation Driving tips
Controls At a glance
Page 52 of 317
Electrical
Adjusting electrically.
Front seats: adjusting the distance
from the back of the head
Press the button and pull the headrest cushion
forward or push it back.
Compromised performance
Do
not place any objects behind the head‐
rest cushion. Otherwise, you can impair the
proper function of the head restraint.◀
Comfort seat*
The distance from the back of the seat occu‐
pant's head can be adjusted using the shoulder
support, refer to page 46. Adjusting side extensions
You can fold the side extensions on the head re‐
straint forward for increased lateral support in
the resting position.
BMW
X5: rear seats and 3rd row seats*
Adjusting the height ▷
To raise: pull.
▷ To lower: press the button, arrow 1, and
push the head restraint down.
In vehicles equipped with 3rd row seats, the
height
of the middle head restraint is not adjust‐
able.
Removing
1. Pull the head restraint upward to the stop.
2. Press the button, arrow 1, and pull the head
restraint out completely.
BMW X6: rear seats
The head restraints in the rear cannot be ad‐
justed and cannot be removed.
Seite 52
52 Online Edition for Part no. 01 40 2 606 735 - 03 11 500
Adjusting
Page 56 of 317
Transporting children safely
The right place for children
Note
Children in the vehicle
Do not leave children unattended in the
vehicle; otherwise, they could endanger them‐
selves and other persons, e.g., by opening the
doors.◀
Children should always be in the rear
Accident research shows that the safest place
for children is on the rear seat.
Transporting children in the rear
Transport
children younger than 13 years
of age or shorter than 5 ft/150 cm on the 2nd row
seats only, using child restraint fixing systems
suitable for the age, weight, and height of the
child. Otherwise, there is the increased danger
of injury in an accident.
Children 13 years of age or older must wear a
safety belt as soon as a suitable child restraint
fixing system can no longer be used, due to their
age, weight and size.◀
Children on the front passenger seat
Should it be necessary to use a child restraint
fixing system on the front passenger seat, make
sure that the front and side airbags on the front
passenger side are deactivated. Automatic de‐
activation of front passenger airbags, refer to
page 87.
Deactivating the front passenger airbags
If a child restraint fixing system is used in
the front passenger seat, the front passenger
airbags must be deactivated; otherwise, there is
an increased risk of injury to the child when the
airbags are triggered, even with a child restraint
fixing system.◀ Installing child restraint fixing
systems
Notes
Manufacturer's information for child re‐
straint fixing systems
To select, mount and use child restraint fixing
systems, observe the information provided by
the system manufacturer; otherwise, the pro‐
tective effect can be impaired.
◀
Note the following in vehicles equipped
with 3rd row seats
BMW X5: in vehicles with 3rd row seats*, make
sure that the seat of the 2nd row seats on which
the child restraint fixing system is mounted is
properly locked. Otherwise, there is an in‐
creased risk of injury for the child in an accident.
Do not mount child restraint fixing systems on
the 3rd row seats, as otherwise the protection
provided by these child restraint fixing systems
may be reduced.◀
BMW X5: before mounting a child restraint fixing
system in the center seat of the 2nd row seats,
move the outer seat cushions and backrests into
the rearmost positions.
On the front passenger seat
After installing a child restraint fixing system on
the front passenger seat, ensure that the front
and side airbags on the front passenger side are
deactivated.
Deactivating the front passenger airbags
If a child restraint fixing system is used in
the front passenger seat, the front passenger
airbags must be deactivated; otherwise, there is
an increased risk of injury to the child when the
airbags are triggered, even with a child restraint
fixing system.◀ Seite 56
56 Online Edition for Part no. 01 40 2 606 735 - 03 11 500
Transporting children safely
Page 57 of 317
Seat position and height
Before installing a child restraint fixing system,
move the front passenger seat as far back as
possible
and adjust its height to the highest po‐
sition to obtain the best possible position for the
belt and to offer optimal protection in the event
of an accident.
Do not change the seat position and height after
this.
Backrest width*
Before mounting a child restraint fixing system
on the front passenger seat, open the backrest
width, refer to page 46, completely. Do not
change the backrest width after this.
Backrest width for the child seat
Before installing a child restraint fixing
system in the front passenger seat, the backrest
width must be opened completely. Do not
change the adjustment after this; otherwise, the
stability of the child seat will be reduced.◀
Child seat security The rear safety belts
▷
BMW X5: all safety belts of the 2nd and 3rd
row seats*
▷ BMW X6: all safety belts of the 2nd row seats
And the safety belt for the front passenger can
be
locked to prevent extension in order to permit
attachment of child restraint fixing systems.
Locking the safety belt
1. Pull out the belt webbing completely.
2. Secure the child restraint fixing system with
the belt. 3.
Allow the belt webbing to be pulled in and
pull it taut against the child restraint fixing
system. The safety belt is locked.
Unlocking the safety belt
1. Open the belt buckle.
2. Remove the child restraint fixing system.
3. Allow the belt webbing to be pulled in com‐
pletely.
LATCH child restraint fixing
system
LATCH:
Lower Anchors and Tether for Children.
Note Manufacturer's information for LATCH
child restraint fixing systems
To mount and use the LATCH child restraint fix‐
ing systems, observe the operating and safety
information from the system manufacturer; oth‐
erwise, the level of protection may be reduced.◀
Mounts for the lower LATCH anchors
Correctly engage the lower LATCH an‐
chors
Make sure that the lower LATCH anchors have
properly engaged and that the child restraint fix‐
ing system is resting snugly against the back‐
rest; otherwise, the degree of protection offered
may be reduced.◀ The mounts for the lower LATCH anchors are
located at the points indicated by the arrows. Seite 57
57Online Edition for Part no. 01 40 2 606 735 - 03 11 500
Reference Mobility Communication Entertainment Navigation Driving tips
Controls At a glance