2012 BMW X5M rear entertainment
[x] Cancel search: rear entertainmentPage 5 of 317

Contents
The fastest way to find information on a partic‐
ular topic or item is by using the index, refer to
page
302.
Using this Owner's Manual
6 Notes
At a glance
12 Cockpit
18 iDrive
24 Voice activation system
Controls
28 Opening and closing
45 Adjusting
56 Transporting children safely
61 Driving
71 Displays
81 Lamps
86 Safety
96 Driving stability control systems
102 Driving comfort
119 Climate
127 Interior equipment
134 Storage compartments
Driving tips
142 Things to remember when driving
Navigation
152 Navigation system
153 Destination entry
161 Destination guidance
168 What to do if...
Entertainment
172 Tone
174 Radio
181 CD/multimedia
200 DVD system in rear Communication
216
Telephone
227 Office
235 Contacts
237 ConnectedDrive
Mobility
246 Refueling
248 Fuel
252 Wheels and tires
263 Engine compartment
268 Maintenance
270 Replacing components
280 Breakdown assistance
285 Care
Reference
290 Technical data
295 Short commands for voice activation
system
302 Everything from A to Z
Seite 5
Online Edition for Part no. 01 40 2 606 735 - 03 11 500 Reference Mobility Communication Entertainment Navigation Driving tips Controls At a glance
Page 13 of 317

Turn signal 66
High beams, head‐
lamp flasher 83
High-beam Assistant* 83
Roadside parking lamps* 83
Computer 73
Settings and information about the
vehicle 71
7 BMW X6: shifting up or down with automatic
transmission 69
8 Instrument cluster 14
9 Steering column stalk, right Windshield wipers 67
Rain sensor
67 BMW X5: rear window wip‐
ers 68
10 Start/stop the engine and switch
the ignition on/off 61
11 Ignition lock 61
12 Steering wheel buttons, right Change the radio station
Stopping a traffic announcement
Select a music track
Scrolling through the redial list
Next entertainment source Recirculated-air mode 122
Steering wheel heating* 55
Lane departure warning* 93
13 Horn, the entire surface
14 15
Cruise control lever Cruise control*
108 Active cruise control*
102
16 Steering wheel buttons, left Telephone* 216
Volume
Activate/deactivate the voice acti‐
vation system* 24
17 Releasing the hood 264
Seite 13
13Online Edition for Part no. 01 40 2 606 735 - 03 11 500
Reference Mobility Communication Entertainment Navigation Driving tips Controls
At a glance
Page 31 of 317

Press the button on the remote control for at
least 3 seconds.
To switch off the alarm: press any button.
Unlocking tailgate Press the button on the remote control for
approx. 1 second and release.
The tailgate will open slightly, regardless of
whether it was previously locked or unlocked.
With automatic tailgate operation
*: the tailgate
opens automatically.
The tailgate pivots back and up when it opens.
Ensure that adequate clearance is available be‐
fore opening.
To avoid locking yourself out of the vehicle, do
not place the remote control into the cargo area.
The tailgate is locked again as soon as it is
pushed closed.
Before and after each trip, check that the tailgate
has not been inadvertently unlocked.
Provide edge protection
Sharp or angular objects can hit the rear
window while driving and damage the heating
wires of the rear window. Provide edge protec‐
tion.◀
Confirmation signals from the vehicle
1. "Settings"
2. "Door locks"
3. "Flash when lock/unlock" Retrieving the seat, mirror, and
steering wheel settings
*
The driver's seat, exterior mirror, and steering
wheel positions* selected last are stored for the
currently used remote control.
When the vehicle is being unlocked, these po‐
sitions are automatically retrieved if the setting
is activated.
Pinch hazard when moving back the seat
If this function is used, first make sure that
the footwell behind the driver's seat is empty.
Failure to do so could cause injury to persons or
damage to objects behind the seat as a result of
a rearward movement of the seat.◀
The adjustment procedure is interrupted:
▷ When a seat position switch is pressed.
▷ When a button of the seat and mirror mem‐
ory is pressed.
Selecting automatic activation
1. "Settings"
2. "Door locks"
3. "Last seat position auto." Malfunctions
Local
radio waves may interfere with the remote
control.
In this case, unlock and lock the car at the door
lock with the integrated key.
If the car can no longer be locked with a remote
control, the battery in the remote control is dis‐
charged. Use the remote control during an ex‐
tended drive in order to recharge the battery,
refer to page 28. The remote control for Comfort Seite 31
31Online Edition for Part no. 01 40 2 606 735 - 03 11 500
Reference Mobility Communication Entertainment Navigation Driving tips
Controls At a glance
Page 41 of 317

▷ Press the switch beyond the resist‐
ance point.
The window opens automatically.
Pressing again stops the motion.
Closing
Danger of pinching
Monitor the closing process and make
sure
that the closing path of the window is clear;
otherwise, injuries may result.◀
▷ Pull
the switch to the resistance point.
The window closes while the switch is held.
▷ Pull the switch beyond the resistance
point.
The window closes automatically.
Pressing the switch stops the motion.
Convenient operation, refer to page 30, via the
remote control or the door lock.
Convenient
closing, refer to page 38, with Com‐
fort Access*.
After the ignition is switched off
When the remote control is removed or the ig‐
nition is switched off, the windows can continue
to be operated for approx. 1 minute as long as
no door is opened.
Pinch protection system
If the closing force exceeds a specific value as a
window closes, the closing action is interrupted.
The window reopens slightly.
Danger of pinching even with pinch pro‐
tection
Even with the pinch protection system, check
that the window's closing path is clear; other‐
wise, the closing action may not stop in certain
situations, e.g., if thin objects are present.◀ Do not use window accessories
Do
not install any accessories in the range
of movement of the windows; otherwise, the
pinch protection system will be impaired.◀
Closing without the pinch protection
system
For example, if there is an external danger or if
ice on the windows prevents a window from
closing normally, proceed as follows:
1. Pull the switch past the resistance point and
hold it there.
Pinch protection is limited and the window
reopens
slightly if the closing force exceeds
a certain value.
2. Pull the switch past the resistance point
again within approx. 4 seconds and hold it
there.
The window closes without pinch protec‐
tion.
Safety switch
With the safety switch, the rear windows are
prevented from being opened or closed via the
switches in the rear passenger area, such as by
children. Press the button.
The LED lights up if the safety function is
switched on.
Safety switch for rear operation
Press
the safety switch when transporting
children in the rear; otherwise, injury may result
if the windows are closed without supervision.◀
Roller sunblinds for the rear
side windows*
Pull the loop of the roller sun blind and hook onto
bracket. Seite 41
41Online Edition for Part no. 01 40 2 606 735 - 03 11 500
Reference Mobility Communication Entertainment Navigation Driving tips
Controls At a glance
Page 45 of 317

Adjusting
Sitting safely
The
ideal seating position can make a vital con‐
tribution to relaxed, fatigue-free driving.
The seating position plays an important role in
an accident in combination with:
▷ Safety belts, refer to page 50.
▷ Head restraints, refer to page 51.
▷ Airbags, refer to page 86.
Seats
Note before adjusting Do not adjust the seat while driving
Never attempt to adjust the driver's seat
while driving.
The
seat could respond with unexpected move‐
ment and the ensuing loss of vehicle control
could lead to an accident.◀
Do not incline the backrest too far to the
rear
Do not incline the backrest on the front passen‐
ger side too far to the rear during driving. Oth‐
erwise, there is the danger of sliding under the
safety belt in an accident. This would eliminate
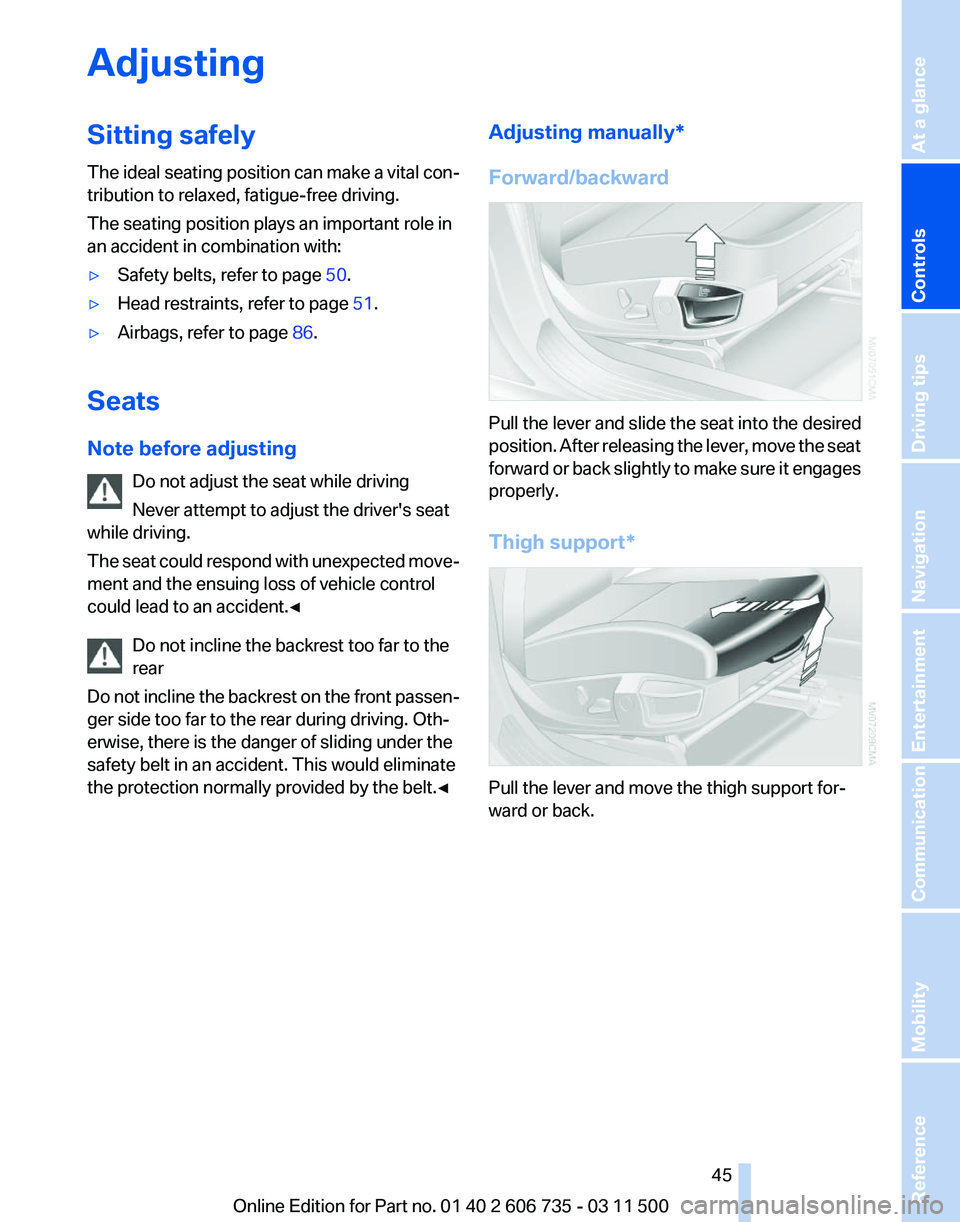
the protection normally provided by the belt.◀ Adjusting manually*
Forward/backward
Pull the lever and slide the seat into the desired
position.
After releasing the lever, move the seat
forward or back slightly to make sure it engages
properly.
Thigh support* Pull the lever and move the thigh support for‐
ward or back.
Seite 45
45Online Edition for Part no. 01 40 2 606 735 - 03 11 500
Reference Mobility Communication Entertainment Navigation Driving tips
Controls At a glance
Page 47 of 317

Press upper or lower section of switch.
BMW X5: rear seats
2nd row seats
If the row of seats is divided
*, each side can be
adjusted separately.
Do not adjust the seat while driving
Never adjust the 2nd row seats while the
vehicle is moving, as otherwise the passengers
on the 3rd row seats could be injured.
Make sure that the locking devices of the 2nd
row seats engage properly. Otherwise the re‐
straining effect of the safety belts during an ac‐
cident could be reduced.◀
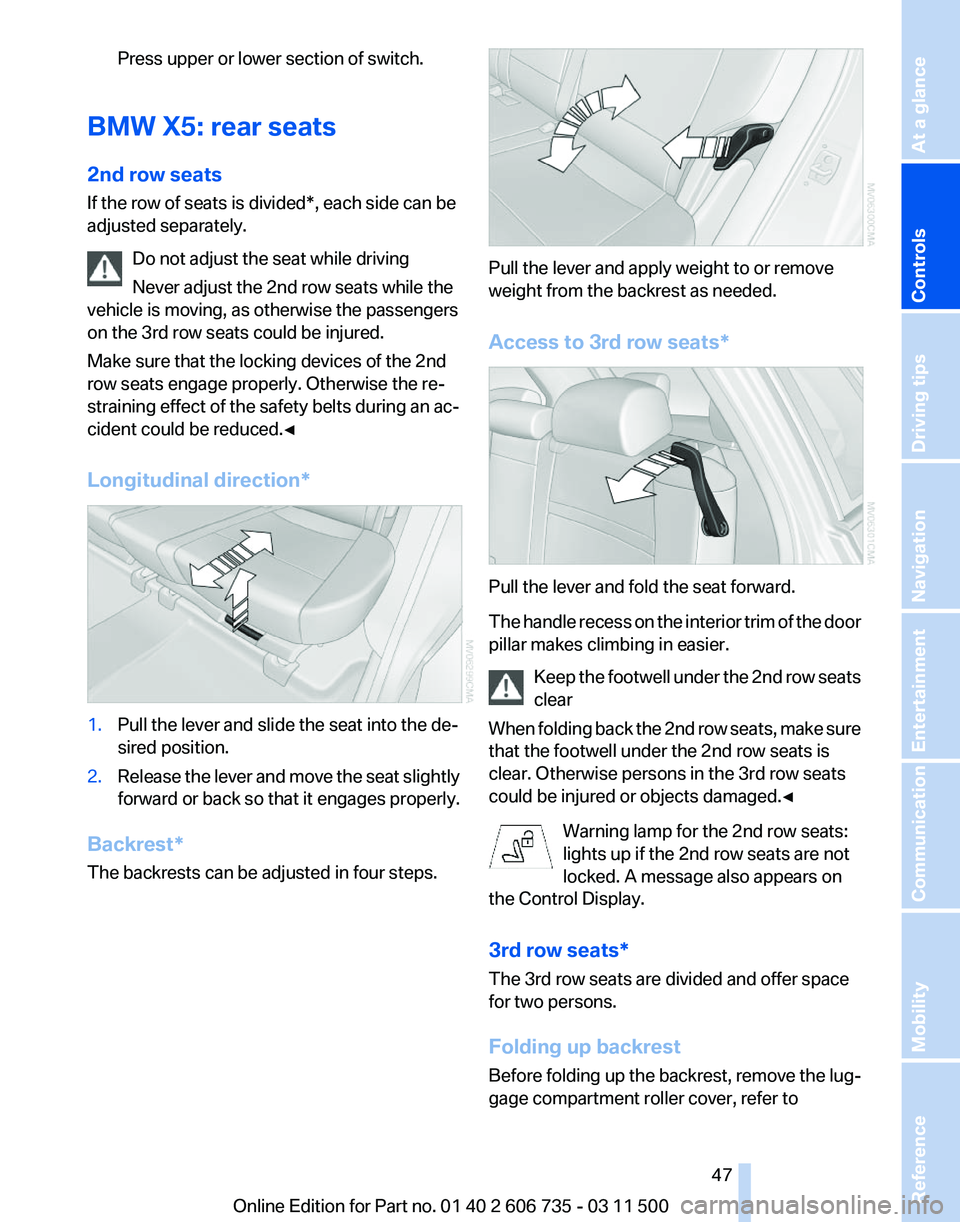
Longitudinal direction* 1.
Pull the lever and slide the seat into the de‐
sired position.
2. Release the lever and move the seat slightly
forward or back so that it engages properly.
Backrest*
The backrests can be adjusted in four steps. Pull the lever and apply weight to or remove
weight from the backrest as needed.
Access to 3rd row seats*
Pull the lever and fold the seat forward.
The
handle recess on the interior trim of the door
pillar makes climbing in easier.
Keep the footwell under the 2nd row seats
clear
When folding back the 2nd row seats, make sure
that the footwell under the 2nd row seats is
clear. Otherwise persons in the 3rd row seats
could be injured or objects damaged.◀
Warning lamp for the 2nd row seats:
lights up if the 2nd row seats are not
locked. A message also appears on
the Control Display.
3rd row seats*
The 3rd row seats are divided and offer space
for two persons.
Folding up backrest
Before folding up the backrest, remove the lug‐
gage compartment roller cover, refer to Seite 47
47Online Edition for Part no. 01 40 2 606 735 - 03 11 500
Reference Mobility Communication Entertainment Navigation Driving tips
Controls At a glance
Page 49 of 317

Active seat ventilation* and
seat heating
*
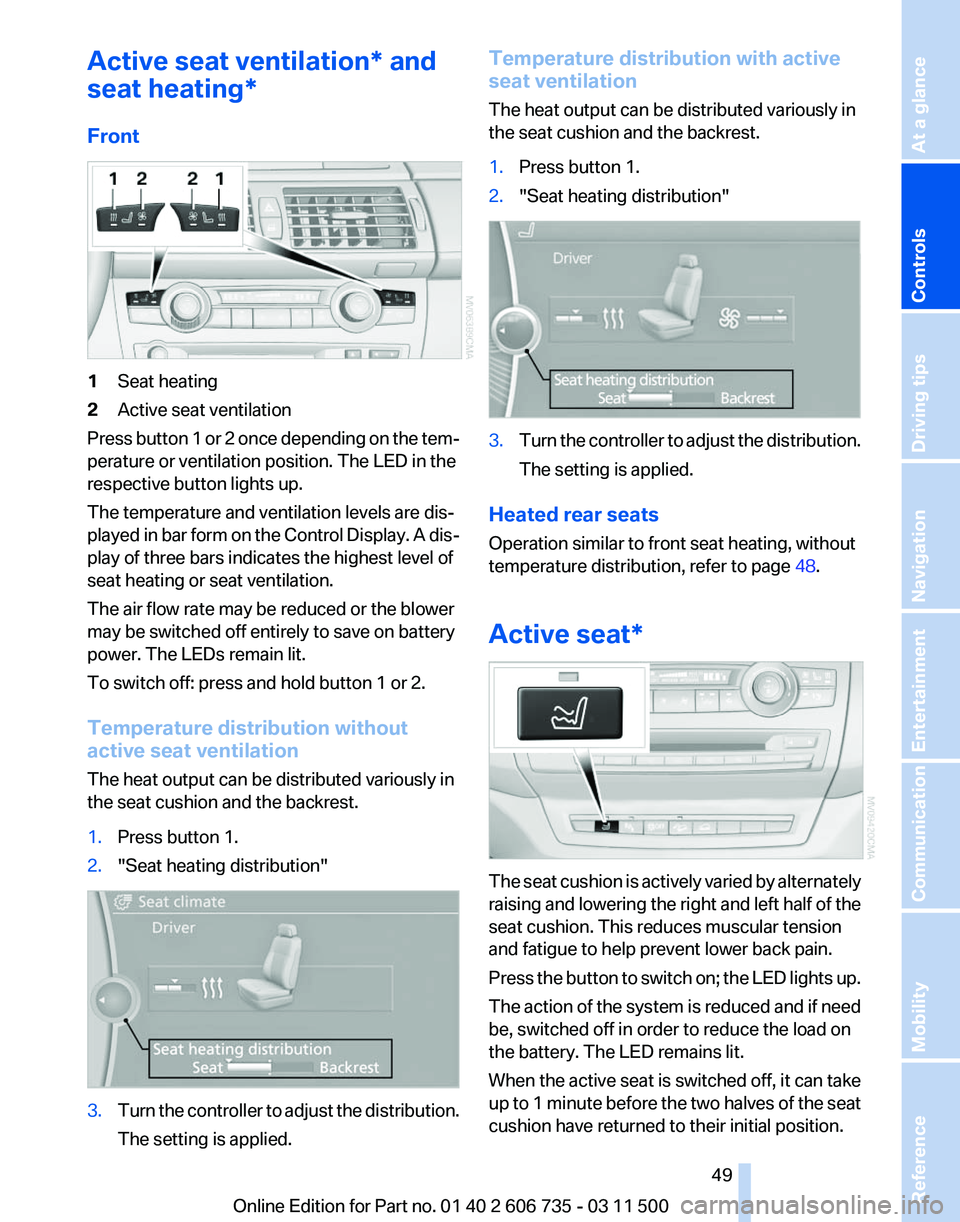
Front 1
Seat heating
2 Active seat ventilation
Press button 1 or 2 once depending on the tem‐
perature or ventilation position. The LED in the
respective button lights up.
The temperature and ventilation levels are dis‐
played
in bar form on the Control Display. A dis‐
play of three bars indicates the highest level of
seat heating or seat ventilation.
The air flow rate may be reduced or the blower
may be switched off entirely to save on battery
power. The LEDs remain lit.
To switch off: press and hold button 1 or 2.
Temperature distribution without
active seat ventilation
The heat output can be distributed variously in
the seat cushion and the backrest.
1. Press button 1.
2. "Seat heating distribution" 3.
Turn the controller to adjust the distribution.
The setting is applied. Temperature distribution with active
seat ventilation
The heat output can be distributed variously in
the seat cushion and the backrest.
1.
Press button 1.
2. "Seat heating distribution" 3.
Turn the controller to adjust the distribution.
The setting is applied.
Heated rear seats
Operation similar to front seat heating, without
temperature distribution, refer to page 48.
Active seat* The seat cushion is actively varied by alternately
raising
and lowering the right and left half of the
seat cushion. This reduces muscular tension
and fatigue to help prevent lower back pain.
Press the button to switch on; the LED lights up.
The action of the system is reduced and if need
be, switched off in order to reduce the load on
the battery. The LED remains lit.
When the active seat is switched off, it can take
up to 1 minute before the two halves of the seat
cushion have returned to their initial position.
Seite 49
49Online Edition for Part no. 01 40 2 606 735 - 03 11 500
Reference Mobility Communication Entertainment Navigation Driving tips
Controls At a glance
Page 51 of 317

Checking and replacing safety belts
Have the work performed only by your
service center; otherwise, it cannot be ensured
that this safety feature will function properly.◀
Belt-force limiter
The
effect of the belt-force limiter on the driver's
seat is dependent on the position of the driver's
seat.
To maintain the long-term accuracy of this func‐
tion, the driver's seat must be calibrated if a cor‐
responding message is displayed on the Control
Display.
Calibrating driver's seat
The warning lamp lights up. A mes‐
sage also appears on the Control Dis‐
play. Please calibrate the driver's seat.
1. Move the driver's seat forward until it stops.
2. Move the driver's seat forward again. It
briefly moves toward the front in the proc‐
ess.
3. Set the desired seating position again.
The calibration is completed when the message
on the Control Display disappears. Should this
message continue to be displayed, repeat the
calibration. If the message does not disappear
even
after repeated calibration, have the system
checked as soon as possible.
Do not carry out calibration while the ve‐
hicle is moving
Never carry out calibration while the vehicle is
moving, as this can cause accidents.
Make sure that no persons or objects become
wedged during the calibration process, as this
can cause injuries or damage.◀
Head restraints
Correctly adjusted head restraints
A correctly adjusted head restraint reduces the
risk of spinal injury in the event of an accident. Adjusting the head restraint
Correctly adjust the head restraints of all
occupied
seats; otherwise, there is an increased
risk of injury in an accident.◀
BMW X5: push the head restraints of the 3rd row
seats* into the top position.
Height
Adjust the head restraint so that its center is ap‐
prox. at ear level.
Distance
Adjust the distance so that the head restraint is
as close as possible to the back of the head.
Active front head restraints
In the event of a rear-end collision of sufficient
severity, the active head restraint reduces the
distance to the head.
Reduced protective function
▷Do not use seat or head restraint cov‐
ers.
▷ Do not hang objects, e.g., clothes hangers,
directly on the head restraints.
▷ Only attach accessories approved by BMW
to the seat or head restraint.
Otherwise, the protective function of the active
head
restraint will be impaired and the personal
safety of the occupants will be endangered.
Have the active head restraints reset after they
are triggered in a rear-end collision. Have this
work performed by the service center only; oth‐
erwise, this safety feature with not be opera‐
tional.◀
Please contact the service center if the front
head restraints need to be removed or installed.
Front seats: adjusting the height
Adjust the head restraint so that its center is ap‐
prox. at ear level. Seite 51
51Online Edition for Part no. 01 40 2 606 735 - 03 11 500
Reference Mobility Communication Entertainment Navigation Driving tips
Controls At a glance