2012 BMW 650I XDRIVE COUPE ignition
[x] Cancel search: ignitionPage 134 of 303
Switching on1.Switch off the ignition.2. Press the right side of the button on
the driver's side.
is shown on the display of the automatic cli‐
mate control.
The interior temperature, air volume and air dis‐
tribution can be adjusted with the ignition
switched on.
Switching off
At the lowest fan speed, press the left side of the
button on the driver's side.
on the display of the automatic climate control
goes out.
Switching the system on/off
Switching off
▷Complete system: At the lowest fan speed, press the
left side of the button on the driver's
side.▷On the front passenger side:
At the lowest fan speed, press the
left side of the button on the front
passenger side.
Switching on
Press any button.
Microfilter/activated-charcoal filter
The microfilter removes dust and pollen from
the incoming air.
The activated-charcoal filter removes gaseous
pollutants from the outside air that enters the
vehicle.
This combined filter should be replaced during
scheduled maintenance, refer to page 260, of
your vehicle.
Ventilation
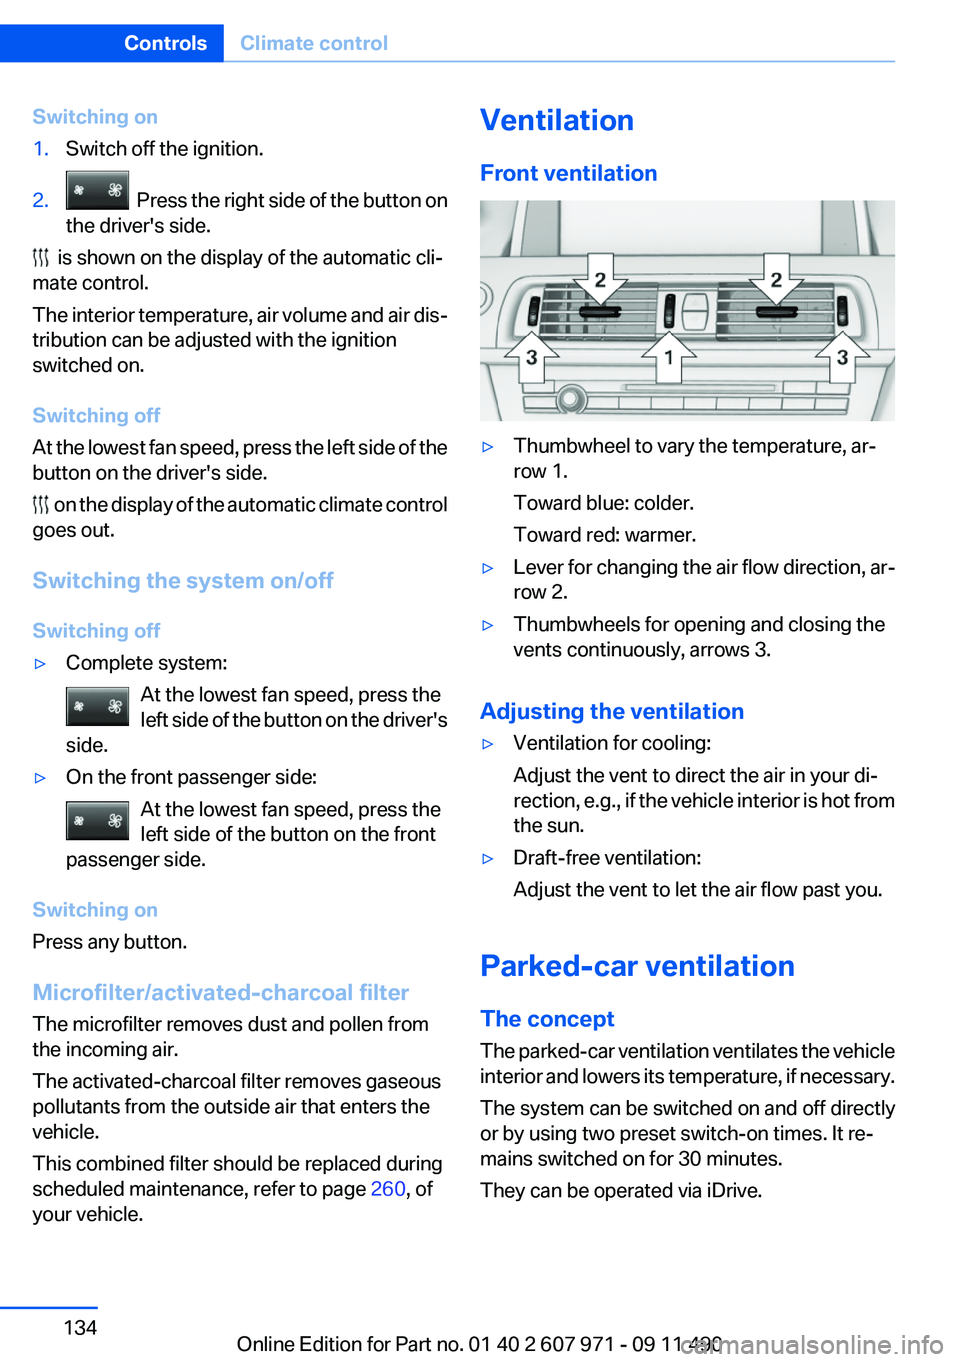
Front ventilation▷Thumbwheel to vary the temperature, ar‐
row 1.
Toward blue: colder.
Toward red: warmer.▷Lever for changing the air flow direction, ar‐
row 2.▷Thumbwheels for opening and closing the
vents continuously, arrows 3.
Adjusting the ventilation
▷Ventilation for cooling:
Adjust the vent to direct the air in your di‐
rection, e.g., if the vehicle interior is hot from
the sun.▷Draft-free ventilation:
Adjust the vent to let the air flow past you.
Parked-car ventilation
The concept
The parked-car ventilation ventilates the vehicle
interior and lowers its temperature, if necessary.
The system can be switched on and off directly
or by using two preset switch-on times. It re‐
mains switched on for 30 minutes.
They can be operated via iDrive.
Seite 134ControlsClimate control134
Online Edition for Part no. 01 40 2 607 971 - 09 11 490
Page 136 of 303
Interior equipmentIntegrated universal remote
control
The concept
This system can replace up to three different
hand-held transmitters for various types of re‐
mote-controlled equipment, such as garage
doors or lighting systems.
The hand-held transmitter signal can be pro‐
grammed on one of the three memory buttons.
The corresponding device can then be operated
using the programmed memory button.
The LED indicates that a signal is being trans‐
mitted.
When selling the vehicle, delete the stored pro‐
grams for security reasons.
During programming
During programming and before activat‐
ing a device using the integrated universal re‐
mote control, ensure that there are no people,
animals, or objects in the range of movement of
the remote-controlled device; otherwise, there
is a risk of injury or damage.
Also follow the safety instructions of the hand-
held transmitter.◀
Compatibility If this symbol is printed on the packaging
or in the instructions of the hand-held
transmitter, the remote-controlled de‐
vice is generally compatible with the integrated
universal remote control.
If you have any questions, please contact:▷Your service center.▷www.homelink.com on the Internet.
HomeLink is a registered trademark of Johnson
Controls, Inc.
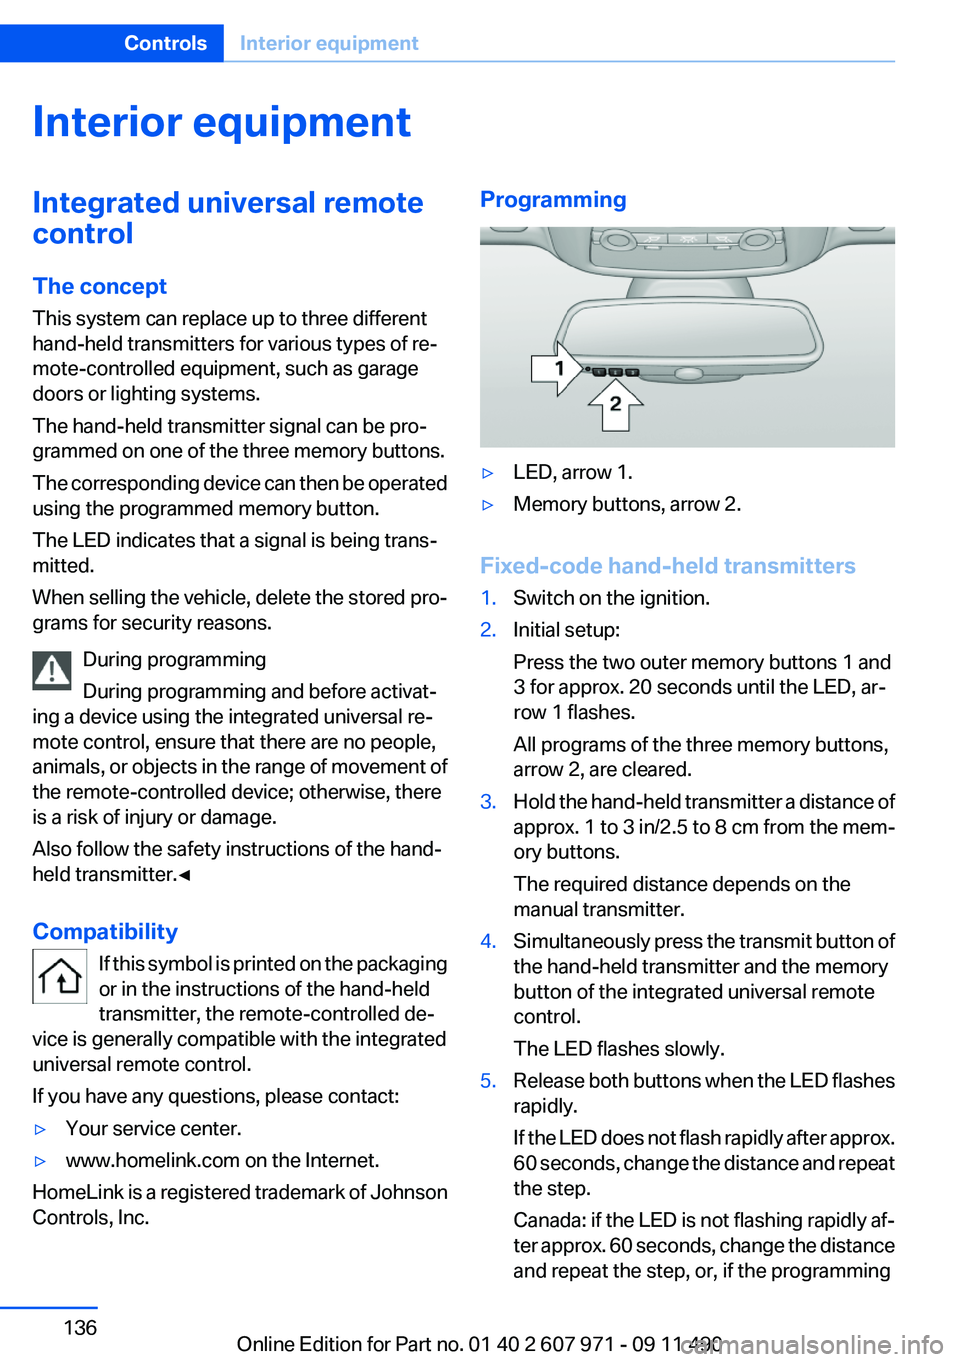
Programming▷LED, arrow 1.▷Memory buttons, arrow 2.
Fixed-code hand-held transmitters
1.Switch on the ignition.2.Initial setup:
Press the two outer memory buttons 1 and
3 for approx. 20 seconds until the LED, ar‐
row 1 flashes.
All programs of the three memory buttons,
arrow 2, are cleared.3.Hold the hand-held transmitter a distance of
approx. 1 to 3 in/2.5 to 8 cm from the mem‐
ory buttons.
The required distance depends on the
manual transmitter.4.Simultaneously press the transmit button of
the hand-held transmitter and the memory
button of the integrated universal remote
control.
The LED flashes slowly.5.Release both buttons when the LED flashes
rapidly.
If the LED does not flash rapidly after approx.
60 seconds, change the distance and repeat
the step.
Canada: if the LED is not flashing rapidly af‐
ter approx. 60 seconds, change the distance
and repeat the step, or, if the programmingSeite 136ControlsInterior equipment136
Online Edition for Part no. 01 40 2 607 971 - 09 11 490
Page 137 of 303
was interrupted by the hand-held transmit‐
ter, hold down the memory button and press
and release the button on the hand-held
transmitter again for 2 seconds.6.To program other hand-held transmitters,
repeat steps 3 to 5.
The device can be operated using the memory
button with the engine running or the ignition
switched on.
Malfunction
If the device cannot be used after repeated at‐
tempts at programming, please check whether
the hand-held transmitter is equipped with an
alternating code system.
To do so:
▷Read the instructions of the hand-held
transmitter.▷Hold down the memory button of the
integrated universal remote control longer.
If the LED of the integrated universal remote
control flashes rapidly for a brief period and then
lights up continuously, the hand-held transmit‐
ter is equipped with an alternating code system.
In this case, program the memory buttons as
described under Alternating-code hand-held
transmitters.
Alternating-code hand-held
transmitters
Please obtain information on synchronizing the
device in the operating manual of the device be‐
ing set up.
Programming will be easier with the aid of a sec‐
ond person.
1.Park the vehicle within range of the remote-
controlled device.2.Program the integrated universal remote
control as described above under Fixed-
code hand-held transmitters.3.Locate the button on the receiver of the de‐
vice to be set, e.g., on the drive.4.Press the button on the receiver of the de‐
vice to be set. You have approx. 30 seconds
for the next step.5.Hold down the programmed memory button
of the integrated universal remote for ap‐
prox. 3 seconds. Repeat this work step, if
necessary, up to three times.
The device can be operated using the memory
button with the engine running or the ignition
switched on.
Reassigning individual programs
1.Switch on the ignition.2.Hold the hand-held transmitter a distance of
approx. 1 to 3 in/2.5 to 8 cm from the mem‐
ory buttons.
The required distance depends on the
manual transmitter.3.Hold down the memory button of the
integrated universal remote control.4.If the LED flashes slowly after approx.
20 seconds, press the transmit button on
the hand-held transmitter.5.Release both buttons when the LED flashes
rapidly.
If the LED does not flash rapidly after approx.
60 seconds, change the distance and repeat
the step.
Canada: if the LED is not flashing rapidly after
approx. 60 seconds, change the distance and
repeat the step, or, if the programming was in‐
terrupted by the hand-held transmitter, hold
down the memory button and press and release
the button on the hand-held transmitter again
for 2 seconds.
Deleting all stored programs
Press the two outer memory buttons for approx.
20 seconds until the LED flashes rapidly.
All stored programs are deleted.
The programs cannot be deleted individually.
Seite 137Interior equipmentControls137
Online Edition for Part no. 01 40 2 607 971 - 09 11 490
Page 138 of 303
Ashtray/cigarette lighter
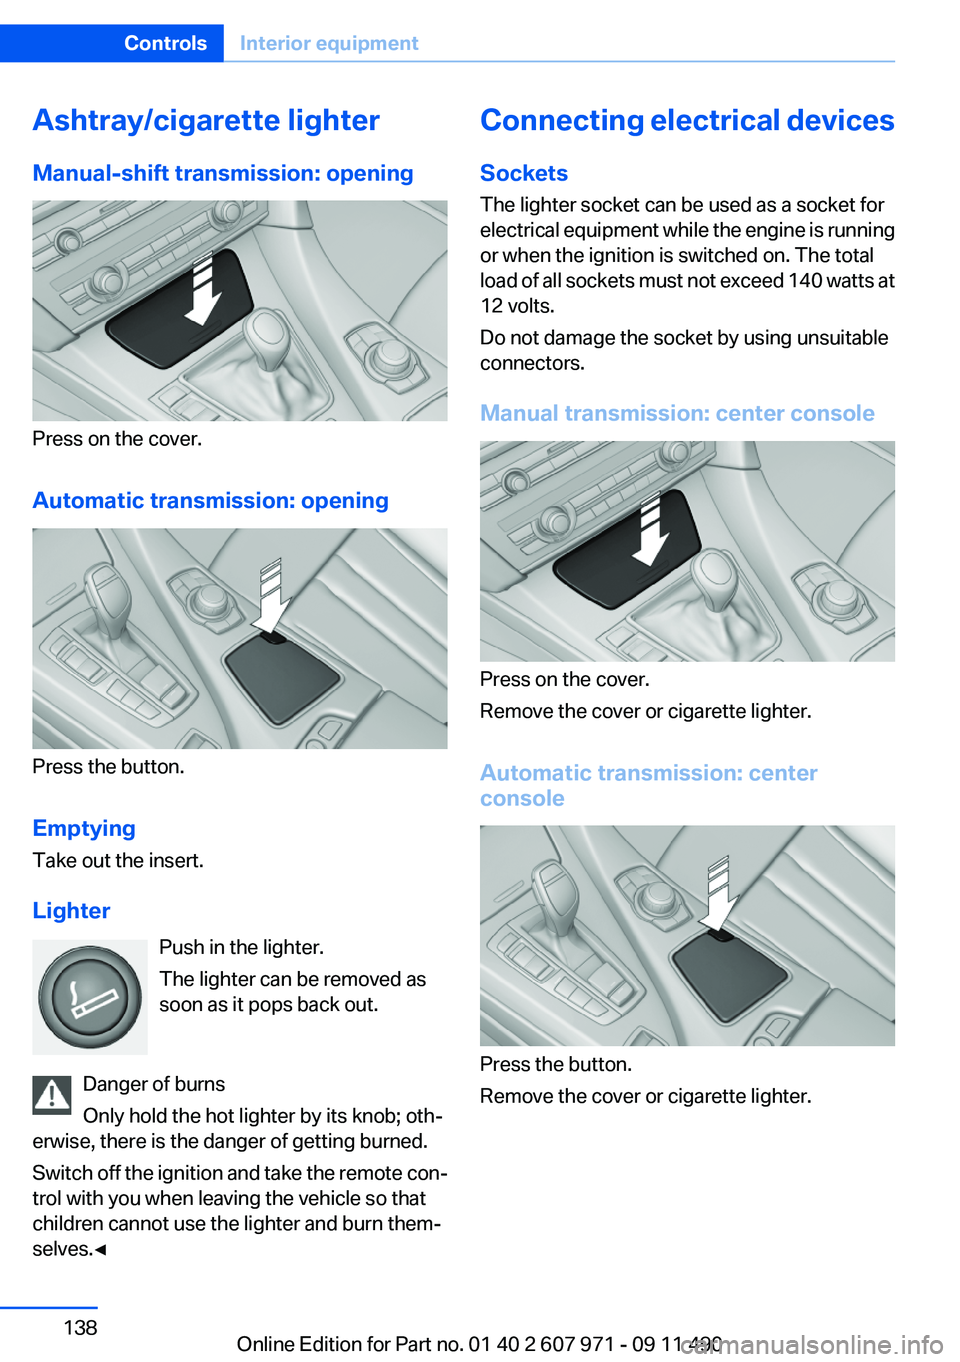
Manual-shift transmission: opening
Press on the cover.
Automatic transmission: opening
Press the button.
Emptying
Take out the insert.
Lighter Push in the lighter.
The lighter can be removed as
soon as it pops back out.
Danger of burns
Only hold the hot lighter by its knob; oth‐
erwise, there is the danger of getting burned.
Switch off the ignition and take the remote con‐
trol with you when leaving the vehicle so that
children cannot use the lighter and burn them‐
selves.◀
Connecting electrical devices
Sockets
The lighter socket can be used as a socket for
electrical equipment while the engine is running
or when the ignition is switched on. The total
load of all sockets must not exceed 140 watts at
12 volts.
Do not damage the socket by using unsuitable
connectors.
Manual transmission: center console
Press on the cover.
Remove the cover or cigarette lighter.
Automatic transmission: center
console
Press the button.
Remove the cover or cigarette lighter.
Seite 138ControlsInterior equipment138
Online Edition for Part no. 01 40 2 607 971 - 09 11 490
Page 179 of 303
RadioVehicle equipment
All standard, country-specific and optional
equipment that is offered in the model series is
described in this chapter. Therefore, equipment
is also described that is not available in a vehicle,
e. g., because of the selected optional equip‐
ment or country variant. This also applies for
safety-related functions and systems.
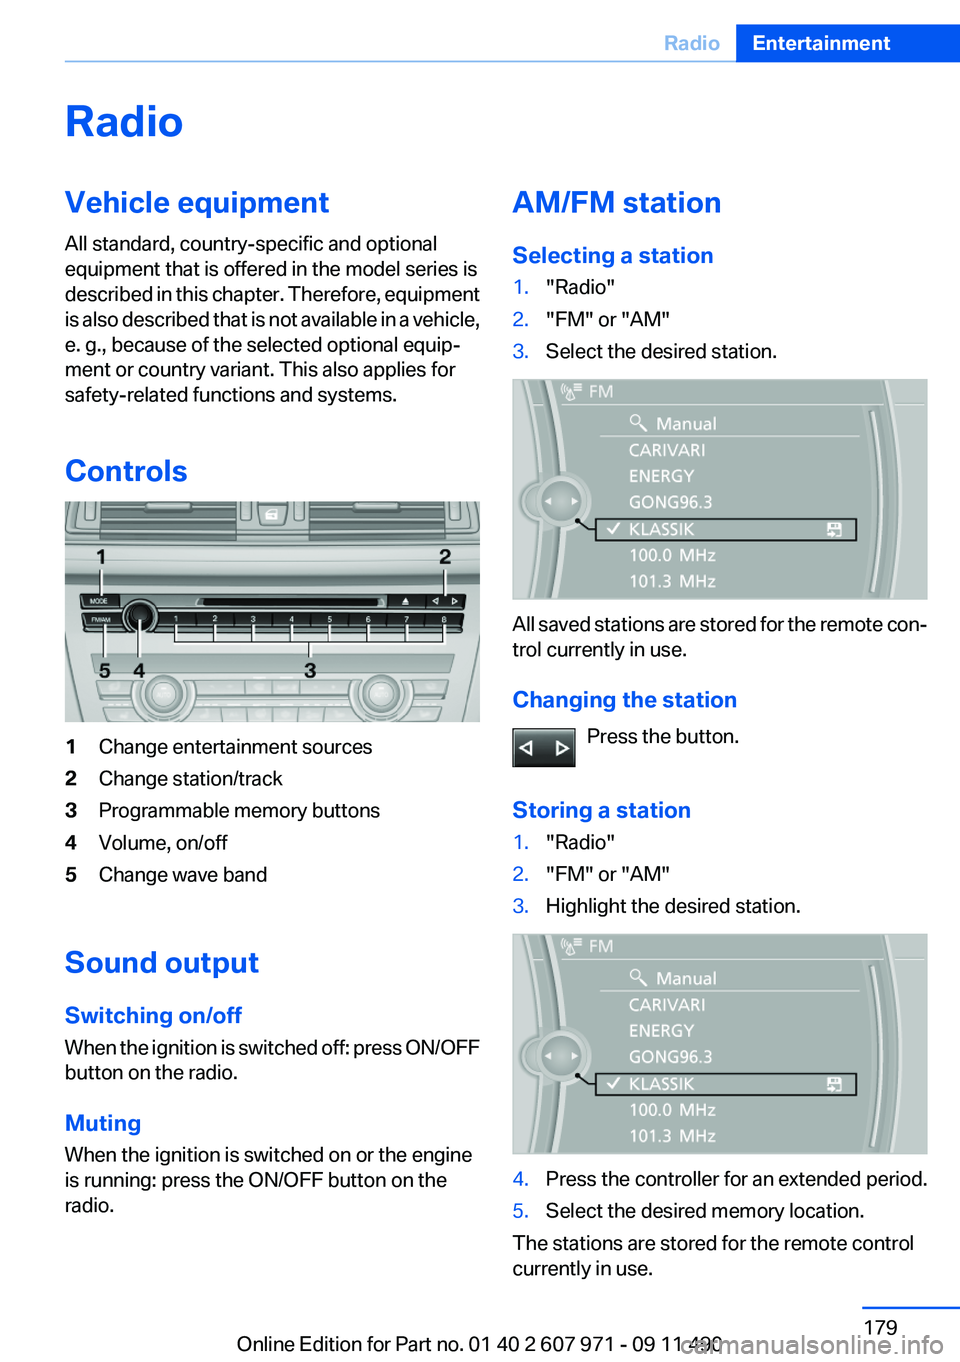
Controls1Change entertainment sources2Change station/track3Programmable memory buttons4Volume, on/off5Change wave band
Sound output
Switching on/off
When the ignition is switched off: press ON/OFF
button on the radio.
Muting
When the ignition is switched on or the engine
is running: press the ON/OFF button on the
radio.
AM/FM station
Selecting a station1."Radio"2."FM" or "AM"3.Select the desired station.
All saved stations are stored for the remote con‐
trol currently in use.
Changing the station Press the button.
Storing a station
1."Radio"2."FM" or "AM"3.Highlight the desired station.4.Press the controller for an extended period.5.Select the desired memory location.
The stations are stored for the remote control
currently in use.
Seite 179RadioEntertainment179
Online Edition for Part no. 01 40 2 607 971 - 09 11 490
Page 187 of 303
CD/multimediaVehicle equipment
All standard, country-specific and optional
equipment that is offered in the model series is
described in this chapter. Therefore, equipment
is also described that is not available in a vehicle,
e. g., because of the selected optional equip‐
ment or country variant. This also applies for
safety-related functions and systems.
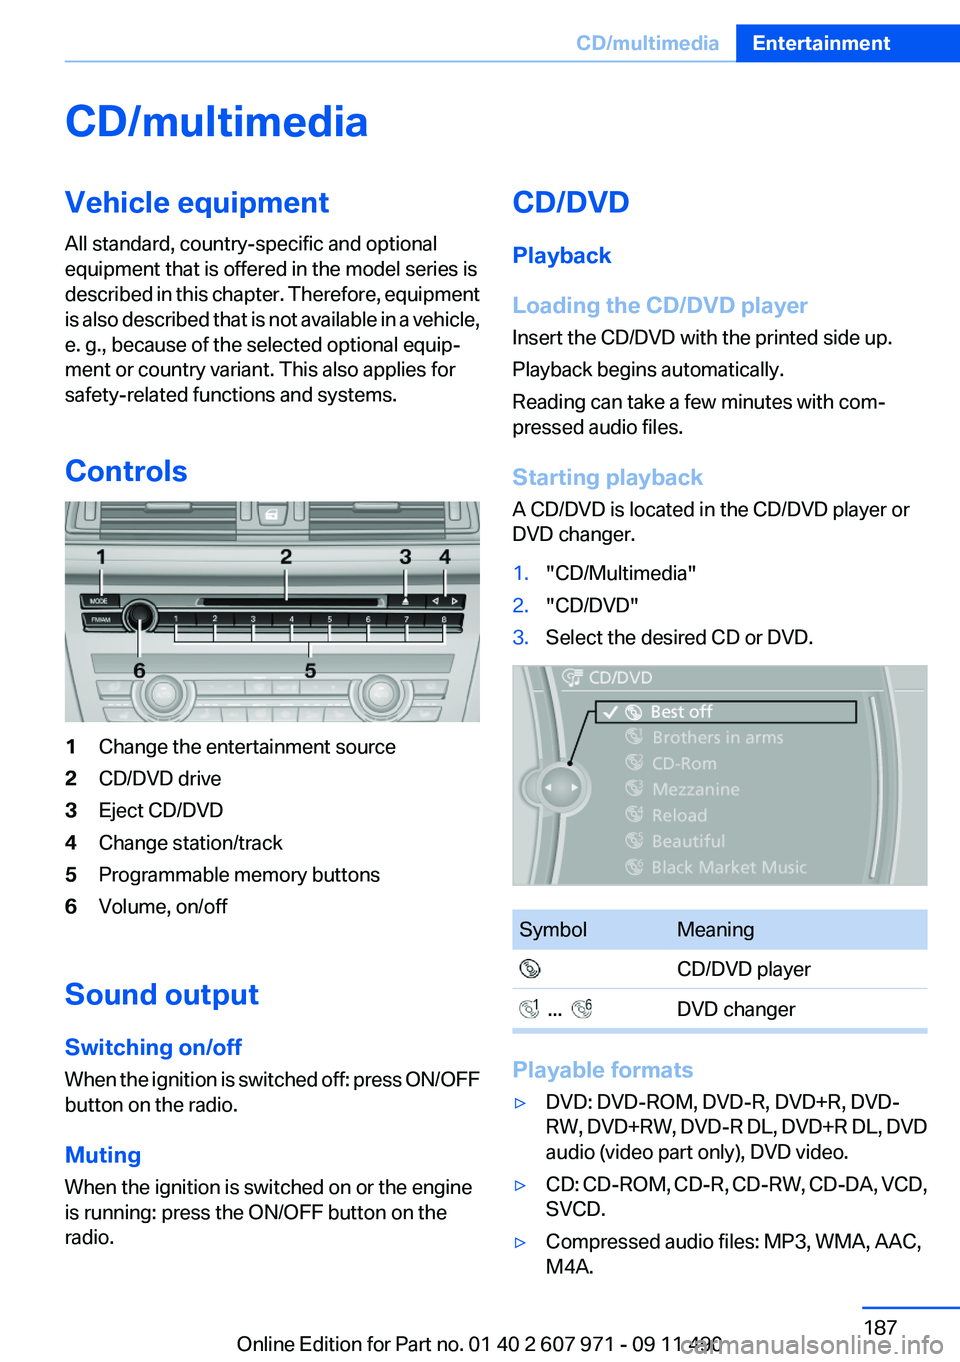
Controls1Change the entertainment source2CD/DVD drive3Eject CD/DVD4Change station/track5Programmable memory buttons6Volume, on/off
Sound output
Switching on/off
When the ignition is switched off: press ON/OFF
button on the radio.
Muting
When the ignition is switched on or the engine
is running: press the ON/OFF button on the
radio.
CD/DVD
Playback
Loading the CD/DVD player
Insert the CD/DVD with the printed side up.
Playback begins automatically.
Reading can take a few minutes with com‐
pressed audio files.
Starting playback
A CD/DVD is located in the CD/DVD player or
DVD changer.1."CD/Multimedia"2."CD/DVD"3.Select the desired CD or DVD.SymbolMeaning CD/DVD player ... DVD changer
Playable formats
▷DVD: DVD-ROM, DVD-R, DVD+R, DVD-
RW, DVD+RW, DVD-R DL, DVD+R DL, DVD
audio (video part only), DVD video.▷CD: CD-ROM, CD-R, CD-RW, CD-DA, VCD,
SVCD.▷Compressed audio files: MP3, WMA, AAC,
M4A.Seite 187CD/multimediaEntertainment187
Online Edition for Part no. 01 40 2 607 971 - 09 11 490
Page 189 of 303
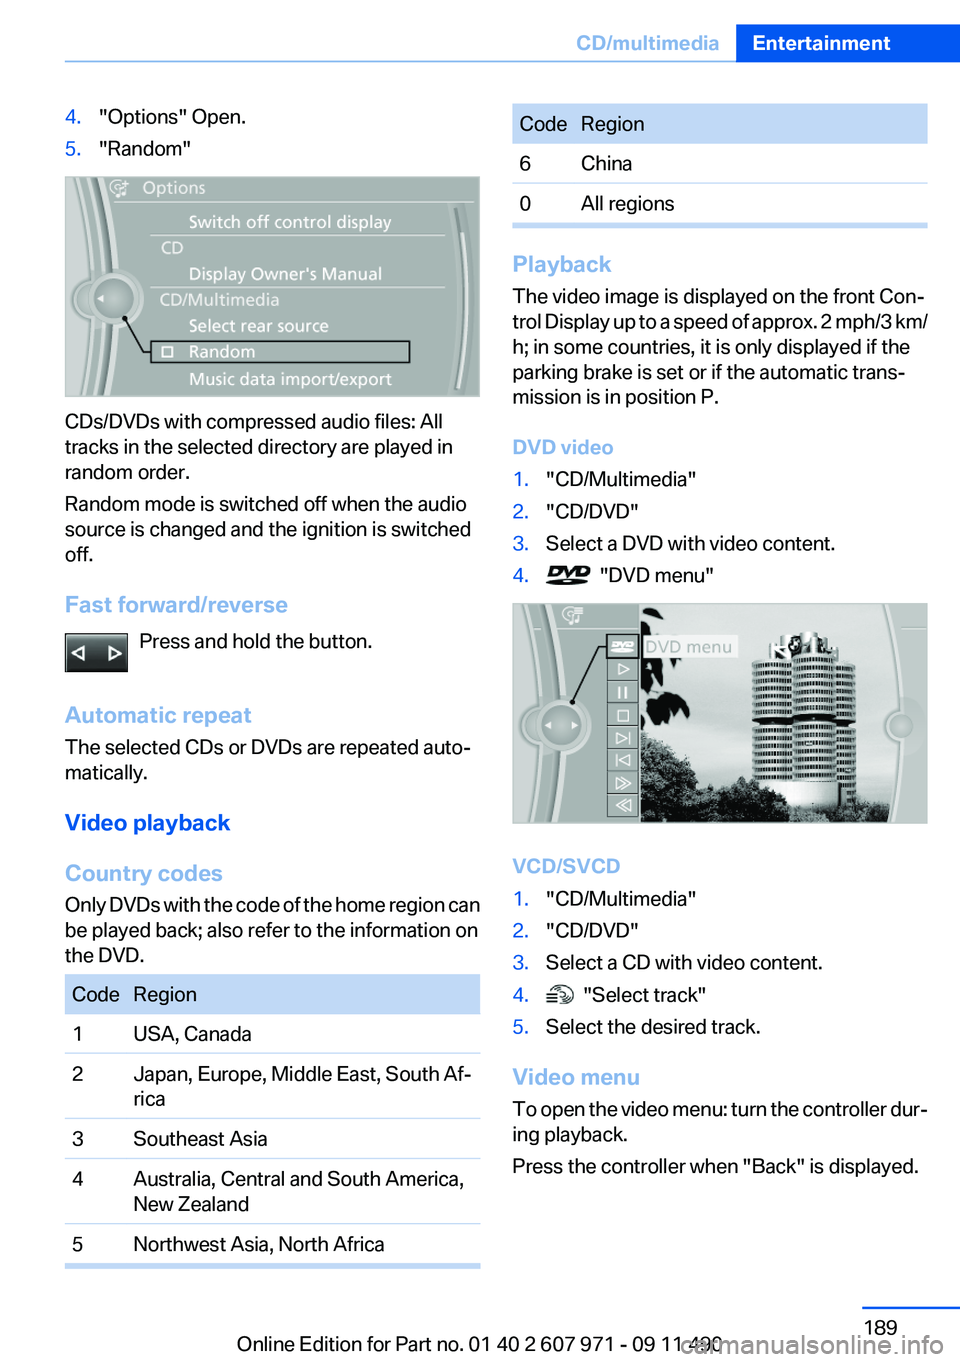
4."Options" Open.5."Random"
CDs/DVDs with compressed audio files: All
tracks in the selected directory are played in
random order.
Random mode is switched off when the audio
source is changed and the ignition is switched
off.
Fast forward/reverse Press and hold the button.
Automatic repeat
The selected CDs or DVDs are repeated auto‐
matically.
Video playback
Country codes
Only DVDs with the code of the home region can
be played back; also refer to the information on
the DVD.
CodeRegion1USA, Canada2Japan, Europe, Middle East, South Af‐
rica3Southeast Asia4Australia, Central and South America,
New Zealand5Northwest Asia, North AfricaCodeRegion6China0All regions
Playback
The video image is displayed on the front Con‐
trol Display up to a speed of approx. 2 mph/3 km/
h; in some countries, it is only displayed if the
parking brake is set or if the automatic trans‐
mission is in position P.
DVD video
1."CD/Multimedia"2."CD/DVD"3.Select a DVD with video content.4. "DVD menu"
VCD/SVCD
1."CD/Multimedia"2."CD/DVD"3.Select a CD with video content.4. "Select track"5.Select the desired track.
Video menu
To open the video menu: turn the controller dur‐
ing playback.
Press the controller when "Back" is displayed.
Seite 189CD/multimediaEntertainment189
Online Edition for Part no. 01 40 2 607 971 - 09 11 490
Page 202 of 303
3."Options" Open.4."Random"
Fast forward/reversePress and hold the button.
Video playback
At a glance
Video playback via snap-in adapter is possible.
Operation can be performed via iDrive. The
sound is output on the vehicle loudspeakers.
Playback
The video image is displayed on the front Con‐
trol Display up to a speed of approx. 2 mph/3 km/
h; in some countries, it is only displayed if the
parking brake is set or if the automatic trans‐
mission is in position P.
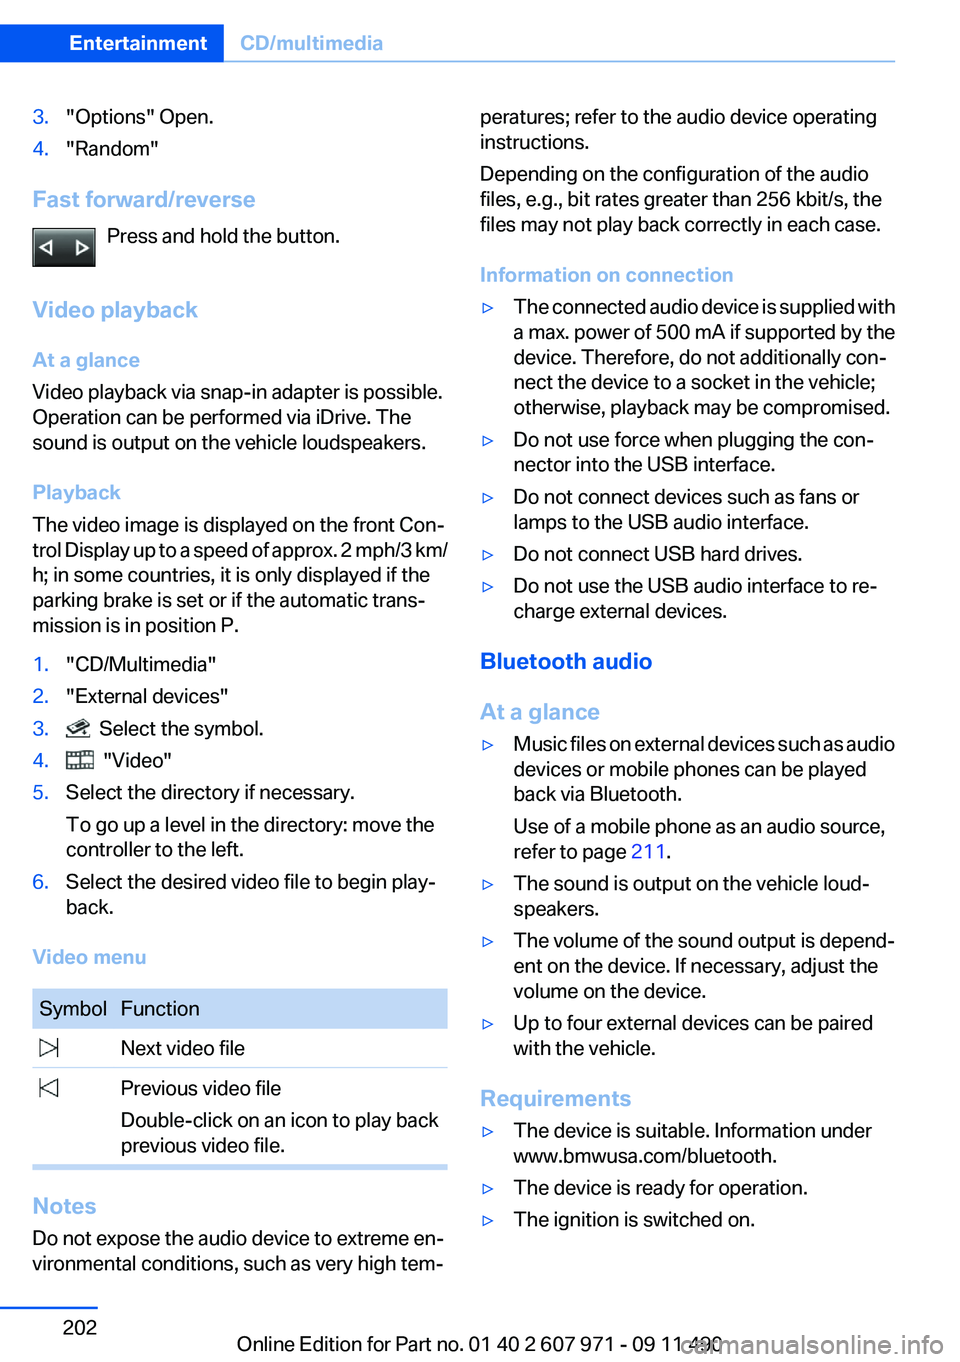
1."CD/Multimedia"2."External devices"3. Select the symbol.4. "Video"5.Select the directory if necessary.
To go up a level in the directory: move the
controller to the left.6.Select the desired video file to begin play‐
back.
Video menu
SymbolFunction Next video file Previous video file
Double-click on an icon to play back
previous video file.
Notes
Do not expose the audio device to extreme en‐
vironmental conditions, such as very high tem‐
peratures; refer to the audio device operating
instructions.
Depending on the configuration of the audio
files, e.g., bit rates greater than 256 kbit/s, the
files may not play back correctly in each case.
Information on connection▷The connected audio device is supplied with
a max. power of 500 mA if supported by the
device. Therefore, do not additionally con‐
nect the device to a socket in the vehicle;
otherwise, playback may be compromised.▷Do not use force when plugging the con‐
nector into the USB interface.▷Do not connect devices such as fans or
lamps to the USB audio interface.▷Do not connect USB hard drives.▷Do not use the USB audio interface to re‐
charge external devices.
Bluetooth audio
At a glance
▷Music files on external devices such as audio
devices or mobile phones can be played
back via Bluetooth.
Use of a mobile phone as an audio source,
refer to page 211.▷The sound is output on the vehicle loud‐
speakers.▷The volume of the sound output is depend‐
ent on the device. If necessary, adjust the
volume on the device.▷Up to four external devices can be paired
with the vehicle.
Requirements
▷The device is suitable. Information under
www.bmwusa.com/bluetooth.▷The device is ready for operation.▷The ignition is switched on.Seite 202EntertainmentCD/multimedia202
Online Edition for Part no. 01 40 2 607 971 - 09 11 490