2012 BMW 650I service indicator
[x] Cancel search: service indicatorPage 56 of 282

Safety belts
Seats with safety belt
The vehicle has four seats, each of which is
equipped with a safety belt.
Notes
Always make sure that safety belts are being
worn by all occupants before driving away.
Although airbags enhance safety by providing
added protection, they are not a substitute for
safety belts.
One person per safety belt
Never
allow more than one person to wear
a single safety belt. Never allow infants or small
children to ride on a passenger's lap.◀
Putting on the belt
Lay the belt, without twisting, snugly
across the lap and shoulders, as close to the
body as possible. Make sure that the belt lies low
around the hips in the lap area and does not
press on the abdomen. Otherwise, the belt can
slip over the hips in the lap area in a frontal im‐
pact and injure the abdomen.
The safety belt must not lie across the neck, rub
on sharp edges, be routed over solid or breaka‐
ble objects, or be pinched.◀
Reduction of restraining effect
Avoid wearing clothing that prevents the
belt from fitting properly, and pull the shoulder
belt periodically to readjust the tension across
your lap; otherwise, the retention effect of the
safety belt may be reduced.◀ Buckling the belt
Make sure you hear the latch plate engage in the
belt buckle.
Unbuckling the belt
1.
Hold the belt firmly.
2. Press the red button in the belt buckle.
3. Guide the belt back into its reel.
Safety belt reminder for the driver's and
front passenger seat The indicator lamp flashes or lights up
and a signal sounds. Make sure that the
safety belts are positioned correctly.
The safety belt reminder is active at speeds
above approx. 5 mph/8 km/h. It can also be ac‐
tivated if objects are placed on the front pas‐
senger seat.
Damage to safety belts
In the case of strain caused by accidents or
damage:
Have the safety belts, including the safety belt
tensioners, replaced and have the belt anchors
checked.
Checking and replacing safety belts
Have the work performed only by your
service center; otherwise, it cannot be ensured
that this safety feature will function properly.◀ Seite 56
56 Online Edition for Part no. 01 40 2 606 521 - 03 11 490
Adjusting
Page 82 of 282

3.
Open "Options".
4. "Last Service Request"
Check Control
The concept
The Check Control system monitors functions
in
the vehicle and notifies you of malfunctions in
the monitored systems.
A Check Control message is displayed as a
combination of indicator or warning lamps and
text messages in the instrument cluster and in
the Head-up Display*.
In addition, an acoustic signal may be output and
a text message may appear on the Control Dis‐
play.
Indicator/warning lamps The indicator and warning lamps can light up in
a variety of combinations and colors.
Several of the lamps are checked for proper
functioning and light up temporarily when the
engine is started or the ignition is switched on.
Text messages
Text
messages in combination with a symbol in
the instrument cluster explain a Check Control
message and the meaning of the indicator and
warning lamps.
Supplementary text messages
Addition information, such as on the cause of a
fault or the required action, can be called up via
Check Control. The supplementary text of ur‐
gent messages is displayed automatically. It is shown on the Control Display.
Symbols
Depending on the Check Control message, the
following functions can be selected.
▷
"Owner's Manual"
Display additional information about the
Check Control message in the integrated
owner's manual.
▷ "Service request"
Contact the service partner.
▷ "Roadside Assistance"
Contact Roadside Assistance.
Hiding Check Control messages Press the computer button on the turn signal
lever.
▷
Some Check Control messages are dis‐
played
continuously and are not cleared un‐
til the malfunction is eliminated. If several
malfunctions occur at once, the messages
are displayed consecutively.
These messages can be hidden for approx.
8 seconds. After this time, they are dis‐
played again automatically.
▷ Other Check Control messages are hidden
automatically after approx. 20 seconds.
They
are stored and can be displayed again
later.
Displaying stored Check Control
messages
1. "Vehicle Info"
2. "Vehicle status"
Seite 82
82 Online Edition for Part no. 01 40 2 606 521 - 03 11 490
Displays
Page 94 of 282

When the vehicle is driven with a damaged tire,
its handling characteristics change, e.g., re‐
duced lane stability during braking, a longer
braking distance, and altered self-steering
properties. Adjust your driving style accord‐
ingly. Avoid abrupt steering maneuvers or driv‐
ing over obstacles, e.g., curbs, potholes, etc.
Because
the possible driving distance depends
on how the vehicle is used during the trip, the
actual distance may be smaller or greater de‐
pending on the driving speed, road conditions,
external temperature, cargo load, etc.
Continued driving with a flat tire
Drive moderately and do not exceed a
speed of 50 mph/80 km/h.
A loss of tire inflation pressure results in a
change in the handling characteristics, e.g., re‐
duced lane stability during braking, a longer
braking distance and altered self-steering prop‐
erties.◀
Final tire failure
Vibrations or loud noises while driving can
indicate the final failure of the tire. Reduce speed
and stop; otherwise, pieces of the tire could
come loose and cause an accident. Do not con‐
tinue driving, and contact your service center.◀
Message when the system was not
reset
A Check Control message is displayed.
The system detected a wheel change but was
not reset.
Warnings regarding the current tire inflation
pressure are not reliable.
Check the tire inflation pressure and reset the
system.
Malfunction
The yellow warning lamp flashes and
then lights up continuously. A Check
Control message is displayed. No flat
tire can be detected.
Display in the following situations: ▷
A wheel without TPM electronics is fitted:
have
the service center check it if necessary.
▷ Malfunction: have the system checked by
your service center.
▷ TPM could not be fully reset. Reset the sys‐
tem again.
▷ Disturbance by systems or devices with the
same
radio frequency: after leaving the area
of the disturbance, the system automatically
becomes active again.
Declaration according to NHTSA/
FMVSS 138 Tire Pressure Monitoring
System
Each tire, including the spare (if provided)
should be checked monthly when cold and in‐
flated
to the inflation pressure recommended by
the vehicle manufacturer on the vehicle placard
or tire inflation pressure label. (If your vehicle has
tires of a different size than the size indicated on
the vehicle placard or tire inflation pressure la‐
bel, you should determine the proper tire infla‐
tion pressure for those tires.) As an added safety
feature, your vehicle has been equipped with a
tire pressure monitoring system (TPMS) that il‐
luminates a low tire pressure telltale when one
or more of your tires is significantly under-in‐
flated. Accordingly, when the low tire pressure
telltale illuminates, you should stop and check
your tires as soon as possible, and inflate them
to the proper pressure. Driving on a significantly
under-inflated tire causes the tire to overheat
and can lead to tire failure. Under-inflation also
reduces fuel efficiency and tire tread life, and
may affect the vehicle's handling and stopping
ability. Please note that the TPMS is not a sub‐
stitute for proper tire maintenance, and it is the
driver's responsibility to maintain correct tire
pressure, even if under-inflation has not reached
the level to trigger illumination of the TPMS low
tire pressure telltale. Your vehicle has also been
equipped with a TPMS malfunction indicator to
indicate when the system is not operating prop‐
erly. The TPMS malfunction indicator is com‐
bined with the low tire pressure telltale. When
the system detects a malfunction, the telltale will
flash for approximately one minute and then re‐
Seite 94
94 Online Edition for Part no. 01 40 2 606 521 - 03 11 490
Safety
Page 232 of 282

Temperature
The temperature grades are A, the highest, B,
and C, representing the tire's resistance to the
generation of heat and its ability to dissipate
heat when tested under controlled conditions
on
a specified indoor laboratory test wheel. Sus‐
tained high temperature can cause the material
of the tire to degenerate and reduce tire life, and
excessive temperature can lead to sudden tire
failure. The grade C corresponds to a level of
performance which all passenger car tires must
meet under the Federal Motor Vehicle Safety
Standard No. 109. Grades Band A represent
higher levels of performance on the laboratory
test wheel than the minimum required by law.
Temperature grade for this tire
The temperature grade for this tire is es‐
tablished for a tire that is properly inflated and
not overloaded. Excessive speed, underinfla‐
tion, or excessive loading, either separately or in
combination, can cause heat buildup and pos‐
sible tire failure.
If necessary, have the vehicle towed.◀
RSC – Run-flat tires
Run-flat tires, refer to page 234, are labeled with
a circular symbol containing the letters RSC
marked on the sidewall.
M+S
Winter and all-season tires with better cold
weather performance than summer tires.
Tire tread
Summer tires
Do not drive with a tire tread depth of less than
0.12 in/3 mm.
There is an increased danger of hydroplaning if
the tread depth is less than 0.12 in/3 mm.
Winter tires
Do not drive with a tire tread depth of less than
0.16 in/4 mm. Below a tread depth of 0.16 in/4 mm, tires are
less suitable for winter operation.
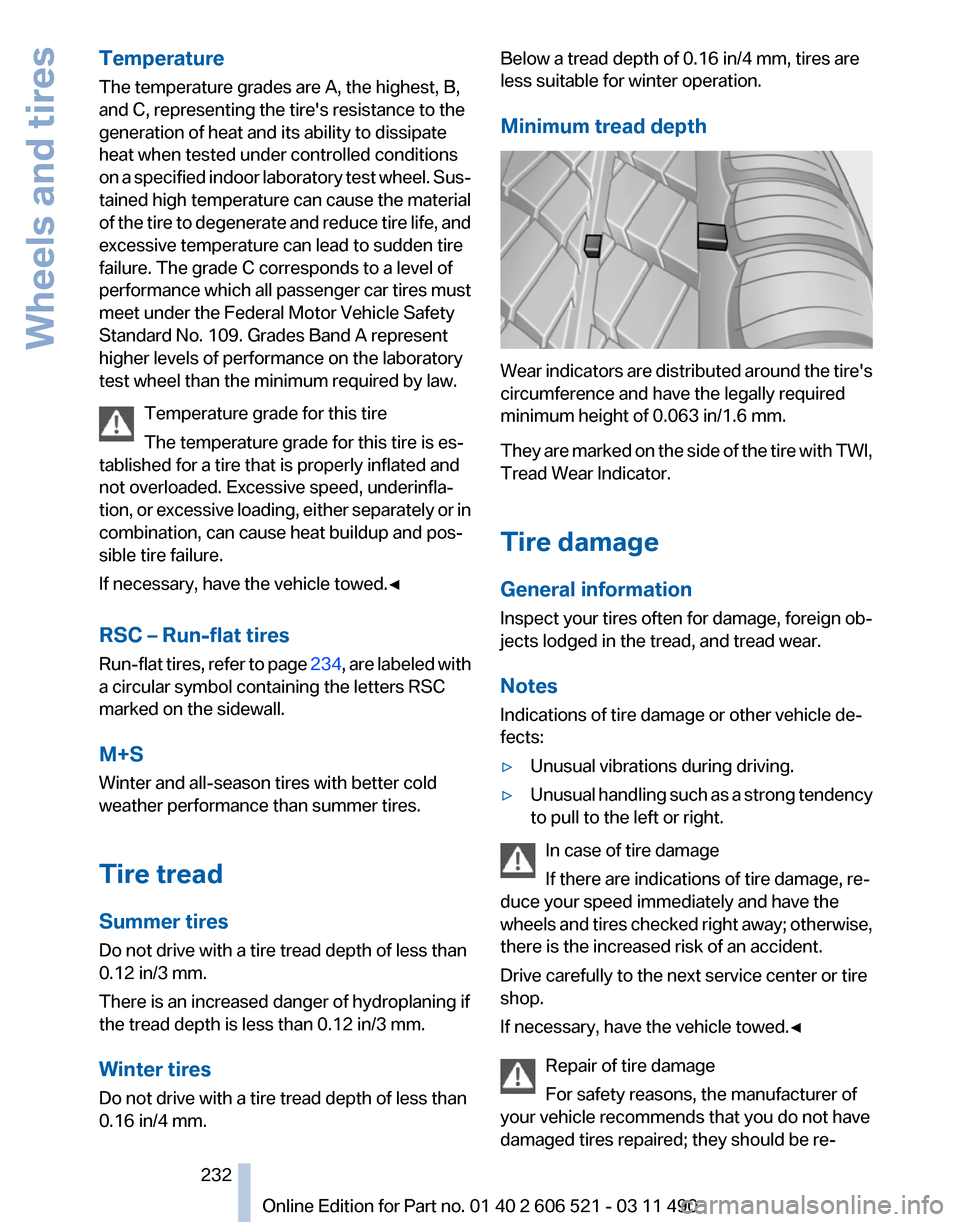
Minimum tread depth
Wear indicators are distributed around the tire's
circumference and have the legally required
minimum height of 0.063 in/1.6 mm.
They
are marked on the side of the tire with TWI,
Tread Wear Indicator.
Tire damage
General information
Inspect your tires often for damage, foreign ob‐
jects lodged in the tread, and tread wear.
Notes
Indications of tire damage or other vehicle de‐
fects:
▷ Unusual vibrations during driving.
▷ Unusual handling such as a strong tendency
to pull to the left or right.
In case of tire damage
If there are indications of tire damage, re‐
duce your speed immediately and have the
wheels
and tires checked right away; otherwise,
there is the increased risk of an accident.
Drive carefully to the next service center or tire
shop.
If necessary, have the vehicle towed.◀
Repair of tire damage
For safety reasons, the manufacturer of
your vehicle recommends that you do not have
damaged tires repaired; they should be re‐ Seite 232
232 Online Edition for Part no. 01 40 2 606 521 - 03 11 490
Wheels and tires
Page 238 of 282

Engine oil
General information
The
engine oil consumption is dependent on the
driving style and driving conditions.
Therefore, check the engine oil level after every
refueling using the electronic engine oil level
check.
Checking the oil level
The concept
The oil level is monitored electronically and dis‐
played on the Control Display.
Requirements
▷ The engine must be running and warm after
the vehicle has been driven for at least
6 miles/10 km.
▷ The vehicle is stopped or being driven on a
level roadway.
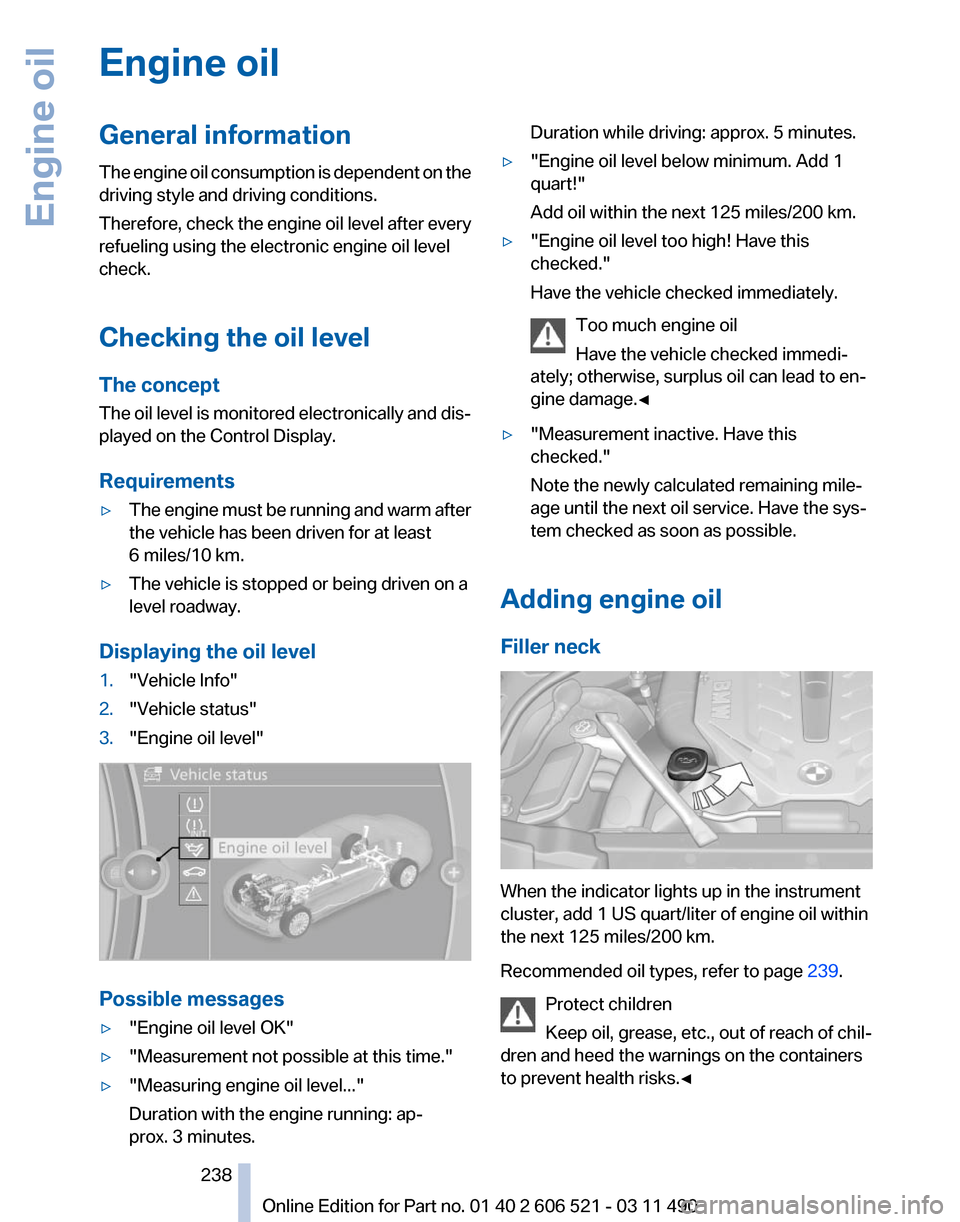
Displaying the oil level
1. "Vehicle Info"
2. "Vehicle status"
3. "Engine oil level" Possible messages
▷
"Engine oil level OK"
▷ "Measurement not possible at this time."
▷ "Measuring engine oil level..."
Duration with the engine running: ap‐
prox. 3 minutes. Duration while driving: approx. 5 minutes.
▷ "Engine oil level below minimum. Add 1
quart!"
Add oil within the next 125 miles/200 km.
▷ "Engine oil level too high! Have this
checked."
Have the vehicle checked immediately.
Too much engine oil
Have the vehicle checked immedi‐
ately; otherwise, surplus oil can lead to en‐
gine damage.
◀ ▷
"Measurement inactive. Have this
checked."
Note the newly calculated remaining mile‐
age until the next oil service. Have the sys‐
tem checked as soon as possible.
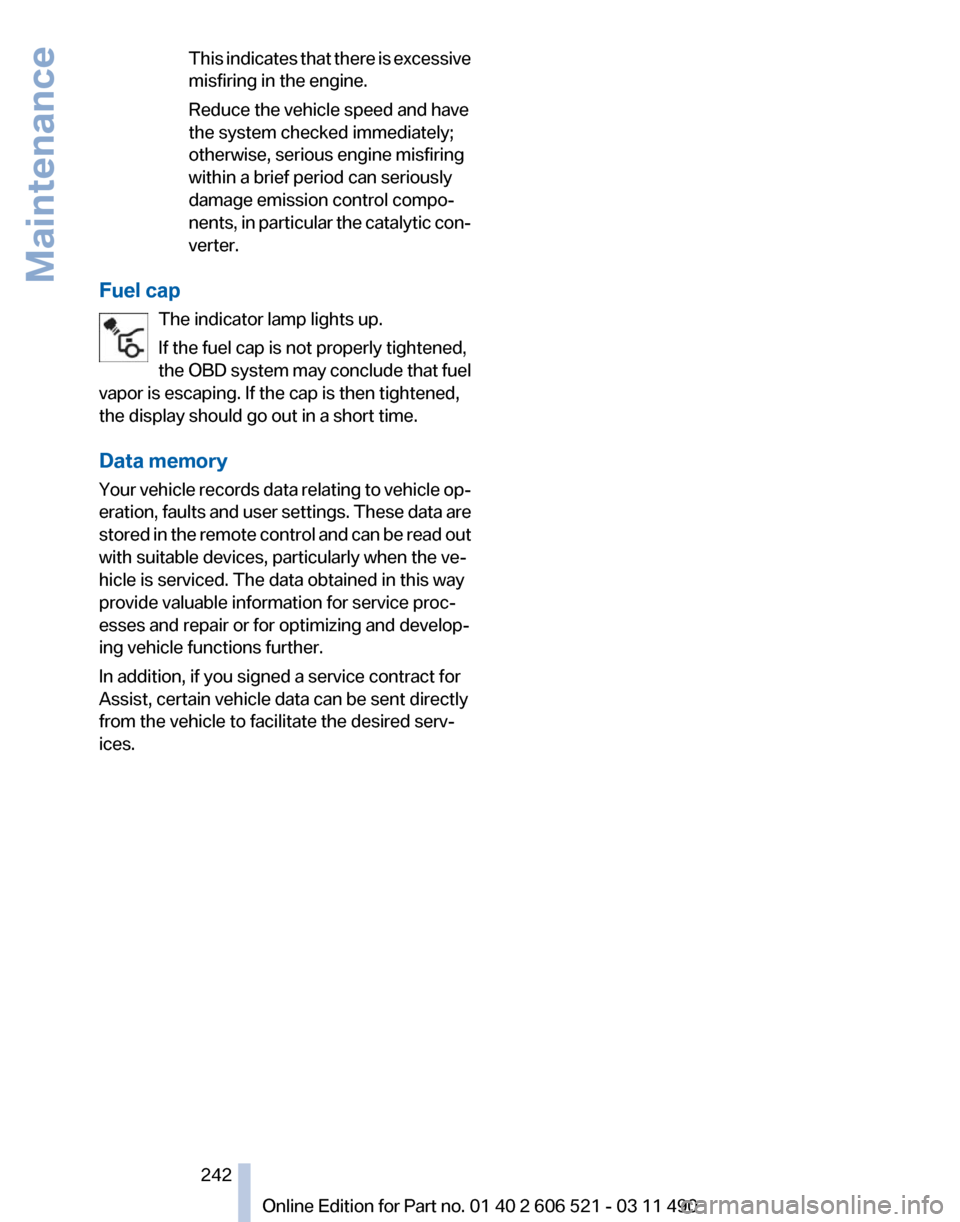
Adding engine oil
Filler neck When the indicator lights up in the instrument
cluster, add 1 US quart/liter of engine oil within
the next 125 miles/200 km.
Recommended oil types, refer to page
239.
Protect children
Keep oil, grease, etc., out of reach of chil‐
dren and heed the warnings on the containers
to prevent health risks.◀ Seite 238
238 Online Edition for Part no. 01 40 2 606 521 - 03 11 490Engine oil
Page 242 of 282

This indicates that there is excessive
misfiring in the engine.
Reduce the vehicle speed and have
the system checked immediately;
otherwise, serious engine misfiring
within a brief period can seriously
damage emission control compo‐
nents,
in particular the catalytic con‐
verter.
Fuel cap The indicator lamp lights up.
If the fuel cap is not properly tightened,
the
OBD system may conclude that fuel
vapor is escaping. If the cap is then tightened,
the display should go out in a short time.
Data memory
Your vehicle records data relating to vehicle op‐
eration, faults and user settings. These data are
stored in the remote control and can be read out
with suitable devices, particularly when the ve‐
hicle is serviced. The data obtained in this way
provide valuable information for service proc‐
esses and repair or for optimizing and develop‐
ing vehicle functions further.
In addition, if you signed a service contract for
Assist, certain vehicle data can be sent directly
from the vehicle to facilitate the desired serv‐
ices. Seite 242
242 Online Edition for Part no. 01 40 2 606 521 - 03 11 490Maintenance
Page 274 of 282

Cooling system
239
Corrosion on brake discs 140
Cruise control 106
Cruising range 74
Cupholder 133
Current fuel consumption 75
Current location, storing 148
Customer Relations 221
D
Damage, tires 232
Damping control, dy‐ namic 102
Data, technical 260
Date 76
Daytime running lights 85
Defrosting, refer to Windows, defrosting 124
Destination distance 77
Destination guidance 153
Destination guidance with in‐ termediate destinations 152
Destination input, naviga‐ tion 146
Digital clock 76
Digital radio 167
Dimensions 260
Dimmable interior rearview mirror 60
Direction indicator, refer to Turn signals 69
Display in front wind‐ shield 121
Display,
instrument cluster 74
Display lighting, refer to Instru‐ ment lighting 87
Displays 14
Displays, cleaning 257
Disposal, coolant 240
Disposal, vehicle battery 247
Distance control, refer to PDC 107
Distance to destination 77
Divided screen view, split screen 23
Door lock, refer to Remote control 32 Doors, Automatic Soft Clos‐
ing 40
Drive-off assistant 101
Drive-off assistant, refer to DSC 101
Driving instructions, breaking in 138
Driving notes, general 138
Driving stability control sys‐ tems 101
Driving tips 138
DSC Dynamic Stability Con‐ trol 101
DTC Dynamic Traction Con‐ trol 101
DVD/CD 173
DVD/CD notes 179
DVD changer 177
DVD settings 176
DVDs, storing 180
DVD, video 175
Dynamic Damping Con‐ trol 102
Dynamic destination guid‐ ance 159
Dynamic Drive 102
Dynamic Driving Control 103
Dynamic Stability Control DSC 101
Dynamic Traction Control DTC 101
E
EfficientDynamics, refer to Saving fuel 141
Electronic displays, instru‐ ment cluster 16
Electronic engine oil level check 238
Electronic Stability Program ESP, refer to DSC 101
Emergency detection, remote control 33
Emergency
operation, conver‐
tible top 47
Emergency release, door lock 39 Emergency release, fuel filler
flap 226
Emergency Request 248
Emergency service, refer to Roadside Assistance 249
Emergency start function, en‐ gine start 33
Emergency unlocking, trunk lid 41
Energy Control 75
Energy recovery 76
Engine compartment 236
Engine compartment, working in 236
Engine coolant 239
Engine oil 238
Engine oil, adding 238
Engine oil additives 239
Engine oil filler neck 238
Engine oil temperature 75
Engine oil types, alterna‐ tive 239
Engine oil types, ap‐ proved 239
Engine start during malfunc‐ tion 33
Engine start, refer to Starting the engine 66
Engine start, Starting aid 249
Engine stop 66
Engine temperature 75
Entering/exiting
vehicle, assis‐
tance, steering wheel 61
Equalizer 164
Equipment, interior 128
ESP Electronic Stability Pro‐ gram, refer to DSC 101
Exchanging wheels/tires 233
Exhaust system 138
Exterior mirror, automatic dim‐ ming feature, dimmable exte‐
rior mirrors 60
Exterior mirrors 59
External devices 184
External start 249
External temperature dis‐ play 75
Seite 274
274 Online Edition for Part no. 01 40 2 606 521 - 03 11 490
Everything from A to Z