2012 BMW 650I Sound
[x] Cancel search: SoundPage 115 of 282

Cameras
The two camera lenses are located on the sides
of the bumper.
The image quality may be impaired by dirt.
Clean the lens, refer to page
257.
Parking assistant
*
The concept This system assists the driver in parking parallel
to the road.
Ultrasound
sensors measure parking spaces on
both sides of the vehicle.
The parking assistant calculates the best pos‐
sible parking line and takes control of steering
during the parking procedure.
When parking, also take note of the visual and
acoustic information issued by the PDC and the
parking assistant and accelerate or brake ac‐
cordingly.
A component of the parking assistant is the PDC
Park Distance Control*, refer to page 107.Personal responsibility
The
parking assistant does not relieve the
driver of responsibility for the vehicle during the
parking procedure.
Watch the parking space and parking procedure
closely and intervene if necessary; otherwise,
there is the danger of an accident.◀
Requirements
For measuring parking spaces
▷ Maximum speed while driving forward ap‐
prox. 22 mph/35 km/h.
▷ Maximum distance to row of parked vehi‐
cles: 5 ft/1.5 m.
Suitable parking space
▷ Gap between two objects with a minimum
length of approx. 5 ft/1.5 m.
▷ Minimum length: own vehicle length plus
approx. 4 ft/1.2 m.
▷ Minimum depth: approx. 5 ft/1.5 m.
For parking procedure
Closed doors.
Switching on
Using the button Press the button.
The LED lights up.
The parking assistant is activated automati‐
cally.
The current status of the parking space search
is indicated on the Control Display. Seite 115
115Online Edition for Part no. 01 40 2 606 521 - 03 11 490
Reference Mobility Communication Entertainment Navigation Driving tips
Controls At a glance
Page 116 of 282

By engaging reverse
Engage transmission position R.
The current status of the parking space search
is indicated on the Control Display.
Activate:
"Parking Assistant" Select the
symbol in the Control Display.
Display on the Control Display
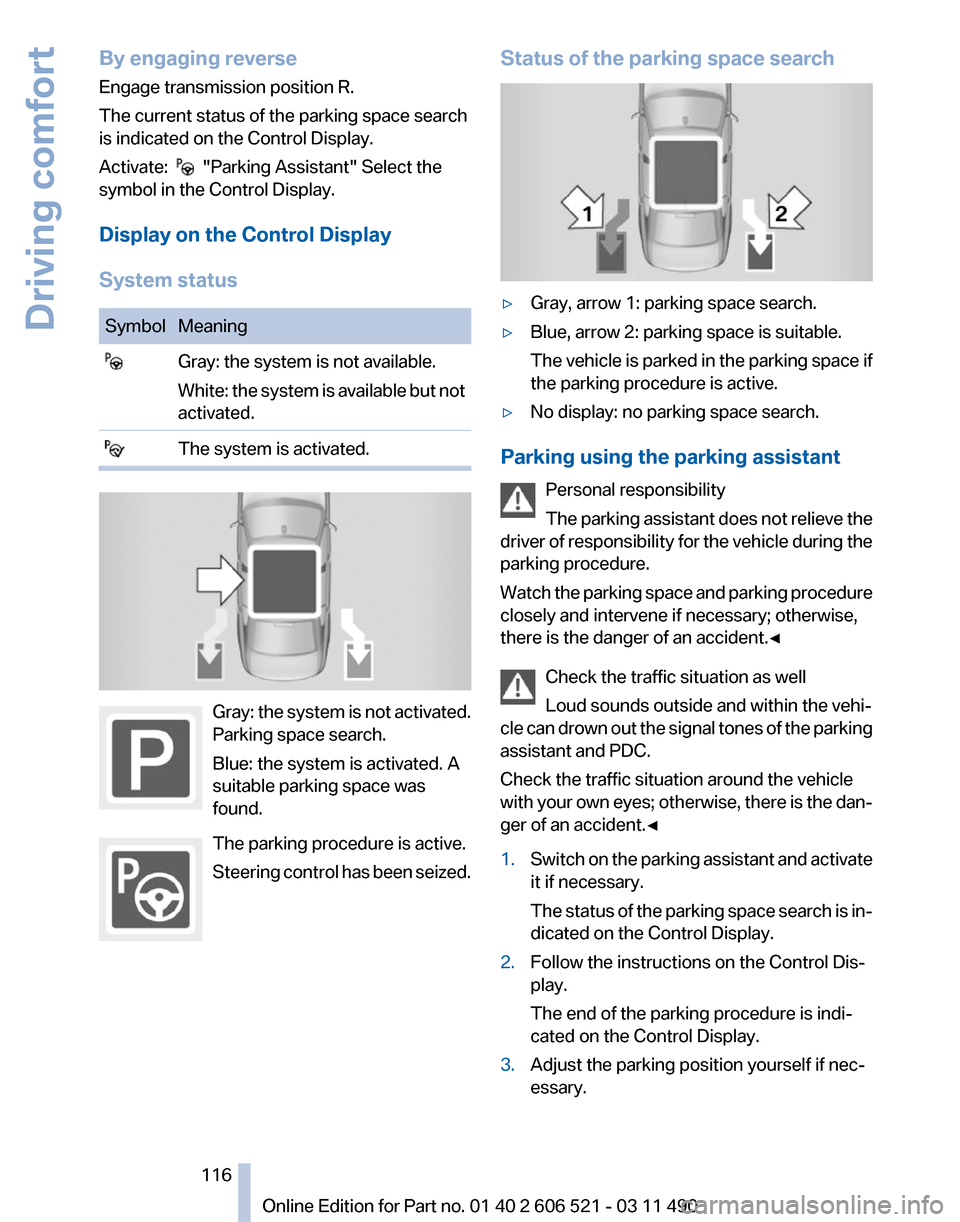
System status Symbol Meaning
Gray: the system is not available.
White: the system is available but not
activated. The system is activated.
Gray: the system is not activated.
Parking space search.
Blue: the system is activated. A
suitable parking space was
found.
The parking procedure is active.
Steering
control has been seized. Status of the parking space search
▷
Gray, arrow 1: parking space search.
▷ Blue, arrow 2: parking space is suitable.
The
vehicle is parked in the parking space if
the parking procedure is active.
▷ No display: no parking space search.
Parking using the parking assistant Personal responsibility
The
parking assistant does not relieve the
driver of responsibility for the vehicle during the
parking procedure.
Watch the parking space and parking procedure
closely and intervene if necessary; otherwise,
there is the danger of an accident.◀
Check the traffic situation as well
Loud sounds outside and within the vehi‐
cle can drown out the signal tones of the parking
assistant and PDC.
Check the traffic situation around the vehicle
with your own eyes; otherwise, there is the dan‐
ger of an accident.◀
1. Switch on the parking assistant and activate
it if necessary.
The
status of the parking space search is in‐
dicated on the Control Display.
2. Follow the instructions on the Control Dis‐
play.
The end of the parking procedure is indi‐
cated on the Control Display.
3. Adjust the parking position yourself if nec‐
essary. Seite 116
116 Online Edition for Part no. 01 40 2 606 521 - 03 11 490
Driving comfort
Page 118 of 282

Limits of ultrasonic measurement
The
detection of objects can reach the physical
limits of ultrasonic measurement, for instance:
▷ With tow bars and trailer hitches.
▷ With thin or wedge-shaped objects.
▷ With elevated, protruding objects such as
ledges or cargo.
▷ With objects with corners and sharp edges.
▷ With objects with a fine surface structure,
such as fences.
The parking assistant may identify parking
spaces that are not suitable for parking.
Ultrasound sensors The ultrasounds sensors used to measure park‐
ing spaces are located in the side turn signals.
To ensure full operability:
▷
Keep the sensors clean and free of ice.
▷ When using a pressure washer, keep the
sprayer moving and maintain a distance of
at least 12 in/30 cm from the sensors.
Night Vision with pedestrian
detection*
The concept
Night
Vision with pedestrian detection is a night
vision system.
An infrared camera records the area in front of
the vehicle and displays the image on the Con‐
trol Display.
The picture is a heat image. The system has an
integrated pedestrian detection function that
detects pedestrians and cyclists. Warm objects that are similar in shape to human beings are
detected by the system.
Personal responsibility
Night Vision cannot replace the driver's
personal judgment of the visibility conditions
and
the traffic situation. The view ahead and the
actual visibility conditions must always be the
basis on which the vehicle speed is adjusted;
otherwise, there is a risk to road safety.◀
Heat image The image shows the heat radiated by objects
in the field of view of the camera.
Warm objects have a light appearance and cold
objects, a dark appearance.
The ability to detect an object depends on the
temperature
difference between the object and
the background and on the level of heat radiation
emitted by the object. Objects that are similar in
temperature to the environment or that radiate
very little heat are difficult to detect.
For safety reasons, when driving at speeds
above approx. 3 mph/5 km/h and in low ambient
light, the image is only displayed when the low
beams are switched on.
A still image is displayed at regular intervals for
a fraction of a second. Seite 118
118 Online Edition for Part no. 01 40 2 606 521 - 03 11 490
Driving comfort
Page 139 of 282

Climate control windshield*
The marked area is not covered with heat re‐
flective coating.
Use this area for garage door openers, devices
for electronic toll collection, etc.
Mobile communication devices in the
vehicle
Mobile communication devices in the ve‐
hicle
It
is advised that you do not use mobile commu‐
nication devices, e.g., mobile phones, inside the
vehicle without connecting them directly to the
external antenna. Otherwise, the vehicle elec‐
tronics and mobile communication devices can
interfere with each other. In addition, there is no
assurance that the radiation generated during
transmission will be discharged from the vehicle
interior.◀
Hydroplaning
On wet or slushy roads, a wedge of water can
form between the tires and road surface.
This phenomenon is referred to as hydroplan‐
ing. It is characterized by a partial or complete
loss of contact between the tires and the road
surface, ultimately undermining your ability to
steer and brake the vehicle.
Hydroplaning
When driving on wet or slushy roads, re‐
duce your speed to prevent hydroplaning.◀ Driving through water
Drive though calm water only if it is not deeper
than 9.8 inches/25 cm and at this height, no
faster
than walking speed, up to 6 mph/10 km/h.
Adhere to water depth and speed limita‐
tions
Do not exceed this water depth and walking
speed; otherwise, the vehicle's engine, the elec‐
trical systems and the transmission may be
damaged.◀
Braking safely
Your vehicle is equipped with ABS as a standard
feature.
Applying the brakes fully is the most effective
way of braking in situations when this is neces‐
sary.
The vehicle maintains steering responsiveness.
You can still avoid any obstacles with a minimum
of steering effort.
Pulsation of the brake pedal and sounds from
the hydraulic circuits indicate that ABS is in its
active mode.
Objects in the area around the pedals
No objects in the area around the pedals
Keep floor mats, carpets, and any other
objects out of the area of motion of the pedals;
otherwise, the function of the pedals could be
impeded while driving
Do not place additional floor mats over existing
mats or other objects.
Only use floor mats that have been approved for
the vehicle and can be properly fixed in place.
Ensure that the floor mats are securely fastened
again after they were removed for cleaning, for
example.◀
Driving in wet conditions
When roads are wet or there is heavy rain, briefly
exert gentle pressure on the brake pedal every
few miles.
Ensure that this action does not endanger other
road users. Seite 139
139Online Edition for Part no. 01 40 2 606 521 - 03 11 490
Reference Mobility Communication Entertainment Navigation
Driving tips Controls At a glance
Page 164 of 282

Tone
General information
The sound settings are stored for the remote
control currently in use.
Treble, bass, balance, and
fader
▷
"Treble": treble adjustment.
▷ "Bass": depth adjustment.
▷ "Balance": left/right volume distribution.
▷ "Fader": front/rear volume distribution.
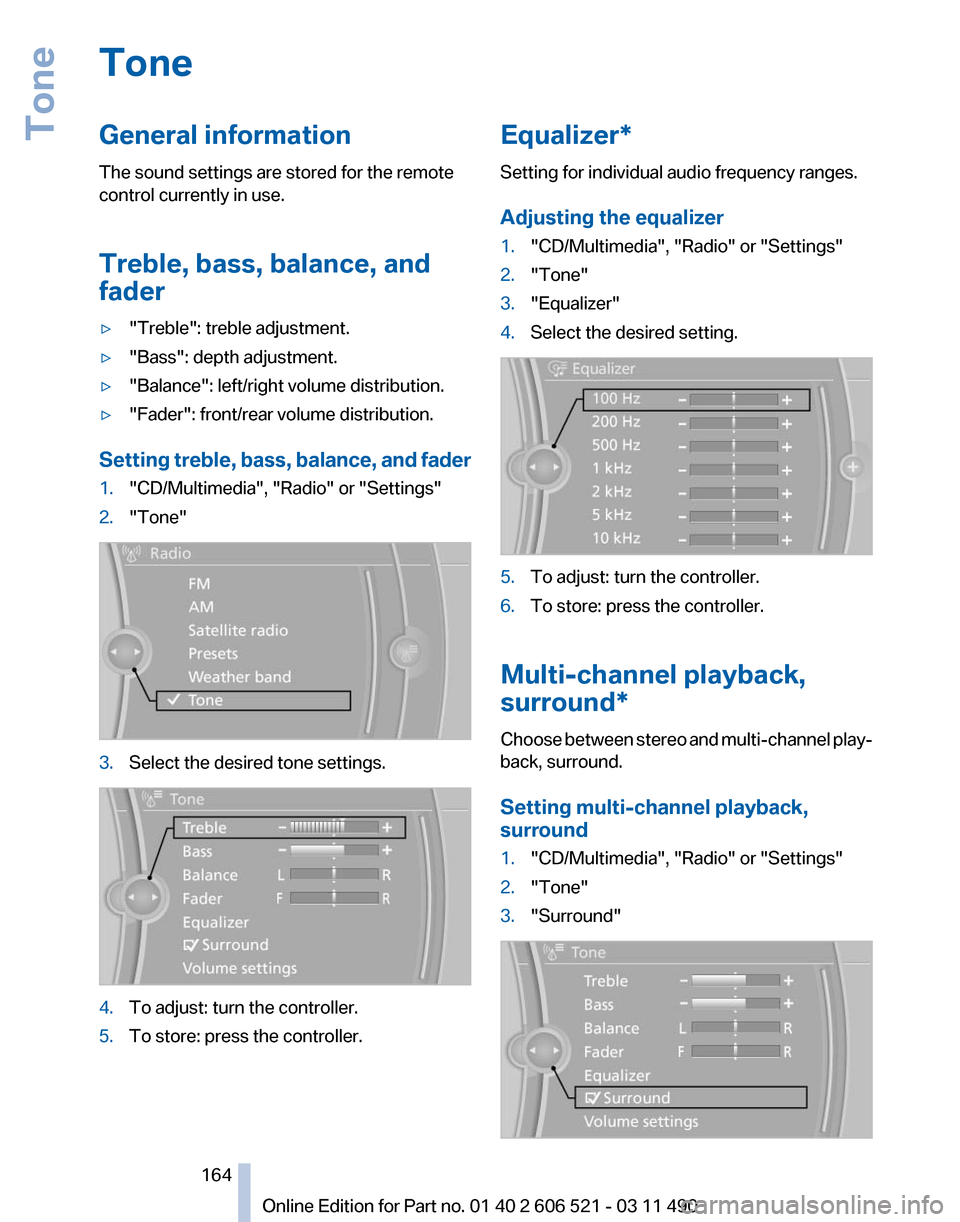
Setting treble, bass, balance, and fader
1. "CD/Multimedia", "Radio" or "Settings"
2. "Tone" 3.
Select the desired tone settings. 4.
To adjust: turn the controller.
5. To store: press the controller. Equalizer*
Setting for individual audio frequency ranges.
Adjusting the equalizer
1.
"CD/Multimedia", "Radio" or "Settings"
2. "Tone"
3. "Equalizer"
4. Select the desired setting. 5.
To adjust: turn the controller.
6. To store: press the controller.
Multi-channel playback,
surround*
Choose between stereo and multi-channel play‐
back, surround.
Setting multi-channel playback,
surround
1. "CD/Multimedia", "Radio" or "Settings"
2. "Tone"
3. "Surround" Seite 164
164 Online Edition for Part no. 01 40 2 606 521 - 03 11 490
Tone
Page 165 of 282

When surround is activated, multi-channel play‐
back is simulated when a stereo audio track is
played.
Volume
▷
"Speed volume": speed-dependent volume
control.
▷ "PDC": volume of the PDC signal* com‐
pared to the entertainment sound output.
▷ "Gong": volume of the signal, such as the
safety belt reminder, compared to the en‐
tertainment sound output.
▷ "Microphone": volume of the microphone*
during a phone call.
▷ "Loudspeak.":
volume of the loudspeakers*
during a phone call.
The following volumes are only stored for the
respective paired telephone:
"Microphone",
"Loudspeak.".
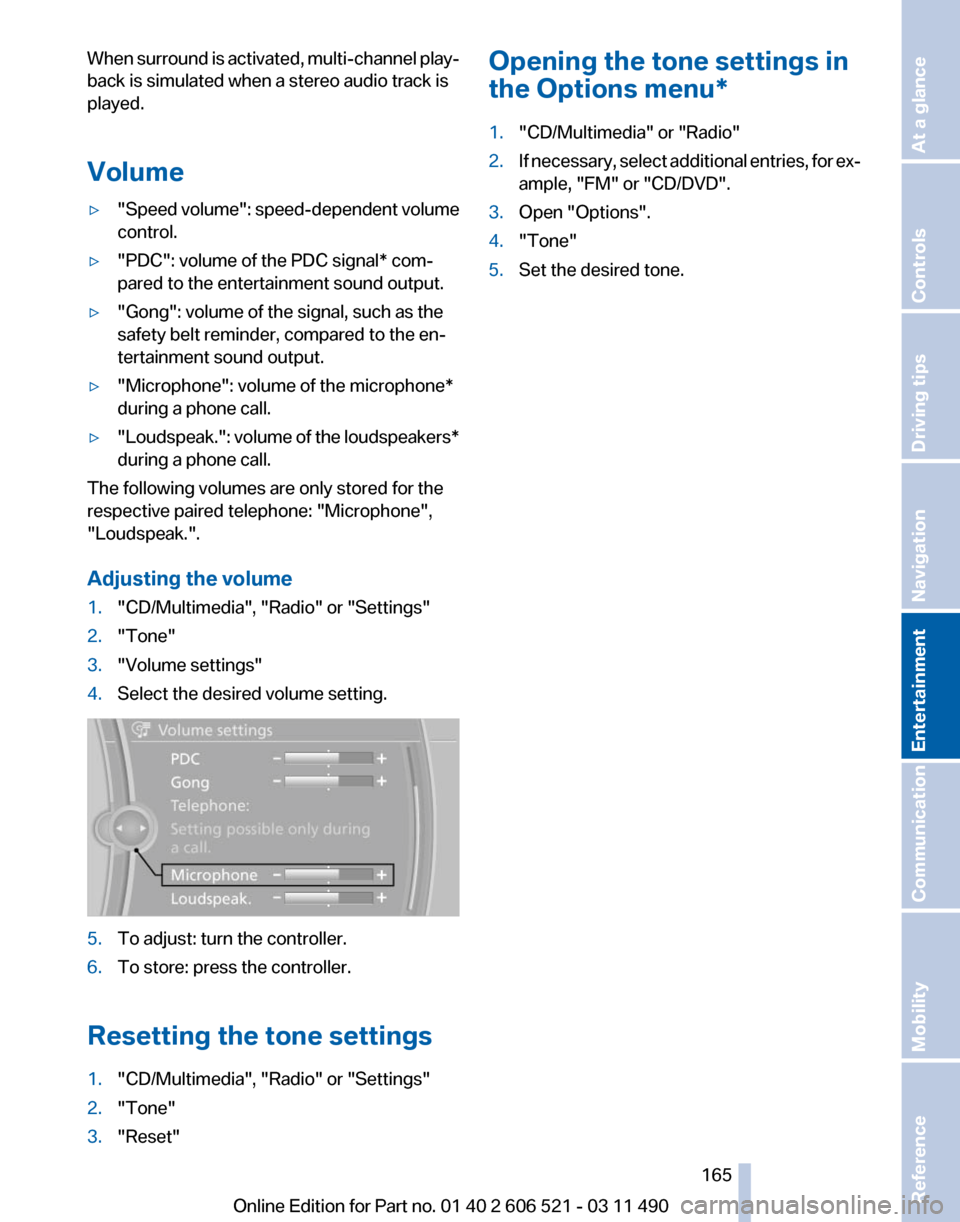
Adjusting the volume
1. "CD/Multimedia", "Radio" or "Settings"
2. "Tone"
3. "Volume settings"
4. Select the desired volume setting. 5.
To adjust: turn the controller.
6. To store: press the controller.
Resetting the tone settings
1. "CD/Multimedia", "Radio" or "Settings"
2. "Tone"
3. "Reset" Opening the tone settings in
the Options menu
*
1. "CD/Multimedia" or "Radio"
2. If necessary, select additional entries, for ex‐
ample, "FM" or
"CD/DVD".
3. Open "Options".
4. "Tone"
5. Set the desired tone.
Seite 165
165Online Edition for Part no. 01 40 2 606 521 - 03 11 490
Reference Mobility Communication
Entertainment Navigation Driving tips Controls At a glance
Page 166 of 282

Radio
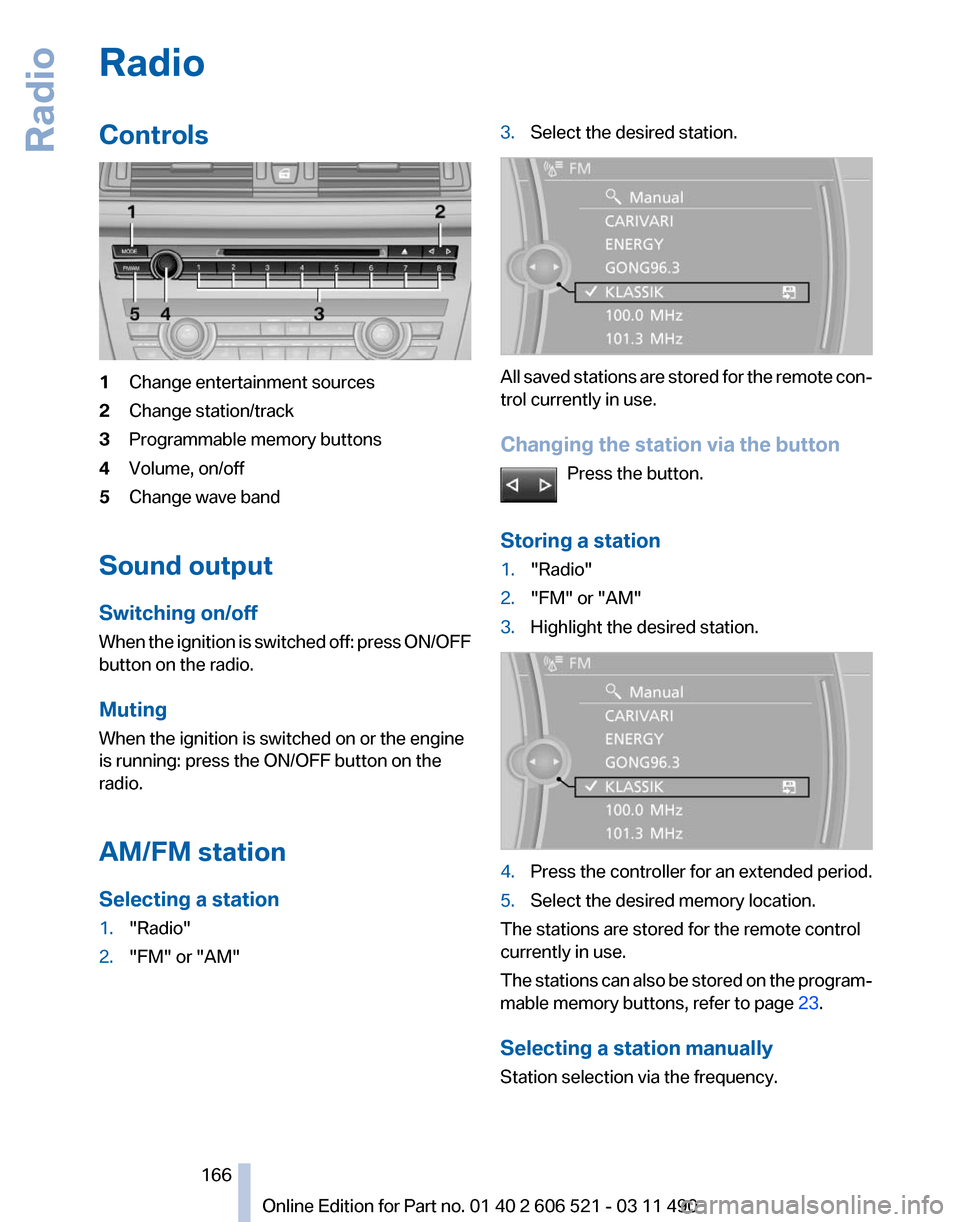
Controls
1
Change entertainment sources
2 Change station/track
3 Programmable memory buttons
4 Volume, on/off
5 Change wave band
Sound output
Switching on/off
When
the ignition is switched off: press ON/OFF
button on the radio.
Muting
When the ignition is switched on or the engine
is running: press the ON/OFF button on the
radio.
AM/FM station
Selecting a station
1. "Radio"
2. "FM" or "AM" 3.
Select the desired station. All saved stations are stored for the remote con‐
trol currently in use.
Changing the station via the button
Press the button.
Storing a station
1. "Radio"
2. "FM" or "AM"
3. Highlight the desired station. 4.
Press the controller for an extended period.
5. Select the desired memory location.
The stations are stored for the remote control
currently in use.
The
stations can also be stored on the program‐
mable memory buttons, refer to page 23.
Selecting a station manually
Station selection via the frequency. Seite 166
166 Online Edition for Part no. 01 40 2 606 521 - 03 11 490
Radio
Page 173 of 282

CD/multimedia
Controls
1
Change the entertainment source
2 CD/DVD* drive
3 Eject CD/DVD
4 Change station/track
5 Programmable memory buttons
6 Volume, on/off
Sound output
Switching on/off
When
the ignition is switched off: press ON/OFF
button on the radio.
Muting
When the ignition is switched on or the engine
is running: press the ON/OFF button on the
radio.
CD/DVD*
Playback
Filling the CD/DVD* player
Insert the CD/DVD with the printed side up.
Playback begins automatically.
Reading can take a few minutes with com‐
pressed audio files. Starting playback
A CD/DVD is located in the CD/DVD player or
DVD changer*.
1.
"CD/Multimedia"
2. "CD/DVD"
3. Select the desired CD or DVD. Symbol Meaning
CD/DVD* player ... DVD changer*
Playable formats
▷
DVD: DVD-ROM, DVD-R, DVD+R, DVD-
RW,
DVD+RW, DVD-R DL, DVD+R DL, DVD
audio (video part only), DVD video*.
▷ CD: CD-ROM, CD-R, CD-RW, CD-DA,
VCD*, SVCD*.
▷ Compressed audio files: MP3, WMA, AAC*,
M4A*.
Audio playback
Selecting the track using the button Press the button repeatedly until the
desired track is played. Seite 173
173Online Edition for Part no. 01 40 2 606 521 - 03 11 490
Reference Mobility Communication
Entertainment Navigation Driving tips Controls At a glance