2012 BMW 650I navigation
[x] Cancel search: navigationPage 243 of 282
Replacing components
Tool kit
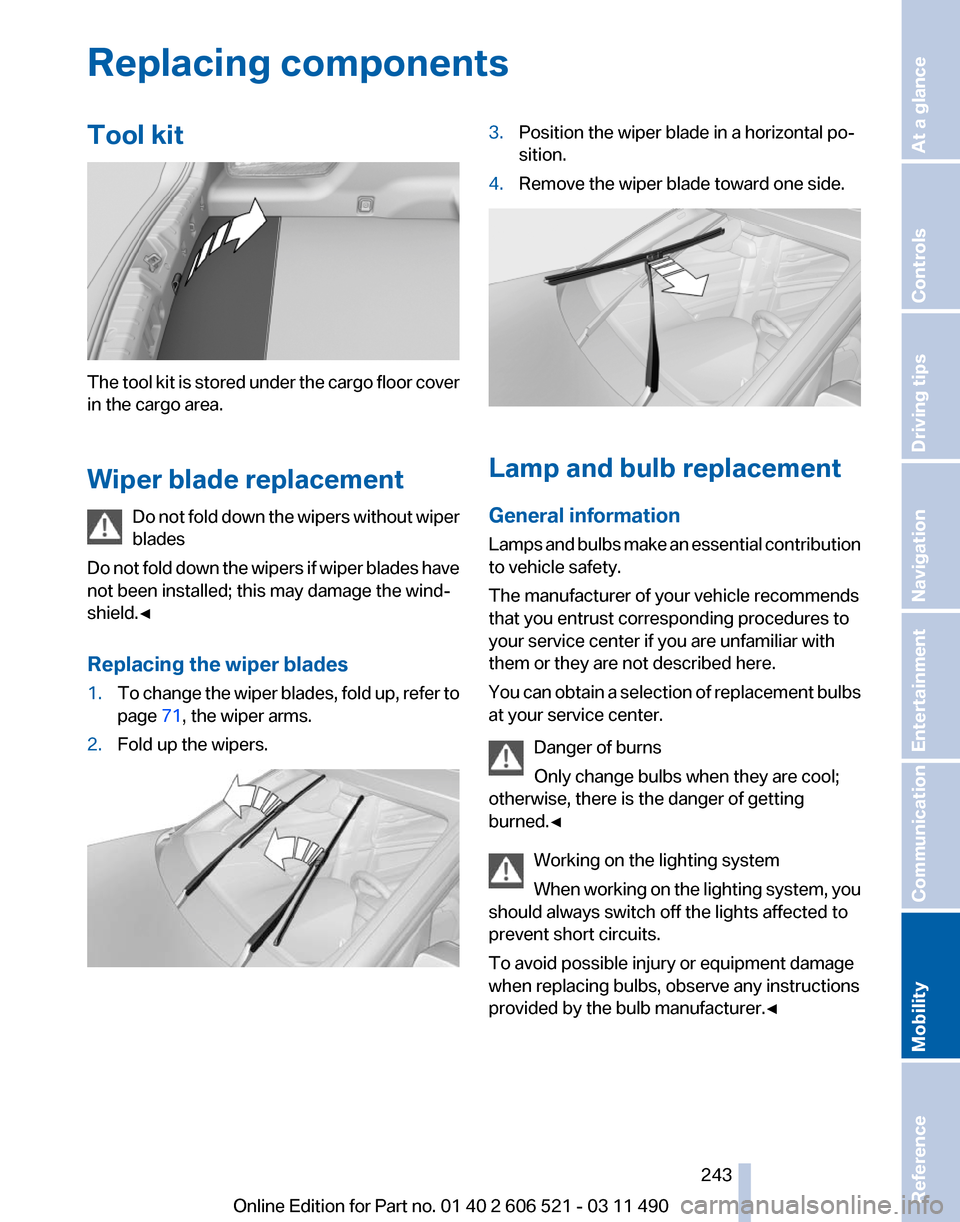
The tool kit is stored under the cargo floor cover
in the cargo area.
Wiper blade replacement
Do
not fold down the wipers without wiper
blades
Do not fold down the wipers if wiper blades have
not been installed; this may damage the wind‐
shield.◀
Replacing the wiper blades
1. To change the wiper blades, fold up, refer to
page 71, the wiper arms.
2. Fold up the wipers. 3.
Position the wiper blade in a horizontal po‐
sition.
4. Remove the wiper blade toward one side. Lamp and bulb replacement
General information
Lamps
and bulbs make an essential contribution
to vehicle safety.
The manufacturer of your vehicle recommends
that you entrust corresponding procedures to
your service center if you are unfamiliar with
them or they are not described here.
You can obtain a selection of replacement bulbs
at your service center.
Danger of burns
Only change bulbs when they are cool;
otherwise, there is the danger of getting
burned.◀
Working on the lighting system
When working on the lighting system, you
should always switch off the lights affected to
prevent short circuits.
To avoid possible injury or equipment damage
when replacing bulbs, observe any instructions
provided by the bulb manufacturer.◀ Seite 243
243Online Edition for Part no. 01 40 2 606 521 - 03 11 490
Reference
Mobility Communication Entertainment Navigation Driving tips Controls At a glance
Page 245 of 282
1.
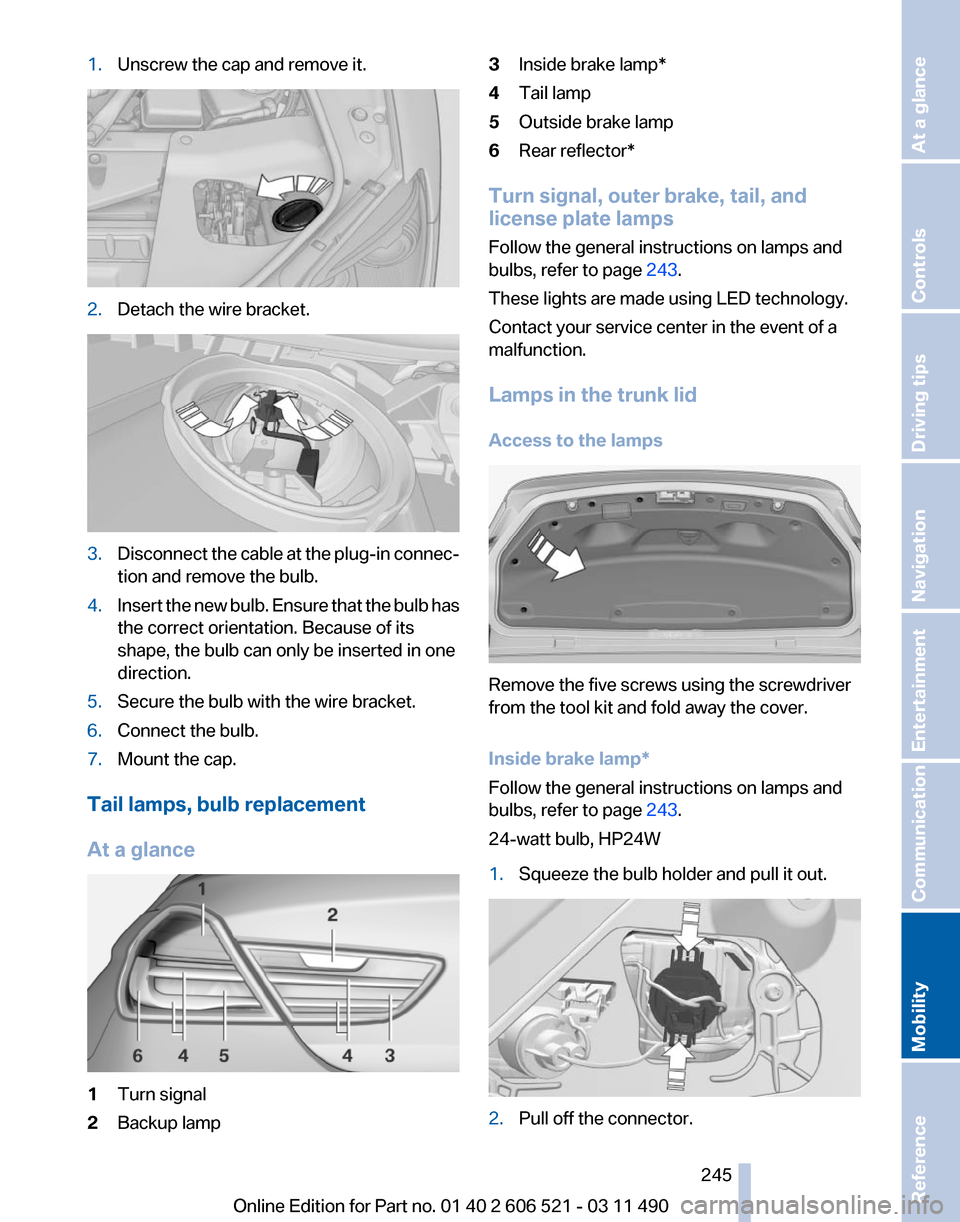
Unscrew the cap and remove it. 2.
Detach the wire bracket. 3.
Disconnect the cable at the plug-in connec‐
tion and remove the bulb.
4. Insert the new bulb. Ensure that the bulb has
the correct orientation. Because of its
shape, the bulb can only be inserted in one
direction.
5. Secure the bulb with the wire bracket.
6. Connect the bulb.
7. Mount the cap.
Tail lamps, bulb replacement
At a glance 1
Turn signal
2 Backup lamp 3
Inside brake lamp*
4 Tail lamp
5 Outside brake lamp
6 Rear reflector*
Turn signal, outer brake, tail, and
license plate lamps
Follow the general instructions on lamps and
bulbs, refer to page 243.
These lights are made using LED technology.
Contact your service center in the event of a
malfunction.
Lamps in the trunk lid
Access to the lamps Remove the five screws using the screwdriver
from the tool kit and fold away the cover.
Inside brake lamp
*
Follow the general instructions on lamps and
bulbs, refer to page 243.
24-watt bulb, HP24W
1. Squeeze the bulb holder and pull it out. 2.
Pull off the connector.
Seite 245
245Online Edition for Part no. 01 40 2 606 521 - 03 11 490
Reference
Mobility Communication Entertainment Navigation Driving tips Controls At a glance
Page 247 of 282
Vehicle battery
Maintenance
The battery is maintenance-free, i.e., the elec‐
trolyte will last for the life of the battery.
Your
service center will be glad to advise you on
questions regarding the battery.
Battery replacement
Use approved vehicle batteries only.
Only use vehicle batteries that have been
approved for your vehicle by the manufacturer;
otherwise, the vehicle could be damaged and
systems or functions may not be fully availa‐
ble.◀
After a battery replacement, have the battery
registered on the vehicle by your service center
to ensure that all comfort functions are fully
available.
Charging the battery
In the vehicle, only charge the battery via the
terminals, refer to page 250, in the engine com‐
partment with the engine off.
Power failure
After a temporary power loss, some equipment
needs to be reinitialized.
Individual settings need to be reprogrammed:
▷ Seat, mirror, and steering wheel memory:
store the positions again.
▷ Time: update.
▷ Date: update.
▷ Radio station: save again.
▷ Navigation system: wait for the operability of
the navigation.
Disposing of old batteries Have old batteries disposed of by your
service center or bring them to a recy‐
cling center.
Maintain the battery in an upright position for
transport and storage. Secure the battery so
that it does not tip over during transport. Fuses
Notes
Replacing fuses
Never attempt to repair a blown fuse and
do
not replace a defective fuse with a substitute
of another color or amperage rating; this could
lead to a circuit overload, ultimately resulting in
a fire in the vehicle.◀
Plastic tweezers and information on the fuse
types and locations are stored in the fuse box in
the cargo area.
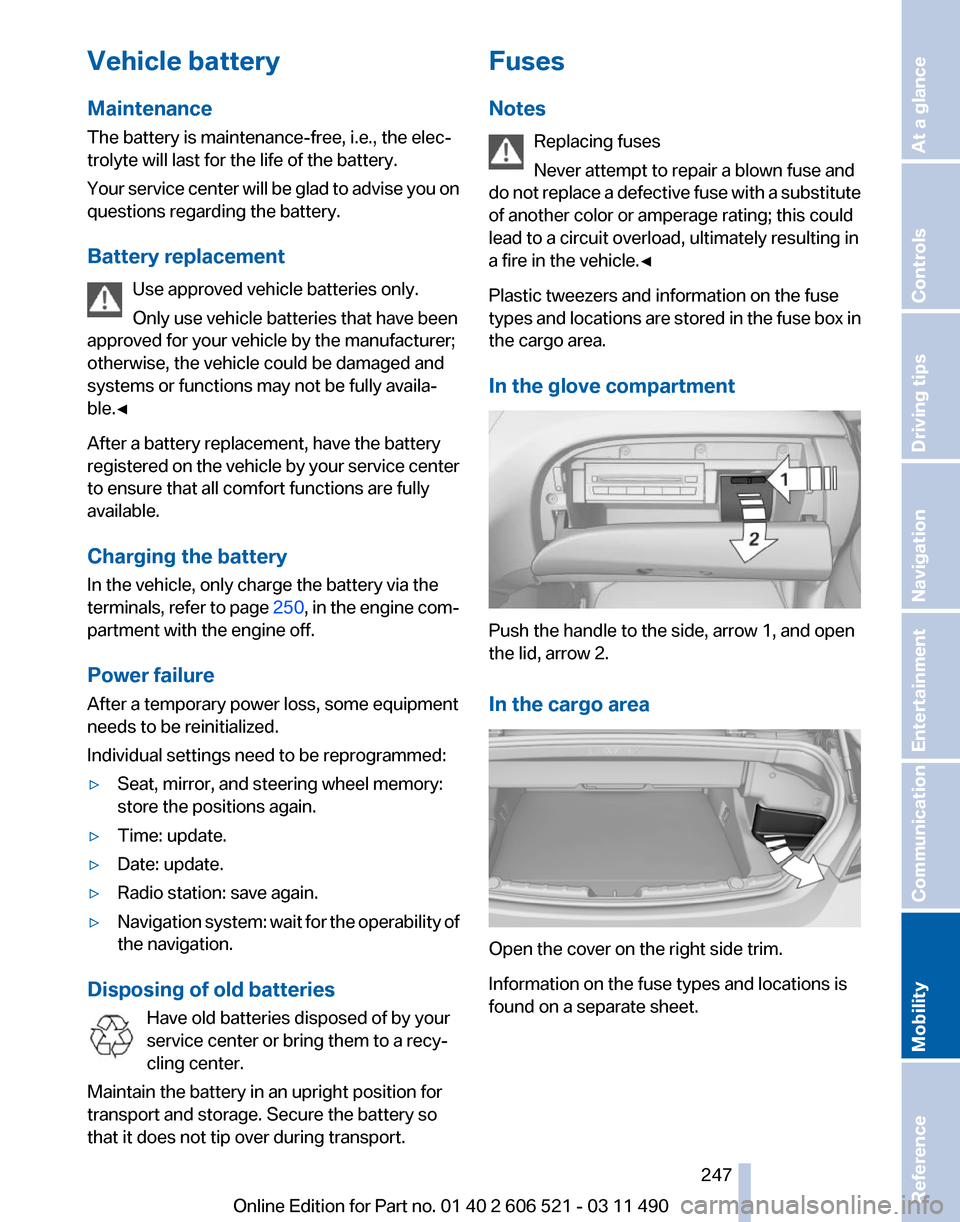
In the glove compartment Push the handle to the side, arrow 1, and open
the lid, arrow 2.
In the cargo area
Open the cover on the right side trim.
Information on the fuse types and locations is
found on a separate sheet. Seite 247
247Online Edition for Part no. 01 40 2 606 521 - 03 11 490
Reference
Mobility Communication Entertainment Navigation Driving tips Controls At a glance
Page 249 of 282
Assist Response Center may still be able to
hear you.
Initiating an Emergency Request
automatically
Under certain conditions, an Emergency Re‐
quest is automatically initiated immediately after
a severe accident. Automatic Collision Notifica‐
tion is not affected by pressing the SOS button.
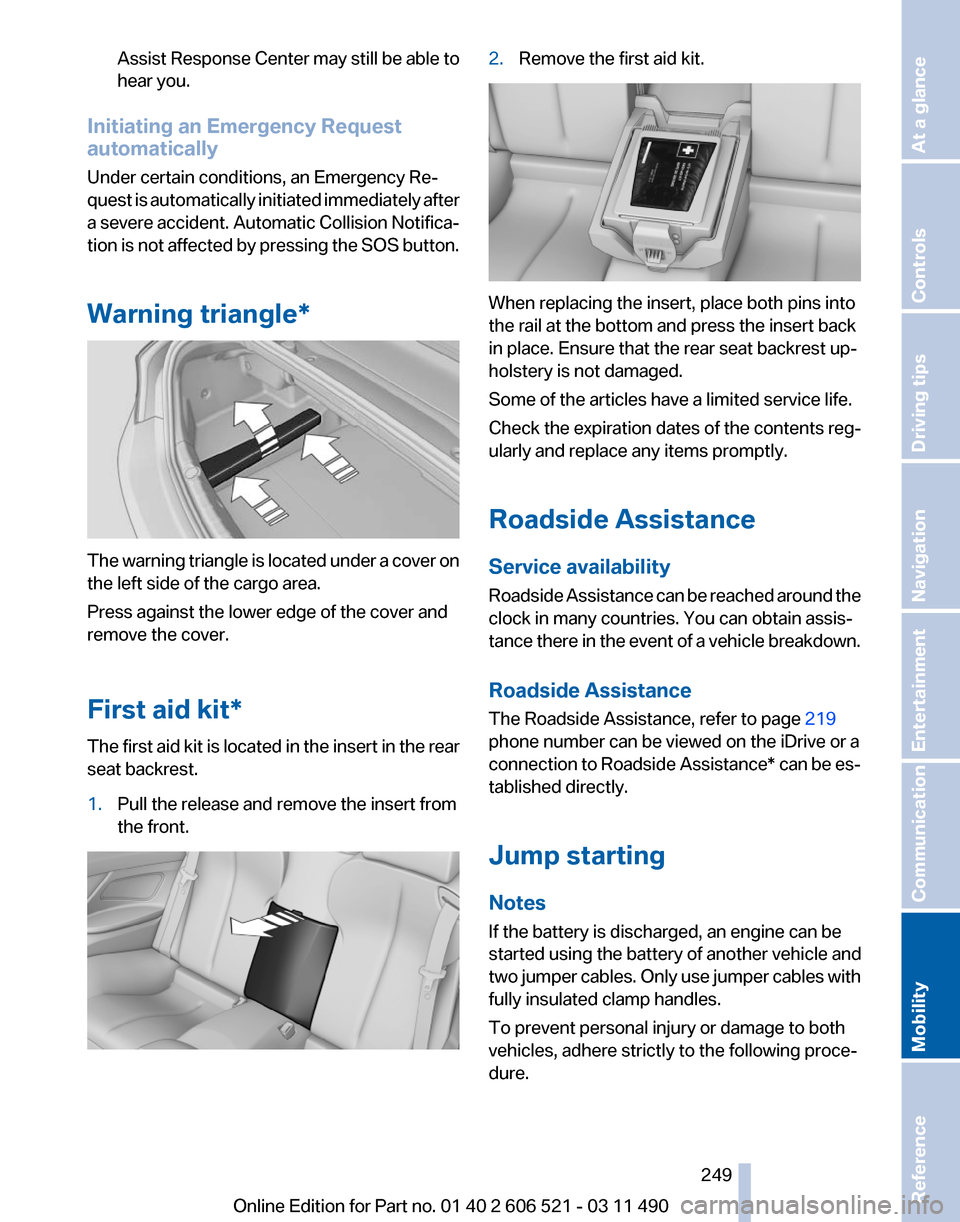
Warning triangle* The warning triangle is located under a cover on
the left side of the cargo area.
Press against the lower edge of the cover and
remove the cover.
First aid kit*
The first aid kit is located in the insert in the rear
seat backrest.
1.
Pull the release and remove the insert from
the front. 2.
Remove the first aid kit. When replacing the insert, place both pins into
the rail at the bottom and press the insert back
in place. Ensure that the rear seat backrest up‐
holstery is not damaged.
Some of the articles have a limited service life.
Check the expiration dates of the contents reg‐
ularly and replace any items promptly.
Roadside Assistance
Service availability
Roadside Assistance can be reached around the
clock in many countries. You can obtain assis‐
tance there in the event of a vehicle breakdown.
Roadside Assistance
The Roadside Assistance, refer to page
219
phone number can be viewed on the iDrive or a
connection to Roadside Assistance* can be es‐
tablished directly.
Jump starting
Notes
If the battery is discharged, an engine can be
started using the battery of another vehicle and
two jumper cables. Only use jumper cables with
fully insulated clamp handles.
To prevent personal injury or damage to both
vehicles, adhere strictly to the following proce‐
dure.
Seite 249
249Online Edition for Part no. 01 40 2 606 521 - 03 11 490
Reference
Mobility Communication Entertainment Navigation Driving tips Controls At a glance
Page 251 of 282
attempt in order to allow the discharged bat‐
tery to recharge.
3. Let both engines run for several minutes.
4. Disconnect the jumper cables in the reverse
order.
Check the battery and recharge if necessary.
Tow-starting and towing
Manual transmission
Observe before towing your vehicle
The parking brake is blocked
The parking brake cannot be released
manually.
When the parking brake is blocked, do not tow
with the front axle lifted or the vehicle can be
damaged.
Contact your service center.◀
Gearshift lever in neutral position.
Towing
Follow the towing instructions
Follow all towing instructions; otherwise,
vehicle damage or accidents may occur.◀
▷ Make sure that the ignition is switched on;
otherwise, the low beams, tail lamps, turn
signals, and windshield wipers may be un‐
available.
▷ Do not tow the vehicle with the rear axle
tilted, as the front wheels could turn.
▷ When the engine is stopped, there is no
power assist. Consequently, more force
needs
to be applied when braking and steer‐
ing.
▷ Larger steering wheel movements are re‐
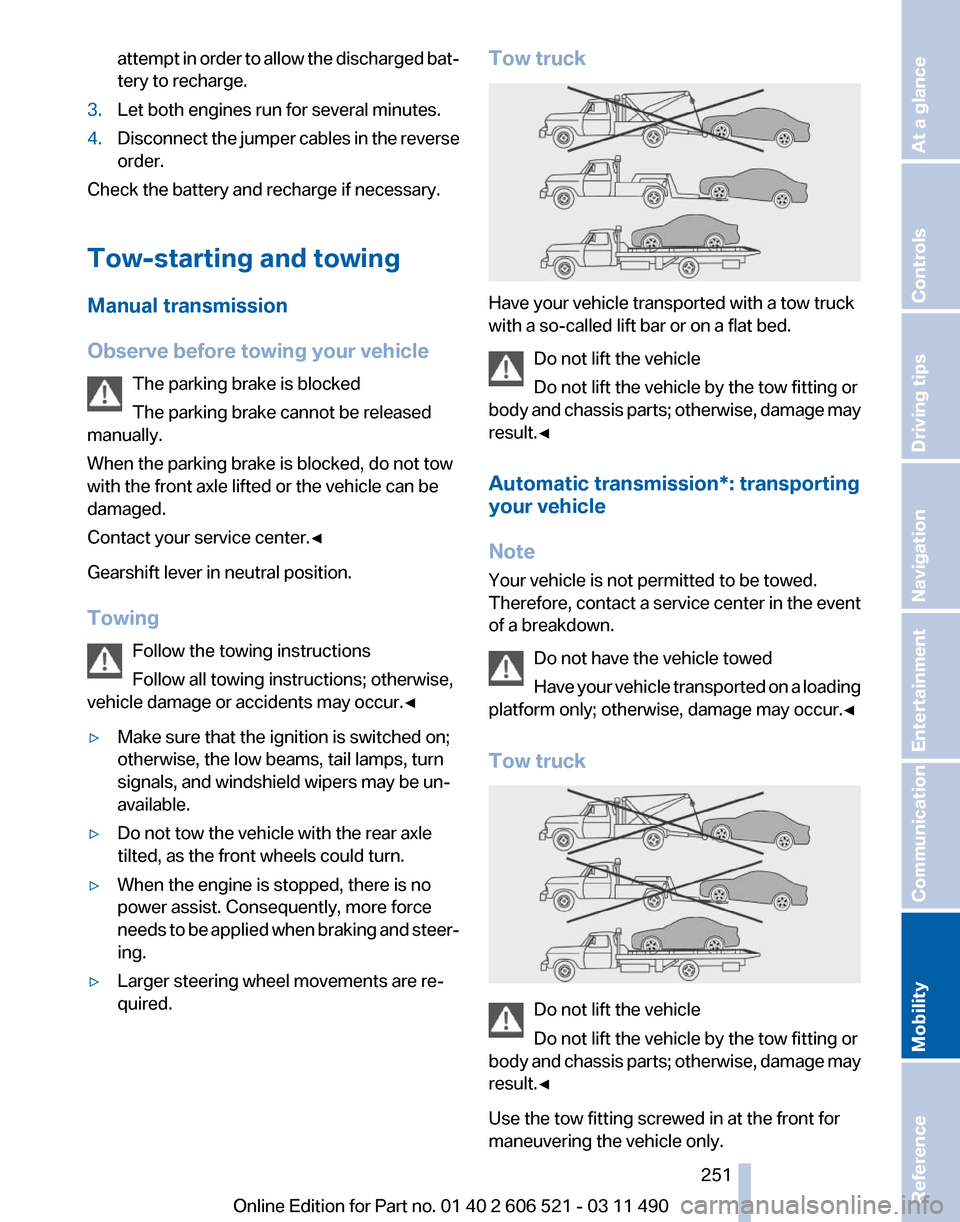
quired. Tow truck
Have your vehicle transported with a tow truck
with a so-called lift bar or on a flat bed.
Do not lift the vehicle
Do not lift the vehicle by the tow fitting or
body
and chassis parts; otherwise, damage may
result.◀
Automatic transmission*: transporting
your vehicle
Note
Your vehicle is not permitted to be towed.
Therefore, contact a service center in the event
of a breakdown.
Do not have the vehicle towed
Have your vehicle transported on a loading
platform only; otherwise, damage may occur.◀
Tow truck Do not lift the vehicle
Do not lift the vehicle by the tow fitting or
body
and chassis parts; otherwise, damage may
result.◀
Use the tow fitting screwed in at the front for
maneuvering the vehicle only. Seite 251
251Online Edition for Part no. 01 40 2 606 521 - 03 11 490
Reference
Mobility Communication Entertainment Navigation Driving tips Controls At a glance
Page 253 of 282
Manual transmission
If
possible, do not tow-start the vehicle but start
the engine by jump-starting, refer to page 249.
If the vehicle is equipped with a catalytic con‐
verter, only tow-start while the engine is cold.
1. Switch on the hazard warning system and
comply with local regulations.
2. Ignition, refer to page 65, on.
3. Engage third gear.
4. Have the vehicle tow-started with the clutch
pressed
and slowly release the clutch. After
the engine starts, immediately press on the
clutch again.
5. Stop at a suitable location, remove the tow
bar or rope, and switch off the hazard warn‐
ing system.
6. Have the vehicle checked.
Seite 253
253Online Edition for Part no. 01 40 2 606 521 - 03 11 490
Reference
Mobility Communication Entertainment Navigation Driving tips Controls At a glance
Page 255 of 282
A signal is sounded when an attempt is made to
lock the vehicle.
Transmission position
Transmission position P is engaged automati‐
cally:
▷
When the ignition is switched off.
▷ After approx. 15 minutes.
Headlamps
▷ Do not rub dry and do not use abrasive or
caustic cleansers.
▷ Soak areas that have been soiled e.g. due to
insects, with shampoo and wash off with
water.
▷ Thaw ice with de-icing spray; do not use an
ice scraper.
After washing the vehicle
After washing the vehicle, apply the brakes
briefly
to dry them; otherwise, braking action can
be reduced and corrosion of the brake discs can
occur.
Vehicle care
Car care products
BMW recommends using cleaning and care
products from BMW, since these have been
tested and approved.
Car care and cleaning products
Follow the instructions on the container.
When cleaning the interior, open the doors or
windows.
Only use products intended for cleaning vehi‐
cles.
Cleansers can contain substances that are dan‐
gerous and harmful to your health.◀
Vehicle paint
Regular care contributes to driving safety and
value retention. Environmental influences can act on the vehicle
paint.
Tailor the frequency and extent of your car
care to these influences.
Caring for the convertible top
The appearance and life of the convertible top
depend on correct care and operation.
Note the following instructions:
▷ To avoid water stains, mildew spots, and
chafe marks, do not fold and stow the con‐
vertible top in the convertible top well while
the top is wet or frozen.
▷ Remove water stains that may nevertheless
have appeared on the headliner using a mi‐
crofiber cloth and an interior cleaner.
▷ When the vehicle is parked in enclosed
areas for lengthy periods, ensure that the
area is well ventilated.
▷ Remove bird droppings immediately as their
corrosive effect will otherwise attack the
convertible top and damage the rubber
seals.
Do not use spot remover, paint thinner,
solvent,
benzine, or similar products to re‐
move spots on the convertible top. These prod‐
ucts may destroy the rubber coating. Incorrect
care and cleaning may cause the convertible top
and its seams to become leaky.◀
To remove heavy soiling, use a special conver‐
tible top cleaner.
Follow the instructions for use from the manu‐
facturer.
Treat the convertible top with an impregnating
agent after it has been washed three to five
times.
Leather care
Remove dust from the leather often, using a
cloth or vacuum cleaner.
Otherwise, particles of dust and road grime
chafe in pores and folds, and lead to increased
wear and premature degradation of the leather
surface. Seite 255
255Online Edition for Part no. 01 40 2 606 521 - 03 11 490
Reference
Mobility Communication Entertainment Navigation Driving tips Controls At a glance
Page 257 of 282

Only use floor mats that have been approved for
the vehicle and can be properly fixed in place.
Ensure
that the floor mats are securely fastened
again after they were removed for cleaning, for
example.◀
Floor mats can be removed from the passenger
compartment for cleaning.
If the floor carpets are very dirty, clean with a
microfiber cloth and water or a textile cleaner. To
prevent matting of the carpet, rub back and forth
in the direction of travel only.
Sensors/cameras
To clean sensors and cameras, use a cloth mois‐
tened with a small amount of glass cleaner.
Displays/screens
Clean the displays with a microfiber cloth.
Cleaning displays
Do not use chemical or household cleans‐
ers.
Keep all fluids and moisture away from the unit.
Otherwise, they could affect or damage surfa‐
ces or electrical components.
Avoid pressing too hard when cleaning and do
not use abrasive materials; otherwise, damage
can result.◀
Long-term vehicle storage
Your service center can advise you on what to
consider when storing the vehicle for longer
than three months. Seite 257
257Online Edition for Part no. 01 40 2 606 521 - 03 11 490
Reference
Mobility Communication Entertainment Navigation Driving tips Controls At a glance