2012 BMW 650I CONVERTIBLE warning light
[x] Cancel search: warning lightPage 119 of 282

Pedestrian detection
The pedestrian detection and warning system
only
operates in darkness and only when a heat
image is displayed.
Warm objects that are similar in shape to human
beings are detected by the system.
People detected by the system are displayed
with a slight yellow hue.
Under good ambient conditions, the pedestrian
detection system operates within a range of ap‐
prox. 50 ft/15 m to approx. 330 ft/100 m. Environmental influences can limit the availabil‐
ity of pedestrian detection.
If
pedestrian detection is not available, a symbol
is displayed in the heat image.
This symbol disappears when the function be‐
comes available again. Warning of people in danger If the system detects a person in the defined
area
in front of the vehicle and if there is the dan‐
ger of a collision with this person, a warning
symbol appears in the Control Display and
Head-up Display*.
Although both the shape and the heat radiation
are analyzed, false warnings cannot be ruled out.
Warning area in front of the vehicle The warning area in front of the vehicle is divided
into two areas.
▷
Central area 1 directly in front of the vehicle.
▷ Expanded area 2 to the right and left.
The entire area moves along with the vehicle in
the direction of the steering angle and changes
with
the vehicle speed. As the vehicle speed in‐
creases, the area becomes longer and wider, for
example.
Symbols
This symbol is displayed when a person
is detected in the central area, arrow 1,
immediately in front of the vehicle.
This symbol is displayed when a person
detected in the extended area, arrow 2, Seite 119
119Online Edition for Part no. 01 40 2 606 521 - 03 11 490
Reference Mobility Communication Entertainment Navigation Driving tips
Controls At a glance
Page 121 of 282

Clean the lens, refer to page
257.
Head-up Display *
The concept This system projects important information into
the driver's field of vision, e.g., the speed.
In this way, the driver can get information with‐
out averting his or her eyes from the road.
Display visibility
The
visibility of the displays in the Head-up Dis‐
play is influenced by:
▷ Certain sitting positions.
▷ Objects on the cover of the Head-up Dis‐
play.
▷ Sunglasses with certain polarization filters.
▷ Wet roads.
▷ Unfavorable light conditions.
If the image is distorted, check the basic set‐
tings.
Switching on/off Press the button. Display
1
Lane departure warning*
2 Active Cruise Control*
3 Desired speed
4 Navigation system*
5 Speed
The collision warning*, Night Vision* pedestrian
warning, or Check Control messages are dis‐
played briefly if needed.
Selecting displays in the Head-up
Display
1. "Settings"
2. "Head-up display"
3. "Displayed information"
4. Select the desired displays in the Head-up
Display.
The settings are stored for the remote control
currently in use.
Setting the brightness
The brightness is automatically adjusted to the
ambient light.
The basic setting can be adjusted manually.
1. "Settings"
2. "Head-up display"
3. "Brightness"
4. Turn the controller.
The brightness is adjusted.
When the low beams are switched on, the
brightness
of the Head-up Display can be addi‐
tionally influenced using the instrument lighting,
refer to page 87.
Seite 121
121Online Edition for Part no. 01 40 2 606 521 - 03 11 490
Reference Mobility Communication Entertainment Navigation Driving tips
Controls At a glance
Page 238 of 282

Engine oil
General information
The
engine oil consumption is dependent on the
driving style and driving conditions.
Therefore, check the engine oil level after every
refueling using the electronic engine oil level
check.
Checking the oil level
The concept
The oil level is monitored electronically and dis‐
played on the Control Display.
Requirements
▷ The engine must be running and warm after
the vehicle has been driven for at least
6 miles/10 km.
▷ The vehicle is stopped or being driven on a
level roadway.
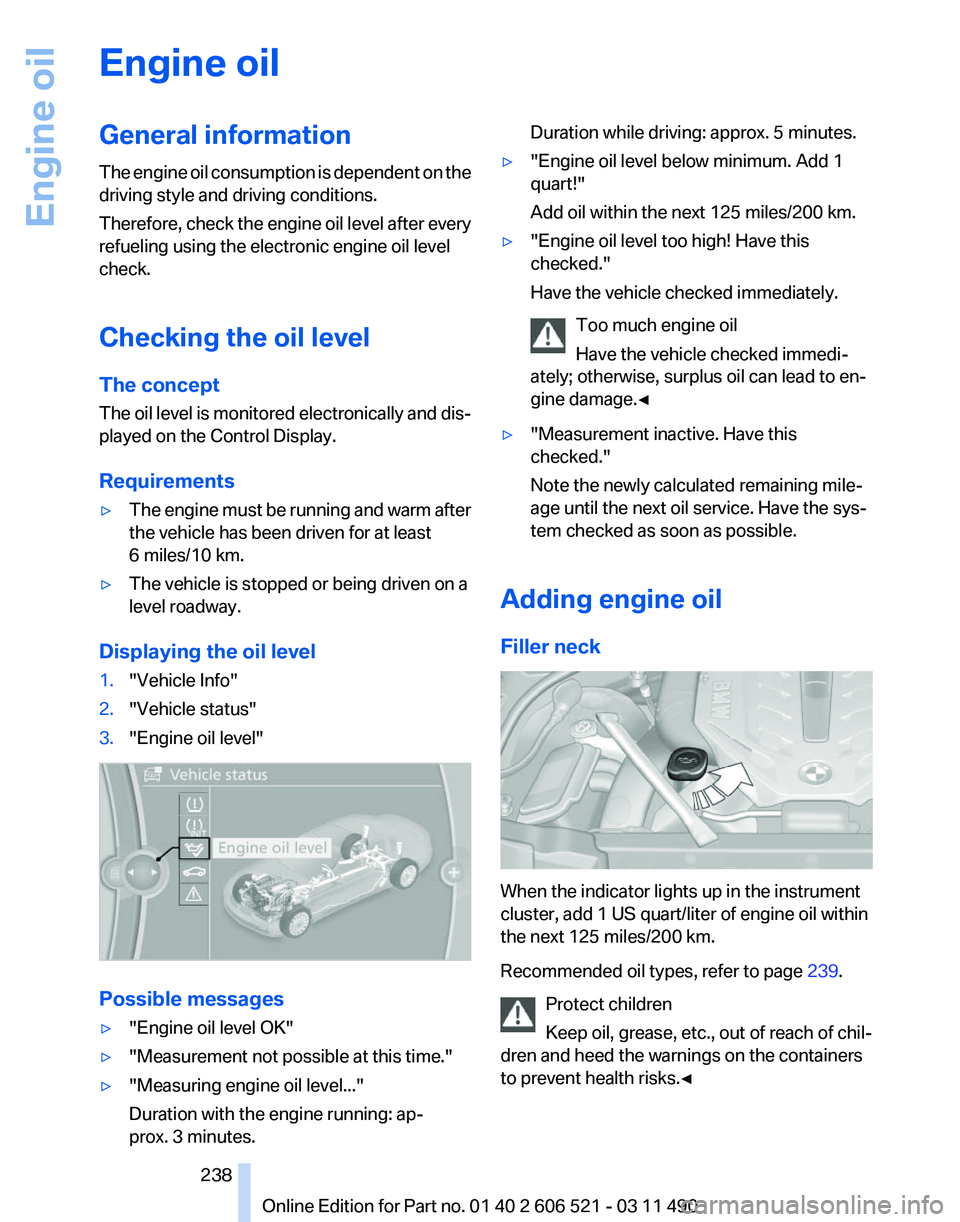
Displaying the oil level
1. "Vehicle Info"
2. "Vehicle status"
3. "Engine oil level" Possible messages
▷
"Engine oil level OK"
▷ "Measurement not possible at this time."
▷ "Measuring engine oil level..."
Duration with the engine running: ap‐
prox. 3 minutes. Duration while driving: approx. 5 minutes.
▷ "Engine oil level below minimum. Add 1
quart!"
Add oil within the next 125 miles/200 km.
▷ "Engine oil level too high! Have this
checked."
Have the vehicle checked immediately.
Too much engine oil
Have the vehicle checked immedi‐
ately; otherwise, surplus oil can lead to en‐
gine damage.
◀ ▷
"Measurement inactive. Have this
checked."
Note the newly calculated remaining mile‐
age until the next oil service. Have the sys‐
tem checked as soon as possible.
Adding engine oil
Filler neck When the indicator lights up in the instrument
cluster, add 1 US quart/liter of engine oil within
the next 125 miles/200 km.
Recommended oil types, refer to page
239.
Protect children
Keep oil, grease, etc., out of reach of chil‐
dren and heed the warnings on the containers
to prevent health risks.◀ Seite 238
238 Online Edition for Part no. 01 40 2 606 521 - 03 11 490Engine oil
Page 241 of 282

Maintenance
BMW Maintenance System
The maintenance system directs you to re‐
quired
maintenance measures and thereby sup‐
ports you in maintaining road safety and the op‐
erational reliability of the vehicle.
Condition Based Service CBS
Sensors and special algorithms take into ac‐
count the driving conditions of your vehicle.
Based on this, Condition Based Service deter‐
mines the maintenance requirements.
The system makes it possible to adapt the
amount of maintenance you need to your user
profile.
Details on the service requirements, refer to
page 81, can be displayed on the Control Dis‐
play.
Service data in the remote control
Information on the required maintenance is con‐
tinuously stored in the remote control. Your
service center will read out this data and suggest
the right array of service procedures for your ve‐
hicle.
Therefore, hand your service specialist the re‐
mote control that you used most recently.
Storage periods
Storage periods during which the vehicle bat‐
tery was disconnected are not taken into ac‐
count.
If this occurs, have a service center update the
time-dependent maintenance procedures,
such as checking brake fluid and, if necessary,
changing the engine oil and the microfilter/acti‐
vated-charcoal filter. Service and Warranty
Information Booklet for US
models and Warranty and
Service Guide Booklet for
Canadian models
Please
consult your Service and Warranty Infor‐
mation Booklet for US models and Warranty and
Service Guide Booklet for Canadian models for
additional information on service requirements.
Maintenance and repair should be performed by
your service center. Make sure to have regular
maintenance procedures recorded in the vehi‐
cle's Service and Warranty Information Booklet
for US models, and in the Warranty and Service
Guide Booklet for Canadian models. These en‐
tries are proof of regular maintenance.
Socket for OBD Onboard
Diagnosis There is an OBD socket on the driver's side for
checking
the primary components in the vehicle
emissions.
Emissions
▷The warning lamp lights up:
Emissions are deteriorating. Have
the
vehicle checked as soon as pos‐
sible.
▷ The warning lamp flashes under cer‐
tain circumstances: Seite 241
241Online Edition for Part no. 01 40 2 606 521 - 03 11 490
Reference
Mobility Communication Entertainment Navigation Driving tips Controls At a glance
Page 248 of 282

Breakdown assistance
Hazard warning flashers
The button is located in the center console.
Emergency Request
*
Requirements
▷ Equipment version with full preparation
package mobile phone.
An Emergency Request can be made, even
if no mobile phones are paired with the ve‐
hicle.
▷ BMW Assist is activated.
▷ The radio ready state is switched on.
▷ The BMW Assist system is logged in to a
wireless communications network sup‐
ported by BMW Assist.
▷ The Assist system is functional.
Only press the SOS button in an emergency.
Emergency Request not guaranteed
For
technical reasons, the Emergency Re‐
quest cannot be guaranteed under unfavorable
conditions.◀
Service contract
▷ After your contract with BMW Assist has ex‐
pired,
the BMW Assist system can be deac‐
tivated by the service center without you
having to visit a workshop.
After deactivation, an Emergency Request
is no longer possible. ▷
Under certain circumstances, the system
can be reactivated by a service center after
you sign a new contract.
Initiating an Emergency Request 1.
Press the cover briefly to open it.
2. Press the SOS button until the LED in the
button lights up.
▷ The LED lights up: an Emergency Request
was initiated.
If the situation allows, wait in your vehicle
until the voice connection has been estab‐
lished.
▷ The LED flashes if the connection to the
BMW
Assist Response Center has been es‐
tablished.
After the Emergency Request arrives at the
BMW Assist Response Center, the BMW
Assist Response Center contacts you and
takes further steps to help you.
Even if you are unable to respond, the BMW
Assist Response Center can take further
steps to help you under certain circumstan‐
ces.
For this purpose, data that are used to de‐
termine the necessary rescue measures,
such as the current position of the vehicle if
it can be established, are transmitted to the
BMW Assist Response Center.
▷ If the LED is flashing but the BMW Assist
Response Center cannot be heard on the
hands-free system, the hands-free system
may be malfunctioning. However, the BMW
Seite 248
248 Online Edition for Part no. 01 40 2 606 521 - 03 11 490
Breakdown assistance
Page 252 of 282

Towing other vehicles
General information
Light towing vehicle
Your vehicle must not be lighter than the
vehicle being towed; otherwise, it will not be
possible to control vehicle response.◀
Attaching the tow bar/tow rope correctly
Attach the tow bar or tow rope to the tow
fitting; connecting it to other vehicle parts may
cause damage.◀
▷ Switch on the hazard warning system, de‐
pending on local regulations.
▷ If the electrical system has failed, clearly
identify the vehicle being towed by placing
a sign or a warning triangle in the rear win‐
dow.
Tow bar
The tow fittings used should be on the same
side on both vehicles.
Should it prove impossible to avoid mounting
the tow bar at an offset angle, please observe
the following:
▷ Maneuvering capability is limited during cor‐
nering.
▷ The tow bar will generate lateral forces if it
is secured with an offset.
Tow rope
When starting to tow the vehicle, make sure that
the tow rope is taut.
To avoid jerking and the associated stresses on
the vehicle components when towing, always
use nylon ropes or nylon straps.
Attaching the tow rope correctly
Only secure the tow rope on the tow fit‐
ting; otherwise, damage can occur when it is se‐
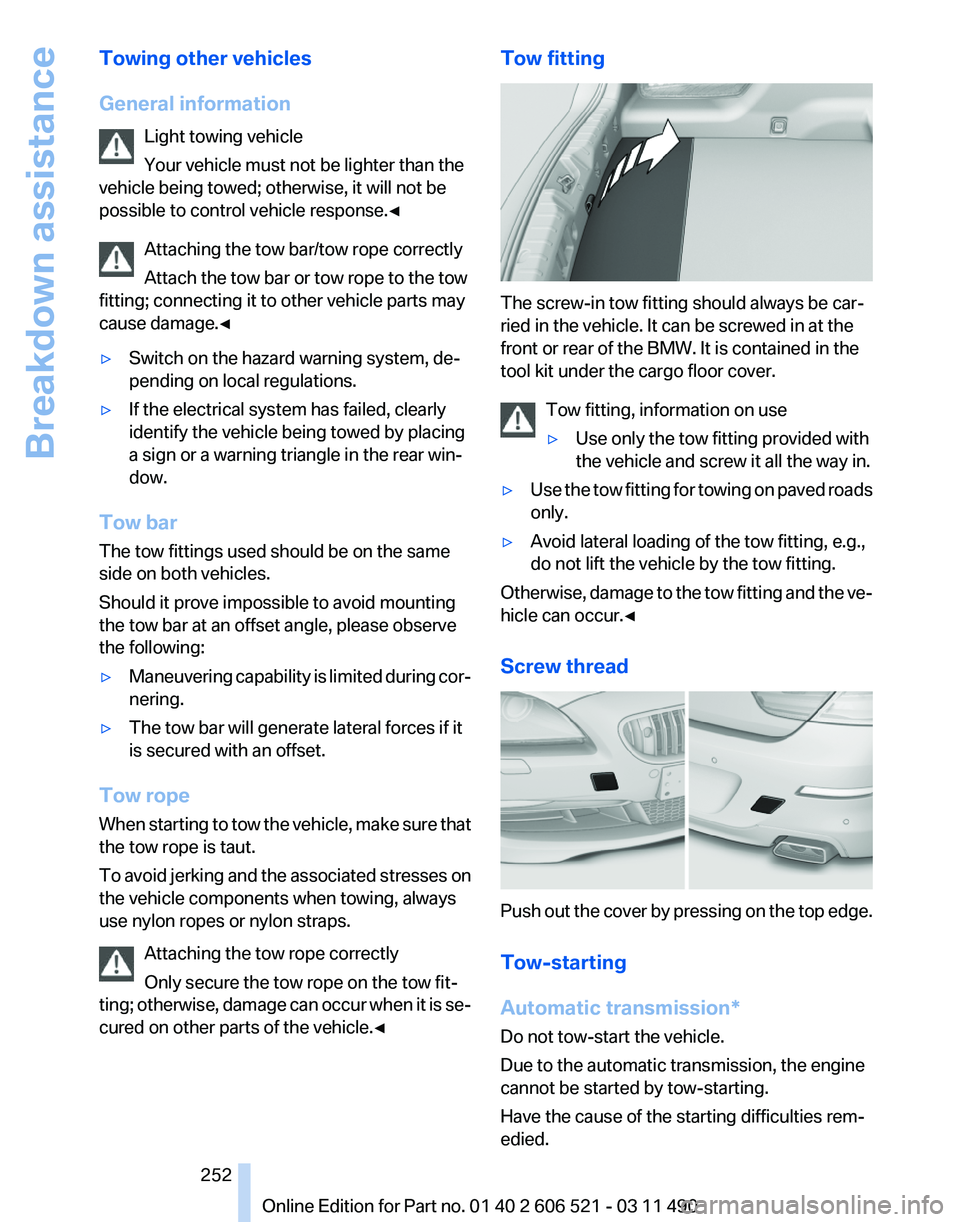
cured on other parts of the vehicle.◀ Tow fitting
The screw-in tow fitting should always be car‐
ried in the vehicle. It can be screwed in at the
front or rear of the BMW. It is contained in the
tool kit under the cargo floor cover.
Tow fitting, information on use
▷Use only the tow fitting provided with
the vehicle and screw it all the way in.
▷ Use the tow fitting for towing on paved roads
only.
▷ Avoid lateral loading of the tow fitting, e.g.,
do not lift the vehicle by the tow fitting.
Otherwise, damage to the tow fitting and the ve‐
hicle can occur.◀
Screw thread Push out the cover by pressing on the top edge.
Tow-starting
Automatic transmission
*
Do not tow-start the vehicle.
Due to the automatic transmission, the engine
cannot be started by tow-starting.
Have the cause of the starting difficulties rem‐
edied. Seite 252
252 Online Edition for Part no. 01 40 2 606 521 - 03 11 490
Breakdown assistance
Page 272 of 282

Everything from A to Z
Index
A
ABS, Antilock Brake Sys‐
tem 101
Activated-charcoal filter 126
Active Blind Spot Detec‐ tion 98
Active seat, front 55
Active seat ventilation, front 55
Active Steering, integral 102
Adaptive brake lights, refer to Brake force display 100
Adaptive drive 102
Adaptive light control 85
Additional telephone 196
Additives, oil 239
Adjustments, seats/head re‐ straints 53
Airbags 88
Airbags, indicator/warning light 89
Air circulation, refer to Recir‐ culated-air mode 125
Air distribution, manual 123
Air drying, refer to Cooling function 125
Air pressure, tires 229
Air vents, refer to Ventila‐ tion 126
Air volume, automatic climate control 124
Alarm system 42
Alarm, unintentional 43
All around the center con‐ sole 17
All
around the interior rearview
mirror 18
All around the steering wheel 12
ALL program, automatic cli‐ mate control 125 All-season tires, refer to Win‐
ter tires 233
Alternating-code hand-held transmitter 129
Alternative oil types 239
AM/FM station 166
Announcement, navigation, refer to Spoken instruc‐
tions 155
Antifreeze, washer fluid 71
Antilock Brake System, ABS 101
Anti-slip control, refer to DSC 101
Appointments 212
Approved engine oils 239
Apps 222
Armrest, refer to Center arm‐ rest 132
Arrival time 78
Ashtray 129
Assist 218
Assistance, Roadside Assis‐ tance 249
Assistance when driving off 101
Audio playback 173
Audio playback, Blue‐ tooth 188
AUTO intensity 124
Automatic car wash 254
Automatic Curb Monitor 59
Automatic deactivation, front passenger airbags 89
Automatic headlamp con‐ trol 85
Automatic Hold 67
Automatic locking 39
Automatic recirculated-air control 125
Automatic Soft Closing, doors 40 Automatic transmission with
Steptronic 72
AUTO program, automatic cli‐ mate control 124
AUTO program, intensity 124
AUX-IN port 184
Average fuel consumption 77
Average speed 77
Axle loads, weights 261
B
Backrest curvature, refer to Lumbar support 54
Backrest, seats 53
Backrest, width 54
Backup camera 110
Backup lamps, bulb replace‐ ment 245
Balance 164
Band-Aids, refer to First aid kit 249
Bar for tow-starting/tow‐ ing 252
Bass 164
Battery replacement, vehicle battery 247
Battery replacement, vehicle remote control 32
Battery, vehicle 247
Before entering the car wash 254
Belts, safety belts 56
Beverage holder, cu‐ pholder 133
Bluetooth audio 188
BMW Apps 222
BMW Apps, video play‐ back 187
BMW Assist 218
BMW EfficientDynamics, refer to Saving fuel 141
BMW homepage 6
Seite 272
272 Online Edition for Part no. 01 40 2 606 521 - 03 11 490
Everything from A to Z
Page 273 of 282

BMW Internet page
6
BMW Maintenance Sys‐ tem 241
BMW Online 220
Bottle holder, refer to Cu‐ pholder 133
Brake assistant 101
Brake discs, breaking in 138
Brake force display 100
Brake lamps, brake force dis‐ play 100
Brake lamps, bulb replace‐ ment 245
Brake lights, adaptive 100
Brake pads, breaking in 138
Braking, notes 139
Breakdown assis‐ tance 248, 249
Breaking in 138
Brightness of Control Dis‐ play 80
Bulb replacement 243
Bulb replacement, front 244
Bulb replacement, rear 245
Bulbs and lamps 243
Button, Start/Stop 65
Bypassing, refer to starting aid 249
C
Calendar 212
California Proposition 65 Warning 7
Camera, backup camera 112
Camera, care 257
Camera, Side View 115
Camera, Top View 114
Can holder, refer to Cu‐ pholder 133
Car battery 247
Car care products 255
Care, displays 257
Care, vehicle 255
Cargo 140
Cargo area, cargo area parti‐ tion 47
Cargo area lid 40 Cargo area partition
47
Cargo area, storage compart‐ ments 134
Cargo straps, securing cargo 141
Car key, refer to Remote con‐ trol 32
Carpet, care 256
Car wash 254
Catalytic converter, refer to Hot exhaust system 138
CBS Condition Based Serv‐ ice 241
CD/DVD 173
CDs, storing 180
Cell phone 196
Center armrest 132
Center console 17
Central locking system 35
Central
screen, refer to Control
Display 19
Changes, technical, refer to Safety 7
Changing parts 243
Changing wheels/tires 233
Check Control 82
Children, seating position 62
Children, transporting safely 62
Child restraint fixing sys‐ tem 62
Child restraint fixing system LATCH 63
Child restraint fixing systems, mounting 62
Child seat, mounting 62
Child seats 62
Chrome parts, care 256
Cigarette lighter 129
Cleaning, displays 257
Climate control 123
Climate control wind‐ shield 139
Clock 76
Closing/opening from in‐ side 39
Closing/opening via door lock 38 Closing/opening with remote
control 36
Combination instrument 14
Combination
instrument, elec‐
tronic displays 16
Combination switch, refer to Turn signals 69
Combination switch, refer to Wiper system 69
Comfort Access 41
COMFORT program, Dynamic Driving Control 105
Computer 76
Concierge service 219
Condensation on win‐ dows 124
Condensation under the vehi‐ cle 140
Condition Based Service CBS 241
Confirmation signal 37
Contacts 207, 216
Control Display 19
Control Display, settings 79
Controller 19
Control systems, driving sta‐ bility 101
Convenient closing 37
Convenient opening 36
Convertible, convertible top 45
Convertible mode, automatic climate control 124
Convertible program, auto‐ matic climate control 124
Convertible top 45
Convertible top, care 255
Convertible top, cargo area partition 47
Convertible top, emergency operation 47
Convertible top, rollover pro‐ tection system 91
Convertible top tool 47
Coolant 239
Coolant temperature 75
Cooling function 125
Cooling, maximum 124
Seite 273
273Online Edition for Part no. 01 40 2 606 521 - 03 11 490
Reference Mobility Communication Entertainment Navigation Driving tips Controls At a glance