2012 BMW 640I CONVERTIBLE turn signal
[x] Cancel search: turn signalPage 199 of 282
▷
Is Bluetooth activated in the vehicle and on
the
mobile phone? Activate Bluetooth in the
vehicle and on the mobile phone.
▷ Do the Bluetooth passkeys on the mobile
phone and the vehicle match? Enter the
same passkey on the mobile phone and via
iDrive.
▷ Did it take longer than 30 seconds to enter
the
passkey? Repeat the pairing procedure.
▷ Are too many Bluetooth devices connected
to
the mobile phone or vehicle? Delete con‐
nections with other devices if necessary.
▷ Is the audio connection activated? Deacti‐
vate the audio connection.
▷ Is the mobile phone in power-save mode or
does
it have only a limited remaining battery
life? Charge the mobile phone in the snap-
in adapter* or via the charging cable.
▷ Depending on the mobile phone, it is possi‐
ble that only one device can be connected
to the vehicle. Unpair the connected device
from the vehicle and pair and connect only
one device.
▷ The mobile phone no longer reacts? Switch
the mobile phone off and on again. Repeat
the pairing procedure.
The telephone functions are not available.
▷ Is the mobile phone paired as an additional
telephone and is the additional telephone
function
deactivated? Activate the function.
▷ Is an outgoing call not possible? Connect
the mobile phone as a telephone.
No or not all phone book entries are displayed,
or they are incomplete.
▷ Transmission of the phone book entries is
not yet complete.
▷ It is possible that only the phone book en‐
tries of the mobile phone or the
SIM card*
are transmitted.
▷ It may not be possible to display phone book
entries with special characters.
▷ The number of phone book entries being
stored is too high. ▷
Is the data volume of the contact too large,
e.g., due to stored information such as
notes? Reduce the data volume of the con‐
tact.
▷ Is the mobile phone connected as an audio
source
or additional telephone? The mobile
phone must be connected as a telephone.
The phone connection quality is poor.
▷ The strength of the Bluetooth signal on the
mobile phone can be adjusted, depending
on the mobile phone.
▷ Insert the mobile phone into the snap-in
adapter* or place it in the area of the center
console.
▷ Adjust the volume of the microphone and
loudspeakers separately.
If all points in this list have been checked and the
required function is still not available, please
contact the hotline or service center.
Controls
Adjusting the volume
Turn the knob until the desired volume is se‐
lected.
The setting is stored for the remote con‐
trol currently in use.
The vehicle automatically adjusts the volume of
the microphone on the telephone and the vol‐
ume of the called party. Depending on the mo‐
bile phone, the volumes may need to be ad‐
justed. The settings can only be created during
a call and must be adjusted separately for each
telephone. The settings are deleted when the
telephone is unpaired.
1. "Settings"
2. "Tone"
3. "Volume settings"
4. Select the desired setting: "Microphone" or
"Loudspeak."
5. To adjust: turn the controller.
6. To store: press the controller.
Seite 199
199Online Edition for Part no. 01 40 2 606 521 - 03 11 490
Reference Mobility
Communication Entertainment Navigation Driving tips Controls At a glance
Page 201 of 282
must be supported by the mobile phone and
service provider.
Accepting a call while speaking to
another party
This function might have to be activated by the
service provider and the mobile phone must be
adjusted accordingly.
If
a second call comes in during an ongoing call,
a call waiting signal is sounded where appropri‐
ate. "Accept"
The call is accepted and the existing call is put
on hold.
Establishing a second call
Establish
an additional call during an active call.
1. "Telephone"
2. "Active calls"
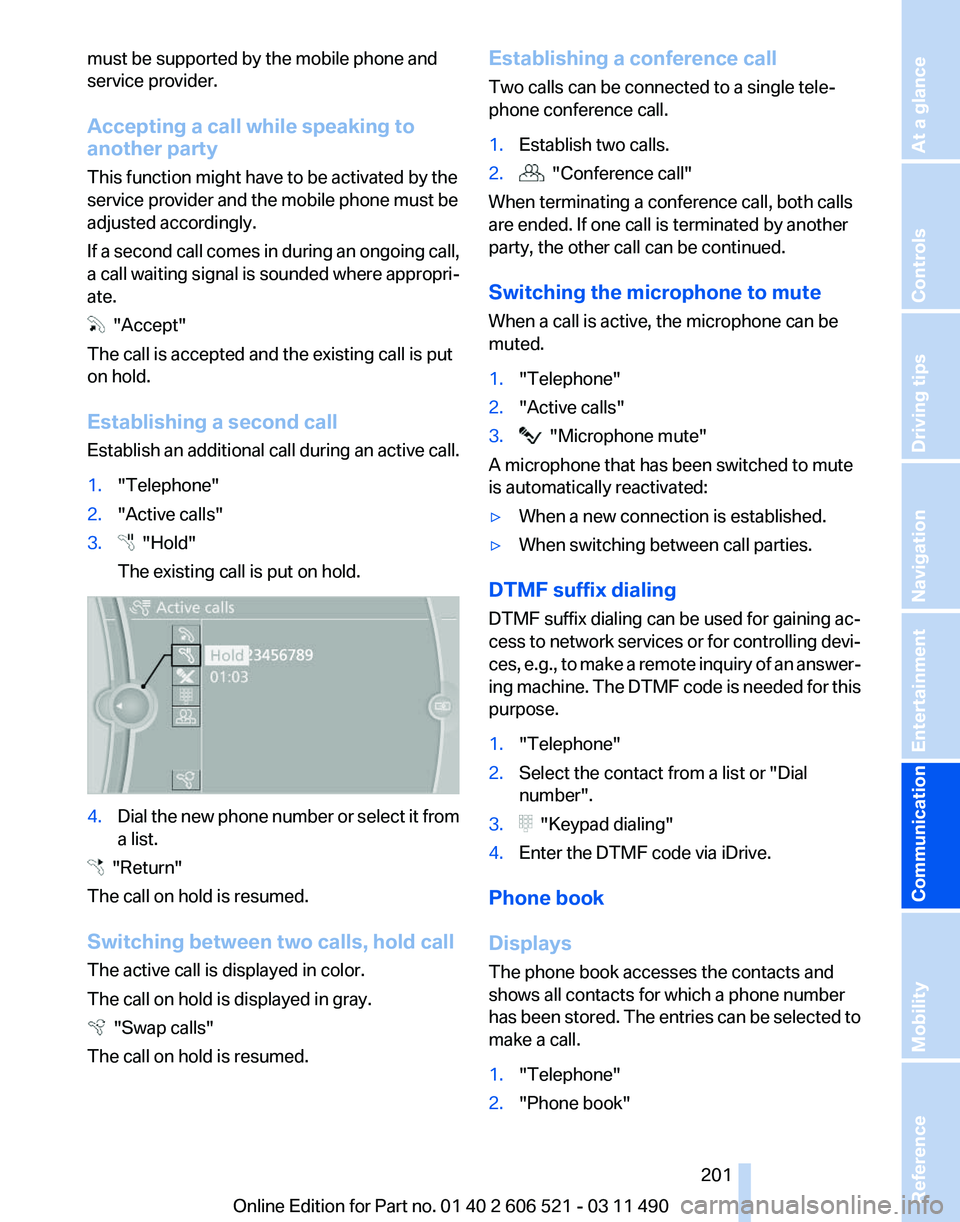
3. "Hold"
The existing call is put on hold. 4.
Dial the new phone number or select it from
a list. "Return"
The call on hold is resumed.
Switching between two calls, hold call
The active call is displayed in color.
The call on hold is displayed in gray. "Swap calls"
The call on hold is resumed. Establishing a conference call
Two calls can be connected to a single tele‐
phone conference call.
1.
Establish two calls.
2. "Conference call"
When terminating a conference call, both calls
are ended. If one call is terminated by another
party, the other call can be continued.
Switching the microphone to mute
When a call is active, the microphone can be
muted.
1. "Telephone"
2. "Active calls"
3. "Microphone mute"
A microphone that has been switched to mute
is automatically reactivated:
▷ When a new connection is established.
▷ When switching between call parties.
DTMF suffix dialing
DTMF suffix dialing can be used for gaining ac‐
cess
to network services or for controlling devi‐
ces, e.g., to make a remote inquiry of an answer‐
ing machine. The DTMF code is needed for this
purpose.
1. "Telephone"
2. Select the contact from a list or "Dial
number".
3. "Keypad dialing"
4. Enter the DTMF code via iDrive.
Phone book
Displays
The phone book accesses the contacts and
shows all contacts for which a phone number
has
been stored. The entries can be selected to
make a call.
1. "Telephone"
2. "Phone book"
Seite 201
201Online Edition for Part no. 01 40 2 606 521 - 03 11 490
Reference Mobility
Communication Entertainment Navigation Driving tips Controls At a glance
Page 244 of 282
Do not touch the bulbs
Do not touch the glass of new bulbs with
your bare hands, as even minute amounts of
contamination will burn into the bulb's surface
and reduce its service life.
Use
a clean tissue, cloth or something similar, or
hold the bulb by its base.◀
Light-emitting diodes (LEDs)
Light-emitting diodes installed behind a cover
serve as the light source for controls, display el‐
ements and other equipment.
These light-emitting diodes, which are related
to conventional lasers, are officially designated
as Class 1 light-emitting diodes.
Do not remove the covers
Do not remove the covers, and never stare
into the unfiltered light for several hours; other‐
wise, irritation of the retina could result.◀
Headlamp glass
Condensation can form on the inside of the ex‐
ternal lamps in cool or humid weather. When the
light is switched on, the condensation evapo‐
rates after a short time. The headlamp glasses
do not need to be changed.
If there is a large amount of moisture, e.g., water
droplets form in the lamp, have it checked by
your service center.
Front lamps, bulb replacement
Xenon headlamps
Because of the long life of these bulbs, the like‐
lihood of failure is very low. Switching the lamps
on and off frequently shortens their life.
If a bulb fails, switch on the front fog lamps* and
continue the trip with great care. Comply with
local regulations.
Do not perform work/bulb replacement on
xenon headlamps
Have any work on the xenon lighting system, in‐
cluding bulb replacement, performed only by a
service center. Due to the high voltage present in the system,
there
is the danger of fatal injuries if work is car‐
ried out improperly.◀
For checking and adjusting headlamp aim,
please contact your BMW center.
LEDs or light modules
The following lamps are equipped with LED
technology or are designed as light modules:
▷ Parking lamps and roadside parking lamps
▷ Turn signal lamps
▷ Front fog lamps*
▷ Daytime running lights*
Contact your service center in the event of a
malfunction.
Follow the general instructions on lamps and
bulbs, refer to page 243.
Corner-illuminating lamps
*
Follow the general instructions on lamps and
bulbs, refer to page 243.
The illustration shows the left side of the engine
compartment.
55-watt bulb, H3
Seite 244
244 Online Edition for Part no. 01 40 2 606 521 - 03 11 490
Replacing components
Page 245 of 282
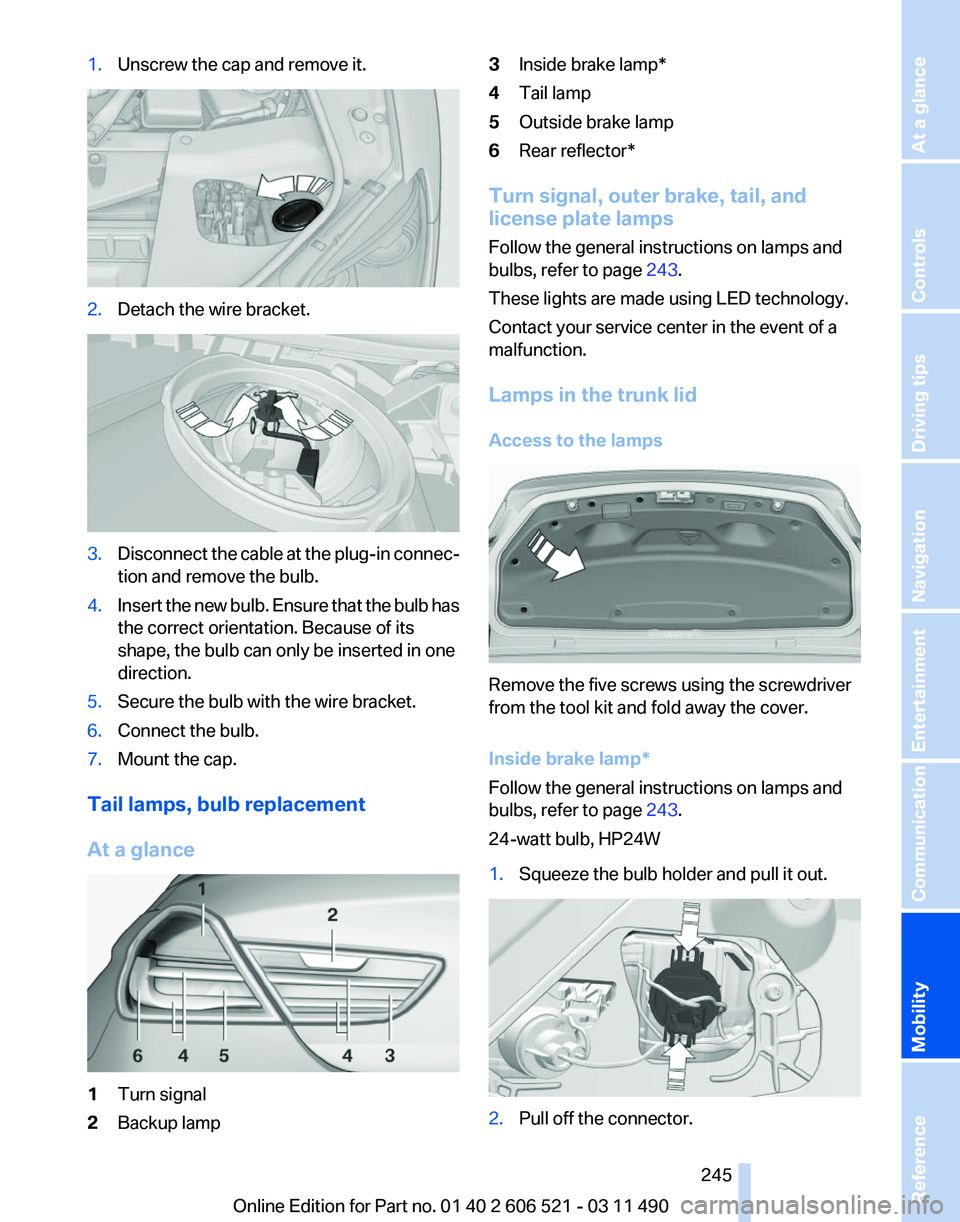
1.
Unscrew the cap and remove it. 2.
Detach the wire bracket. 3.
Disconnect the cable at the plug-in connec‐
tion and remove the bulb.
4. Insert the new bulb. Ensure that the bulb has
the correct orientation. Because of its
shape, the bulb can only be inserted in one
direction.
5. Secure the bulb with the wire bracket.
6. Connect the bulb.
7. Mount the cap.
Tail lamps, bulb replacement
At a glance 1
Turn signal
2 Backup lamp 3
Inside brake lamp*
4 Tail lamp
5 Outside brake lamp
6 Rear reflector*
Turn signal, outer brake, tail, and
license plate lamps
Follow the general instructions on lamps and
bulbs, refer to page 243.
These lights are made using LED technology.
Contact your service center in the event of a
malfunction.
Lamps in the trunk lid
Access to the lamps Remove the five screws using the screwdriver
from the tool kit and fold away the cover.
Inside brake lamp
*
Follow the general instructions on lamps and
bulbs, refer to page 243.
24-watt bulb, HP24W
1. Squeeze the bulb holder and pull it out. 2.
Pull off the connector.
Seite 245
245Online Edition for Part no. 01 40 2 606 521 - 03 11 490
Reference
Mobility Communication Entertainment Navigation Driving tips Controls At a glance
Page 251 of 282
attempt in order to allow the discharged bat‐
tery to recharge.
3. Let both engines run for several minutes.
4. Disconnect the jumper cables in the reverse
order.
Check the battery and recharge if necessary.
Tow-starting and towing
Manual transmission
Observe before towing your vehicle
The parking brake is blocked
The parking brake cannot be released
manually.
When the parking brake is blocked, do not tow
with the front axle lifted or the vehicle can be
damaged.
Contact your service center.◀
Gearshift lever in neutral position.
Towing
Follow the towing instructions
Follow all towing instructions; otherwise,
vehicle damage or accidents may occur.◀
▷ Make sure that the ignition is switched on;
otherwise, the low beams, tail lamps, turn
signals, and windshield wipers may be un‐
available.
▷ Do not tow the vehicle with the rear axle
tilted, as the front wheels could turn.
▷ When the engine is stopped, there is no
power assist. Consequently, more force
needs
to be applied when braking and steer‐
ing.
▷ Larger steering wheel movements are re‐
quired. Tow truck
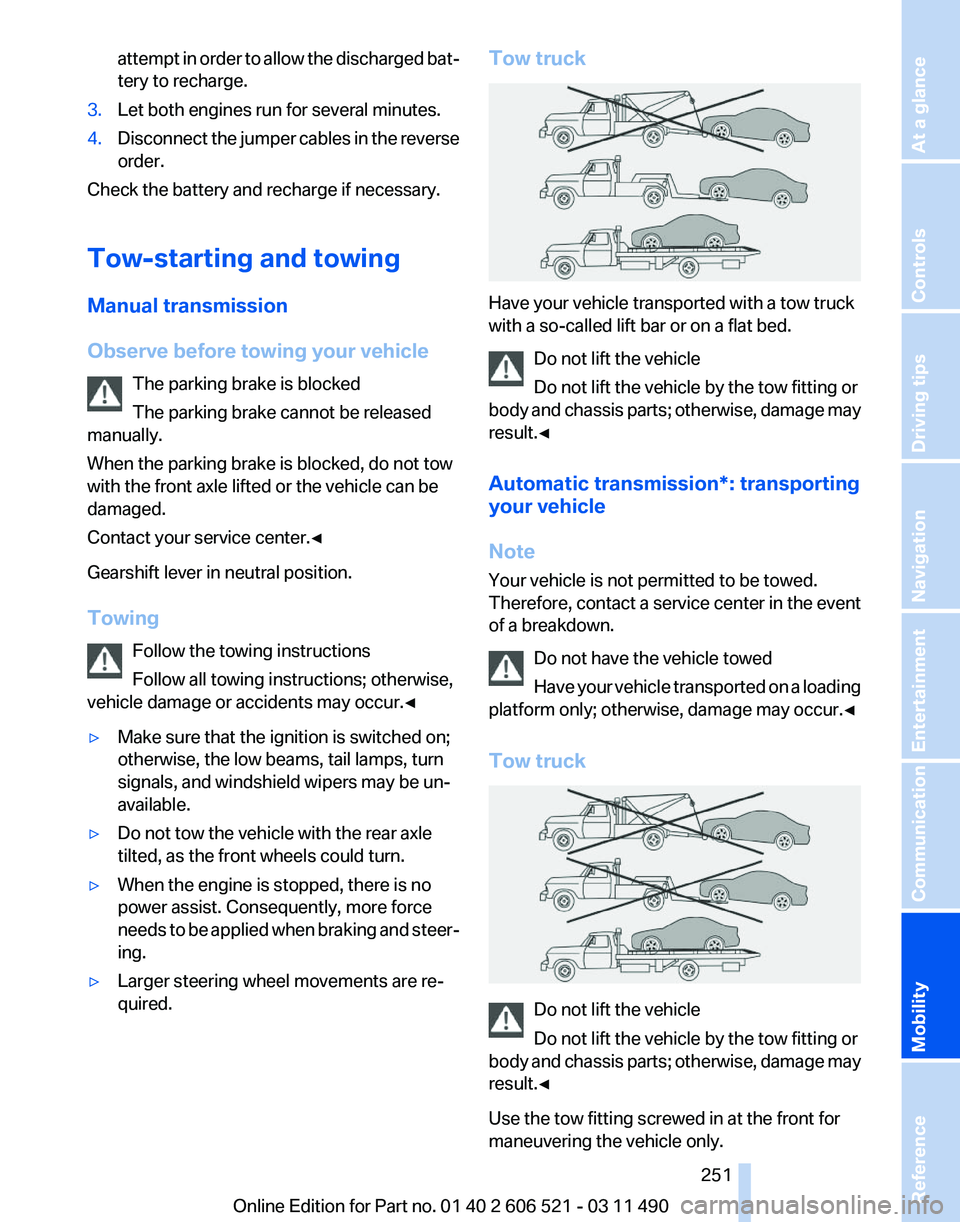
Have your vehicle transported with a tow truck
with a so-called lift bar or on a flat bed.
Do not lift the vehicle
Do not lift the vehicle by the tow fitting or
body
and chassis parts; otherwise, damage may
result.◀
Automatic transmission*: transporting
your vehicle
Note
Your vehicle is not permitted to be towed.
Therefore, contact a service center in the event
of a breakdown.
Do not have the vehicle towed
Have your vehicle transported on a loading
platform only; otherwise, damage may occur.◀
Tow truck Do not lift the vehicle
Do not lift the vehicle by the tow fitting or
body
and chassis parts; otherwise, damage may
result.◀
Use the tow fitting screwed in at the front for
maneuvering the vehicle only. Seite 251
251Online Edition for Part no. 01 40 2 606 521 - 03 11 490
Reference
Mobility Communication Entertainment Navigation Driving tips Controls At a glance
Page 273 of 282
BMW Internet page
6
BMW Maintenance Sys‐ tem 241
BMW Online 220
Bottle holder, refer to Cu‐ pholder 133
Brake assistant 101
Brake discs, breaking in 138
Brake force display 100
Brake lamps, brake force dis‐ play 100
Brake lamps, bulb replace‐ ment 245
Brake lights, adaptive 100
Brake pads, breaking in 138
Braking, notes 139
Breakdown assis‐ tance 248, 249
Breaking in 138
Brightness of Control Dis‐ play 80
Bulb replacement 243
Bulb replacement, front 244
Bulb replacement, rear 245
Bulbs and lamps 243
Button, Start/Stop 65
Bypassing, refer to starting aid 249
C
Calendar 212
California Proposition 65 Warning 7
Camera, backup camera 112
Camera, care 257
Camera, Side View 115
Camera, Top View 114
Can holder, refer to Cu‐ pholder 133
Car battery 247
Car care products 255
Care, displays 257
Care, vehicle 255
Cargo 140
Cargo area, cargo area parti‐ tion 47
Cargo area lid 40 Cargo area partition
47
Cargo area, storage compart‐ ments 134
Cargo straps, securing cargo 141
Car key, refer to Remote con‐ trol 32
Carpet, care 256
Car wash 254
Catalytic converter, refer to Hot exhaust system 138
CBS Condition Based Serv‐ ice 241
CD/DVD 173
CDs, storing 180
Cell phone 196
Center armrest 132
Center console 17
Central locking system 35
Central
screen, refer to Control
Display 19
Changes, technical, refer to Safety 7
Changing parts 243
Changing wheels/tires 233
Check Control 82
Children, seating position 62
Children, transporting safely 62
Child restraint fixing sys‐ tem 62
Child restraint fixing system LATCH 63
Child restraint fixing systems, mounting 62
Child seat, mounting 62
Child seats 62
Chrome parts, care 256
Cigarette lighter 129
Cleaning, displays 257
Climate control 123
Climate control wind‐ shield 139
Clock 76
Closing/opening from in‐ side 39
Closing/opening via door lock 38 Closing/opening with remote
control 36
Combination instrument 14
Combination
instrument, elec‐
tronic displays 16
Combination switch, refer to Turn signals 69
Combination switch, refer to Wiper system 69
Comfort Access 41
COMFORT program, Dynamic Driving Control 105
Computer 76
Concierge service 219
Condensation on win‐ dows 124
Condensation under the vehi‐ cle 140
Condition Based Service CBS 241
Confirmation signal 37
Contacts 207, 216
Control Display 19
Control Display, settings 79
Controller 19
Control systems, driving sta‐ bility 101
Convenient closing 37
Convenient opening 36
Convertible, convertible top 45
Convertible mode, automatic climate control 124
Convertible program, auto‐ matic climate control 124
Convertible top 45
Convertible top, care 255
Convertible top, cargo area partition 47
Convertible top, emergency operation 47
Convertible top, rollover pro‐ tection system 91
Convertible top tool 47
Coolant 239
Coolant temperature 75
Cooling function 125
Cooling, maximum 124
Seite 273
273Online Edition for Part no. 01 40 2 606 521 - 03 11 490
Reference Mobility Communication Entertainment Navigation Driving tips Controls At a glance
Page 274 of 282

Cooling system
239
Corrosion on brake discs 140
Cruise control 106
Cruising range 74
Cupholder 133
Current fuel consumption 75
Current location, storing 148
Customer Relations 221
D
Damage, tires 232
Damping control, dy‐ namic 102
Data, technical 260
Date 76
Daytime running lights 85
Defrosting, refer to Windows, defrosting 124
Destination distance 77
Destination guidance 153
Destination guidance with in‐ termediate destinations 152
Destination input, naviga‐ tion 146
Digital clock 76
Digital radio 167
Dimensions 260
Dimmable interior rearview mirror 60
Direction indicator, refer to Turn signals 69
Display in front wind‐ shield 121
Display,
instrument cluster 74
Display lighting, refer to Instru‐ ment lighting 87
Displays 14
Displays, cleaning 257
Disposal, coolant 240
Disposal, vehicle battery 247
Distance control, refer to PDC 107
Distance to destination 77
Divided screen view, split screen 23
Door lock, refer to Remote control 32 Doors, Automatic Soft Clos‐
ing 40
Drive-off assistant 101
Drive-off assistant, refer to DSC 101
Driving instructions, breaking in 138
Driving notes, general 138
Driving stability control sys‐ tems 101
Driving tips 138
DSC Dynamic Stability Con‐ trol 101
DTC Dynamic Traction Con‐ trol 101
DVD/CD 173
DVD/CD notes 179
DVD changer 177
DVD settings 176
DVDs, storing 180
DVD, video 175
Dynamic Damping Con‐ trol 102
Dynamic destination guid‐ ance 159
Dynamic Drive 102
Dynamic Driving Control 103
Dynamic Stability Control DSC 101
Dynamic Traction Control DTC 101
E
EfficientDynamics, refer to Saving fuel 141
Electronic displays, instru‐ ment cluster 16
Electronic engine oil level check 238
Electronic Stability Program ESP, refer to DSC 101
Emergency detection, remote control 33
Emergency
operation, conver‐
tible top 47
Emergency release, door lock 39 Emergency release, fuel filler
flap 226
Emergency Request 248
Emergency service, refer to Roadside Assistance 249
Emergency start function, en‐ gine start 33
Emergency unlocking, trunk lid 41
Energy Control 75
Energy recovery 76
Engine compartment 236
Engine compartment, working in 236
Engine coolant 239
Engine oil 238
Engine oil, adding 238
Engine oil additives 239
Engine oil filler neck 238
Engine oil temperature 75
Engine oil types, alterna‐ tive 239
Engine oil types, ap‐ proved 239
Engine start during malfunc‐ tion 33
Engine start, refer to Starting the engine 66
Engine start, Starting aid 249
Engine stop 66
Engine temperature 75
Entering/exiting
vehicle, assis‐
tance, steering wheel 61
Equalizer 164
Equipment, interior 128
ESP Electronic Stability Pro‐ gram, refer to DSC 101
Exchanging wheels/tires 233
Exhaust system 138
Exterior mirror, automatic dim‐ ming feature, dimmable exte‐
rior mirrors 60
Exterior mirrors 59
External devices 184
External start 249
External temperature dis‐ play 75
Seite 274
274 Online Edition for Part no. 01 40 2 606 521 - 03 11 490
Everything from A to Z
Page 278 of 282

Random playback
174
RDS 167
Reading out loud 214
Rear axle steering 102
Rear lamps 245
Rearview mirror 59
Rear window defroster 125
Recirculated-air mode 125
Recommended tire brands 233
Refueling 226
Remaining range 74
Reminders 213
Remote control/key 32
Remote control, malfunc‐ tion 38
Remote
control, universal 128
Replacement fuse 247
Replacing parts 243
Replacing wheels/tires 233
Reporting safety defects 8
Reserve warning, refer to Range 74
Resetting, Tire Pressure Mon‐ itor TPM 92
Residual heat, automatic cli‐ mate control 125
Retaining straps, securing cargo 141
Retreaded tires 233
Roadside Assistance 219
Roadside parking lamps 85
Rollover protection system 91
Roll stabilization, refer to Adaptive Drive 102
Roll stabilization, refer to Dy‐ namic Drive 102
Roof load capacity 261
Rope for tow-starting/tow‐ ing 252
Route 154
Route criteria, route 153
Route, displaying 154
Routes, avoiding 154
Route section, bypassing 155
RSC Runflat System Compo‐ nent, refer to Run-flat
tires 234 Rubber components,
care 256
Run-flat tires 234
S
Safe braking 139
Safety 7
Safety belt reminder 56
Safety belts 56
Safety belts, care 256
Safety systems, airbags 88
Satellite radio 168
Saving fuel 141
Scale, changing during navi‐ gation 156
Screen, refer to Control Dis‐ play 19
Screwdriver 243
Screw thread for tow fit‐ ting 252
Seat belts, refer to Safety belts 56
Seat heating, front 55
Seating position for chil‐ dren 62
Seat, mirror, and steering wheel memory 58
Seats 53
Seat ventilation, front 55
Selection list in instrument cluster 76
Selector lever, automatic transmission 72
Sensors, care 257
Service and warranty 7
Service requirements, CBS Condition Based Serv‐
ice 241
Service requirements, dis‐ play 81
Service, Roadside Assis‐ tance 249
Settings on Control Dis‐ play 79
Settings, storing for seat, mir‐ rors, steering wheel 58 Shifting, automatic transmis‐
sion 72
Shifting, manual transmis‐ sion 71
Shift paddles on steering wheel 73
Short commands 263
Shoulder support 54
Side airbags 88
Side View 114
Signaling, horn 12
Signals when unlocking 37
Sitting safely 53
Size 260
Ski bag 131
Smallest turning circle 261
Smoker's package 129
Snap-in adapter, mobile phone 205
Snow chains 234
Socket 130
Socket, OBD Onboard Diag‐ nostics 241
Software applications, iPhone 222
Software update 191
Spare fuse 247
Special destinations, naviga‐ tion 149
Specified engine oil types 239
Speed, average 77
Speed limit, setting 78
Speedometer 14
Split screen 23
Split
screen map settings 157
Spoken instructions, naviga‐ tion 155
SPORT+ program, Dynamic Driving Control 104
Sport automatic transmis‐ sion 73
SPORT program, Dynamic Driving Control 104
Sport program, transmis‐ sion 73
Stability control systems 101
Start/Stop button 65
Seite 278
278 Online Edition for Part no. 01 40 2 606 521 - 03 11 490
Everything from A to Z