2012 BMW 6 SERIES automatic transmission
[x] Cancel search: automatic transmissionPage 118 of 303

▷When using a pressure washer, keep the
sprayer moving and maintain a distance of
at least 12 in/30 cm from the sensors.
Surround View
The concept
Surround View includes the following systems:
▷Backup camera, refer to page 118.▷Side View, refer to page 122.▷Top View, refer to page 120.
It assists the driver when parking, maneuvering
and on blind driveways and intersections.
Backup camera
The concept
The backup camera provides assistance in park‐
ing and maneuvering backwards. The area be‐
hind the vehicle is shown on the Control Display.
System limits Check the traffic situation as well
Check the traffic situation around the ve‐
hicle with your own eyes. Otherwise, an accident
could result from road users or objects located
outside the picture area of the backup camera. ◀
Detection of objects
High, protruding objects such as ledges
may not be detected by the backup camera.◀
Switching on automatically
Select transmission position R with the engine
running.
The backup camera image is displayed if the
system was switched on via the iDrive.
Automatic deactivation during forward
travel
The system switches off when a certain driving
distance or speed is exceeded.
Switch the system back on if necessary.
Switching on/off manually
Press the button.
▷On: the LED lights up.▷Off: the LED goes out.
The PDC is shown on the Control Display.
Switch on the backup camera via the iDrive, refer
to page 120.
Assistance functions
Functional requirement
▷The backup camera is switched on.▷The trunk lid is fully closed.
Pathway lines
▷Can be shown in the backup camera image
when in transmission position R.Seite 118ControlsDriving comfort118
Online Edition for Part no. 01 40 2 607 971 - 09 11 490
Page 120 of 303

Display on the Control Display
Switching on the backup camera via
iDrive
With PDC activated:
"Rear view camera"
The backup camera image is displayed. The set‐
ting is stored for the remote control currently in
use.
Brightness
With the backup camera switched on:
1. Select the symbol.2.Turn the controller until the desired setting
is reached and press the controller.
Contrast
With the backup camera switched on:
1. Select the symbol.2.Turn the controller until the desired setting
is reached and press the controller.
Camera
The camera lens is located under the BMW em‐
blem of the trunk lid. The image quality may be
impaired by dirt.
Clean the lens, refer to page 276.
Top View
The concept
Top View assists you in parking and maneuver‐
ing. The area around the doors and the road area
around the vehicle are shown on the Control
Display for this purpose.
Capturing the image
The image is captured by two cameras
integrated in the exterior mirrors and by the
backup camera.
The range equals:▷Approx. 7 ft/2 m to the side.▷approx. 7 ft/2 m to the rear.
In this way, obstacles up to the height of the ex‐
terior mirrors are detected early.
System limits
Top View cannot be used in the following situa‐
tions:
▷With a door open.▷With the trunk lid open.▷With an exterior mirror folded in.▷In poor light.
A Check Control message is displayed in some
of these situations.
Check the traffic situation as well
Check the traffic situation around the ve‐
hicle with your own eyes. Otherwise, an accident
could result from road users or objects located
outside the picture area of the cameras.◀
Switching on automatically
Select transmission position R with the engine
running.
The Top View and PDC images are displayed if
the system is switched on via iDrive.
Seite 120ControlsDriving comfort120
Online Edition for Part no. 01 40 2 607 971 - 09 11 490
Page 124 of 303

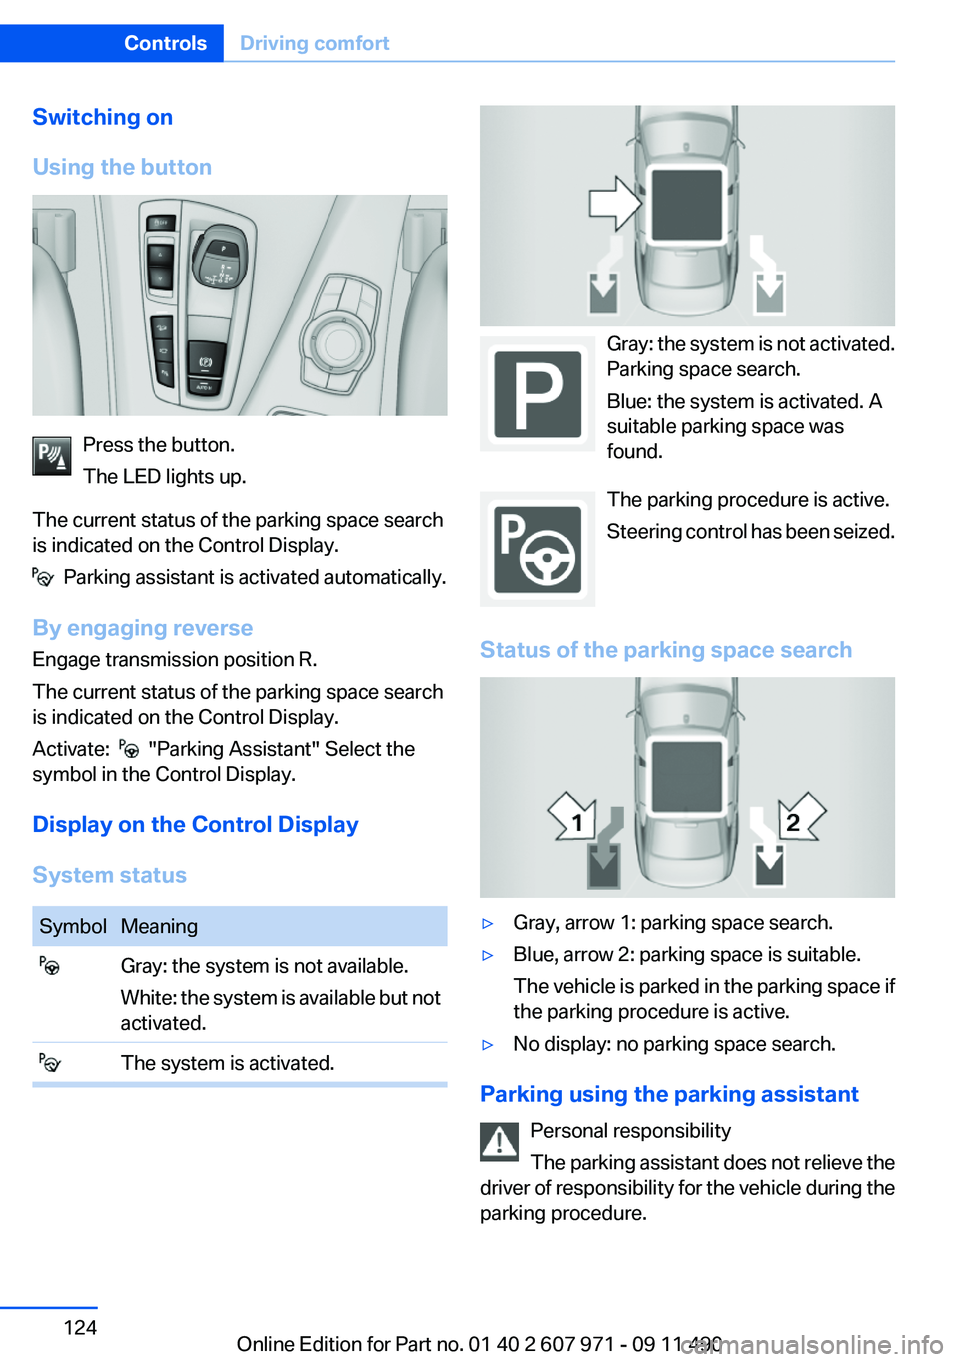
Switching on
Using the button
Press the button.
The LED lights up.
The current status of the parking space search
is indicated on the Control Display.
Parking assistant is activated automatically.
By engaging reverse
Engage transmission position R.
The current status of the parking space search
is indicated on the Control Display.
Activate:
"Parking Assistant" Select the
symbol in the Control Display.
Display on the Control Display
System status
SymbolMeaning Gray: the system is not available.
White: the system is available but not
activated. The system is activated.
Gray: the system is not activated.
Parking space search.
Blue: the system is activated. A
suitable parking space was
found.
The parking procedure is active.
Steering control has been seized.
Status of the parking space search
▷Gray, arrow 1: parking space search.▷Blue, arrow 2: parking space is suitable.
The vehicle is parked in the parking space if
the parking procedure is active.▷No display: no parking space search.
Parking using the parking assistant
Personal responsibility
The parking assistant does not relieve the
driver of responsibility for the vehicle during the
parking procedure.
Seite 124ControlsDriving comfort124
Online Edition for Part no. 01 40 2 607 971 - 09 11 490
Page 138 of 303

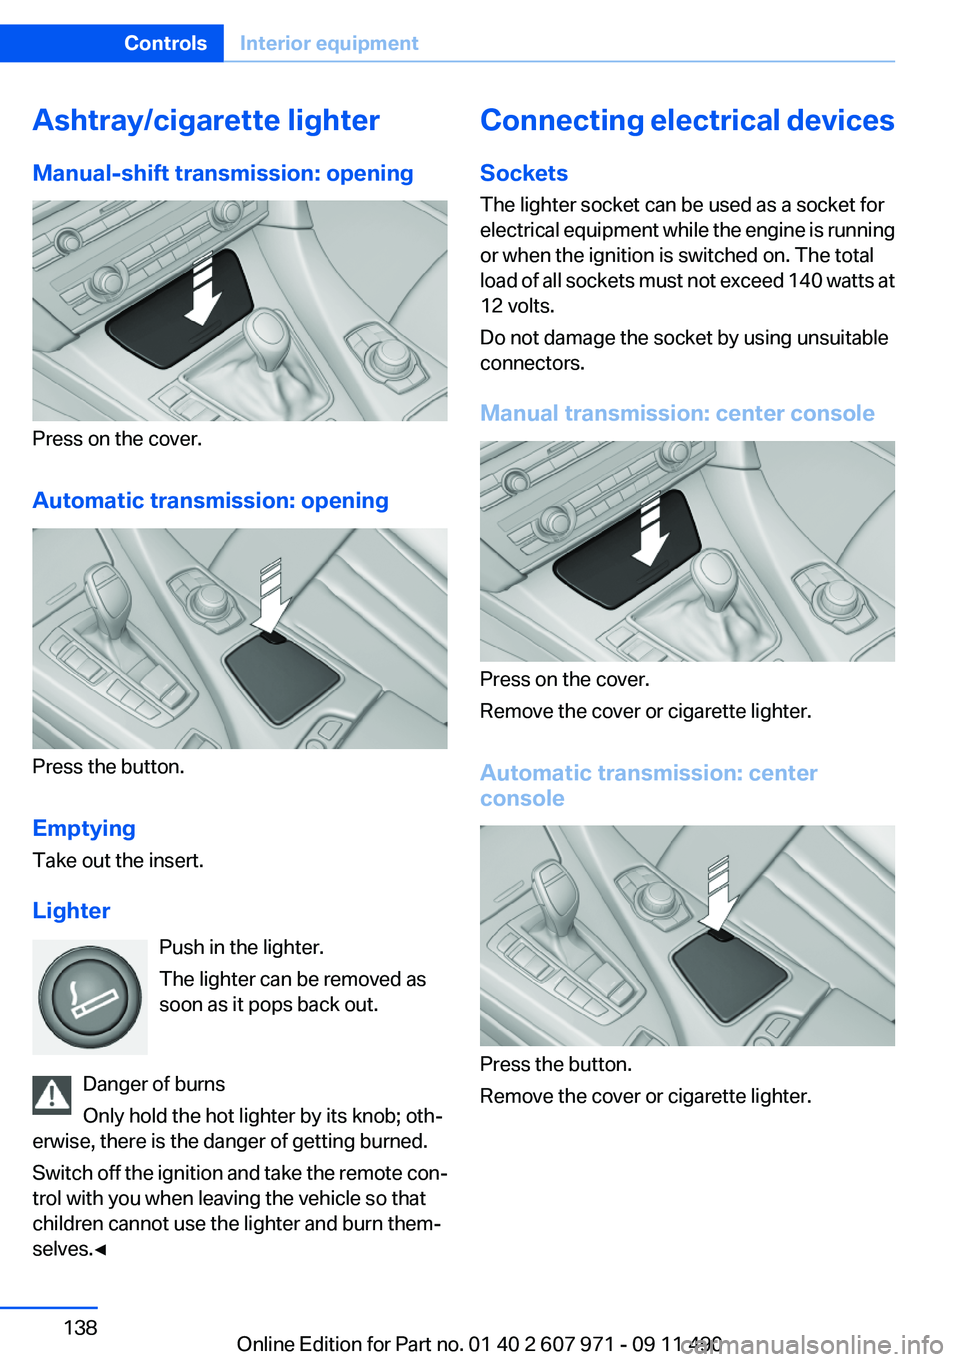
Ashtray/cigarette lighter
Manual-shift transmission: opening
Press on the cover.
Automatic transmission: opening
Press the button.
Emptying
Take out the insert.
Lighter Push in the lighter.
The lighter can be removed as
soon as it pops back out.
Danger of burns
Only hold the hot lighter by its knob; oth‐
erwise, there is the danger of getting burned.
Switch off the ignition and take the remote con‐
trol with you when leaving the vehicle so that
children cannot use the lighter and burn them‐
selves.◀
Connecting electrical devices
Sockets
The lighter socket can be used as a socket for
electrical equipment while the engine is running
or when the ignition is switched on. The total
load of all sockets must not exceed 140 watts at
12 volts.
Do not damage the socket by using unsuitable
connectors.
Manual transmission: center console
Press on the cover.
Remove the cover or cigarette lighter.
Automatic transmission: center
console
Press the button.
Remove the cover or cigarette lighter.
Seite 138ControlsInterior equipment138
Online Edition for Part no. 01 40 2 607 971 - 09 11 490
Page 143 of 303

Manual transmission: center console
A cupholder is located on the center console.
Manual transmission: center armrest
A cupholder is located in the center armrest
compartment.
To open: press the buttons next to the lock.
Automatic transmission: center
console
To open: press on the cover.
Storage compartments in the
cargo area
Net
Small objects can be stowed in the net on the
rear cargo area trim.
Lashing eyes
To secure the cargo, refer to page 150, there
are lashing eyes in the cargo area.
Storage compartment under the cargo
floor cover
Raise the cargo floor cover using the strap.
Seite 143Storage compartmentsControls143
Online Edition for Part no. 01 40 2 607 971 - 09 11 490
Page 148 of 303

Do not place additional floor mats over existing
mats or other objects.
Only use floor mats that have been approved for
the vehicle and can be properly fixed in place.
Ensure that the floor mats are securely fastened
again after they were removed for cleaning, for
example.◀
Driving in wet conditions
When roads are wet or there is heavy rain, briefly
exert gentle pressure on the brake pedal every
few miles.
Ensure that this action does not endanger other
road users.
The heat generated in this process helps dry the
brake discs and pads.
In this way braking efficiency will be available
when you need it.
Hills
Drive long or steep downhill gradients in the gear
in which the least braking is required. Otherwise,
the brake system may overheat, resulting in a
reduction in the brake system efficiency.
Manual transmission:
You can increase the engine's braking effect by
shifting down, going all the way to first gear, if
necessary.
Automatic transmission:
You can increase the engine's braking effect by
shifting down in the manual mode of the auto‐
matic transmission, refer to page 66.
Avoid load on the brakes
Avoid placing excessive load on the brake
system. Light but consistent brake pressure can
lead to high temperatures, brake wear and pos‐
sibly even brake failure.◀Do not drive in neutral
Do not drive in neutral or with the engine
stopped, as doing so disables engine braking. In
addition, steering and brake assist is unavailable
with the engine stopped.◀
Brake disc corrosion
Corrosion on the brake discs and contamination
on the brake pads are furthered by:▷Low mileage.▷Extended periods when the vehicle is not
used at all.▷Infrequent use of the brakes.
Corrosion occurs when the minimum pressure
that must be exerted by the pads during brake
applications to clean the discs is not reached.
Should corrosion form on the brake discs, the
brakes will tend to respond with a pulsating ef‐
fect that generally cannot be corrected.
Condensation under the parked vehicle
When using the automatic climate control, con‐
densation water develops that exits underneath
the vehicle.
Therefore, traces of condensed water under the
vehicle are normal.
Seite 148Driving tipsThings to remember when driving148
Online Edition for Part no. 01 40 2 607 971 - 09 11 490
Page 153 of 303

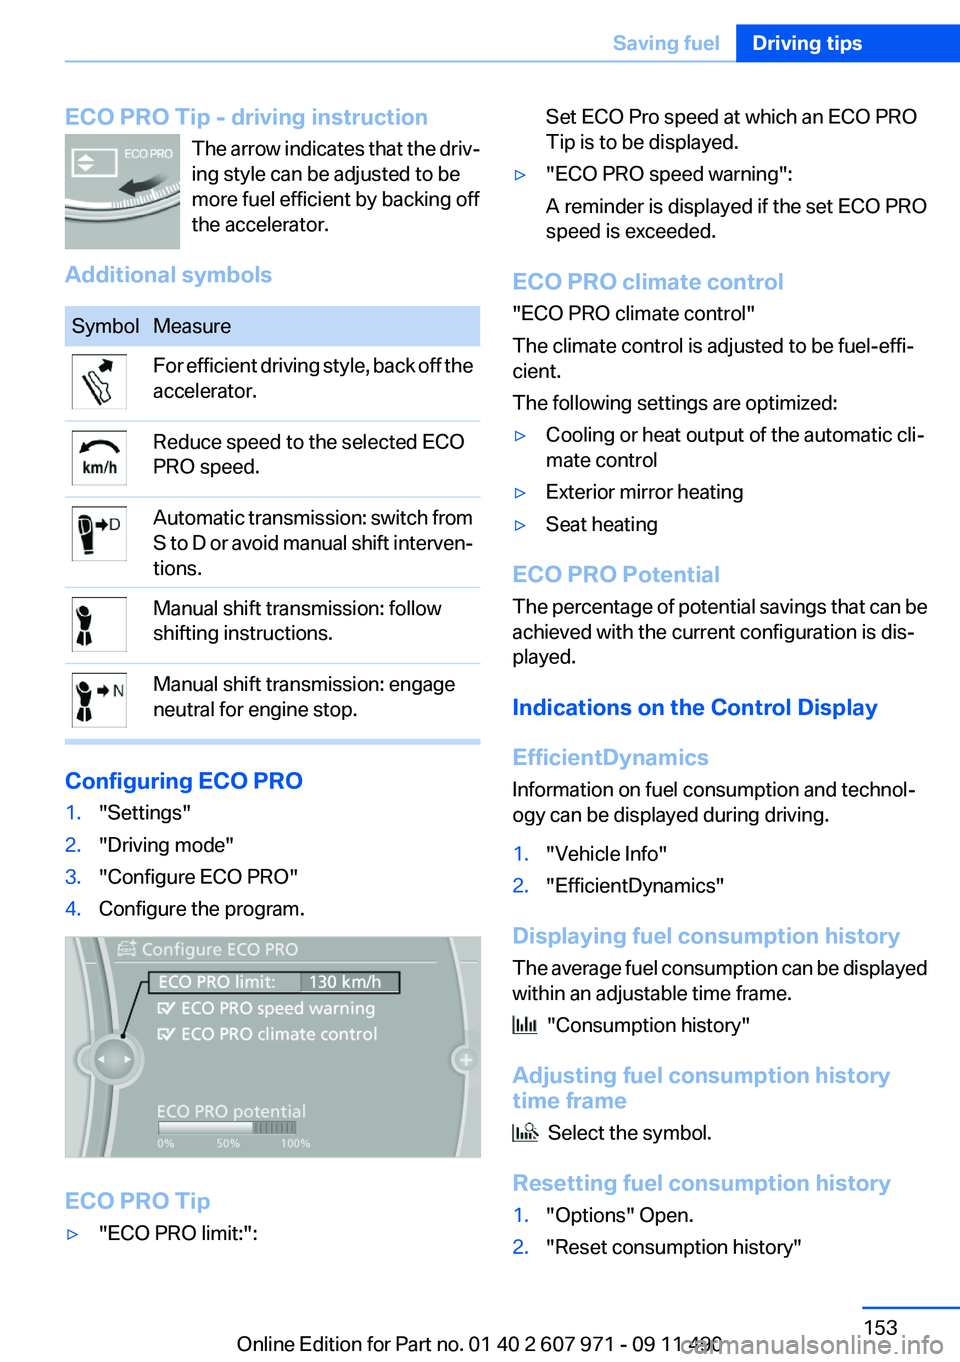
ECO PRO Tip - driving instructionThe arrow indicates that the driv‐
ing style can be adjusted to be
more fuel efficient by backing off
the accelerator.
Additional symbolsSymbolMeasureFor efficient driving style, back off the
accelerator.Reduce speed to the selected ECO
PRO speed.Automatic transmission: switch from
S to D or avoid manual shift interven‐
tions.Manual shift transmission: follow
shifting instructions.Manual shift transmission: engage
neutral for engine stop.
Configuring ECO PRO
1."Settings"2."Driving mode"3."Configure ECO PRO"4.Configure the program.
ECO PRO Tip
▷"ECO PRO limit:":Set ECO Pro speed at which an ECO PRO
Tip is to be displayed.▷"ECO PRO speed warning":
A reminder is displayed if the set ECO PRO
speed is exceeded.
ECO PRO climate control
"ECO PRO climate control"
The climate control is adjusted to be fuel-effi‐
cient.
The following settings are optimized:
▷Cooling or heat output of the automatic cli‐
mate control▷Exterior mirror heating▷Seat heating
ECO PRO Potential
The percentage of potential savings that can be
achieved with the current configuration is dis‐
played.
Indications on the Control Display
EfficientDynamics
Information on fuel consumption and technol‐
ogy can be displayed during driving.
1."Vehicle Info"2."EfficientDynamics"
Displaying fuel consumption history
The average fuel consumption can be displayed
within an adjustable time frame.
"Consumption history"
Adjusting fuel consumption history
time frame
Select the symbol.
Resetting fuel consumption history
1."Options" Open.2."Reset consumption history"Seite 153Saving fuelDriving tips153
Online Edition for Part no. 01 40 2 607 971 - 09 11 490
Page 183 of 303

6.Press the controller again to confirm the
highlighted channel.7.Select the desired memory location.
The channels are stored for the remote control
currently in use.
The channels can also be stored on the pro‐
grammable memory buttons, refer to page 20.
Changing the list view
The list view changes every time the first symbol
on the navigation bar is pressed.
Information on the channel is displayed.
SymbolMeaning Channel name Artist Track
Selecting a category
1."Radio"2."Satellite radio"3. "Category"4.Select the desired category.
Timeshift
Approx. one hour of the program being broad‐
cast on the channel currently being listened to
is stored in a buffer. Prerequisite: the signal must
be available.
The stored audio track can be played with a de‐
lay following the live broadcast. When the buffer
is full, the older tracks are overwritten. The buf‐
fer is cleared when a new channel is selected.
Opening the timeshift function1."Radio"2."Satellite radio"3. "Replay - Time shift"▷The red arrow shows the current playback
position.▷The time difference to the live broadcast is
displayed next to the buffer bar.
For live transmissions: "live".
Timeshift menu
SymbolFunction Go to the live broadcast Playback/pause Next track Previous track Fast forward Reverse Automatic timeshift deactivated/ac‐
tivated
Automatic timeshift
When the function is activated, audio playback
is stopped automatically in the event of:
▷Incoming and outgoing telephone calls.▷Activation of the voice activation system.Seite 183RadioEntertainment183
Online Edition for Part no. 01 40 2 607 971 - 09 11 490