2012 BMW 550I XDRIVE GRAN TURISMO center console
[x] Cancel search: center consolePage 14 of 321
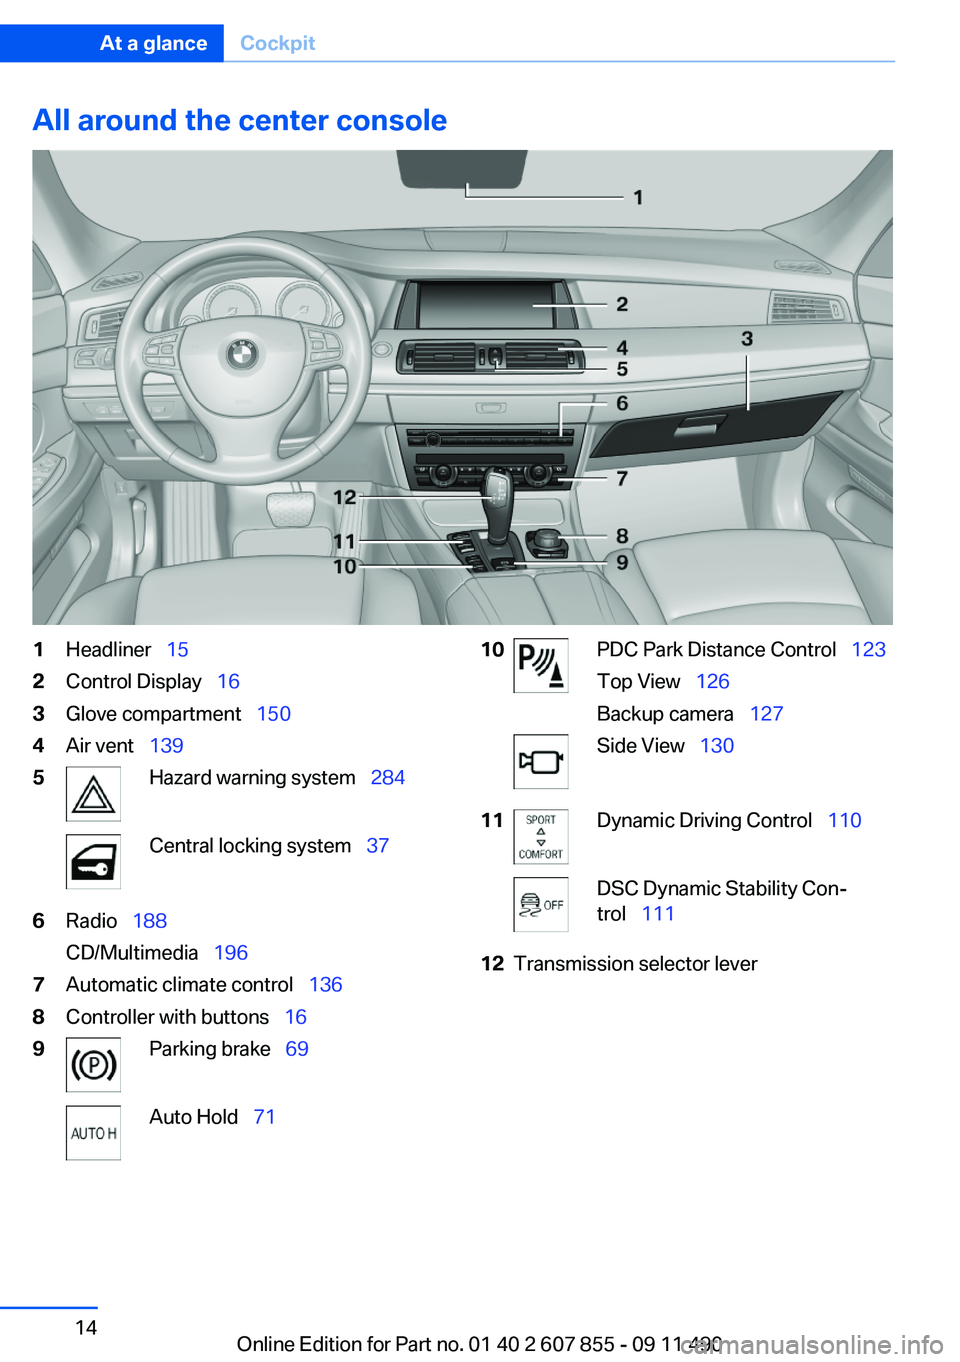
All around the center console1Headliner 152Control Display 163Glove compartment 1504Air vent 1395Hazard warning system 284Central locking system 376Radio 188
CD/Multimedia 1967Automatic climate control 1368Controller with buttons 169Parking brake 69Auto Hold 7110PDC Park Distance Control 123
Top View 126
Backup camera 127Side View 13011Dynamic Driving Control 110DSC Dynamic Stability Con‐
trol 11112Transmission selector leverSeite 14At a glanceCockpit14
Online Edition for Part no. 01 40 2 607 855 - 09 11 490
Page 146 of 321
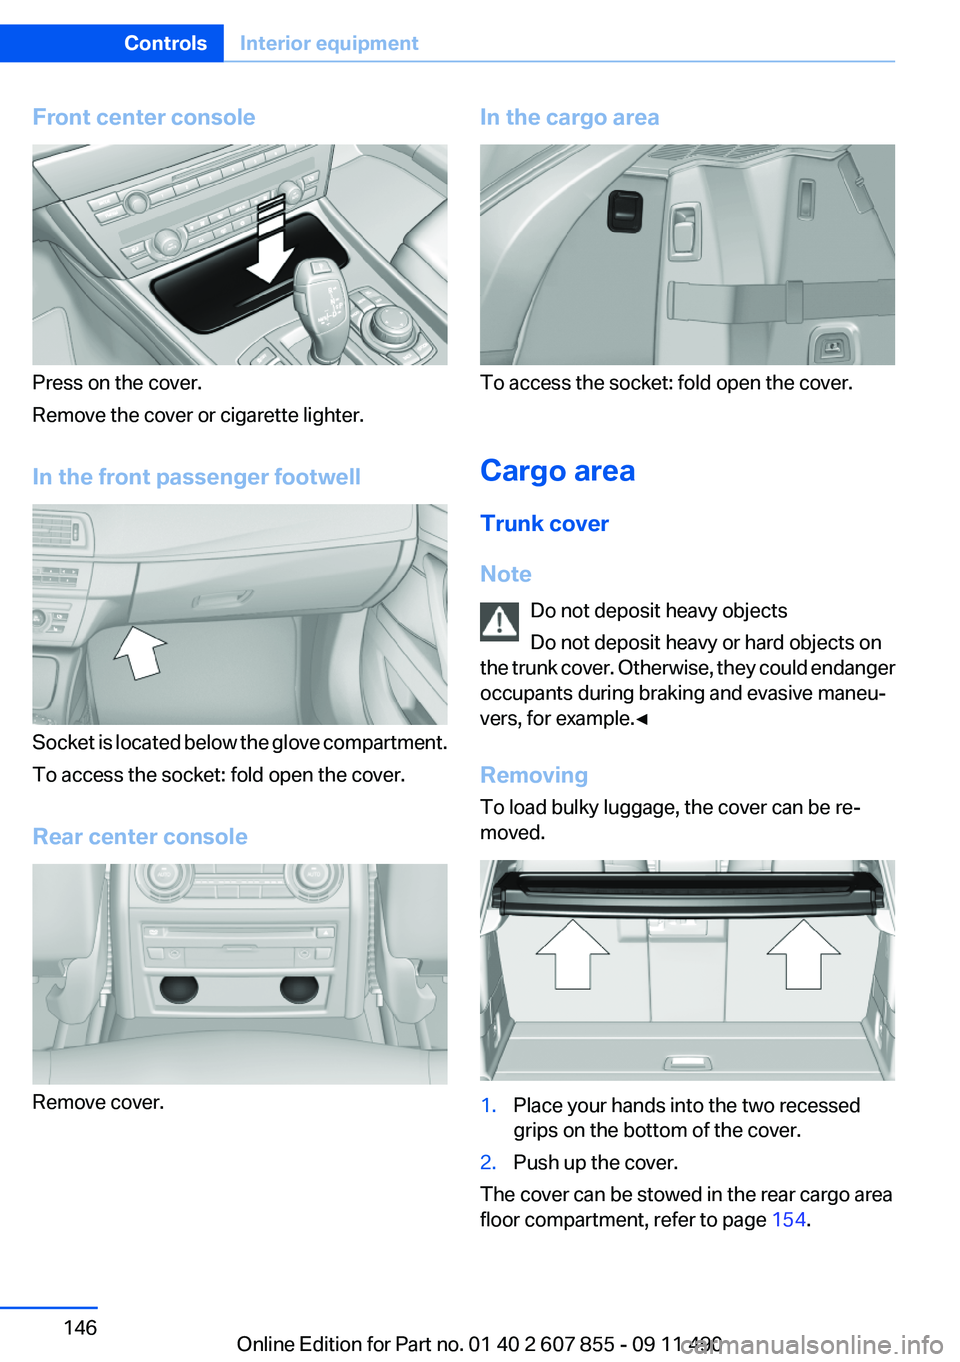
Front center console
Press on the cover.
Remove the cover or cigarette lighter.
In the front passenger footwell
Socket is located below the glove compartment.
To access the socket: fold open the cover.
Rear center console
Remove cover.
In the cargo area
To access the socket: fold open the cover.
Cargo area
Trunk cover
Note Do not deposit heavy objects
Do not deposit heavy or hard objects on
the trunk cover. Otherwise, they could endanger
occupants during braking and evasive maneu‐
vers, for example.◀
Removing
To load bulky luggage, the cover can be re‐
moved.
1.Place your hands into the two recessed
grips on the bottom of the cover.2.Push up the cover.
The cover can be stowed in the rear cargo area
floor compartment, refer to page 154.
Seite 146ControlsInterior equipment146
Online Edition for Part no. 01 40 2 607 855 - 09 11 490
Page 150 of 321
Storage compartmentsVehicle equipment
All standard, country-specific and optional
equipment that is offered in the model series is
described in this chapter. Therefore, equipment
is also described that is not available in a vehicle,
e. g., because of the selected optional equip‐
ment or country variant. This also applies for
safety-related functions and systems.
Storage compartments
The following storage compartments are avail‐
able in the vehicle interior:▷Glove compartment on the driver's and front
passenger side, refer to page 150.▷Storage compartment in the center console,
refer to page 152.▷Storage compartment in the center armrest,
refer to page 151, in the front and rear.▷Compartments in the doors.▷Pockets on the backrests of the front seats.▷Net in the front passenger footwell.
No loose objects in the passenger com‐
partment
Do not stow any objects in the passenger com‐
partment without securing them; otherwise,
they may present a danger to occupants for in‐
stance during braking and avoidance maneu‐
vers.◀
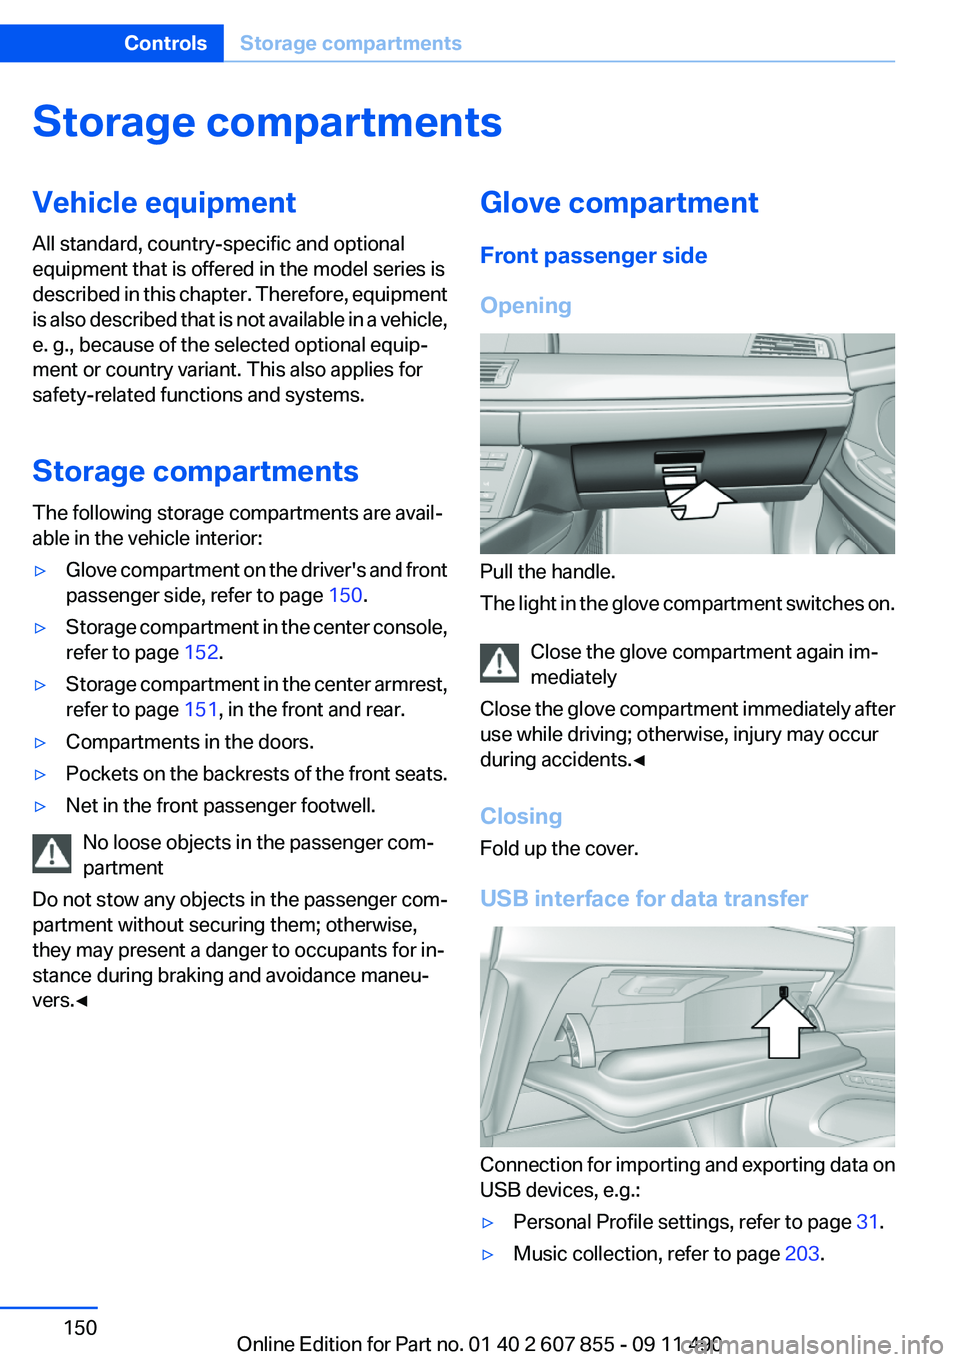
Glove compartment
Front passenger side
Opening
Pull the handle.
The light in the glove compartment switches on.
Close the glove compartment again im‐
mediately
Close the glove compartment immediately after
use while driving; otherwise, injury may occur
during accidents.◀
Closing
Fold up the cover.
USB interface for data transfer
Connection for importing and exporting data on
USB devices, e.g.:
▷Personal Profile settings, refer to page 31.▷Music collection, refer to page 203.Seite 150ControlsStorage compartments150
Online Edition for Part no. 01 40 2 607 855 - 09 11 490
Page 152 of 321
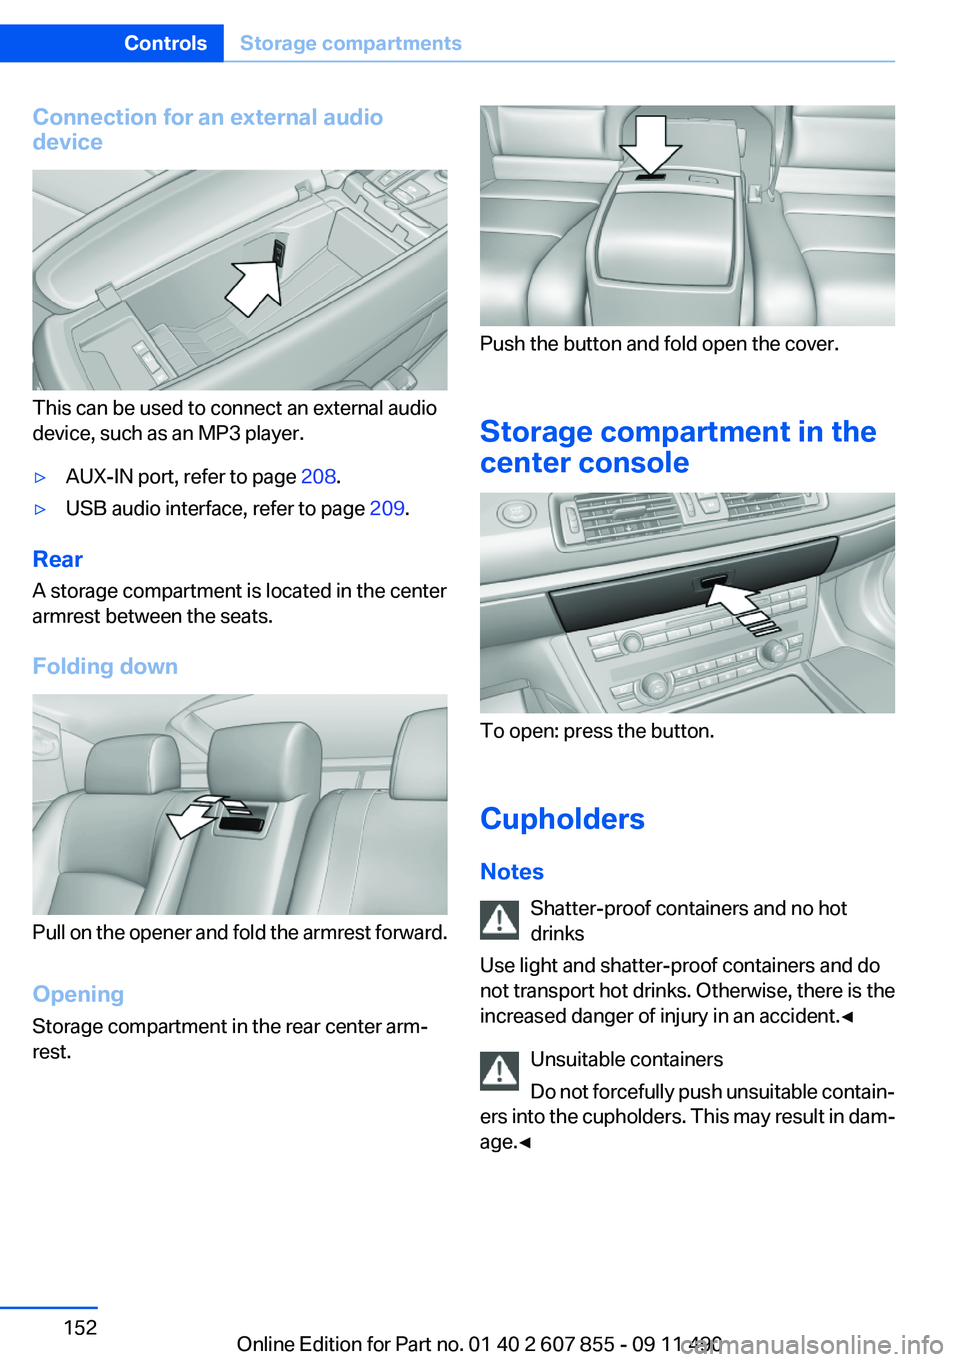
Connection for an external audio
device
This can be used to connect an external audio
device, such as an MP3 player.
▷AUX-IN port, refer to page 208.▷USB audio interface, refer to page 209.
Rear
A storage compartment is located in the center
armrest between the seats.
Folding down
Pull on the opener and fold the armrest forward.
Opening
Storage compartment in the rear center arm‐
rest.
Push the button and fold open the cover.
Storage compartment in the
center console
To open: press the button.
Cupholders
Notes Shatter-proof containers and no hot
drinks
Use light and shatter-proof containers and do
not transport hot drinks. Otherwise, there is the
increased danger of injury in an accident.◀
Unsuitable containers
Do not forcefully push unsuitable contain‐
ers into the cupholders. This may result in dam‐
age.◀
Seite 152ControlsStorage compartments152
Online Edition for Part no. 01 40 2 607 855 - 09 11 490
Page 191 of 321
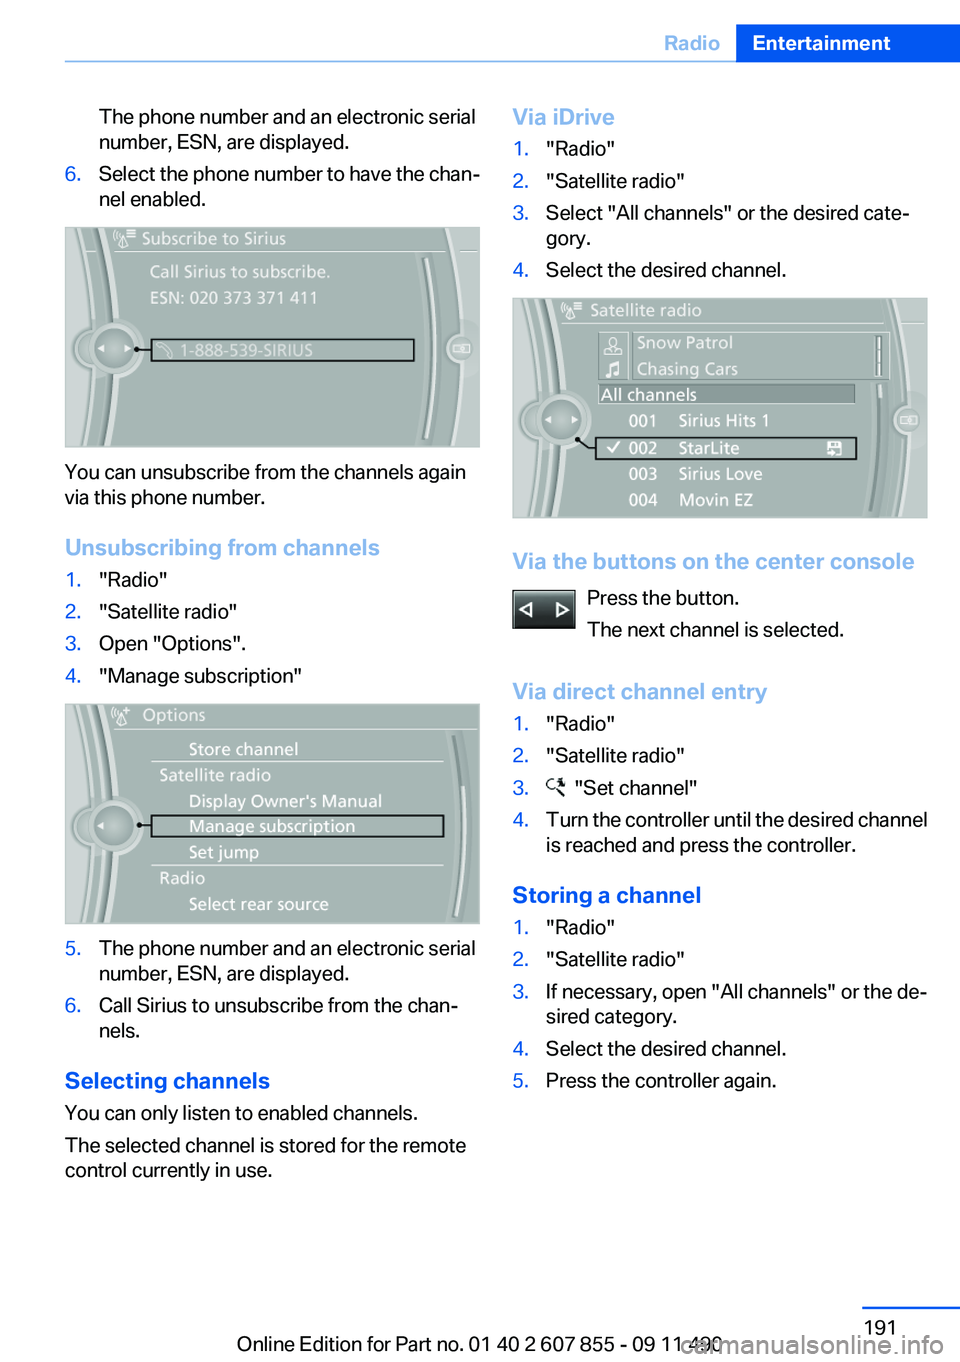
The phone number and an electronic serial
number, ESN, are displayed.6.Select the phone number to have the chan‐
nel enabled.
You can unsubscribe from the channels again
via this phone number.
Unsubscribing from channels
1."Radio"2."Satellite radio"3.Open "Options".4."Manage subscription"5.The phone number and an electronic serial
number, ESN, are displayed.6.Call Sirius to unsubscribe from the chan‐
nels.
Selecting channels
You can only listen to enabled channels.
The selected channel is stored for the remote
control currently in use.
Via iDrive1."Radio"2."Satellite radio"3.Select "All channels" or the desired cate‐
gory.4.Select the desired channel.
Via the buttons on the center console
Press the button.
The next channel is selected.
Via direct channel entry
1."Radio"2."Satellite radio"3. "Set channel"4.Turn the controller until the desired channel
is reached and press the controller.
Storing a channel
1."Radio"2."Satellite radio"3.If necessary, open "All channels" or the de‐
sired category.4.Select the desired channel.5.Press the controller again.Seite 191RadioEntertainment191
Online Edition for Part no. 01 40 2 607 855 - 09 11 490
Page 230 of 321
▷It may not be possible to display phone book
entries with special characters.▷The number of phone book entries being
stored is too high.▷Is the data volume of the contact too large,
e.g., due to stored information such as
notes? Reduce the data volume of the con‐
tact.▷Is the mobile phone connected as an audio
source or additional telephone? The mobile
phone must be connected as a telephone.
The phone connection quality is poor.
▷The strength of the Bluetooth signal on the
mobile phone can be adjusted, depending
on the mobile phone.▷Insert the mobile phone into the snap-in
adapter or place it in the area of the center
console.▷Adjust the volume of the microphone and
loudspeakers separately.
If all points in this list have been checked and the
required function is still not available, contact
the hotline or service center.
Controls
Adjusting the volume
Turn the knob until the desired volume is se‐
lected. The setting is stored for the remote con‐
trol currently in use.
The vehicle automatically adjusts the volume of
the microphone on the telephone and the vol‐
ume of the called party. Depending on the mo‐
bile phone, the volumes may need to be ad‐
justed. The settings can only be created during
a call and must be adjusted separately for each
telephone. The settings are deleted when the
telephone is unpaired.
1."Settings"2."Tone"3."Volume settings"4.Select the desired setting: "Microphone" or
"Loudspeak."5.To adjust: turn the controller.6.To store: press the controller.
Incoming call
Receiving calls
If the number of the caller is stored in the phone
book and is transmitted by the network, the
name of the contact is displayed. Otherwise,
only the phone number is displayed.
If more than one phone number is assigned to a
contact, only the name of the contact is dis‐
played.
For calls on the additional telephone, the num‐
ber is only displayed if it is transmitted by the
network.
An incoming call to the additional telephone is
automatically rejected if there is an active call on
the other telephone.
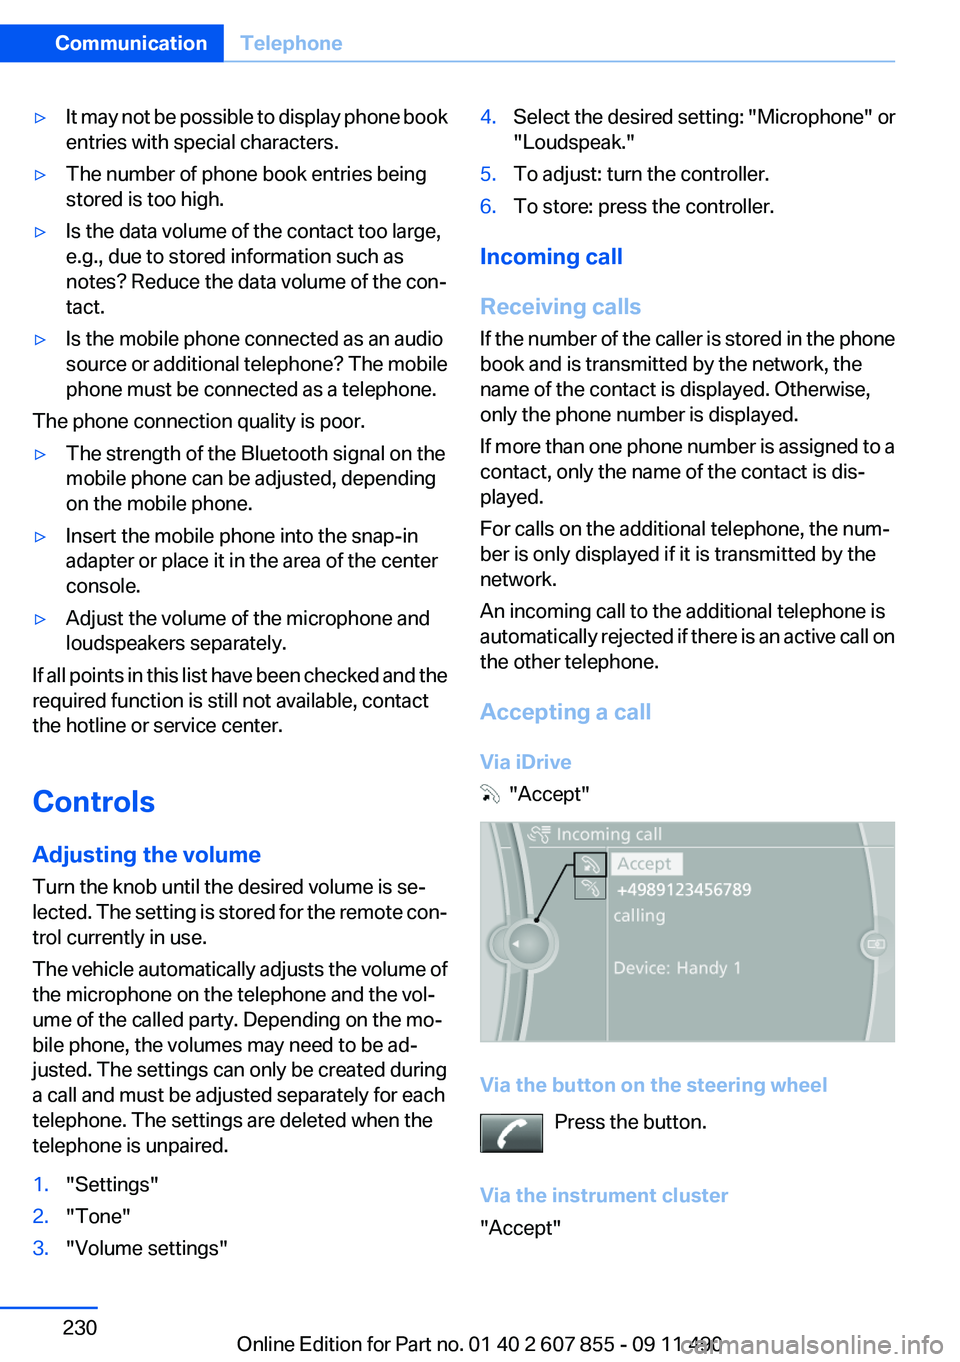
Accepting a call
Via iDrive
"Accept"
Via the button on the steering wheel Press the button.
Via the instrument cluster
"Accept"
Seite 230CommunicationTelephone230
Online Edition for Part no. 01 40 2 607 855 - 09 11 490
Page 284 of 321
Breakdown assistanceVehicle equipment
All standard, country-specific and optional
equipment that is offered in the model series is
described in this chapter. Therefore, equipment
is also described that is not available in a vehicle,
e. g., because of the selected optional equip‐
ment or country variant. This also applies for
safety-related functions and systems.
Hazard warning flashers
The button is located in the center console.
Emergency Request
Requirements
▷Equipment version with full preparation
package mobile phone.
An Emergency Request can be made, even
if no mobile phones are paired with the ve‐
hicle.▷BMW Assist is activated.▷The radio ready state is switched on.▷The BMW Assist system is logged in to a
wireless communications network sup‐
ported by BMW Assist.▷The Assist system is functional.
Only press the SOS button in an emergency.
Emergency Request not guaranteed
For technical reasons, the Emergency Re‐
quest cannot be guaranteed under unfavorable
conditions.◀
Service contract▷After your contract with BMW Assist has ex‐
pired, the BMW Assist system can be deac‐
tivated by the service center without you
having to visit a workshop.
After deactivation, an Emergency Request
is no longer possible.▷Under certain circumstances, the system
can be reactivated by a service center after
you sign a new contract.
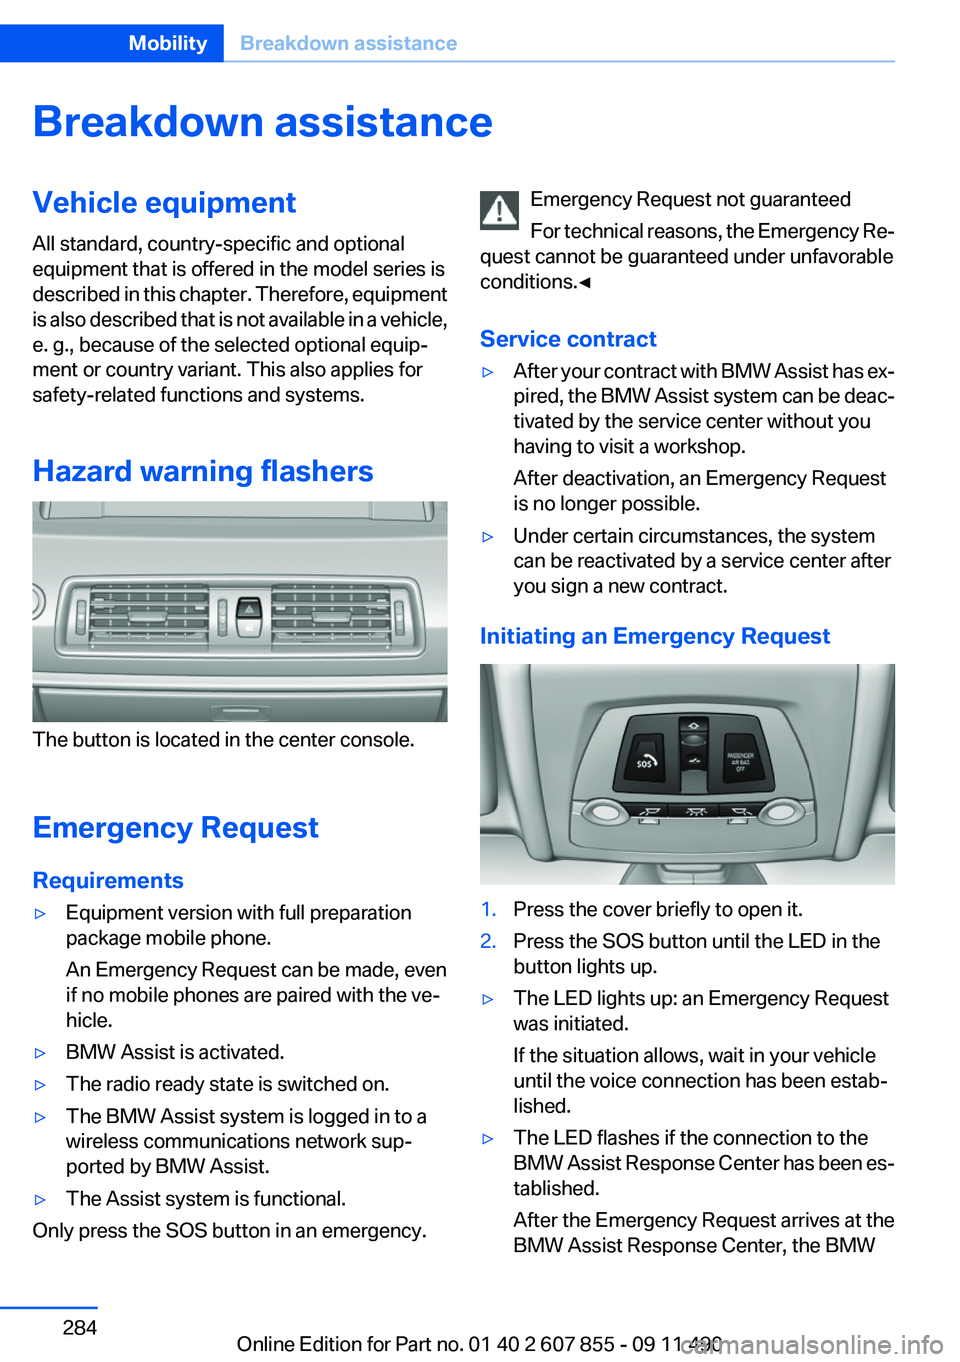
Initiating an Emergency Request
1.Press the cover briefly to open it.2.Press the SOS button until the LED in the
button lights up.▷The LED lights up: an Emergency Request
was initiated.
If the situation allows, wait in your vehicle
until the voice connection has been estab‐
lished.▷The LED flashes if the connection to the
BMW Assist Response Center has been es‐
tablished.
After the Emergency Request arrives at the
BMW Assist Response Center, the BMWSeite 284MobilityBreakdown assistance284
Online Edition for Part no. 01 40 2 607 855 - 09 11 490
Page 311 of 321
Band-Aids, refer to First aidkit 285
Bar for tow-starting/tow‐ ing 287
Basic position, rear seats 55
Bass 186
Battery replacement, remote control, rear entertain‐
ment 218
Battery replacement, vehicle battery 282
Battery replacement, vehicle remote control 30
Battery, vehicle 282
Belts, safety belts 56
Beverage holder, cu‐ pholder 152
Blinds, sun protection 46
Bluetooth audio 212
BMW Assist 249
BMW homepage 6
BMW Internet page 6
BMW Maintenance Sys‐ tem 276
BMW Search 251
Bottle holder, refer to Cu‐ pholder 152
Brake assistant 106
Brake assistant, adaptive 106
Brake discs, breaking in 158
Brake force display 105
Brake lamps, brake force dis‐ play 105
Brake lamps, bulb replace‐ ment 281
Brake lights, adaptive 105
Brake pads, breaking in 158
Braking, notes 159
Breakdown assis‐ tance 284, 285
Breaking in 158
Brightness of Control Dis‐ play 88
Bulb replacement 278
Bulb replacement, front 279
Bulb replacement, rear 281 Bulbs and lamps 278
Button, RES 116
Button, Start/Stop 67
Bypassing, refer to starting aid 285
C
Calendar 244
California Proposition 65 Warning 7
Camera, backup camera 130
Camera, care 292
Camera, Side View 131
Camera, Top View 127
Can holder, refer to Cu‐ pholder 152
Car battery 282
Car care products 290
Care, displays 292
Care, vehicle 290
Cargo 161
Cargo area 146
Cargo area, enlarging 147
Cargo area lid 38
Cargo area, storage compart‐ ments 153
Cargo partition 148
Cargo straps, securing cargo 162
Car key, refer to Remote con‐ trol 30
Carpet, care 291
Car wash 289
Catalytic converter, refer to Hot exhaust system 158
CBS Condition Based Serv‐ ice 276
CD/DVD 196
CD/DVD player, rear 217
CDs, storing 203
Cell phone 226
Center armrest 151
Center console 14
Central locking system 33 Central screen, refer to Control
Display 16
Changes, technical, refer to Safety 6
Changing parts 278
Changing wheels 282
Changing wheels/tires 267
Check Control 79
Checking the oil level 273
Children, seating position 63
Children, transporting safely 63
Child restraint fixing sys‐ tem 63
Child restraint fixing system LATCH 64
Child restraint fixing systems, mounting 63
Child safety locks 66
Child seat, mounting 63
Child seats 63
Chrome parts, care 291
Cigarette lighter 145
Cleaning, displays 292
Climate control 136
Climate control wind‐ shield 159
Clock 82
Closing/opening from in‐ side 37
Closing/opening via door lock 36
Closing/opening with remote control 34
Clothes hooks 153
Collision warning 120
Combination switch, refer to Turn signals 72
Combination switch, refer to Wiper system 73
COMFORT+ program, Driving Experience Switch 112
Comfort Access 41
COMFORT program, Driving Experience Switch 112
Computer 84 Seite 311Everything from A to ZReference311
Online Edition for Part no. 01 40 2 607 855 - 09 11 490