2012 BMW 535I XDRIVE SEDAN belt
[x] Cancel search: beltPage 150 of 335

Center armrest
Remove cover.
Rear center console
Remove the cover or cigarette lighter.
In the front passenger footwell
Socket is located below the glove compartment.
To access the socket: fold open the cover.
In the cargo area
The socket is located in the cover of the loading
lip.
To access the socket: fold open the cover.
Through-loading system
General information
The cargo area can be enlarged by folding down
the rear seat backrest.
The rear seat backrest is divided into two parts
at a ratio of 60 to 40. The sides can be folded
down separately or together.
Opening Move the front seats to an upright position
Before folding down the rear backrests,
ensure that the front seats are moved forward
slightly and are in an upright position. Other‐
wise, the head restraint and screen could be
damaged.◀1.Unlock the belt lock of the center safety belt
in the rear using the latch plate of another
safety belt.2.Insert the latch plate at the end of the belt
into the specially designated fixture on the
rear window shelf.3.Push the corresponding head restraint
down as far as it will go.Seite 150ControlsInterior equipment150
Online Edition for Part no. 01 40 2 607 879 - 09 11 490
Page 151 of 335
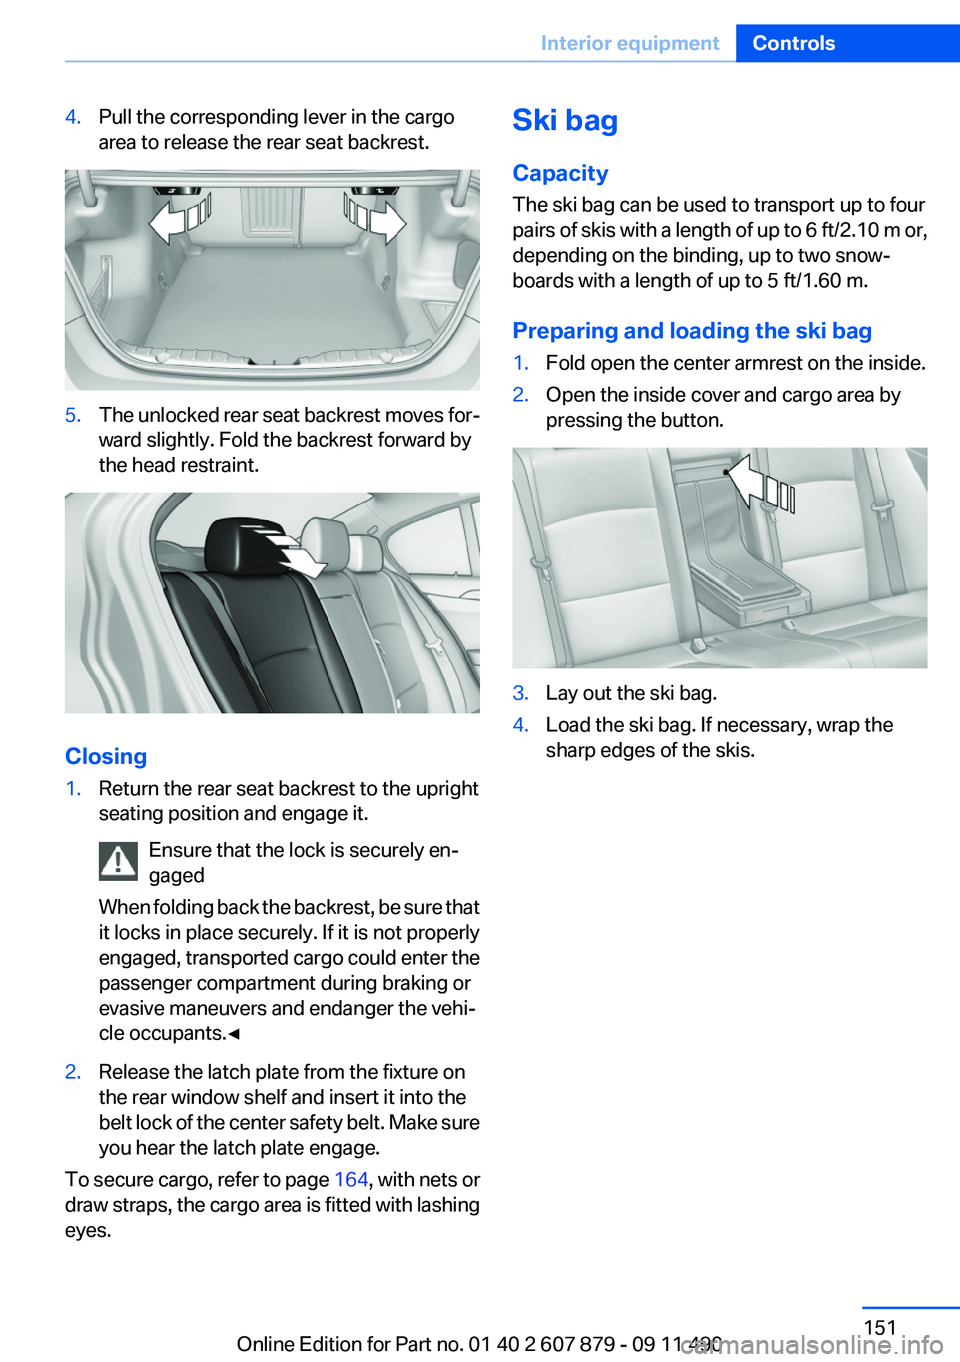
4.Pull the corresponding lever in the cargo
area to release the rear seat backrest.5.The unlocked rear seat backrest moves for‐
ward slightly. Fold the backrest forward by
the head restraint.
Closing
1.Return the rear seat backrest to the upright
seating position and engage it.
Ensure that the lock is securely en‐
gaged
When folding back the backrest, be sure that
it locks in place securely. If it is not properly
engaged, transported cargo could enter the
passenger compartment during braking or
evasive maneuvers and endanger the vehi‐
cle occupants.◀2.Release the latch plate from the fixture on
the rear window shelf and insert it into the
belt lock of the center safety belt. Make sure
you hear the latch plate engage.
To secure cargo, refer to page 164, with nets or
draw straps, the cargo area is fitted with lashing
eyes.
Ski bag
Capacity
The ski bag can be used to transport up to four
pairs of skis with a length of up to 6 ft/2.10 m or,
depending on the binding, up to two snow‐
boards with a length of up to 5 ft/1.60 m.
Preparing and loading the ski bag1.Fold open the center armrest on the inside.2.Open the inside cover and cargo area by
pressing the button.3.Lay out the ski bag.4.Load the ski bag. If necessary, wrap the
sharp edges of the skis.Seite 151Interior equipmentControls151
Online Edition for Part no. 01 40 2 607 879 - 09 11 490
Page 152 of 335
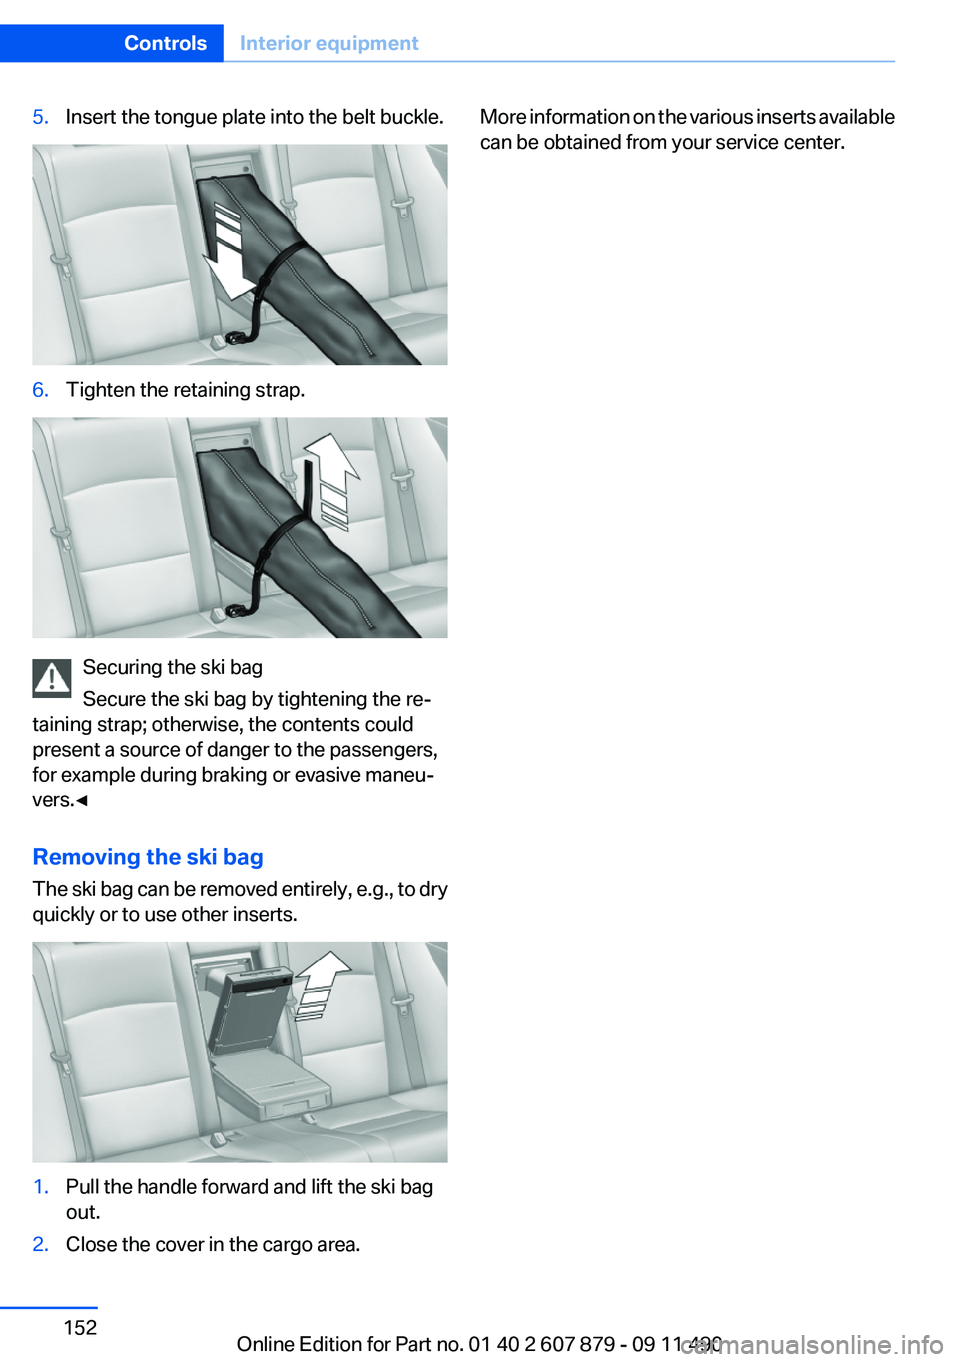
5.Insert the tongue plate into the belt buckle.6.Tighten the retaining strap.
Securing the ski bag
Secure the ski bag by tightening the re‐
taining strap; otherwise, the contents could
present a source of danger to the passengers,
for example during braking or evasive maneu‐
vers.◀
Removing the ski bag
The ski bag can be removed entirely, e.g., to dry
quickly or to use other inserts.
1.Pull the handle forward and lift the ski bag
out.2.Close the cover in the cargo area.More information on the various inserts available
can be obtained from your service center.Seite 152ControlsInterior equipment152
Online Edition for Part no. 01 40 2 607 879 - 09 11 490
Page 164 of 335
Stowing cargo▷Heavy cargo: stow as far forward and as low
as possible, ideally directly behind the cargo
area separating wall.▷Very heavy cargo: when the rear seat is not
occupied, secure each of the outer safety
belts in the opposite buckle.▷Cover sharp edges and corners.▷If necessary, fold down the rear backrests to
stow cargo.▷Do not stack cargo above the top edge of the
backrests.▷Place protective material around any sharp-
edged or pointed objects that could bump
against the rear window while the vehicle is
in motion.
Securing cargo
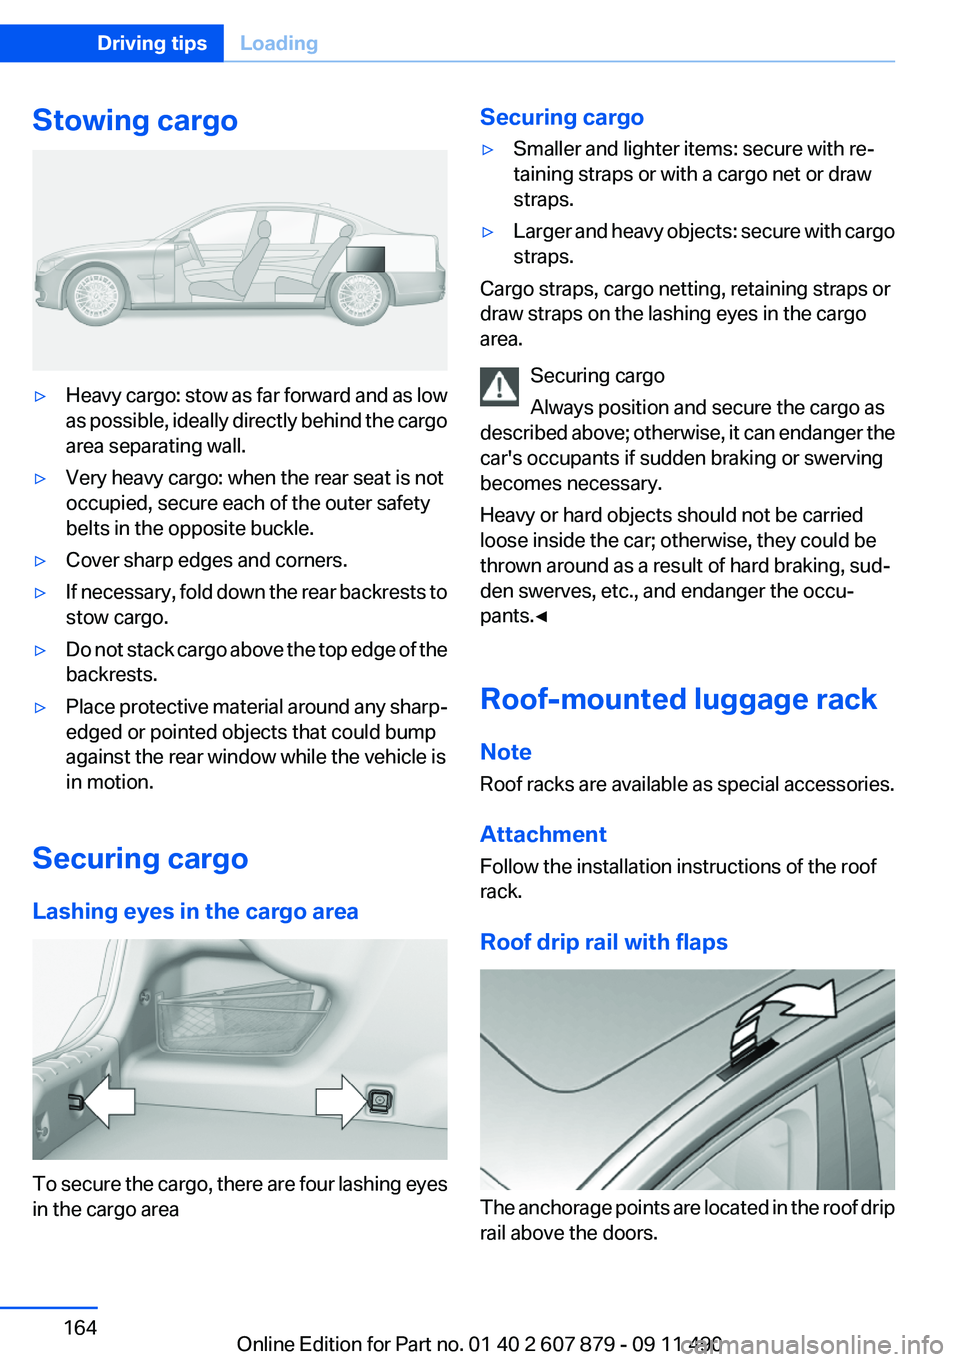
Lashing eyes in the cargo area
To secure the cargo, there are four lashing eyes
in the cargo area
Securing cargo▷Smaller and lighter items: secure with re‐
taining straps or with a cargo net or draw
straps.▷Larger and heavy objects: secure with cargo
straps.
Cargo straps, cargo netting, retaining straps or
draw straps on the lashing eyes in the cargo
area.
Securing cargo
Always position and secure the cargo as
described above; otherwise, it can endanger the
car's occupants if sudden braking or swerving
becomes necessary.
Heavy or hard objects should not be carried
loose inside the car; otherwise, they could be
thrown around as a result of hard braking, sud‐
den swerves, etc., and endanger the occu‐
pants.◀
Roof-mounted luggage rack
Note
Roof racks are available as special accessories.
Attachment
Follow the installation instructions of the roof
rack.
Roof drip rail with flaps
The anchorage points are located in the roof drip
rail above the doors.
Seite 164Driving tipsLoading164
Online Edition for Part no. 01 40 2 607 879 - 09 11 490
Page 191 of 335
Multi-channel playback,
surround
Choose between stereo and multi-channel play‐
back, surround.
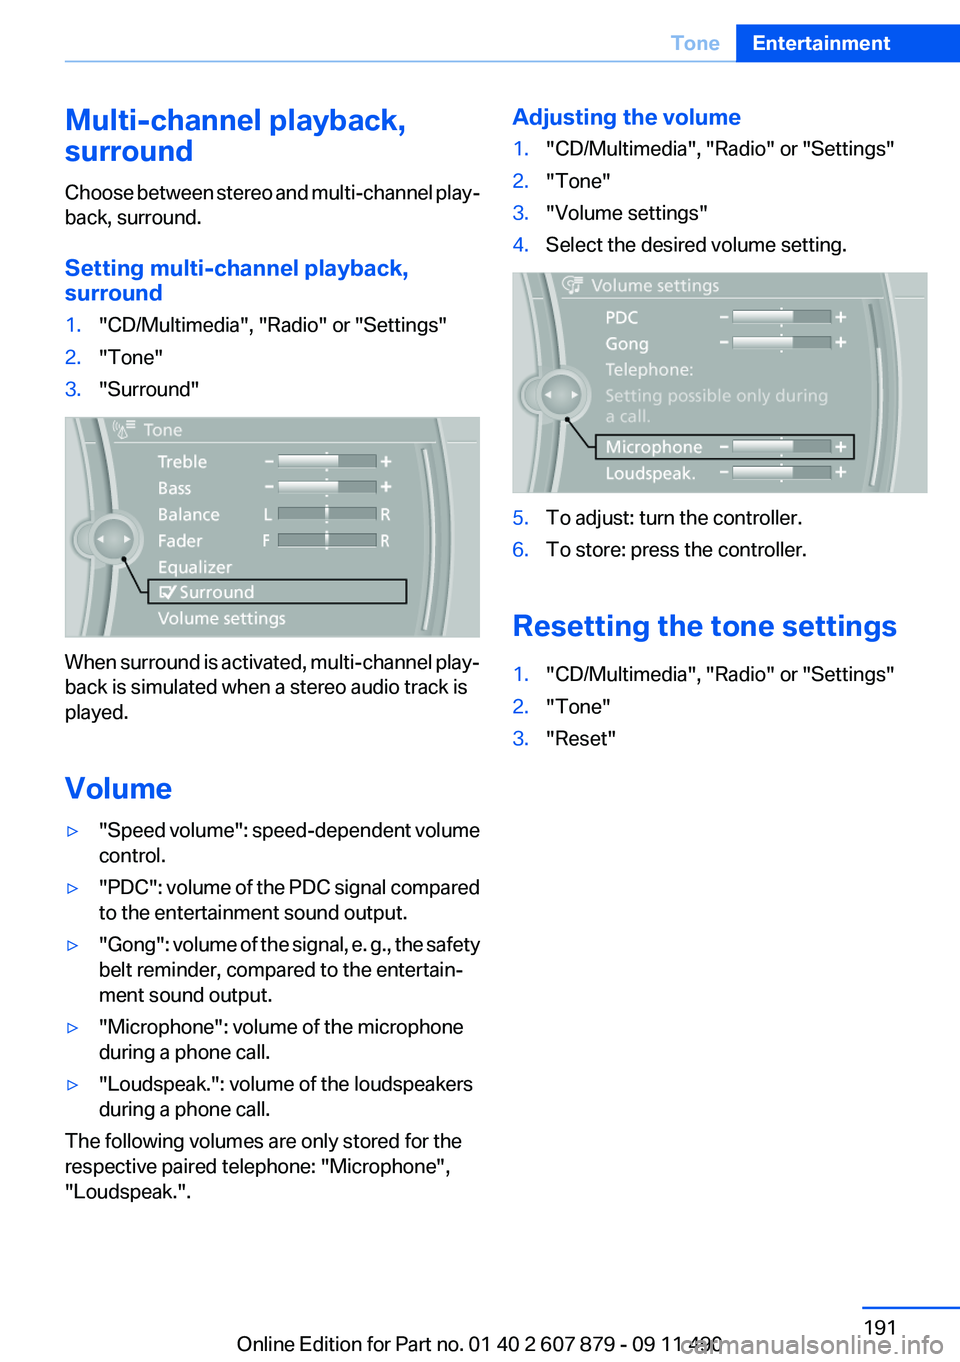
Setting multi-channel playback,
surround1."CD/Multimedia", "Radio" or "Settings"2."Tone"3."Surround"
When surround is activated, multi-channel play‐
back is simulated when a stereo audio track is
played.
Volume
▷" Speed volume": speed-dependent volume
control.▷"PDC" : volume of the PDC signal compared
to the entertainment sound output.▷"Gong" : volume of the signal, e. g., the safety
belt reminder, compared to the entertain‐
ment sound output.▷"Microphone": volume of the microphone
during a phone call.▷"Loudspeak.": volume of the loudspeakers
during a phone call.
The following volumes are only stored for the
respective paired telephone: "Microphone",
"Loudspeak.".
Adjusting the volume1."CD/Multimedia", "Radio" or "Settings"2."Tone"3."Volume settings"4.Select the desired volume setting.5.To adjust: turn the controller.6.To store: press the controller.
Resetting the tone settings
1."CD/Multimedia", "Radio" or "Settings"2."Tone"3."Reset"Seite 191ToneEntertainment191
Online Edition for Part no. 01 40 2 607 879 - 09 11 490
Page 306 of 335
Upholstery material care
Vacuum regularly with a vacuum cleaner.
If they are very dirty, e.g., beverage stains, use a
soft sponge or microfiber cloth with a suitable
interior cleaner.
Clean the upholstery down to the seams using
large sweeping motions. Avoid rubbing the ma‐
terial vigorously.
Damage from Velcro® fasteners
Open Velcro® fasteners on pants or other
articles of clothing can damage the seat covers.
Ensure that any Velcro® fasteners are closed. ◀
Caring for special components
Light-alloy wheels
Use wheel cleaner, particularly during the winter
months. Do not use aggressive, acidic, strongly
alkaline or abrasive cleaners, or steam jets
above 140 ℉/60 ℃; follow the manufacturer's
instructions.
Chrome surfaces
Carefully clean components such as the radiator
grille or door handles with an ample supply of
water, possibly with shampoo added, particu‐
larly when they have been exposed to road salt.
Rubber components
Aside from water, treat only with rubber cleans‐
ers.
When cleaning rubber seals, do not use any sil‐
icon-containing car care products in order to
avoid damage or reduced noise damping.
Fine wood parts
Clean fine wood facing and fine wood compo‐
nents only with a moist rag. Then dry with a soft
cloth.
Plastic components
These include:▷Imitation leather surfaces.▷Headliner.▷Lamp lenses.▷Instrument cluster cover.▷Matte black spray-coated components.▷Painted parts in the interior.
Clean with a microfiber cloth.
Lightly dampen the cloth with water.
Do not soak the headliner.
Do not use cleansers that contain alcohol
or solvents
Do not use cleansers that contain alcohol or sol‐
vents, such as lacquer thinners, heavy-duty
grease removers, fuel, or such; this could lead to
surface damage.◀
Safety belts
Dirty belt straps impede the reeling action and
thus have a negative impact on safety.
Chemical cleaning
Do not clean chemically; this can destroy
the webbing.◀
Use only a mild soapy solution, with the safety
belts clipped into their buckles.
Do not allow the reels to retract the safety belts
until they are dry.
Floor carpets and floor mats No objects in the area around the pedals
Keep floor mats, carpets, and any other
objects out of the area of motion of the pedals;
otherwise, the function of the pedals could be
impeded while driving
Do not place additional floor mats over existing
mats or other objects.
Only use floor mats that have been approved for
the vehicle and can be properly fixed in place.
Ensure that the floor mats are securely fastened
again after they were removed for cleaning, for
example.◀
Seite 306MobilityCare306
Online Edition for Part no. 01 40 2 607 879 - 09 11 490
Page 325 of 335
Bar for tow-starting/tow‐ing 302
Bass 190
Battery replacement, remote control, rear entertain‐
ment 222
Battery replacement, vehicle battery 296
Battery replacement, vehicle remote control 30
Battery, vehicle 296
Belts, safety belts 51
Beverage holder, cu‐ pholder 155
Blinds, sun protection 44
Bluetooth audio 216
BMW Assist 253
BMW homepage 6
BMW Internet page 6
BMW Maintenance Sys‐ tem 288
BMW Search 255
Bottle holder, refer to Cu‐ pholder 155
Brake assistant 107
Brake assistant, adaptive 107
Brake discs, breaking in 160
Brake force display 105
Brake lamps, brake force dis‐ play 105
Brake lamps, bulb replace‐ ment 295
Brake lights, adaptive 105
Brake pads, breaking in 160
Braking, notes 161
Breakdown assis‐ tance 298, 299
Breaking in 160
Brightness of Control Dis‐ play 87
Bulb replacement 290
Bulb replacement, front 291
Bulb replacement, rear 294
Bulbs and lamps 290
Button, RES 116
Button, Start/Stop 62 Bypassing, refer to starting
aid 299
C
Calendar 248
California Proposition 65 Warning 7
Camera, backup camera 128
Camera, care 307
Camera, Side View 131
Camera, Top View 130
Can holder, refer to Cu‐ pholder 155
Car battery 296
Car care products 305
Care, displays 307
Care, vehicle 305
Cargo 163
Cargo area, enlarging 150
Cargo area lid 38
Cargo area, storage compart‐ ments 156
Cargo straps, securing cargo 164
Car key, refer to Remote con‐ trol 30
Carpet, care 306
Car wash 304
Catalytic converter, refer to Hot exhaust system 161
CBS Condition Based Serv‐ ice 288
CD/DVD 200
CD/DVD player, rear 221
CDs, storing 207
Cell phone 230
Center armrest 154
Center console 14
Central locking system 33
Central screen, refer to Control Display 16
Changes, technical, refer to Safety 6
Changing parts 290
Changing wheels 296 Changing wheels/tires 278
Check Control 78
Checking the oil level 284
Children, seating position 58
Children, transporting safely 58
Child restraint fixing sys‐ tem 58
Child restraint fixing system LATCH 59
Child restraint fixing systems, mounting 58
Child safety locks 61
Child seat, mounting 58
Child seats 58
Chrome parts, care 306
Cigarette lighter 148
Cleaning, displays 307
Climate control 139
Climate control wind‐ shield 161
Clock 81
Closing/opening from in‐ side 37
Closing/opening via door lock 36
Closing/opening with remote control 34
Clothes hooks 156
Collision warning 120
Combination switch, refer to Turn signals 69
Combination switch, refer to Wiper system 69
COMFORT+ program, Driving Experience Switch 113
Comfort Access 40
COMFORT program, Driving Experience Switch 112
Computer 84
Concierge service 254
Condensation on win‐ dows 140
Condensation under the vehi‐ cle 162 Seite 325Everything from A to ZReference325
Online Edition for Part no. 01 40 2 607 879 - 09 11 490
Page 331 of 335
RSC Runflat System Compo‐nent, refer to Run-flat
tires 280
Rubber components, care 306
Run-flat tires 280
S
Safe braking 161
Safety 6
Safety belt reminder 52
Safety belts 51
Safety belts, care 306
Safety Package, refer to Active Protection 106
Safety switch, windows 44
Safety systems, airbags 94
Satellite radio 194
Saving fuel 166
Scale, changing during navi‐ gation 183
Screen, refer to Control Dis‐ play 16
Screwdriver 290
Screw thread for tow fit‐ ting 302
Search, refer to BMW Search 255
Seat belts, refer to Safety belts 51
Seat heating, front 50
Seat heating, rear 50
Seating position for chil‐ dren 58
Seat, mirror, and steering wheel memory 54
Seats 47
Seat ventilation, front 50
Selection list in instrument cluster 83
Selector lever, automatic transmission 72
Sensors, care 307
Service and warranty 7 Service requirements, Condi‐
tion Based Service CBS 288
Service requirements, dis‐ play 82
Service, Roadside Assis‐ tance 299
Settings on Control Dis‐ play 86
Settings, storing for seat, mir‐ rors, steering wheel 54
Shifting, automatic transmis‐ sion 72
Shifting, manual transmis‐ sion 71
Shift paddles on steering wheel 73
Short commands 314
Shoulder support 49
Side airbags 94
Side View 130
Signaling, horn 12
Signals when unlocking 35
Sitting safely 47
Size 310
Ski bag 151
Slide/tilt glass roof 45
Smallest turning circle 311
Smoker's package 148
Snap-in adapter, mobile phone 240
Snow chains 280
Socket 149
Socket, OBD Onboard Diag‐ nostics 289
Software applications, iPhone 258
Software update 219
Spare fuse 297
Special destinations, naviga‐ tion 175
Specified engine oil types 285
Speed, average 84
Speed limit, setting 85
Speed Volume, volume equal‐ ization 191 Split screen 20
Split screen map settings 184
Spoken instructions, naviga‐ tion 182
SPORT+ program, Dynamic Driving Control 112
Sport automatic transmis‐ sion 73
SPORT program, Dynamic Driving Control 112
Sport program, transmis‐ sion 73
Stability control systems 107
Start/stop, automatic func‐ tion 64
Start/Stop button 62
Start function during malfunc‐ tion 31
Starting aid 299
Starting the engine 63
State/province, selecting for navigation 172
Stations, stored 198
Station, storing 192
Status display, tires 97
Status information, iDrive 19
Status of Owner's Manual 6
Steering, Integral Active Steering 110
Steering wheel, adjusting 57
Steering wheel heating 57
Steering wheel memory 54
Steptronic, automatic trans‐ mission 72
Stopping the engine 63
Storage compartment, remote control 156
Storage compartments 153
Storage compartments, loca‐ tions 153
Storage, tires 279
Storing the vehicle 307
Street, entering for naviga‐ tion 173
Summer tires, tread 277 Seite 331Everything from A to ZReference331
Online Edition for Part no. 01 40 2 607 879 - 09 11 490