2012 BMW 535I XDRIVE buttons
[x] Cancel search: buttonsPage 111 of 335
At speeds up to approx. 37 mph/60 km/h, e.g.,
in curves, the steering angle is increased, i.e.,
steering becomes more direct.
The rear axle steering acts to increase maneu‐
verability by turning the rear wheels slightly in a
direction opposite to the front wheels.
At higher speeds, the steering angle is increas‐
ingly reduced.
The rear wheels are turned to the same angle as
the front wheels.
In critical situations, Integral Active Steering can
specifically steer the front and rear wheels to
stabilize the vehicle before the driver intervenes,
e.g., when braking where road conditions differ
on the left and right sides of the vehicle.
Initializing
In rare cases, it may become necessary to initi‐
alize the Integral Active Steering.
The warning lamp lights up. A Check
Control message is displayed.1.With the engine running, turn the steering
wheel all the way to the left and right several
times in a uniform manner until the warning
lamp disappears.2.Have the system checked if the warning
lamp does not go out after moving the steer‐
ing wheel approx. 6 times or if the steering
wheel is at an angle.
Using snow chains
Ensure that the rear axle steering is deactivated
when using snow chains, refer to page 280.
Programs
The system offers two different programs.
The programs can be selected via the Driving
Experience Switch, refer to page 111.
SPORT
Consistently sporty tuning of the Integral Active
Steering for greater driving agility.
COMFORT
Balanced tuning of the Integral Active Steering
for optimal traveling comfort.
Malfunction
In the event of a malfunction, the steering wheel
must be turned further, while the vehicle re‐
sponds more sensitively to steering wheel
movements in the higher speed range.
The stability-enhancing intervention may be de‐
activated.
Proceed cautiously and drive defensively.
Have the system checked.
Driving Experience Switch
The concept
The Driving Experience Switch can be used to
adjust the driving dynamics of the vehicle. For
this purpose various programs are available for
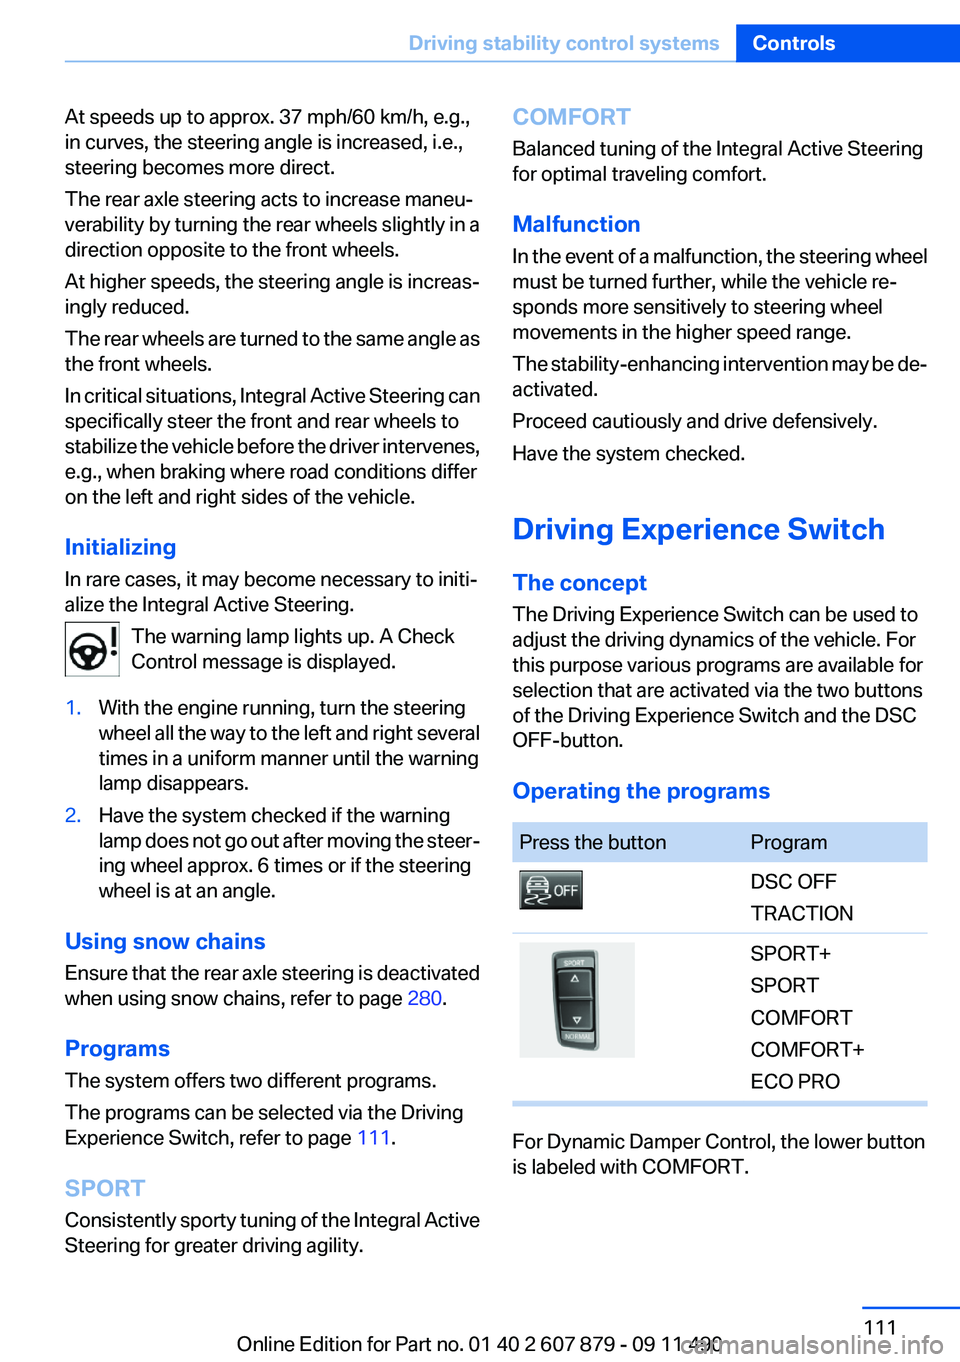
selection that are activated via the two buttons
of the Driving Experience Switch and the DSC
OFF-button.
Operating the programsPress the buttonProgramDSC OFF
TRACTIONSPORT+
SPORT
COMFORT
COMFORT+
ECO PRO
For Dynamic Damper Control, the lower button
is labeled with COMFORT.
Seite 111Driving stability control systemsControls111
Online Edition for Part no. 01 40 2 607 879 - 09 11 490
Page 114 of 335
Driving comfortVehicle equipment
All standard, country-specific and optional
equipment that is offered in the model series is
described in this chapter. Therefore, equipment
is also described that is not available in a vehicle,
e. g., because of the selected optional equip‐
ment or country variant. This also applies for
safety-related functions and systems.
Active Cruise Control with
Stop & Go function, ACC
The concept
This system can be used to select a desired
speed that the vehicle will maintain automati‐
cally on clear roads.
To the extent possible, the system automatically
adjusts the speed to a slower vehicle ahead of
you.
The distance that the vehicle maintains to the
vehicle ahead of you can be varied.
For safety reasons, it depends on the speed.
To maintain a certain distance, the system au‐
tomatically decelerates, applies the brakes
lightly, or accelerates again if the vehicle ahead
begins moving faster.
If the vehicle ahead of you brakes to a halt, the
system is able to detect this within the given
system limits. If the vehicle ahead of your drives
away again from a halt, your vehicle is able to
accelerate if operated accordingly.
Even if some time passes before the vehicle
drives away again, the BMW can still be accel‐
erated automatically and simply.
As soon as the road is clear, it accelerates to the
desired speed.
The speed is also maintained on downhill gra‐
dients, but may not be maintained on uphill
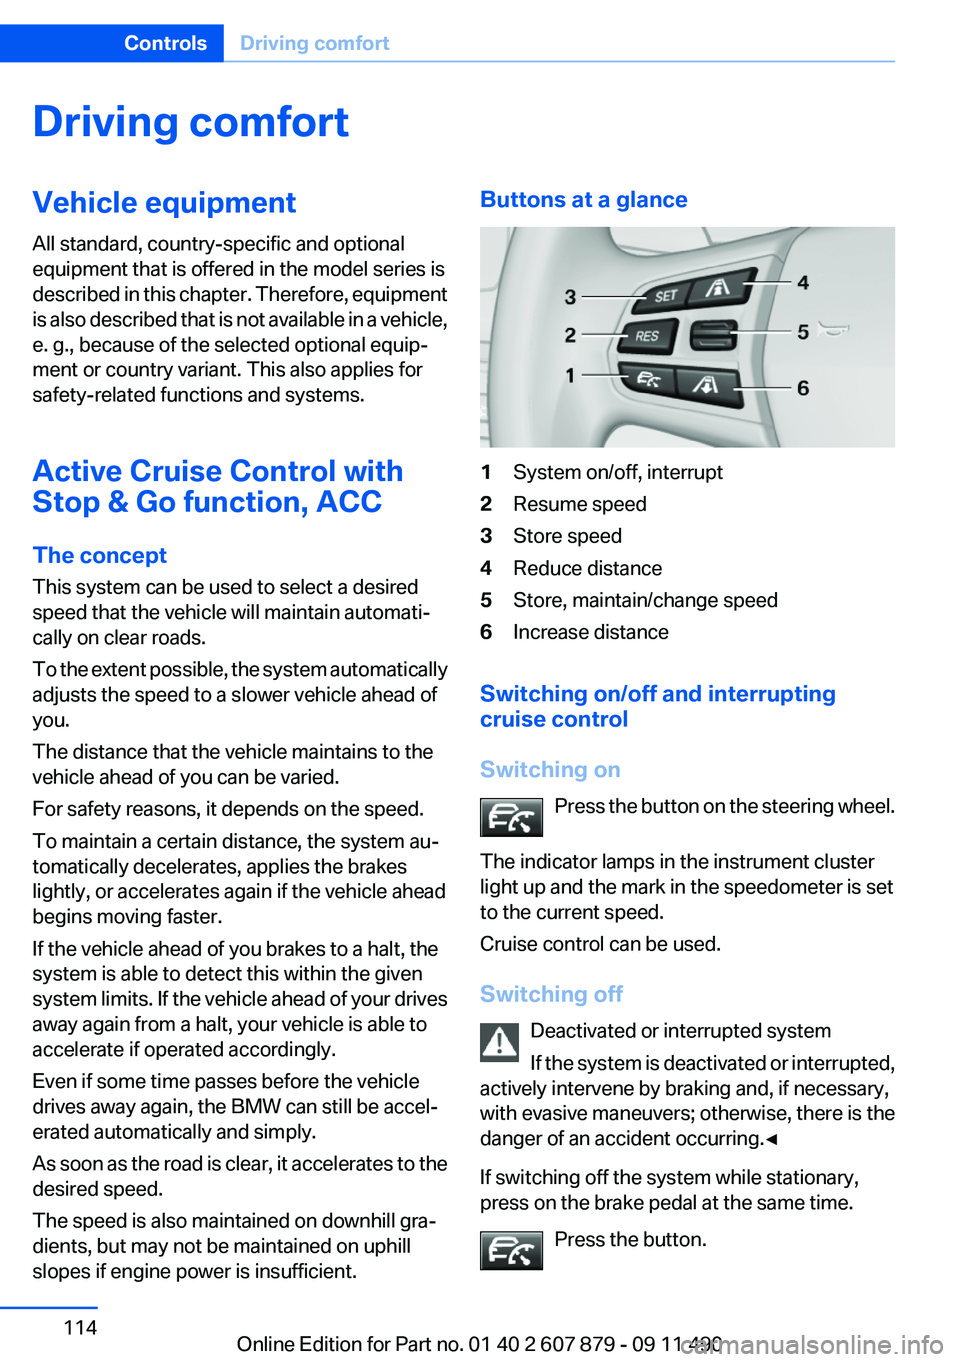
slopes if engine power is insufficient.Buttons at a glance1System on/off, interrupt2Resume speed3Store speed4Reduce distance5Store, maintain/change speed6Increase distance
Switching on/off and interrupting
cruise control
Switching on Press the button on the steering wheel.
The indicator lamps in the instrument cluster
light up and the mark in the speedometer is set
to the current speed.
Cruise control can be used.
Switching off Deactivated or interrupted system
If the system is deactivated or interrupted,
actively intervene by braking and, if necessary,
with evasive maneuvers; otherwise, there is the
danger of an accident occurring.◀
If switching off the system while stationary,
press on the brake pedal at the same time.
Press the button.
Seite 114ControlsDriving comfort114
Online Edition for Part no. 01 40 2 607 879 - 09 11 490
Page 146 of 335
Interior equipmentVehicle equipment
All standard, country-specific and optional
equipment that is offered in the model series is
described in this chapter. Therefore, equipment
is also described that is not available in a vehicle,
e. g., because of the selected optional equip‐
ment or country variant. This also applies for
safety-related functions and systems.
Integrated universal remote
control
The concept
This system can replace up to three different
hand-held transmitters for various types of re‐
mote-controlled equipment, such as garage
doors or lighting systems.
The hand-held transmitter signal can be pro‐
grammed on one of the three memory buttons.
The corresponding device can then be operated
using the programmed memory button.
The LED indicates that a signal is being trans‐
mitted.
When selling the vehicle, delete the stored pro‐
grams for security reasons.
During programming
During programming and before activat‐
ing a device using the integrated universal re‐
mote control, ensure that there are no people,
animals, or objects in the range of movement of
the remote-controlled device; otherwise, there
is a risk of injury or damage.
Also follow the safety instructions of the hand-
held transmitter.◀
Compatibility If this symbol is printed on the packaging
or in the instructions of the hand-heldtransmitter, the remote-controlled device is
generally compatible with the integrated univer‐
sal remote control.
If you have any questions, please contact:▷Your service center.▷www.homelink.com on the Internet.
HomeLink is a registered trademark of Johnson
Controls, Inc.
Programming
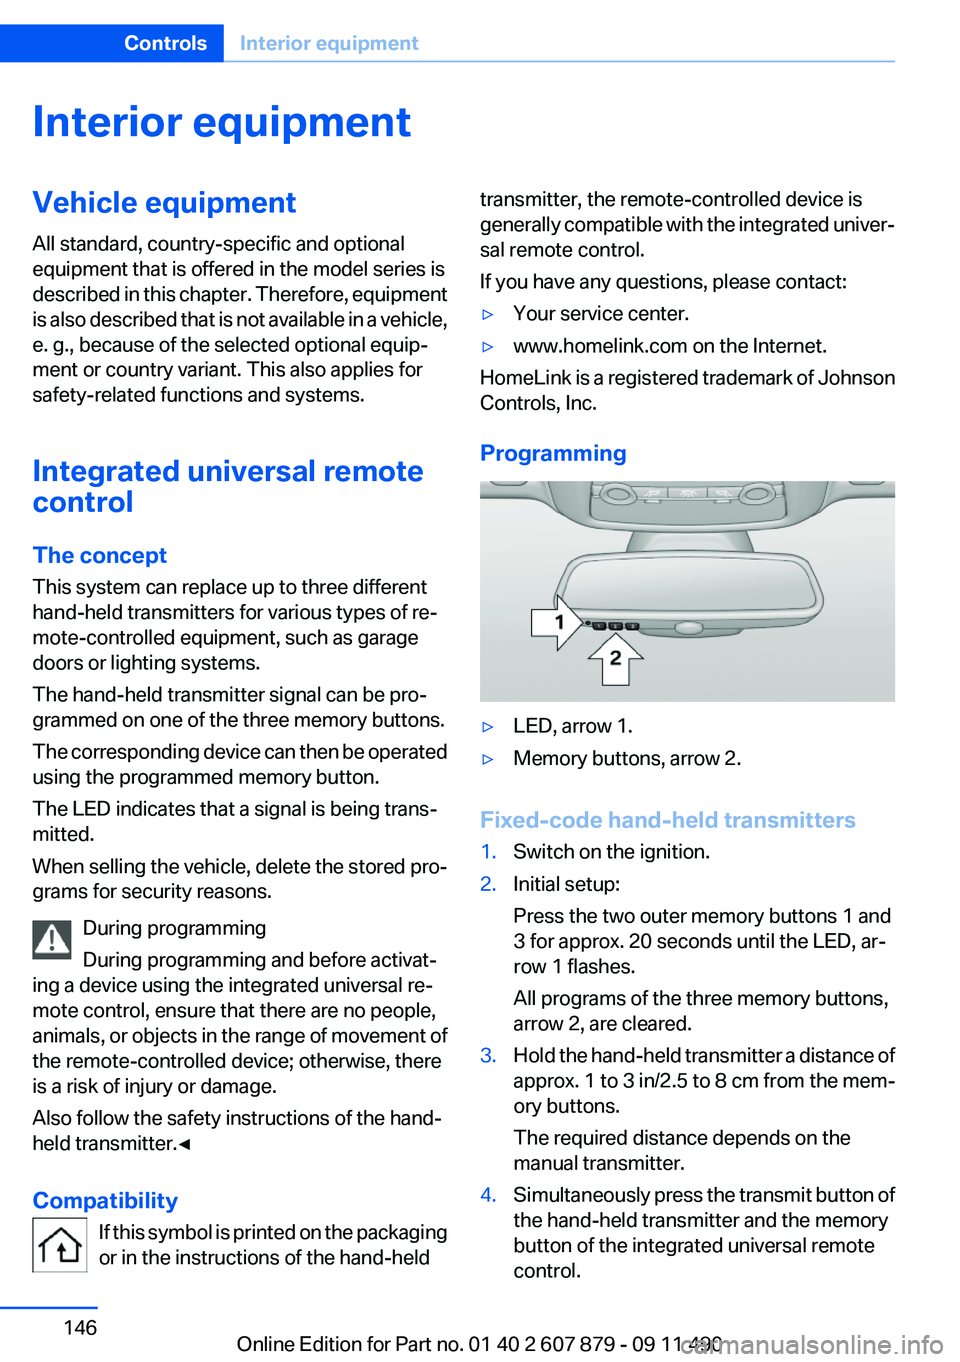
▷LED, arrow 1.▷Memory buttons, arrow 2.
Fixed-code hand-held transmitters
1.Switch on the ignition.2.Initial setup:
Press the two outer memory buttons 1 and
3 for approx. 20 seconds until the LED, ar‐
row 1 flashes.
All programs of the three memory buttons,
arrow 2, are cleared.3.Hold the hand-held transmitter a distance of
approx. 1 to 3 in/2.5 to 8 cm from the mem‐
ory buttons.
The required distance depends on the
manual transmitter.4.Simultaneously press the transmit button of
the hand-held transmitter and the memory
button of the integrated universal remote
control.Seite 146ControlsInterior equipment146
Online Edition for Part no. 01 40 2 607 879 - 09 11 490
Page 147 of 335
The LED flashes slowly.5.Release both buttons when the LED flashes
rapidly.
If the LED does not flash rapidly after approx.
60 seconds, change the distance and repeat
the step.
Canada: if the LED is not flashing rapidly af‐
ter approx. 60 seconds, change the distance
and repeat the step, or, if the programming
was interrupted by the hand-held transmit‐
ter, hold down the memory button and press
and release the button on the hand-held
transmitter again for 2 seconds.6.To program other hand-held transmitters,
repeat steps 3 to 5.
The device can be operated using the memory
button with the engine running or the ignition
switched on.
Malfunction
If the device cannot be used after repeated at‐
tempts at programming, please check whether
the hand-held transmitter is equipped with an
alternating code system.
To do so:
▷Read the instructions of the hand-held
transmitter.▷Hold down the memory button of the
integrated universal remote control longer.
If the LED of the integrated universal remote
control flashes rapidly for a brief period and then
lights up continuously, the hand-held transmit‐
ter is equipped with an alternating code system.
In this case, program the memory buttons as
described under Alternating-code hand-held
transmitters.
Alternating-code hand-held
transmitters
Please obtain information on synchronizing the
device in the operating manual of the device be‐
ing set up.
Programming will be easier with the aid of a sec‐
ond person.1.Park the vehicle within range of the remote-
controlled device.2.Program the integrated universal remote
control as described above under Fixed-
code hand-held transmitters.3.Locate the button on the receiver of the de‐
vice to be set, e.g., on the drive.4.Press the button on the receiver of the de‐
vice to be set. You have approx. 30 seconds
for the next step.5.Hold down the programmed memory button
of the integrated universal remote for ap‐
prox. 3 seconds. Repeat this work step, if
necessary, up to three times.
The device can be operated using the memory
button with the engine running or the ignition
switched on.
Reassigning individual programs
1.Switch on the ignition.2.Hold the hand-held transmitter a distance of
approx. 1 to 3 in/2.5 to 8 cm from the mem‐
ory buttons.
The required distance depends on the
manual transmitter.3.Hold down the memory button of the
integrated universal remote control.4.If the LED flashes slowly after approx.
20 seconds, press the transmit button on
the hand-held transmitter.5.Release both buttons when the LED flashes
rapidly.
If the LED does not flash rapidly after approx.
60 seconds, change the distance and repeat
the step.
Canada: if the LED is not flashing rapidly after
approx. 60 seconds, change the distance and
repeat the step, or, if the programming was in‐
terrupted by the hand-held transmitter, hold
down the memory button and press and release
Seite 147Interior equipmentControls147
Online Edition for Part no. 01 40 2 607 879 - 09 11 490
Page 148 of 335
the button on the hand-held transmitter again
for 2 seconds.
Deleting all stored programs
Press the two outer memory buttons for approx.
20 seconds until the LED flashes rapidly.
All stored programs are deleted.
The programs cannot be deleted individually.
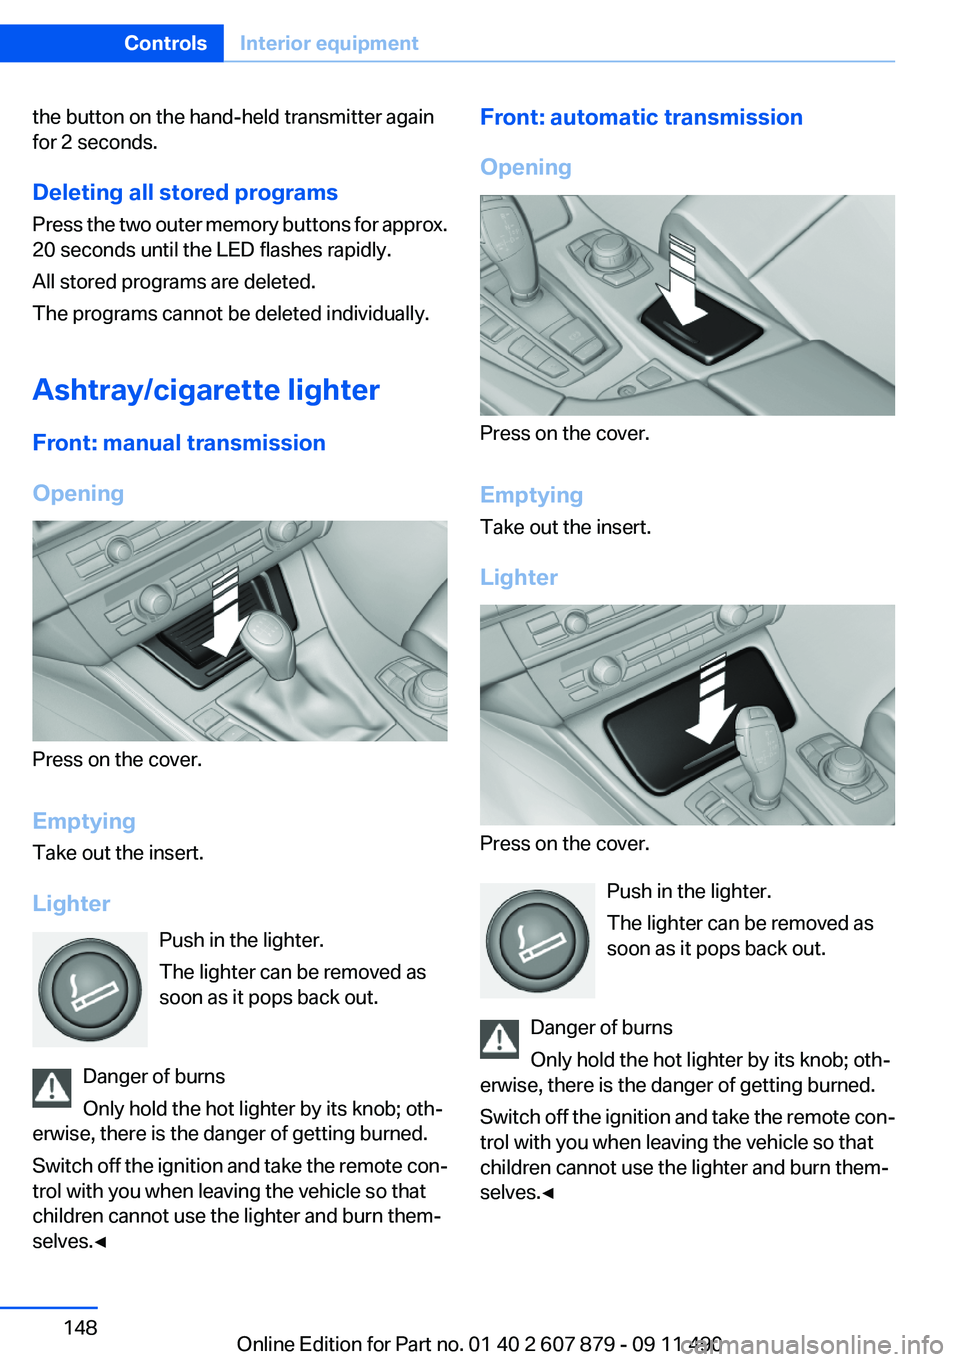
Ashtray/cigarette lighter
Front: manual transmission
Opening
Press on the cover.
Emptying
Take out the insert.
Lighter Push in the lighter.
The lighter can be removed as
soon as it pops back out.
Danger of burns
Only hold the hot lighter by its knob; oth‐
erwise, there is the danger of getting burned.
Switch off the ignition and take the remote con‐
trol with you when leaving the vehicle so that
children cannot use the lighter and burn them‐
selves.◀
Front: automatic transmission
Opening
Press on the cover.
Emptying
Take out the insert.
Lighter
Press on the cover. Push in the lighter.
The lighter can be removed as
soon as it pops back out.
Danger of burns
Only hold the hot lighter by its knob; oth‐
erwise, there is the danger of getting burned.
Switch off the ignition and take the remote con‐
trol with you when leaving the vehicle so that
children cannot use the lighter and burn them‐
selves.◀
Seite 148ControlsInterior equipment148
Online Edition for Part no. 01 40 2 607 879 - 09 11 490
Page 182 of 335
Resuming the original route
If the route section should no longer be by‐
passed:1."Navigation"2."Route information"3."New route for:"4."Remove blocking"
Gas station recommendation
The remaining range is calculated, and if nec‐
essary gas stations along the route are dis‐
played.
1."Navigation"2."Route information"3."Recommended refuel"
A list of the gas stations is displayed.4.Highlight a gas station.
The position of the gas station is displayed
on the split screen.5.Select the gas station.6. Select the symbol.7."Start guidance": destination guidance to
the selected gas station is started.
"Add as another destination": the gas sta‐
tion is added to the route.
Switching spoken instructions on/off
The setting is stored for the remote control cur‐
rently in use.
1."Navigation"2."Map"3. "Voice instructions"
Repeating spoken instructions
1."Navigation"2."Map"3. Highlight the symbol.4.Press the controller twice.Volume of spoken instructions
Turn the volume button while giving an instruc‐
tion until the desired volume is set.
Saving the spoken instructions on the
programmable memory buttons
The function for switching the spoken instruc‐
tions on/off can be stored on a programmable
memory button, refer to page 20, for quick ac‐
cess.
Map view
Selecting the map view1."Navigation"2."Map"
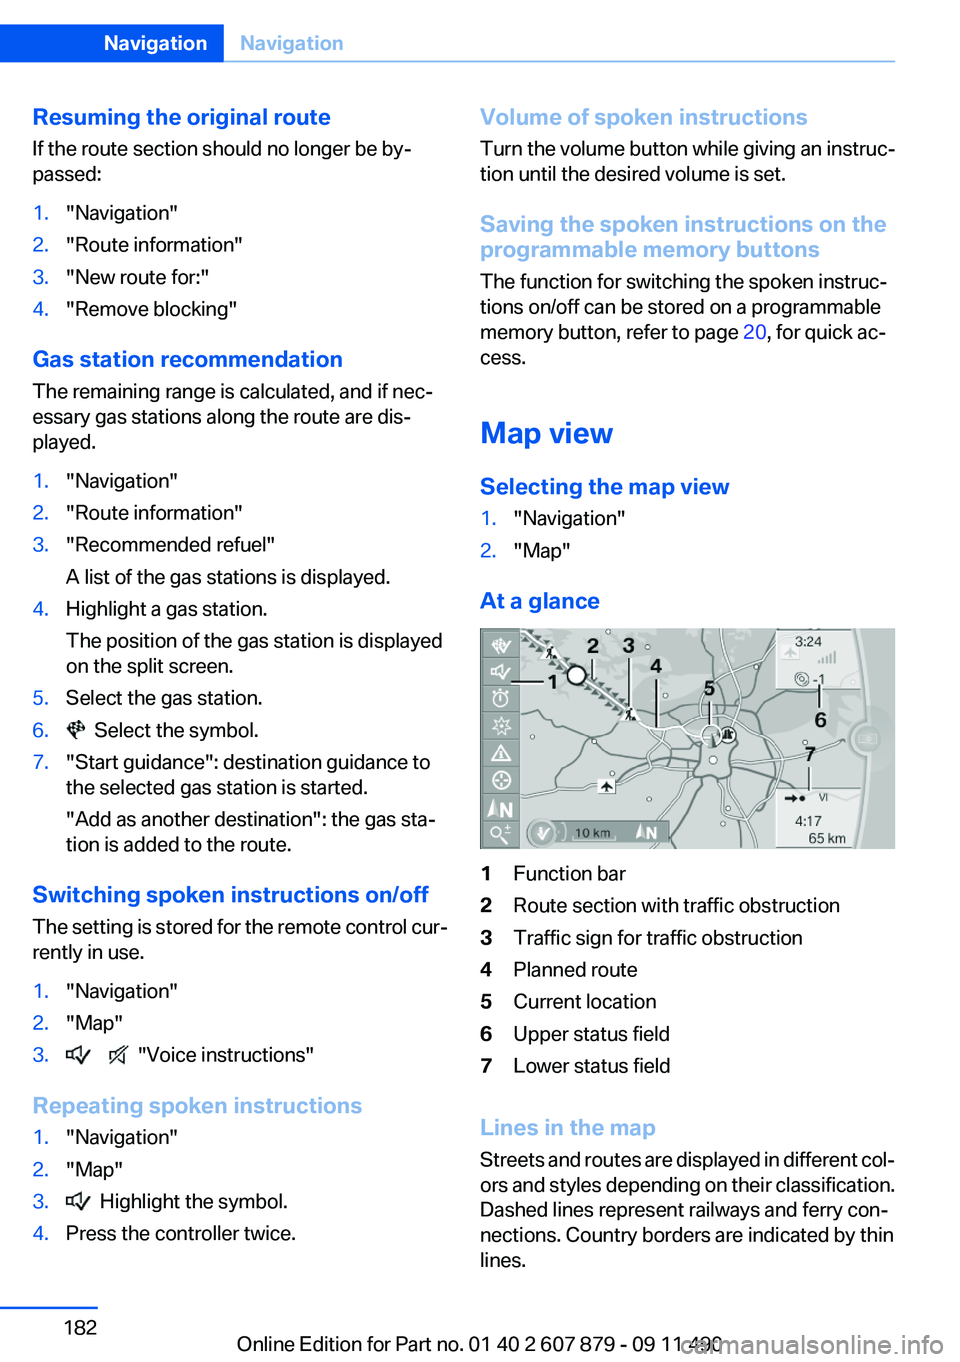
At a glance
1Function bar2Route section with traffic obstruction3Traffic sign for traffic obstruction4Planned route5Current location6Upper status field7Lower status field
Lines in the map
Streets and routes are displayed in different col‐
ors and styles depending on their classification.
Dashed lines represent railways and ferry con‐
nections. Country borders are indicated by thin
lines.
Seite 182NavigationNavigation182
Online Edition for Part no. 01 40 2 607 879 - 09 11 490
Page 192 of 335
RadioVehicle equipment
All standard, country-specific and optional
equipment that is offered in the model series is
described in this chapter. Therefore, equipment
is also described that is not available in a vehicle,
e. g., because of the selected optional equip‐
ment or country variant. This also applies for
safety-related functions and systems.
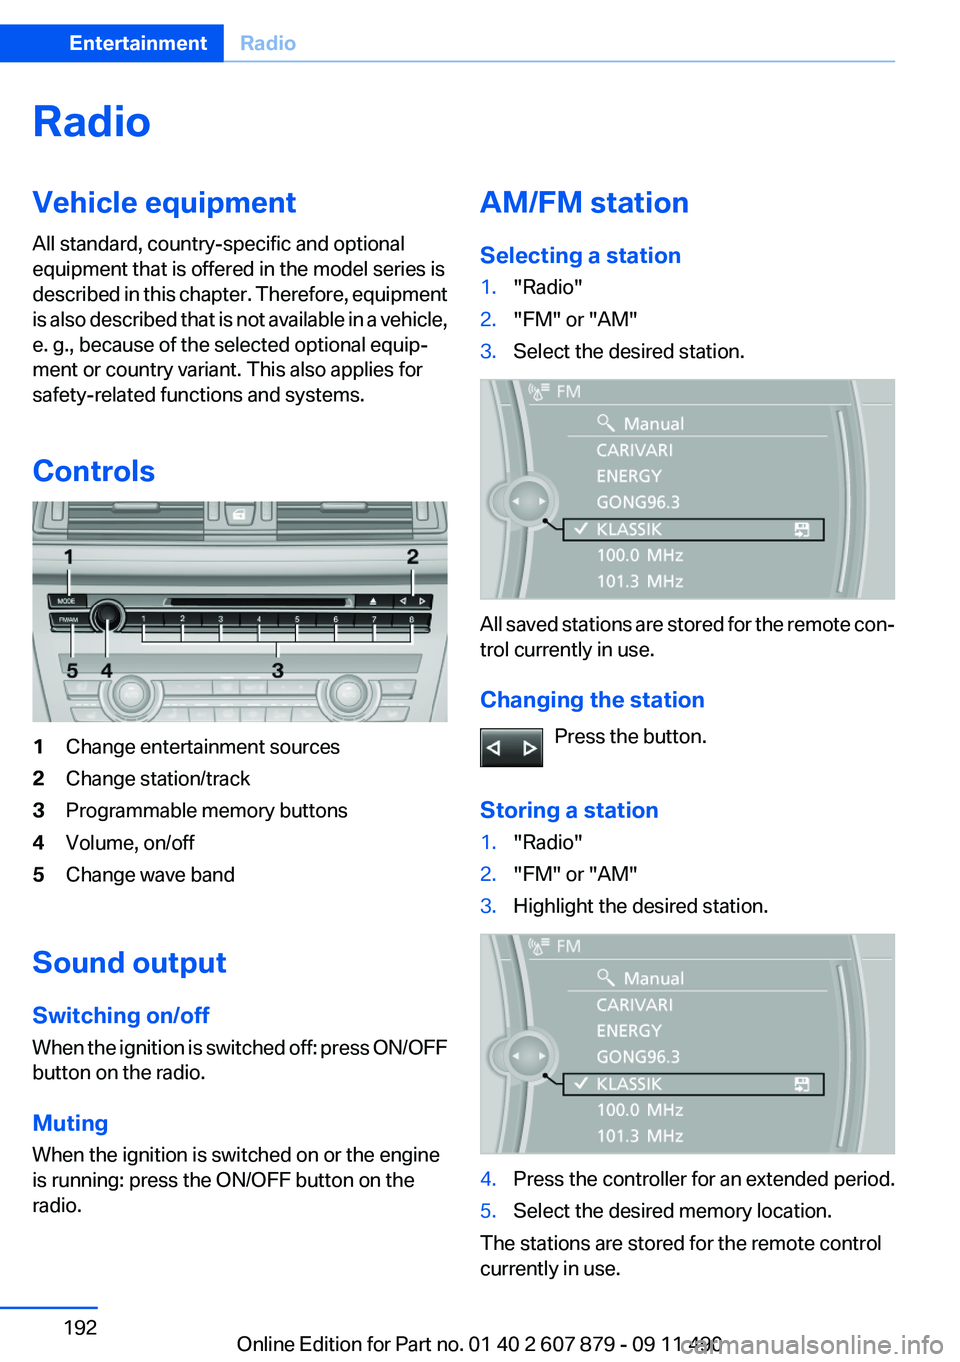
Controls1Change entertainment sources2Change station/track3Programmable memory buttons4Volume, on/off5Change wave band
Sound output
Switching on/off
When the ignition is switched off: press ON/OFF
button on the radio.
Muting
When the ignition is switched on or the engine
is running: press the ON/OFF button on the
radio.
AM/FM station
Selecting a station1."Radio"2."FM" or "AM"3.Select the desired station.
All saved stations are stored for the remote con‐
trol currently in use.
Changing the station Press the button.
Storing a station
1."Radio"2."FM" or "AM"3.Highlight the desired station.4.Press the controller for an extended period.5.Select the desired memory location.
The stations are stored for the remote control
currently in use.
Seite 192EntertainmentRadio192
Online Edition for Part no. 01 40 2 607 879 - 09 11 490
Page 193 of 335
The stations can also be stored on the program‐
mable memory buttons, refer to page 20.
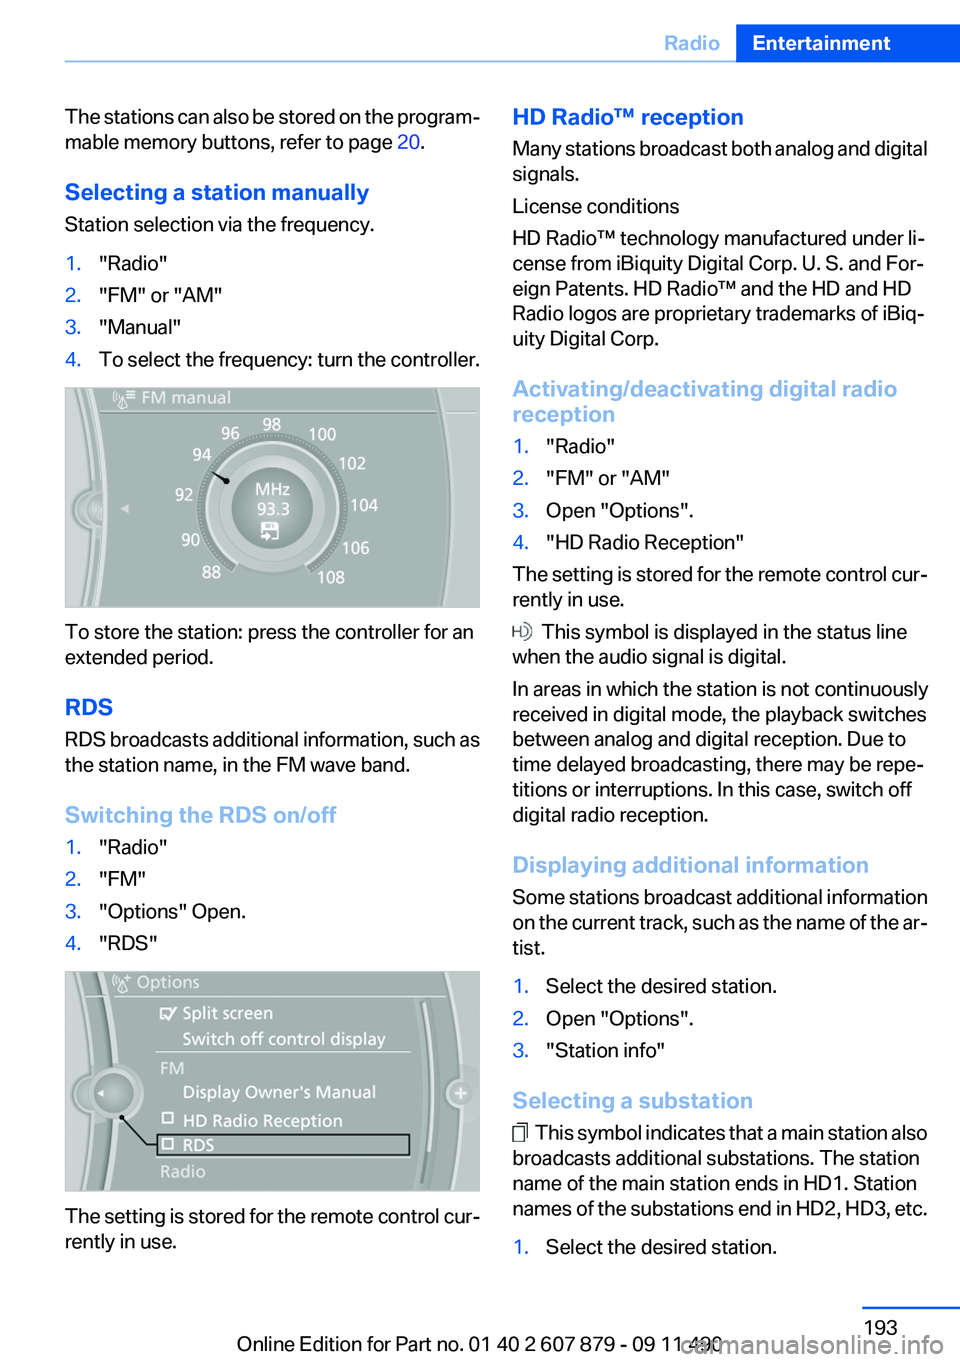
Selecting a station manually
Station selection via the frequency.1."Radio"2."FM" or "AM"3."Manual"4.To select the frequency: turn the controller.
To store the station: press the controller for an
extended period.
RDS
RDS broadcasts additional information, such as
the station name, in the FM wave band.
Switching the RDS on/off
1."Radio"2."FM"3."Options" Open.4."RDS"
The setting is stored for the remote control cur‐
rently in use.
HD Radio™ reception
Many stations broadcast both analog and digital
signals.
License conditions
HD Radio™ technology manufactured under li‐
cense from iBiquity Digital Corp. U. S. and For‐
eign Patents. HD Radio™ and the HD and HD
Radio logos are proprietary trademarks of iBiq‐
uity Digital Corp.
Activating/deactivating digital radio
reception1."Radio"2."FM" or "AM"3.Open "Options".4."HD Radio Reception"
The setting is stored for the remote control cur‐
rently in use.
This symbol is displayed in the status line
when the audio signal is digital.
In areas in which the station is not continuously
received in digital mode, the playback switches
between analog and digital reception. Due to
time delayed broadcasting, there may be repe‐
titions or interruptions. In this case, switch off
digital radio reception.
Displaying additional information
Some stations broadcast additional information
on the current track, such as the name of the ar‐
tist.
1.Select the desired station.2.Open "Options".3."Station info"
Selecting a substation
This symbol indicates that a main station also
broadcasts additional substations. The station
name of the main station ends in HD1. Station
names of the substations end in HD2, HD3, etc.
1.Select the desired station.Seite 193RadioEntertainment193
Online Edition for Part no. 01 40 2 607 879 - 09 11 490