2012 BMW 535I SEDAN ECU
[x] Cancel search: ECUPage 222 of 335
Notes▷Do not cover lower screen edge, since this
is where the sensors and the infrared inter‐
face are installed.▷When loading the rear seats and adjusting
the backrest of the front seat, fold in the
screens.▷When using the through-loading system,
fold the screens down.▷When cleaning the screen, follow the care
instructions, refer to page 307.
Remote control
In the center armrest in the rear
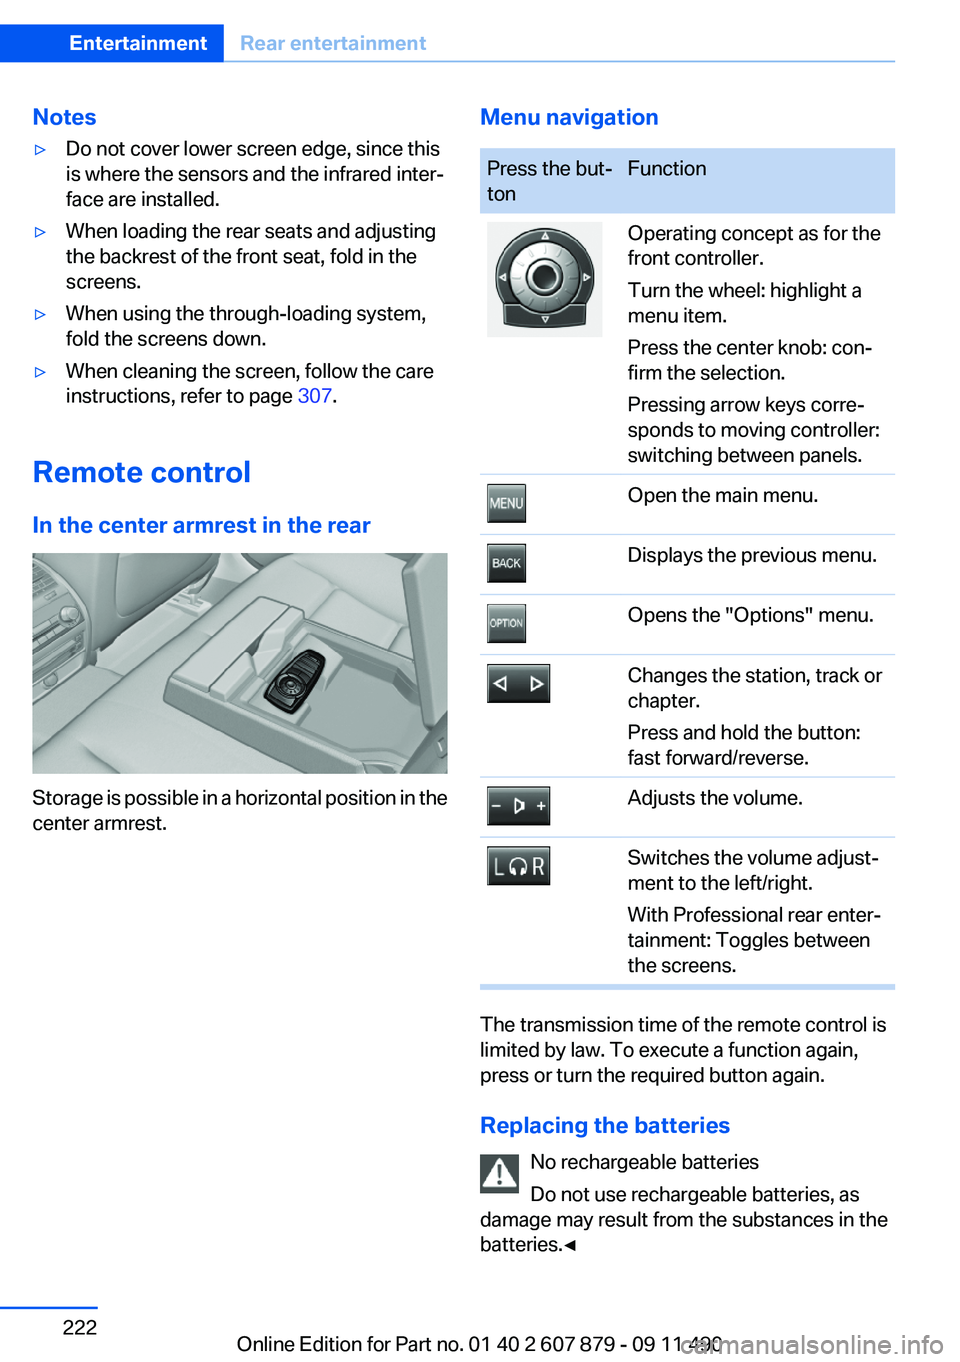
Storage is possible in a horizontal position in the
center armrest.
Menu navigationPress the but‐
tonFunctionOperating concept as for the
front controller.
Turn the wheel: highlight a
menu item.
Press the center knob: con‐
firm the selection.
Pressing arrow keys corre‐
sponds to moving controller:
switching between panels.Open the main menu.Displays the previous menu.Opens the "Options" menu.Changes the station, track or
chapter.
Press and hold the button:
fast forward/reverse.Adjusts the volume.Switches the volume adjust‐
ment to the left/right.
With Professional rear enter‐
tainment: Toggles between
the screens.
The transmission time of the remote control is
limited by law. To execute a function again,
press or turn the required button again.
Replacing the batteries No rechargeable batteries
Do not use rechargeable batteries, as
damage may result from the substances in the
batteries.◀
Seite 222EntertainmentRear entertainment222
Online Edition for Part no. 01 40 2 607 879 - 09 11 490
Page 231 of 335
Notes
At high temperatures, the charge function of the
mobile phone can be limited where appropriate
and the functions are no longer executed.
When the mobile phone is used via the vehicle,
heed the operating manual of the mobile phone.
Pairing/unpairing the mobile
phone
General information
The following functions are available:▷Use of a mobile phone as a telephone.▷Use of a mobile phone as an additional tele‐
phone.▷Use of a mobile phone as an audio source.▷Use of an audio device as an audio source,
refer to page 216.
Requirements
▷The mobile phone is suitable.▷The mobile phone is ready for operation.▷Bluetooth is activated in the vehicle and on
the mobile phone.▷Bluetooth presettings may need to be made
on the mobile phone, e.g., for a connection
without confirmation or visibility, refer to the
mobile phone operating instructions.▷Deactivate Bluetooth audio if necessary.▷A number with at least four and a maximum
of 16 digits was defined as the Bluetooth
passkey. It is only required once for pairing.▷The ignition is switched on.
Activating/deactivating Bluetooth
Bluetooth is not permitted everywhere. Comply
with all safety guidelines and regulations.
1."Telephone"2."Options" Open.3."Bluetooth®"Additional functions
Activating/deactivating the additional
functions
Activate the functions before pairing to be able
to use them in the vehicle. Information on suit‐
able mobile phones, refer to page 230, that sup‐
port these functions.1."Telephone"2."Bluetooth® (phone)"3."Options" Open.4."Configure Bluetooth®"5.Select the desired additional function.▷"Additional telephone"▷"Office"▷"Bluetooth® audio"6."OK"
As long as an additional function is deactivated,
it cannot be assigned to a telephone.
Additional telephone
A mobile phone can be used as an additional
telephone.
The additional telephone can be used to accept
incoming calls, refer to page 234. While a call is
active on the additional telephone, incoming
calls are displayed on the Control Display.
Audio source
A mobile phone can be used as an audio source.
Pairing and connecting cell phone Pairing the mobile phone
To avoid becoming distracted and posing
an unnecessary hazard both to your own vehi‐
cle's occupants and to other road users, only
pair the mobile phone while the vehicle is sta‐
tionary.◀
Seite 231TelephoneCommunication231
Online Edition for Part no. 01 40 2 607 879 - 09 11 490
Page 240 of 335
Deleting an entry1.›Delete name‹2.Say the name after being prompted to do so.3.Confirm the query with ›Yes‹.
Deleting all entries
1.›Delete phonebook‹
The dialog for deleting the phone book is
opened.2.Confirm the query with ›Yes‹.3.Confirm the query again with ›Yes‹.
Reading and selecting entries
1.›Read phonebook‹
The dialog for reading the phone book is
opened.2.Say ›Dial number‹ when the desired entry is
read.
Selecting an entry
1.›Dial name‹2.Say the name after being prompted to do so.3.Confirm the query with ›Yes‹.
Adjusting the volume
Turn the knob during an announcement.
▷The volume remains constant even if the
volume of other audio sources is changed.▷The volume is stored for the remote control
currently in use.
Notes
Do not use the voice operation to initiate an
Emergency Request. In stressful situations, the
voice and vocal pitch can change. This can un‐
necessarily delay the establishment of a tele‐
phone connection.
Instead, use the SOS button, refer to
page 298, in the vicinity of the interior mirror.
Environmental conditions▷Say the commands, numbers, and letters
smoothly and with normal volume, empha‐
sis, and speed.▷Always say commands in the language of
the system. The language for the mobile
phone voice operation is preset and cannot
be changed in the Control Display.▷Keep the doors, windows, and glass sun‐
roof closed to prevent noise interference.▷Avoid making other noise in the vehicle
while speaking.
Snap-in adapter
General information
Detailed information about snap-in adapter,
which supports the functions of the mobile
phone, available from the service center.
Notes
At high temperatures, the charge function of the
mobile phone can be limited where appropriate
and the functions are no longer executed.
When the mobile phone is used via the vehicle,
heed the operating manual of the mobile phone.
Installation position
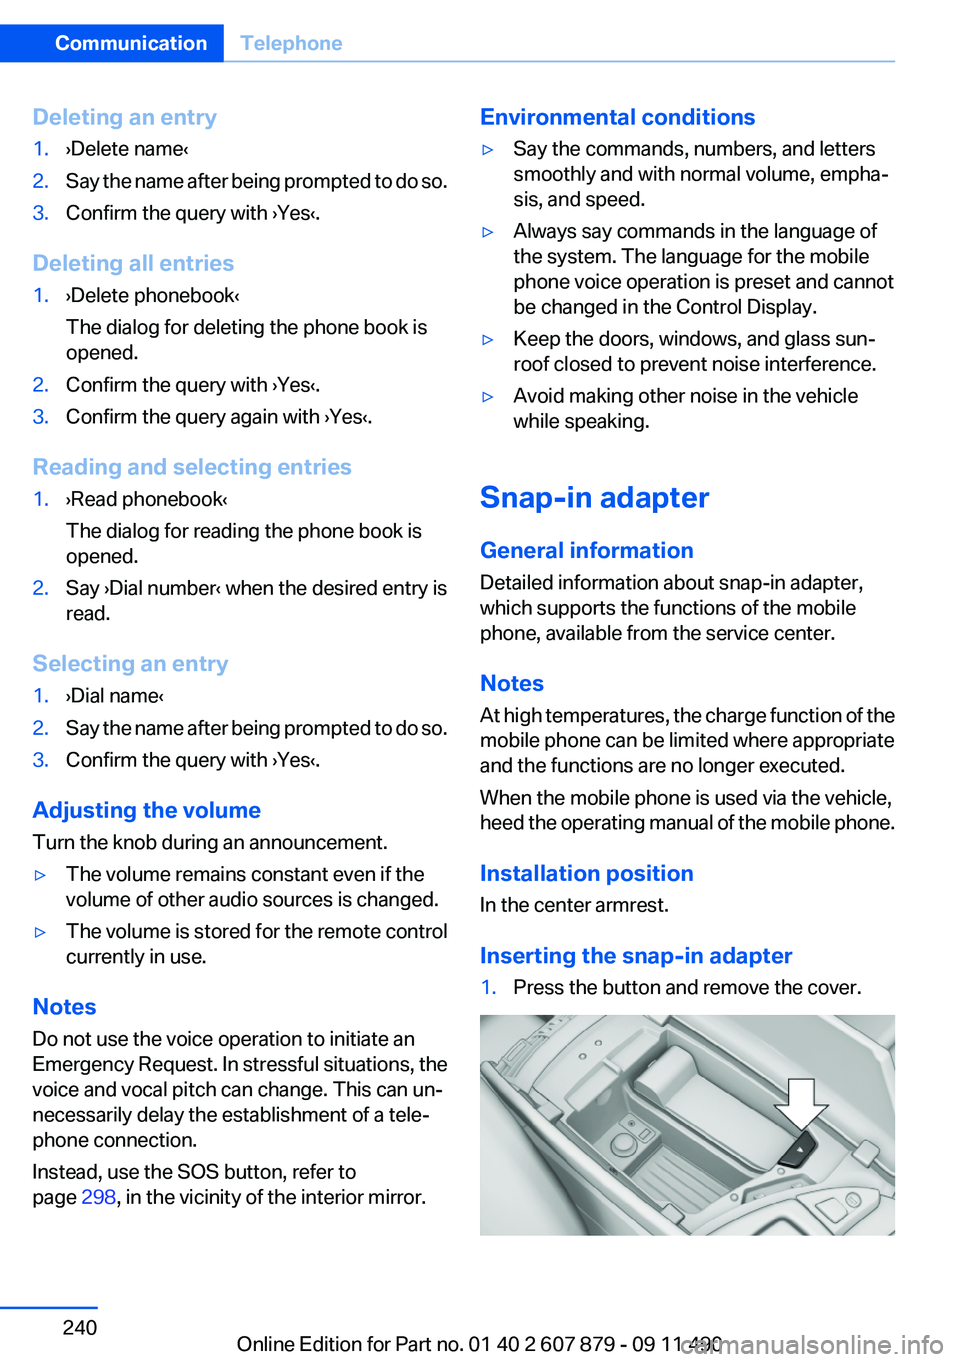
In the center armrest.
Inserting the snap-in adapter
1.Press the button and remove the cover.Seite 240CommunicationTelephone240
Online Edition for Part no. 01 40 2 607 879 - 09 11 490
Page 283 of 335
Never reach into the engine compartment
Never reach into the intermediate spaces
or gaps in the engine compartment. Otherwise,
there is risk of injury, e.g. from rotating or hot
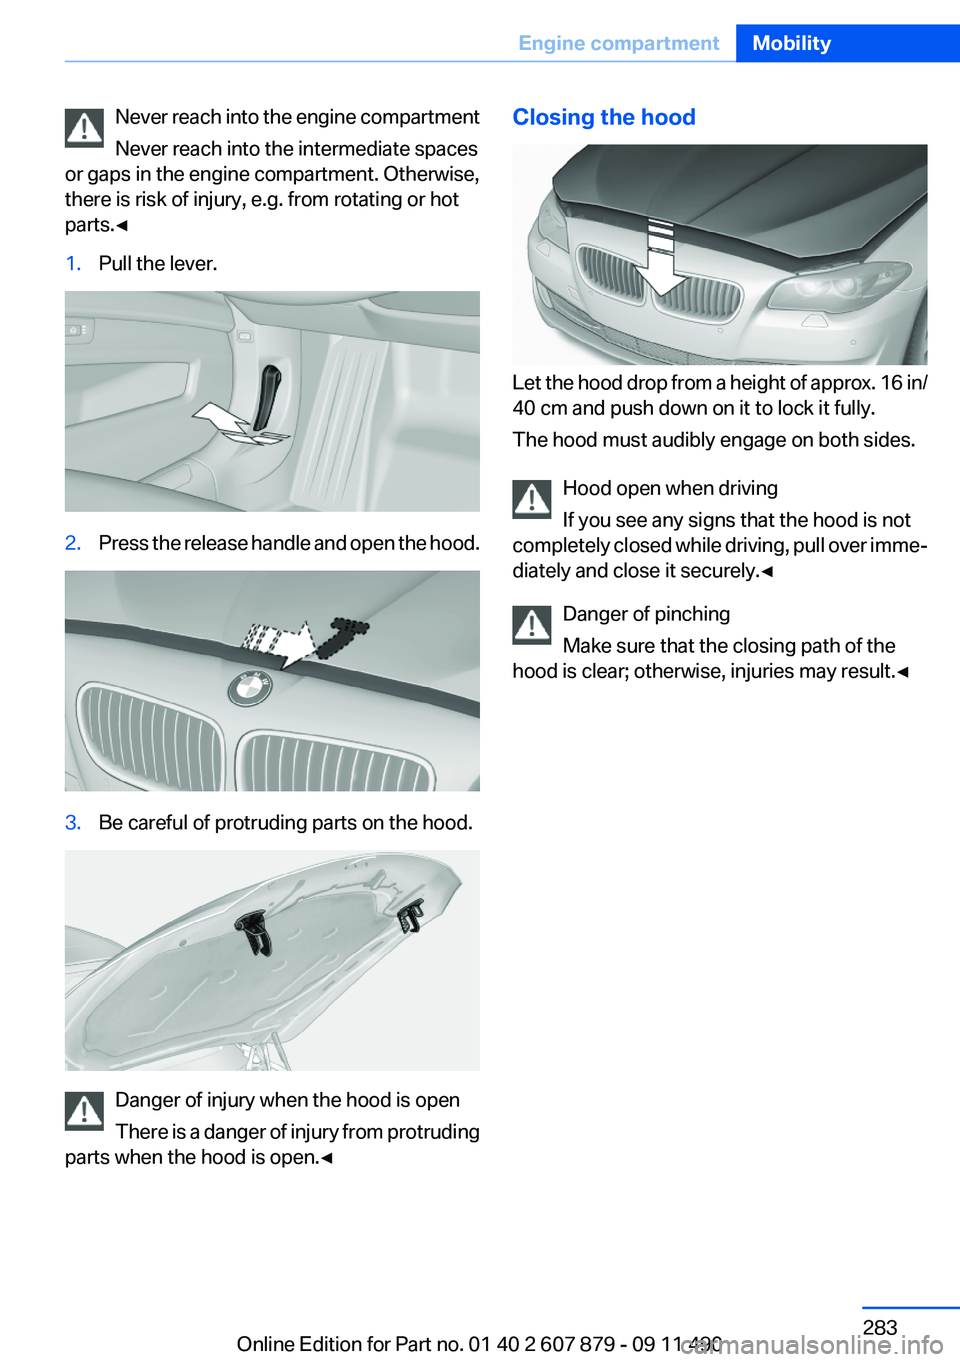
parts.◀1.Pull the lever.2.Press the release handle and open the hood.3.Be careful of protruding parts on the hood.
Danger of injury when the hood is open
There is a danger of injury from protruding
parts when the hood is open.◀
Closing the hood
Let the hood drop from a height of approx. 16 in/
40 cm and push down on it to lock it fully.
The hood must audibly engage on both sides.
Hood open when driving
If you see any signs that the hood is not
completely closed while driving, pull over imme‐
diately and close it securely.◀
Danger of pinching
Make sure that the closing path of the
hood is clear; otherwise, injuries may result.◀
Seite 283Engine compartmentMobility283
Online Edition for Part no. 01 40 2 607 879 - 09 11 490
Page 297 of 335
Maintain the battery in an upright position for
transport and storage. Secure the battery so
that it does not tip over during transport.
Fuses
Notes Replacing fuses
Never attempt to repair a blown fuse and
do not replace a defective fuse with a substitute
of another color or amperage rating; this could
lead to a circuit overload, ultimately resulting in
a fire in the vehicle.◀
Plastic tweezers and information on the fuse
types and locations are stored in the fuse box in
the cargo area.
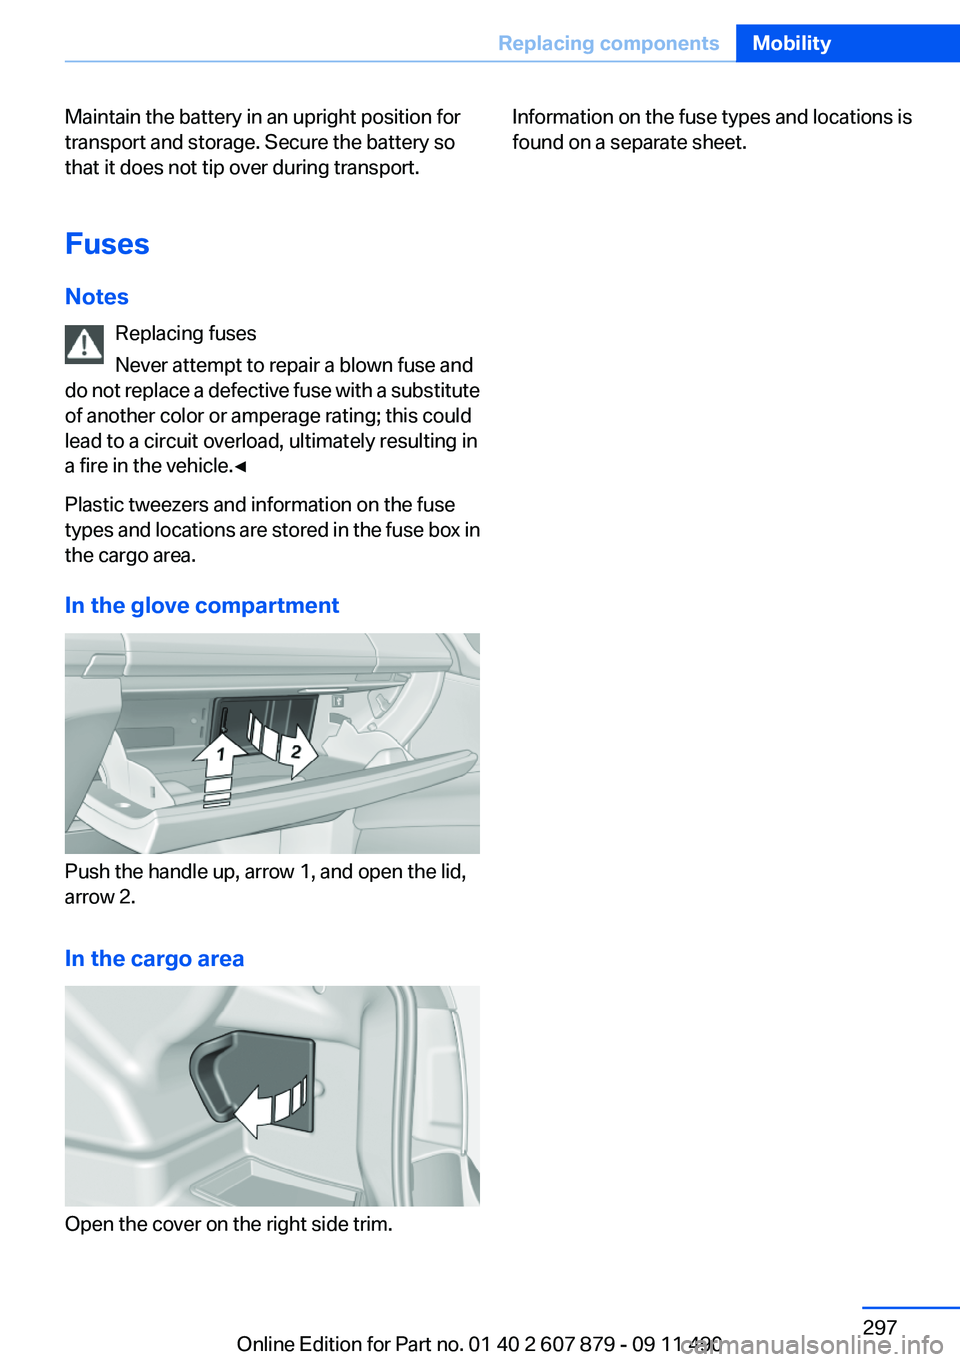
In the glove compartment
Push the handle up, arrow 1, and open the lid,
arrow 2.
In the cargo area
Open the cover on the right side trim.
Information on the fuse types and locations is
found on a separate sheet.Seite 297Replacing componentsMobility297
Online Edition for Part no. 01 40 2 607 879 - 09 11 490
Page 302 of 335
Do not lift the vehicle
Do not lift the vehicle by the tow fitting or
body and chassis parts; otherwise, damage may
result.◀
Towing other vehicles
General information Light towing vehicle
Your vehicle must not be lighter than the
vehicle being towed; otherwise, it will not be
possible to control vehicle response.◀
Attaching the tow bar/tow rope correctly
Attach the tow bar or tow rope to the tow
fitting; connecting it to other vehicle parts may
cause damage.◀▷Switch on the hazard warning system, de‐
pending on local regulations.▷If the electrical system has failed, clearly
identify the vehicle being towed by placing
a sign or a warning triangle in the rear win‐
dow.
Tow bar
The tow fittings used should be on the same
side on both vehicles.
Should it prove impossible to avoid mounting
the tow bar at an offset angle, please observe
the following:
▷Maneuvering capability is limited during cor‐
nering.▷The tow bar will generate lateral forces if it
is secured with an offset.
Tow rope
When starting to tow the vehicle, make sure that
the tow rope is taut.
To avoid jerking and the associated stresses on
the vehicle components when towing, always
use nylon ropes or nylon straps.
Attaching the tow rope correctly
Only secure the tow rope on the tow fit‐
ting; otherwise, damage can occur when it is se‐
cured on other parts of the vehicle.◀
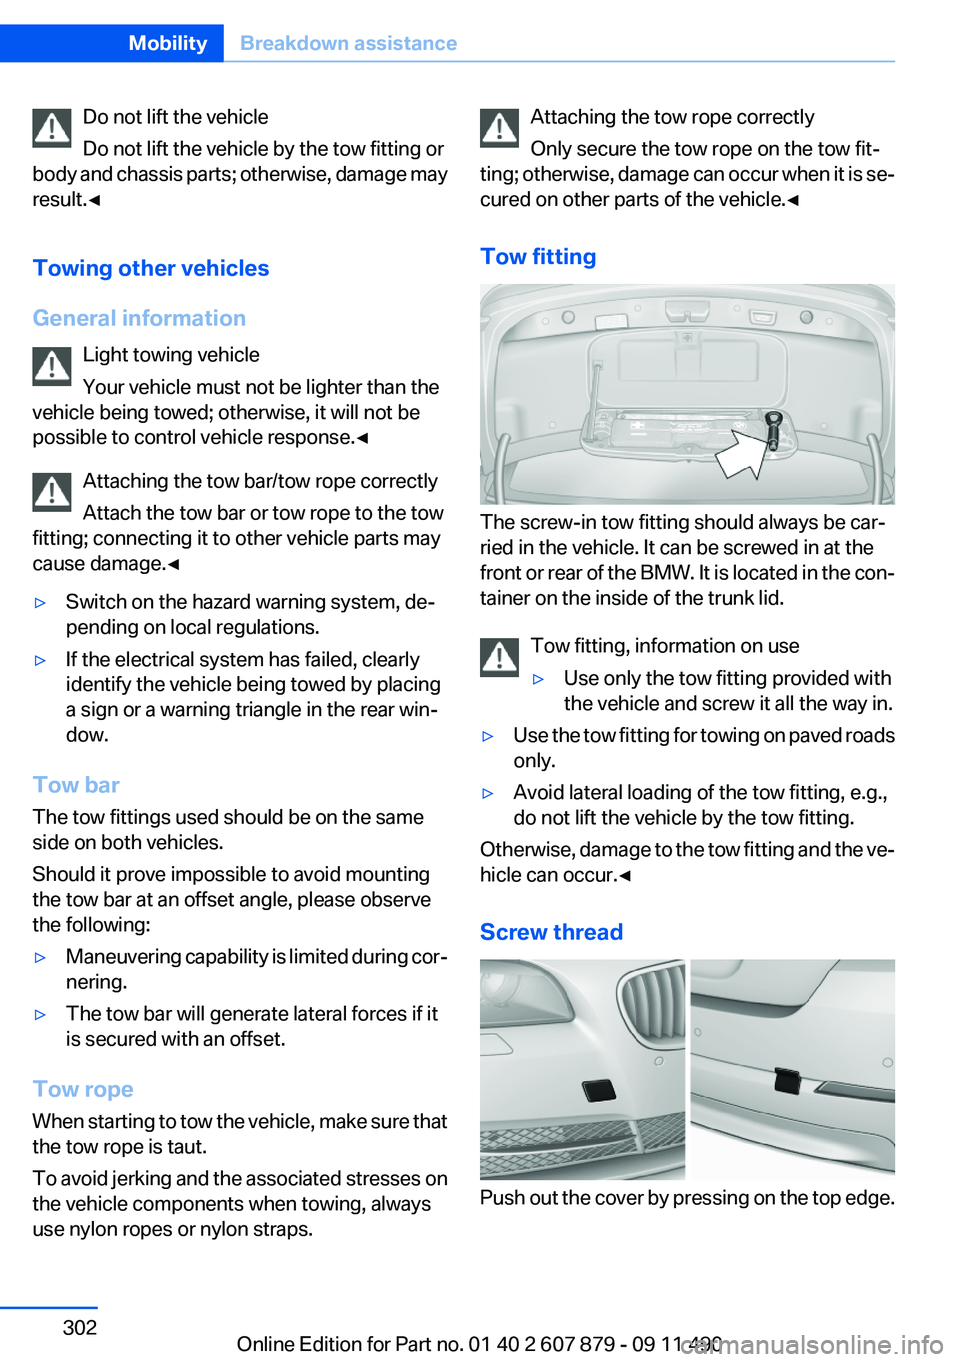
Tow fitting
The screw-in tow fitting should always be car‐
ried in the vehicle. It can be screwed in at the
front or rear of the BMW. It is located in the con‐
tainer on the inside of the trunk lid.
Tow fitting, information on use
▷Use only the tow fitting provided with
the vehicle and screw it all the way in.▷Use the tow fitting for towing on paved roads
only.▷Avoid lateral loading of the tow fitting, e.g.,
do not lift the vehicle by the tow fitting.
Otherwise, damage to the tow fitting and the ve‐
hicle can occur.◀
Screw thread
Push out the cover by pressing on the top edge.
Seite 302MobilityBreakdown assistance302
Online Edition for Part no. 01 40 2 607 879 - 09 11 490
Page 306 of 335
Upholstery material care
Vacuum regularly with a vacuum cleaner.
If they are very dirty, e.g., beverage stains, use a
soft sponge or microfiber cloth with a suitable
interior cleaner.
Clean the upholstery down to the seams using
large sweeping motions. Avoid rubbing the ma‐
terial vigorously.
Damage from Velcro® fasteners
Open Velcro® fasteners on pants or other
articles of clothing can damage the seat covers.
Ensure that any Velcro® fasteners are closed. ◀
Caring for special components
Light-alloy wheels
Use wheel cleaner, particularly during the winter
months. Do not use aggressive, acidic, strongly
alkaline or abrasive cleaners, or steam jets
above 140 ℉/60 ℃; follow the manufacturer's
instructions.
Chrome surfaces
Carefully clean components such as the radiator
grille or door handles with an ample supply of
water, possibly with shampoo added, particu‐
larly when they have been exposed to road salt.
Rubber components
Aside from water, treat only with rubber cleans‐
ers.
When cleaning rubber seals, do not use any sil‐
icon-containing car care products in order to
avoid damage or reduced noise damping.
Fine wood parts
Clean fine wood facing and fine wood compo‐
nents only with a moist rag. Then dry with a soft
cloth.
Plastic components
These include:▷Imitation leather surfaces.▷Headliner.▷Lamp lenses.▷Instrument cluster cover.▷Matte black spray-coated components.▷Painted parts in the interior.
Clean with a microfiber cloth.
Lightly dampen the cloth with water.
Do not soak the headliner.
Do not use cleansers that contain alcohol
or solvents
Do not use cleansers that contain alcohol or sol‐
vents, such as lacquer thinners, heavy-duty
grease removers, fuel, or such; this could lead to
surface damage.◀
Safety belts
Dirty belt straps impede the reeling action and
thus have a negative impact on safety.
Chemical cleaning
Do not clean chemically; this can destroy
the webbing.◀
Use only a mild soapy solution, with the safety
belts clipped into their buckles.
Do not allow the reels to retract the safety belts
until they are dry.
Floor carpets and floor mats No objects in the area around the pedals
Keep floor mats, carpets, and any other
objects out of the area of motion of the pedals;
otherwise, the function of the pedals could be
impeded while driving
Do not place additional floor mats over existing
mats or other objects.
Only use floor mats that have been approved for
the vehicle and can be properly fixed in place.
Ensure that the floor mats are securely fastened
again after they were removed for cleaning, for
example.◀
Seite 306MobilityCare306
Online Edition for Part no. 01 40 2 607 879 - 09 11 490
Page 325 of 335
Bar for tow-starting/tow‐ing 302
Bass 190
Battery replacement, remote control, rear entertain‐
ment 222
Battery replacement, vehicle battery 296
Battery replacement, vehicle remote control 30
Battery, vehicle 296
Belts, safety belts 51
Beverage holder, cu‐ pholder 155
Blinds, sun protection 44
Bluetooth audio 216
BMW Assist 253
BMW homepage 6
BMW Internet page 6
BMW Maintenance Sys‐ tem 288
BMW Search 255
Bottle holder, refer to Cu‐ pholder 155
Brake assistant 107
Brake assistant, adaptive 107
Brake discs, breaking in 160
Brake force display 105
Brake lamps, brake force dis‐ play 105
Brake lamps, bulb replace‐ ment 295
Brake lights, adaptive 105
Brake pads, breaking in 160
Braking, notes 161
Breakdown assis‐ tance 298, 299
Breaking in 160
Brightness of Control Dis‐ play 87
Bulb replacement 290
Bulb replacement, front 291
Bulb replacement, rear 294
Bulbs and lamps 290
Button, RES 116
Button, Start/Stop 62 Bypassing, refer to starting
aid 299
C
Calendar 248
California Proposition 65 Warning 7
Camera, backup camera 128
Camera, care 307
Camera, Side View 131
Camera, Top View 130
Can holder, refer to Cu‐ pholder 155
Car battery 296
Car care products 305
Care, displays 307
Care, vehicle 305
Cargo 163
Cargo area, enlarging 150
Cargo area lid 38
Cargo area, storage compart‐ ments 156
Cargo straps, securing cargo 164
Car key, refer to Remote con‐ trol 30
Carpet, care 306
Car wash 304
Catalytic converter, refer to Hot exhaust system 161
CBS Condition Based Serv‐ ice 288
CD/DVD 200
CD/DVD player, rear 221
CDs, storing 207
Cell phone 230
Center armrest 154
Center console 14
Central locking system 33
Central screen, refer to Control Display 16
Changes, technical, refer to Safety 6
Changing parts 290
Changing wheels 296 Changing wheels/tires 278
Check Control 78
Checking the oil level 284
Children, seating position 58
Children, transporting safely 58
Child restraint fixing sys‐ tem 58
Child restraint fixing system LATCH 59
Child restraint fixing systems, mounting 58
Child safety locks 61
Child seat, mounting 58
Child seats 58
Chrome parts, care 306
Cigarette lighter 148
Cleaning, displays 307
Climate control 139
Climate control wind‐ shield 161
Clock 81
Closing/opening from in‐ side 37
Closing/opening via door lock 36
Closing/opening with remote control 34
Clothes hooks 156
Collision warning 120
Combination switch, refer to Turn signals 69
Combination switch, refer to Wiper system 69
COMFORT+ program, Driving Experience Switch 113
Comfort Access 40
COMFORT program, Driving Experience Switch 112
Computer 84
Concierge service 254
Condensation on win‐ dows 140
Condensation under the vehi‐ cle 162 Seite 325Everything from A to ZReference325
Online Edition for Part no. 01 40 2 607 879 - 09 11 490