2012 BMW 535I remote control
[x] Cancel search: remote controlPage 180 of 335
3."Options" Open.4."Delete all trips" or "Delete trip"
Open the last trip
1."Navigation"2."Stored trips"3."Last trip"4."Start guidance"
Destination guidance
Starting destination guidance
1."Navigation"2.Make a destination entry, refer to page 172.3."Accept destination"4."Start guidance"▷The route is shown on the Control Display.▷The distance to the destination/intermedi‐
ate destination and the estimated time of ar‐
rival are displayed in the map view.▷The arrow view is shown in the instrument
cluster, in the Head-up Display, and on the
Control Display where appropriate.
Terminating destination guidance
1."Navigation"2."Map"3. "Guidance"4."Stop guidance"
Continuing destination guidance
If the destination was not reached during the last
trip, destination guidance can be resumed.
"Resume guidance"
Route criteria
General information
▷The route calculated can be influenced by
selecting certain criteria.▷The route criteria can be changed when the
destination is entered and during destina‐
tion guidance.▷Road types are part of the navigation data
and are taken into consideration when plan‐
ning a route, e.g., avoid highways.▷The recommended route may differ from the
route you would take based on personal ex‐
perience.▷The settings are stored for the remote con‐
trol currently in use.▷Destination guidance with traffic bulletins,
refer to page 186.
Changing the route criteria
1."Navigation"2."Map"3. "Route preference"4.Select the criterion:▷ "Fast route": time-optimized route,
being a combination of the shortest pos‐
sible route and the fastest roads.▷ "ECO PRO route": optimized com‐
bination of the fastest and shortest
route.▷ "Short route": short distance, irre‐
spective of how fast or slow progress will
be.▷"Alternative routes": if available, alter‐
native routes are suggested during ac‐
tive route guidance.Seite 180NavigationNavigation180
Online Edition for Part no. 01 40 2 607 879 - 09 11 490
Page 182 of 335
Resuming the original route
If the route section should no longer be by‐
passed:1."Navigation"2."Route information"3."New route for:"4."Remove blocking"
Gas station recommendation
The remaining range is calculated, and if nec‐
essary gas stations along the route are dis‐
played.
1."Navigation"2."Route information"3."Recommended refuel"
A list of the gas stations is displayed.4.Highlight a gas station.
The position of the gas station is displayed
on the split screen.5.Select the gas station.6. Select the symbol.7."Start guidance": destination guidance to
the selected gas station is started.
"Add as another destination": the gas sta‐
tion is added to the route.
Switching spoken instructions on/off
The setting is stored for the remote control cur‐
rently in use.
1."Navigation"2."Map"3. "Voice instructions"
Repeating spoken instructions
1."Navigation"2."Map"3. Highlight the symbol.4.Press the controller twice.Volume of spoken instructions
Turn the volume button while giving an instruc‐
tion until the desired volume is set.
Saving the spoken instructions on the
programmable memory buttons
The function for switching the spoken instruc‐
tions on/off can be stored on a programmable
memory button, refer to page 20, for quick ac‐
cess.
Map view
Selecting the map view1."Navigation"2."Map"
At a glance
1Function bar2Route section with traffic obstruction3Traffic sign for traffic obstruction4Planned route5Current location6Upper status field7Lower status field
Lines in the map
Streets and routes are displayed in different col‐
ors and styles depending on their classification.
Dashed lines represent railways and ferry con‐
nections. Country borders are indicated by thin
lines.
Seite 182NavigationNavigation182
Online Edition for Part no. 01 40 2 607 879 - 09 11 490
Page 183 of 335
Traffic obstructions
Small triangles along the planned route indicate
route sections with traffic obstructions, depend‐
ing on the map scale. The direction of the trian‐
gles indicates the direction of the obstruction.
The traffic signs indicate the significance of the
obstruction.▷Red traffic sign: the obstruction affects the
planned route or direction.▷Gray traffic sign: the obstruction does not
affect the planned route or direction.
Traffic bulletins, refer to page 184.
Planned route
After destination guidance is started, the plan‐
ned route is displayed on the map.
Status fields
Show/hide: press the controller.
▷Upper status field: time, telephone, and en‐
tertainment details.▷Lower status field: symbol for active desti‐
nation guidance, status of traffic bulletins,
time of arrival, and distance to destination.
Function bar
The following functions are available in the func‐
tion bar:
SymbolFunction Start/end destination guidance. Switch spoken instructions on/
off. Change the route criteria. Search for a special destination. Display traffic bulletins. Interactive map. Set the map view. Change the scale.To change to the function bar, move the con‐
troller to the left.
Changing the map section
"Interactive map"
▷To shift the map: move the controller in the
required direction.▷To shift the map diagonally: move the con‐
troller in the required direction and turn it.
Changing the scale
1. Select the symbol.2.To change the scale: turn the controller.
Automatically scaled map scale
In the map view facing north, turn the controller
in any direction until the AUTO scale is dis‐
played. The map shows the entire route be‐
tween the current location and the destination.
Settings for the map view
The settings are stored for the remote control
currently in use.
1."Navigation"2."Map"3."Options" Open.4."Settings"
Set the map view.
▷"Day/night mode"
Select and create the necessary settings
depending on the light conditions.
"Traffic conditions/gray map" active: the
setting is disregarded.▷"Satellite images"
Depending on availability and resolution,
satellite images are displayed in a scale of
approx. 1 mile to 600 miles/2 km to
1,000 km.▷"Perspective view in 3D"Seite 183NavigationNavigation183
Online Edition for Part no. 01 40 2 607 879 - 09 11 490
Page 190 of 335
ToneVehicle equipment
All standard, country-specific and optional
equipment that is offered in the model series is
described in this chapter. Therefore, equipment
is also described that is not available in a vehicle,
e. g., because of the selected optional equip‐
ment or country variant. This also applies for
safety-related functions and systems.
General information
The sound settings are stored for the remote
control currently in use.
Treble, bass, balance, and
fader▷"Treble": treble adjustment.▷"Bass": depth adjustment.▷"Balance": left/right volume distribution.▷"Fader": front/rear volume distribution.
Setting treble, bass, balance, and fader
1."CD/Multimedia", "Radio" or "Settings"2."Tone"3.Select the desired tone settings.4.To adjust: turn the controller.5.To store: press the controller.
Equalizer
Setting for individual audio frequency ranges.
Adjusting the equalizer
1."CD/Multimedia", "Radio" or "Settings"2."Tone"3."Equalizer"4.Select the desired setting.5.To adjust: turn the controller.6.To store: press the controller.Seite 190EntertainmentTone190
Online Edition for Part no. 01 40 2 607 879 - 09 11 490
Page 192 of 335
RadioVehicle equipment
All standard, country-specific and optional
equipment that is offered in the model series is
described in this chapter. Therefore, equipment
is also described that is not available in a vehicle,
e. g., because of the selected optional equip‐
ment or country variant. This also applies for
safety-related functions and systems.
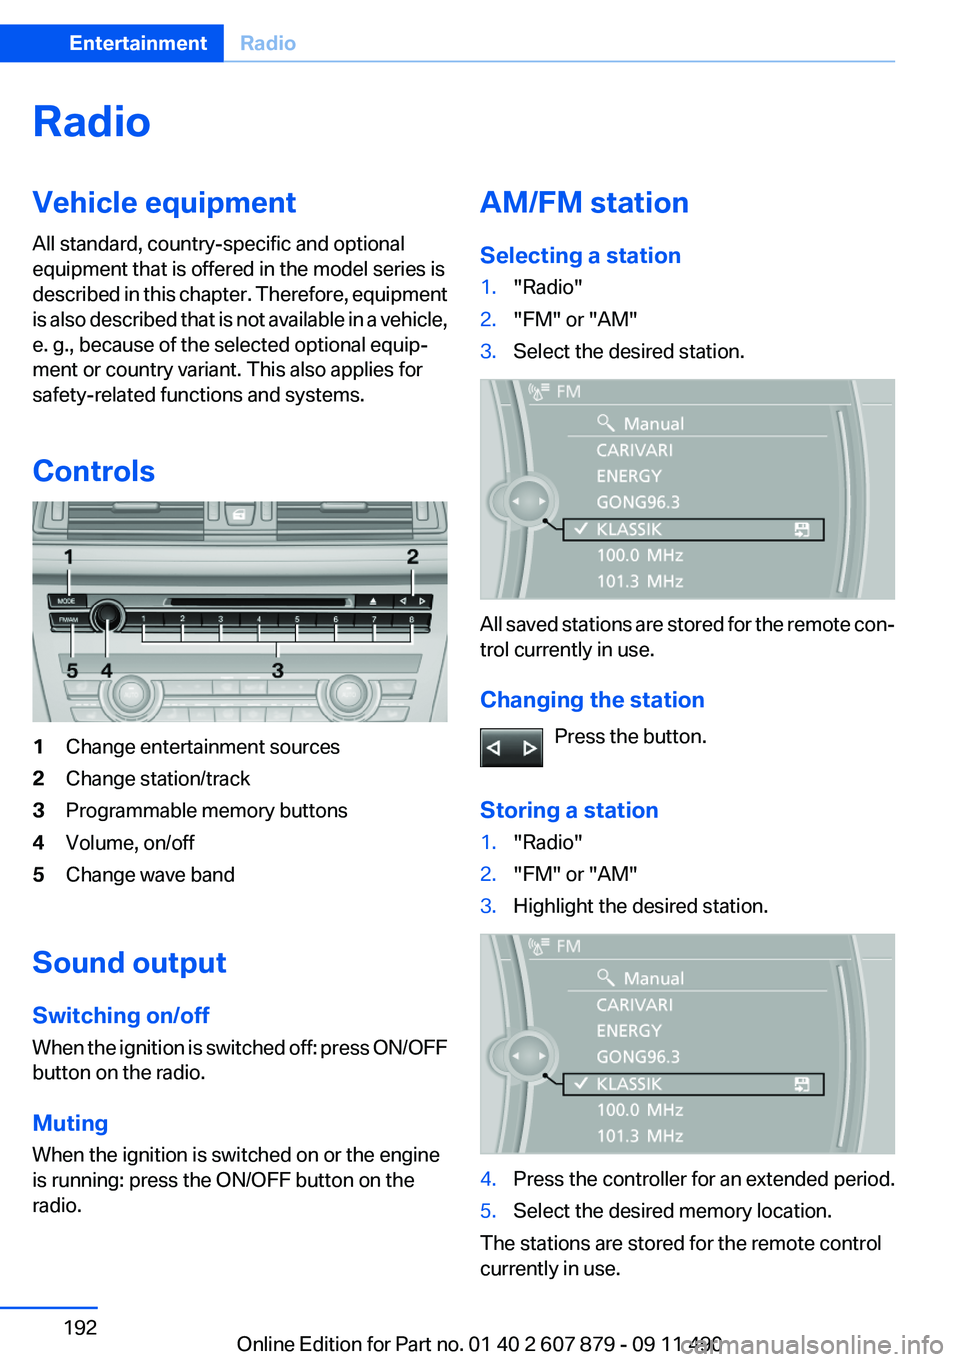
Controls1Change entertainment sources2Change station/track3Programmable memory buttons4Volume, on/off5Change wave band
Sound output
Switching on/off
When the ignition is switched off: press ON/OFF
button on the radio.
Muting
When the ignition is switched on or the engine
is running: press the ON/OFF button on the
radio.
AM/FM station
Selecting a station1."Radio"2."FM" or "AM"3.Select the desired station.
All saved stations are stored for the remote con‐
trol currently in use.
Changing the station Press the button.
Storing a station
1."Radio"2."FM" or "AM"3.Highlight the desired station.4.Press the controller for an extended period.5.Select the desired memory location.
The stations are stored for the remote control
currently in use.
Seite 192EntertainmentRadio192
Online Edition for Part no. 01 40 2 607 879 - 09 11 490
Page 193 of 335
The stations can also be stored on the program‐
mable memory buttons, refer to page 20.
Selecting a station manually
Station selection via the frequency.1."Radio"2."FM" or "AM"3."Manual"4.To select the frequency: turn the controller.
To store the station: press the controller for an
extended period.
RDS
RDS broadcasts additional information, such as
the station name, in the FM wave band.
Switching the RDS on/off
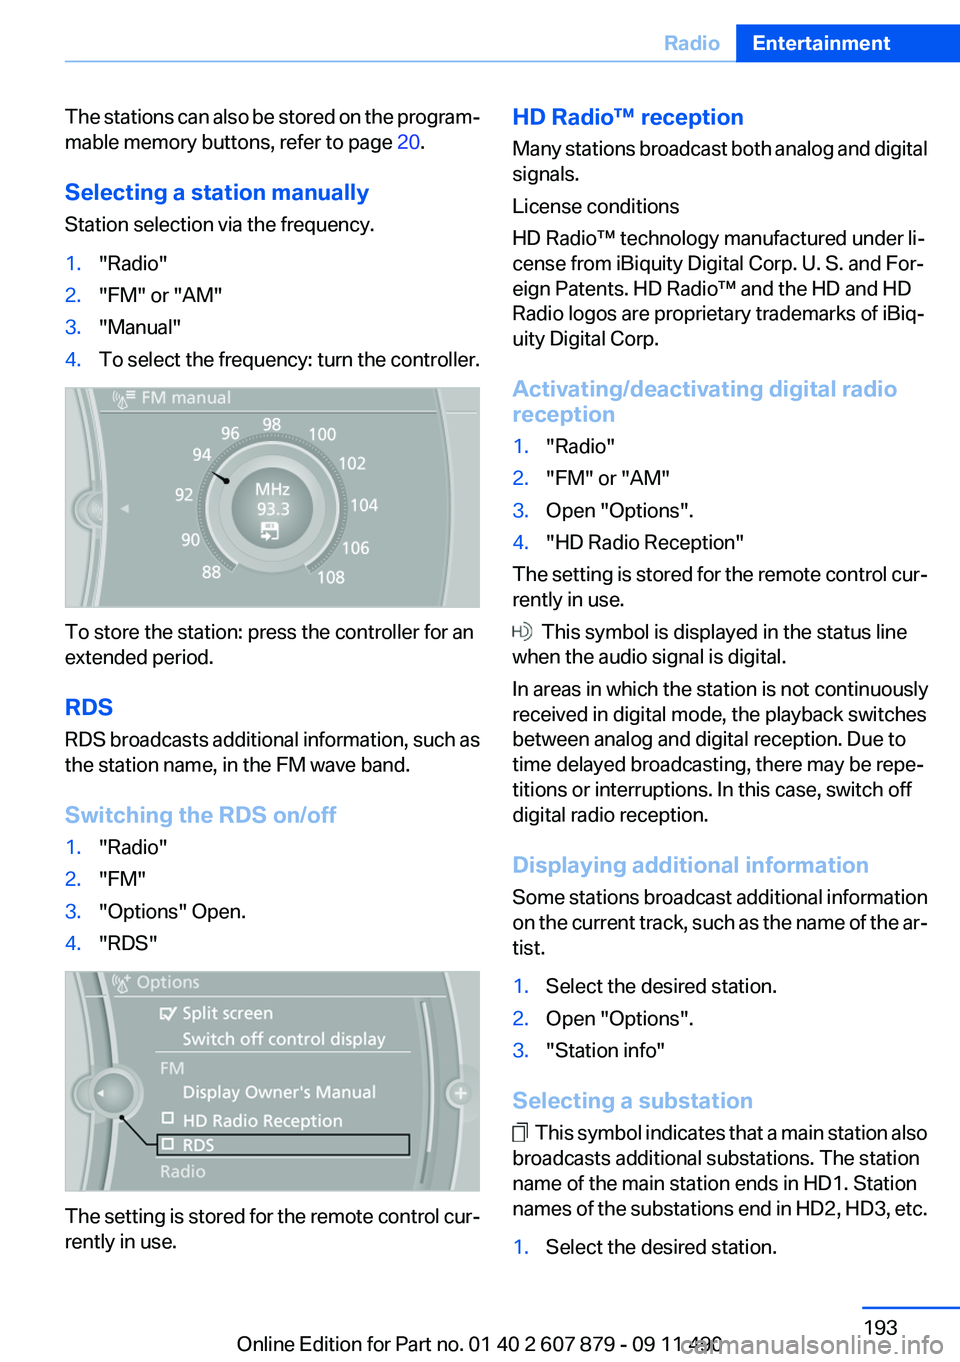
1."Radio"2."FM"3."Options" Open.4."RDS"
The setting is stored for the remote control cur‐
rently in use.
HD Radio™ reception
Many stations broadcast both analog and digital
signals.
License conditions
HD Radio™ technology manufactured under li‐
cense from iBiquity Digital Corp. U. S. and For‐
eign Patents. HD Radio™ and the HD and HD
Radio logos are proprietary trademarks of iBiq‐
uity Digital Corp.
Activating/deactivating digital radio
reception1."Radio"2."FM" or "AM"3.Open "Options".4."HD Radio Reception"
The setting is stored for the remote control cur‐
rently in use.
This symbol is displayed in the status line
when the audio signal is digital.
In areas in which the station is not continuously
received in digital mode, the playback switches
between analog and digital reception. Due to
time delayed broadcasting, there may be repe‐
titions or interruptions. In this case, switch off
digital radio reception.
Displaying additional information
Some stations broadcast additional information
on the current track, such as the name of the ar‐
tist.
1.Select the desired station.2.Open "Options".3."Station info"
Selecting a substation
This symbol indicates that a main station also
broadcasts additional substations. The station
name of the main station ends in HD1. Station
names of the substations end in HD2, HD3, etc.
1.Select the desired station.Seite 193RadioEntertainment193
Online Edition for Part no. 01 40 2 607 879 - 09 11 490
Page 195 of 335
The phone number and an electronic serial
number, ESN, are displayed.6.Select the phone number to have the chan‐
nel enabled.
You can unsubscribe from the channels again
via this phone number.
Unsubscribing from channels
1."Radio"2."Satellite radio"3.Open "Options".4."Manage subscription"5.The phone number and an electronic serial
number, ESN, are displayed.6.Call Sirius to unsubscribe from the chan‐
nels.
Selecting channels
You can only listen to enabled channels.
The selected channel is stored for the remote
control currently in use.
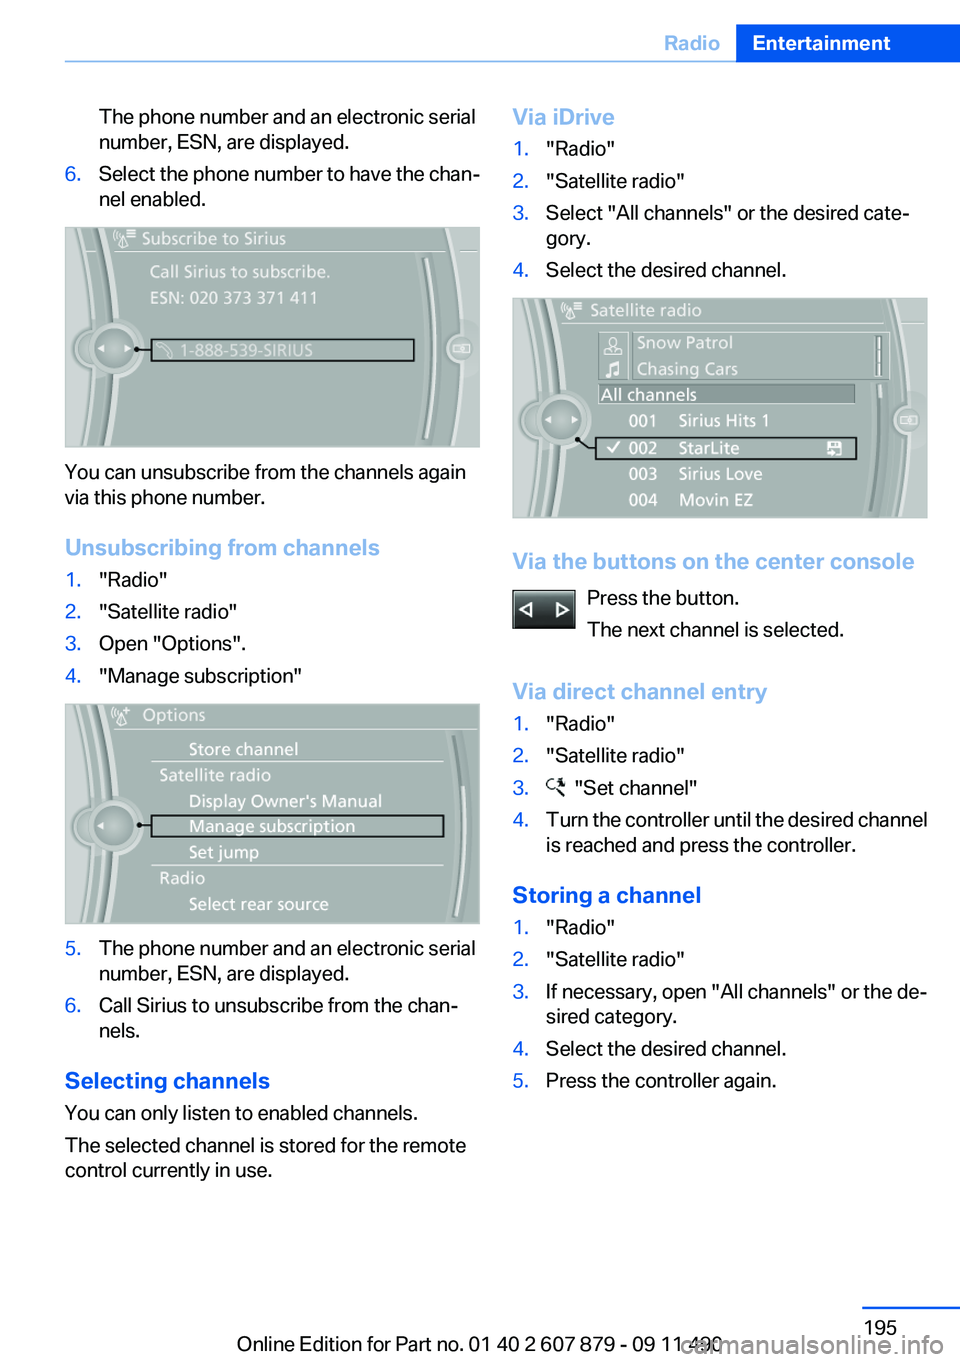
Via iDrive1."Radio"2."Satellite radio"3.Select "All channels" or the desired cate‐
gory.4.Select the desired channel.
Via the buttons on the center console
Press the button.
The next channel is selected.
Via direct channel entry
1."Radio"2."Satellite radio"3. "Set channel"4.Turn the controller until the desired channel
is reached and press the controller.
Storing a channel
1."Radio"2."Satellite radio"3.If necessary, open "All channels" or the de‐
sired category.4.Select the desired channel.5.Press the controller again.Seite 195RadioEntertainment195
Online Edition for Part no. 01 40 2 607 879 - 09 11 490
Page 196 of 335
6.Press the controller again to confirm the
highlighted channel.7.Select the desired memory location.
The channels are stored for the remote control
currently in use.
The channels can also be stored on the pro‐
grammable memory buttons, refer to page 20.
Changing the list view
The list view changes every time the first symbol
on the navigation bar is pressed.
Information on the channel is displayed.
SymbolMeaning Channel name Artist Track
Selecting a category
1."Radio"2."Satellite radio"3. "Category"4.Select the desired category.
Timeshift
Approx. one hour of the program being broad‐
cast on the channel currently being listened to
is stored in a buffer. Prerequisite: the signal must
be available.
The stored audio track can be played with a de‐
lay following the live broadcast. When the buffer
is full, the older tracks are overwritten. The buf‐
fer is cleared when a new channel is selected.
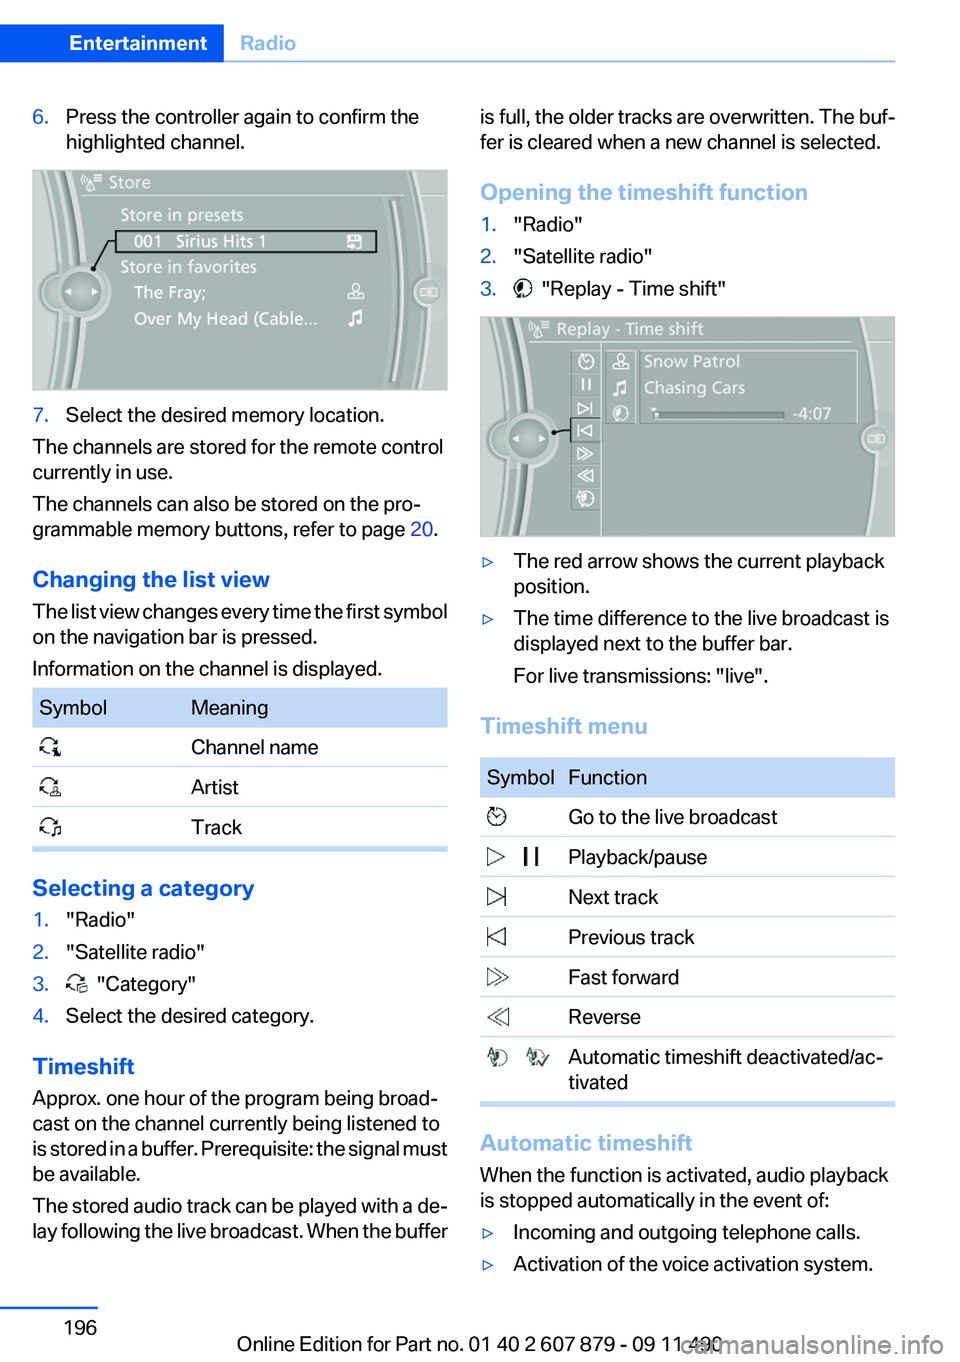
Opening the timeshift function1."Radio"2."Satellite radio"3. "Replay - Time shift"▷The red arrow shows the current playback
position.▷The time difference to the live broadcast is
displayed next to the buffer bar.
For live transmissions: "live".
Timeshift menu
SymbolFunction Go to the live broadcast Playback/pause Next track Previous track Fast forward Reverse Automatic timeshift deactivated/ac‐
tivated
Automatic timeshift
When the function is activated, audio playback
is stopped automatically in the event of:
▷Incoming and outgoing telephone calls.▷Activation of the voice activation system.Seite 196EntertainmentRadio196
Online Edition for Part no. 01 40 2 607 879 - 09 11 490