2012 BMW 535I light
[x] Cancel search: lightPage 218 of 335
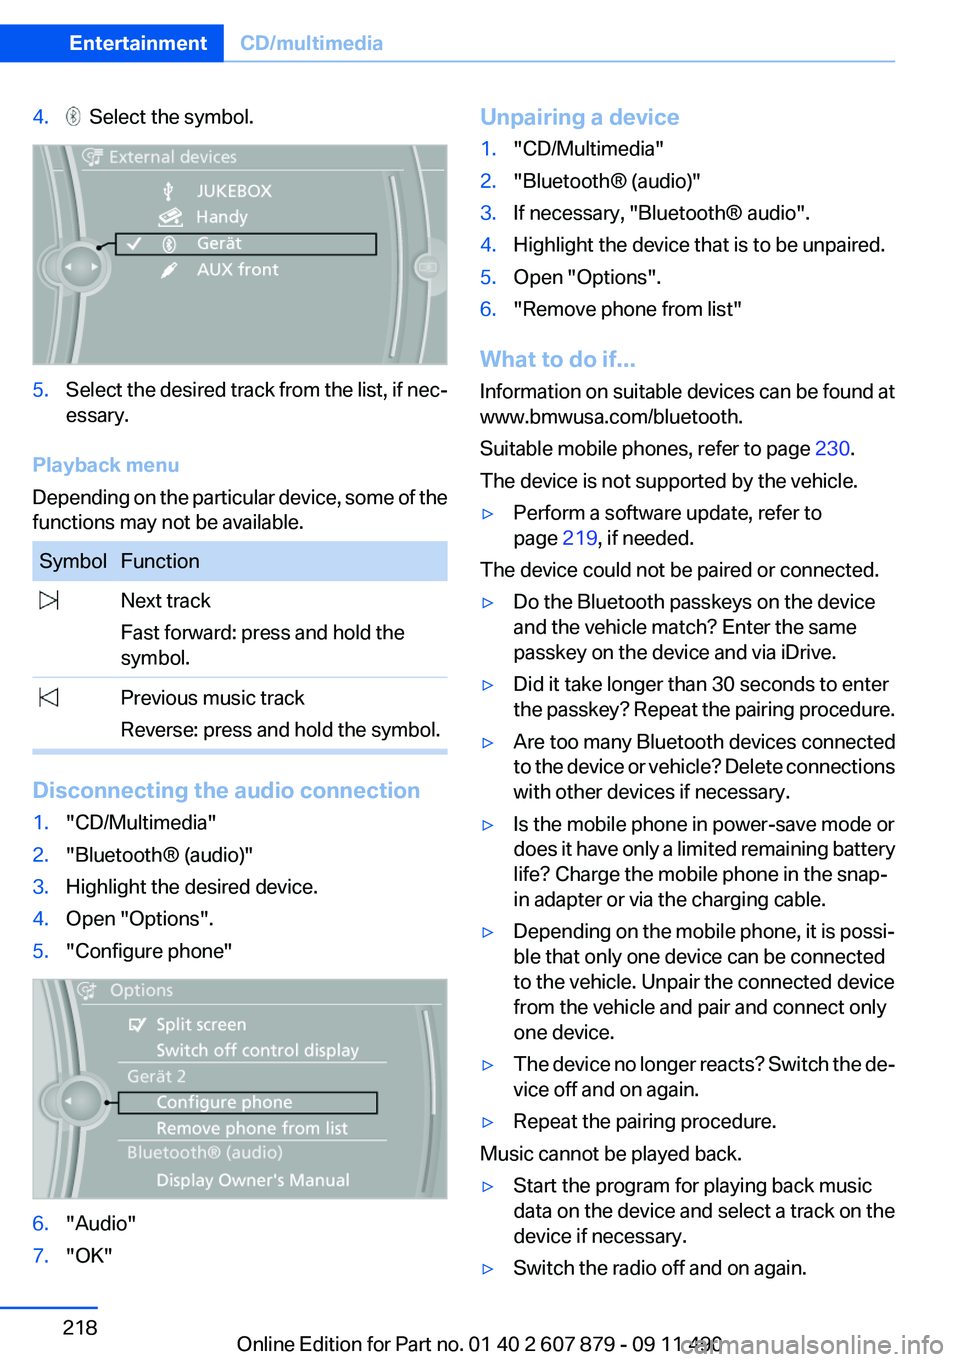
4. Select the symbol.5.Select the desired track from the list, if nec‐
essary.
Playback menu
Depending on the particular device, some of the
functions may not be available.
SymbolFunction Next track
Fast forward: press and hold the
symbol. Previous music track
Reverse: press and hold the symbol.
Disconnecting the audio connection
1."CD/Multimedia"2."Bluetooth® (audio)"3.Highlight the desired device.4.Open "Options".5."Configure phone"6."Audio"7."OK"Unpairing a device1."CD/Multimedia"2."Bluetooth® (audio)"3.If necessary, "Bluetooth® audio".4.Highlight the device that is to be unpaired.5.Open "Options".6."Remove phone from list"
What to do if...
Information on suitable devices can be found at
www.bmwusa.com/bluetooth.
Suitable mobile phones, refer to page 230.
The device is not supported by the vehicle.
▷Perform a software update, refer to
page 219, if needed.
The device could not be paired or connected.
▷Do the Bluetooth passkeys on the device
and the vehicle match? Enter the same
passkey on the device and via iDrive.▷Did it take longer than 30 seconds to enter
the passkey? Repeat the pairing procedure.▷Are too many Bluetooth devices connected
to the device or vehicle? Delete connections
with other devices if necessary.▷Is the mobile phone in power-save mode or
does it have only a limited remaining battery
life? Charge the mobile phone in the snap-
in adapter or via the charging cable.▷Depending on the mobile phone, it is possi‐
ble that only one device can be connected
to the vehicle. Unpair the connected device
from the vehicle and pair and connect only
one device.▷The device no longer reacts? Switch the de‐
vice off and on again.▷Repeat the pairing procedure.
Music cannot be played back.
▷Start the program for playing back music
data on the device and select a track on the
device if necessary.▷Switch the radio off and on again.Seite 218EntertainmentCD/multimedia218
Online Edition for Part no. 01 40 2 607 879 - 09 11 490
Page 222 of 335
Notes▷Do not cover lower screen edge, since this
is where the sensors and the infrared inter‐
face are installed.▷When loading the rear seats and adjusting
the backrest of the front seat, fold in the
screens.▷When using the through-loading system,
fold the screens down.▷When cleaning the screen, follow the care
instructions, refer to page 307.
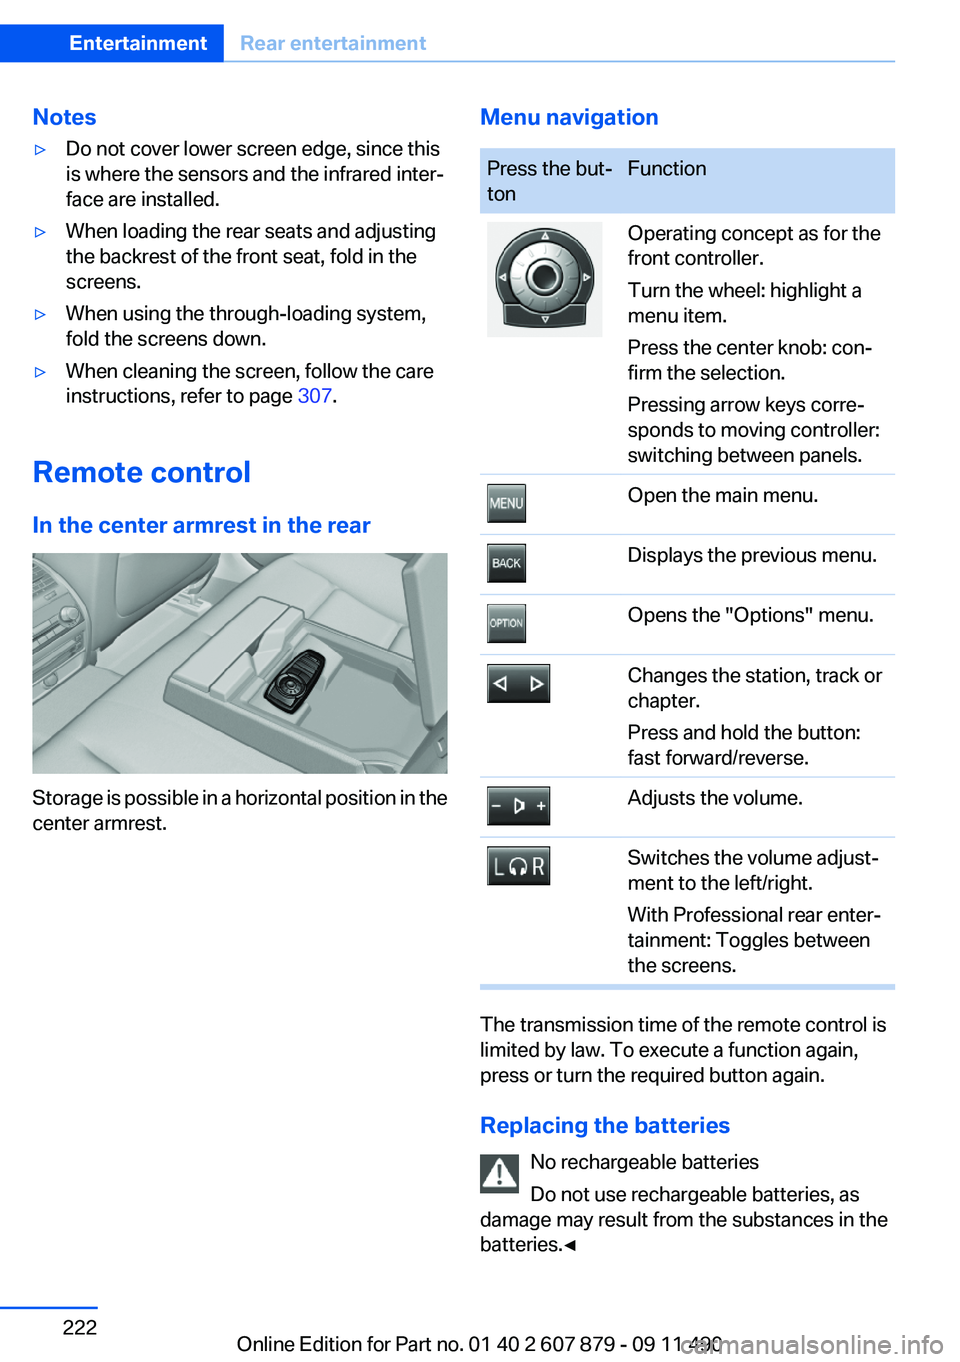
Remote control
In the center armrest in the rear
Storage is possible in a horizontal position in the
center armrest.
Menu navigationPress the but‐
tonFunctionOperating concept as for the
front controller.
Turn the wheel: highlight a
menu item.
Press the center knob: con‐
firm the selection.
Pressing arrow keys corre‐
sponds to moving controller:
switching between panels.Open the main menu.Displays the previous menu.Opens the "Options" menu.Changes the station, track or
chapter.
Press and hold the button:
fast forward/reverse.Adjusts the volume.Switches the volume adjust‐
ment to the left/right.
With Professional rear enter‐
tainment: Toggles between
the screens.
The transmission time of the remote control is
limited by law. To execute a function again,
press or turn the required button again.
Replacing the batteries No rechargeable batteries
Do not use rechargeable batteries, as
damage may result from the substances in the
batteries.◀
Seite 222EntertainmentRear entertainment222
Online Edition for Part no. 01 40 2 607 879 - 09 11 490
Page 225 of 335
The rear has priority▷When the source selected in the rear is
played on headphones, it can be selected
but not operated via iDrive in the front. Other
audio or video sources can be operated.▷Sound is output in the rear via headphones:
the source selected via the iDrive in the front
is output on the vehicle loudspeakers.▷Sound is output via loudspeakers: the
source selected in the rear is output on the
vehicle loudspeakers. Audio or video sour‐
ces cannot be selected via the iDrive in the
front.
Switching off the rear DVD
▷Rear entertainment is switched off.▷To switch rear entertainment back on: select
a different priority via the iDrive in the front
and switch on the system, refer to
page 221.
Headphones, vehicle
loudspeakers
Connecting the headphones
Normal headphones
Connect via the jack 1/8"/3.5 mm, refer to
page 221, on the rear CD/DVD player.
Infrared headphones
Connection via the infrared interface on the
lower edge of the screen.
Fitting infrared headphones and information on
which headphones are supported can be ob‐
tained from your service center.
When using infrared headphones, ensure that
the connection between the headphones and
the infrared interface is not disrupted:
▷Do not place an obstacle between the inter‐
face and headphones.▷Do not cover the interface.▷Do not scratch the interface.
Fold up display screens for interference-free re‐
ception.
Unfavorable light conditions such as bright am‐
bient light can impair reception.
Sound output on the headphones or
vehicle loudspeakers
Operation is only possible in the rear.
1."Options" Open.2."Headphones" or"Loudspeakers"
With the following setting, sound output in the
rear is not possible via the vehicle speakers:
"Driver control".
External devices
General information
External audio and video devices and digital
cameras can be connected to cinch sockets, re‐
fer to page 221, on the CD/DVD player. Opera‐
tion takes place on the external device.
Due to the large number of different audio and
video devices available on the market, it cannot
be ensured that every audio and video device
will be displayed correctly on the screen.
Connecting an external device
1.Fold down the cover in front of the cinch
sockets on the CD/DVD player.2.Connect the external device to the RCA
sockets.▷Video: yellow socket.▷Audio: white and red socket.
Starting playback
1."CD/Multimedia"2."External devices"3.Select the or symbol.Seite 225Rear entertainmentEntertainment225
Online Edition for Part no. 01 40 2 607 879 - 09 11 490
Page 233 of 335
Configuring cell phone
Additional functions can be activated or deacti‐
vated for paired and connected mobile phones.1."Telephone"2."Bluetooth® (phone)"3.Highlight the mobile phone to be config‐
ured.4."Options" Open.5."Configure phone"6.At least one function must be selected.▷"Telephone"▷"Additional telephone"▷"Audio"7."OK"
If a function is assigned to a mobile phone, the
function will be deactivated where appropriate
for a mobile phone that is already connected and
the mobile phone will be unpaired.
Swapping the telephone and additional
telephone
The function of the telephone and additional tel‐
ephone can be swapped automatically.
1."Telephone"2."Bluetooth® (phone)"3."Swap phone/addit. phone"
Unpairing the mobile phone
1."Telephone"2."Bluetooth® (phone)"3.Highlight the mobile phone that is to be un‐
paired.4."Options" Open.5."Remove phone from list"
What to do if...
Information on suitable mobile phones, refer to
page 230.
The mobile phone could not be paired or con‐
nected.
▷Is Bluetooth activated in the vehicle and on
the mobile phone? Activate Bluetooth in the
vehicle and on the mobile phone.▷Do the Bluetooth passkeys on the mobile
phone and the vehicle match? Enter the
same passkey on the mobile phone and via
iDrive.▷Did it take longer than 30 seconds to enter
the passkey? Repeat the pairing procedure.▷Are too many Bluetooth devices connected
to the mobile phone or vehicle? Delete con‐
nections with other devices if necessary.▷Is the audio connection activated? Deacti‐
vate the audio connection.▷Is the mobile phone in power-save mode or
does it have only a limited remaining battery
life? Charge the mobile phone in the snap-
in adapter or via the charging cable.▷Depending on the mobile phone, it is possi‐
ble that only one cell phone can be con‐
nected to the vehicle. Unpair the connected
cell phone from the vehicle and pair and con‐
nect only one cell phone.
The mobile phone no longer reacts.
▷Switch the mobile phone off and on again.▷Ambient temperatures too high or too low?
Do not subject the mobile phone to extreme
ambient temperatures.
The telephone functions are not available.
▷Is the mobile phone paired as an additional
telephone and is the additional telephone
function deactivated? Activate the function.▷Is an outgoing call not possible? Connect
the mobile phone as a telephone.
No or not all phone book entries are displayed,
or they are incomplete.
▷Transmission of the phone book entries is
not yet complete.▷It is possible that only the phone book en‐
tries of the mobile phone or the SIM card are
transmitted.Seite 233TelephoneCommunication233
Online Edition for Part no. 01 40 2 607 879 - 09 11 490
Page 237 of 335
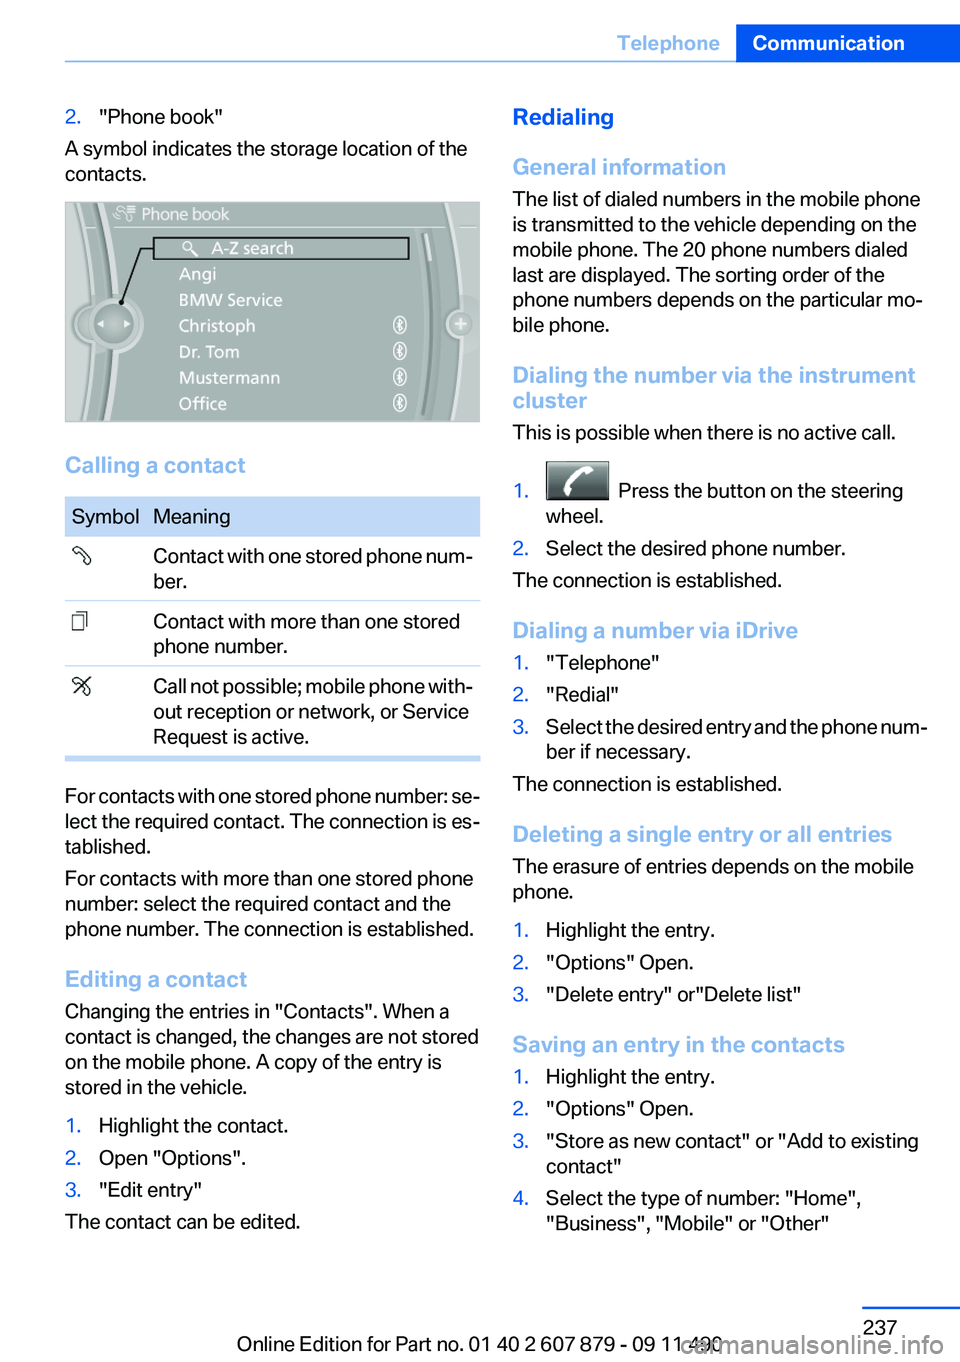
2."Phone book"
A symbol indicates the storage location of the
contacts.
Calling a contact
SymbolMeaning Contact with one stored phone num‐
ber. Contact with more than one stored
phone number. Call not possible; mobile phone with‐
out reception or network, or Service
Request is active.
For contacts with one stored phone number: se‐
lect the required contact. The connection is es‐
tablished.
For contacts with more than one stored phone
number: select the required contact and the
phone number. The connection is established.
Editing a contact
Changing the entries in "Contacts". When a
contact is changed, the changes are not stored
on the mobile phone. A copy of the entry is
stored in the vehicle.
1.Highlight the contact.2.Open "Options".3."Edit entry"
The contact can be edited.
Redialing
General information
The list of dialed numbers in the mobile phone
is transmitted to the vehicle depending on the
mobile phone. The 20 phone numbers dialed
last are displayed. The sorting order of the
phone numbers depends on the particular mo‐
bile phone.
Dialing the number via the instrument
cluster
This is possible when there is no active call.1. Press the button on the steering
wheel.2.Select the desired phone number.
The connection is established.
Dialing a number via iDrive
1."Telephone"2."Redial"3.Select the desired entry and the phone num‐
ber if necessary.
The connection is established.
Deleting a single entry or all entries
The erasure of entries depends on the mobile
phone.
1.Highlight the entry.2."Options" Open.3."Delete entry" or"Delete list"
Saving an entry in the contacts
1.Highlight the entry.2."Options" Open.3."Store as new contact" or "Add to existing
contact"4.Select the type of number: "Home",
"Business", "Mobile" or "Other"Seite 237TelephoneCommunication237
Online Edition for Part no. 01 40 2 607 879 - 09 11 490
Page 238 of 335
5.Complete the entries if necessary.6.If necessary, "Store contact in vehicle".
Received calls
Displaying calls
The 20 calls that were last received are dis‐
played.
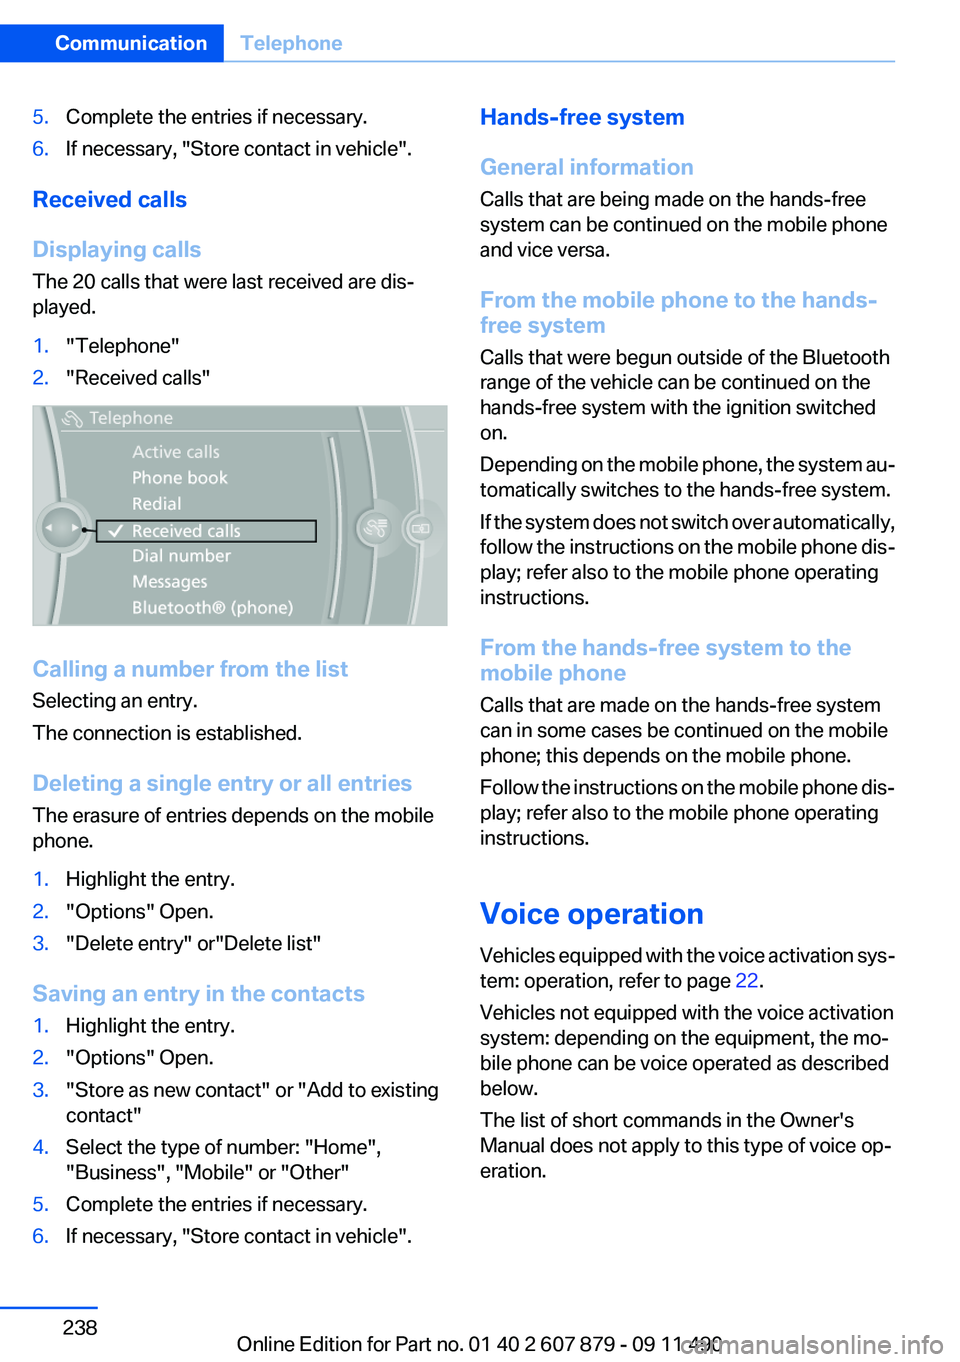
1."Telephone"2."Received calls"
Calling a number from the list
Selecting an entry.
The connection is established.
Deleting a single entry or all entries
The erasure of entries depends on the mobile
phone.
1.Highlight the entry.2."Options" Open.3."Delete entry" or"Delete list"
Saving an entry in the contacts
1.Highlight the entry.2."Options" Open.3."Store as new contact" or "Add to existing
contact"4.Select the type of number: "Home",
"Business", "Mobile" or "Other"5.Complete the entries if necessary.6.If necessary, "Store contact in vehicle".Hands-free system
General information
Calls that are being made on the hands-free
system can be continued on the mobile phone
and vice versa.
From the mobile phone to the hands-
free system
Calls that were begun outside of the Bluetooth
range of the vehicle can be continued on the
hands-free system with the ignition switched
on.
Depending on the mobile phone, the system au‐
tomatically switches to the hands-free system.
If the system does not switch over automatically,
follow the instructions on the mobile phone dis‐
play; refer also to the mobile phone operating
instructions.
From the hands-free system to the
mobile phone
Calls that are made on the hands-free system
can in some cases be continued on the mobile
phone; this depends on the mobile phone.
Follow the instructions on the mobile phone dis‐
play; refer also to the mobile phone operating
instructions.
Voice operation
Vehicles equipped with the voice activation sys‐
tem: operation, refer to page 22.
Vehicles not equipped with the voice activation
system: depending on the equipment, the mo‐
bile phone can be voice operated as described
below.
The list of short commands in the Owner's
Manual does not apply to this type of voice op‐
eration.Seite 238CommunicationTelephone238
Online Edition for Part no. 01 40 2 607 879 - 09 11 490
Page 244 of 335
tained in the vehicle. The address can be
checked for this purpose.1.Select the desired contact and highlight the
address.2.Open "Options".3."Check as destination"4.Correct and store the address if necessary.
If the address is corrected and stored, a copy of
it is stored in the vehicle. The address is not
changed on the mobile phone.
New contact
General information
A contact can have up to 8 phone numbers,
2 addresses, 3 e-mail addresses and one Inter‐
net address.
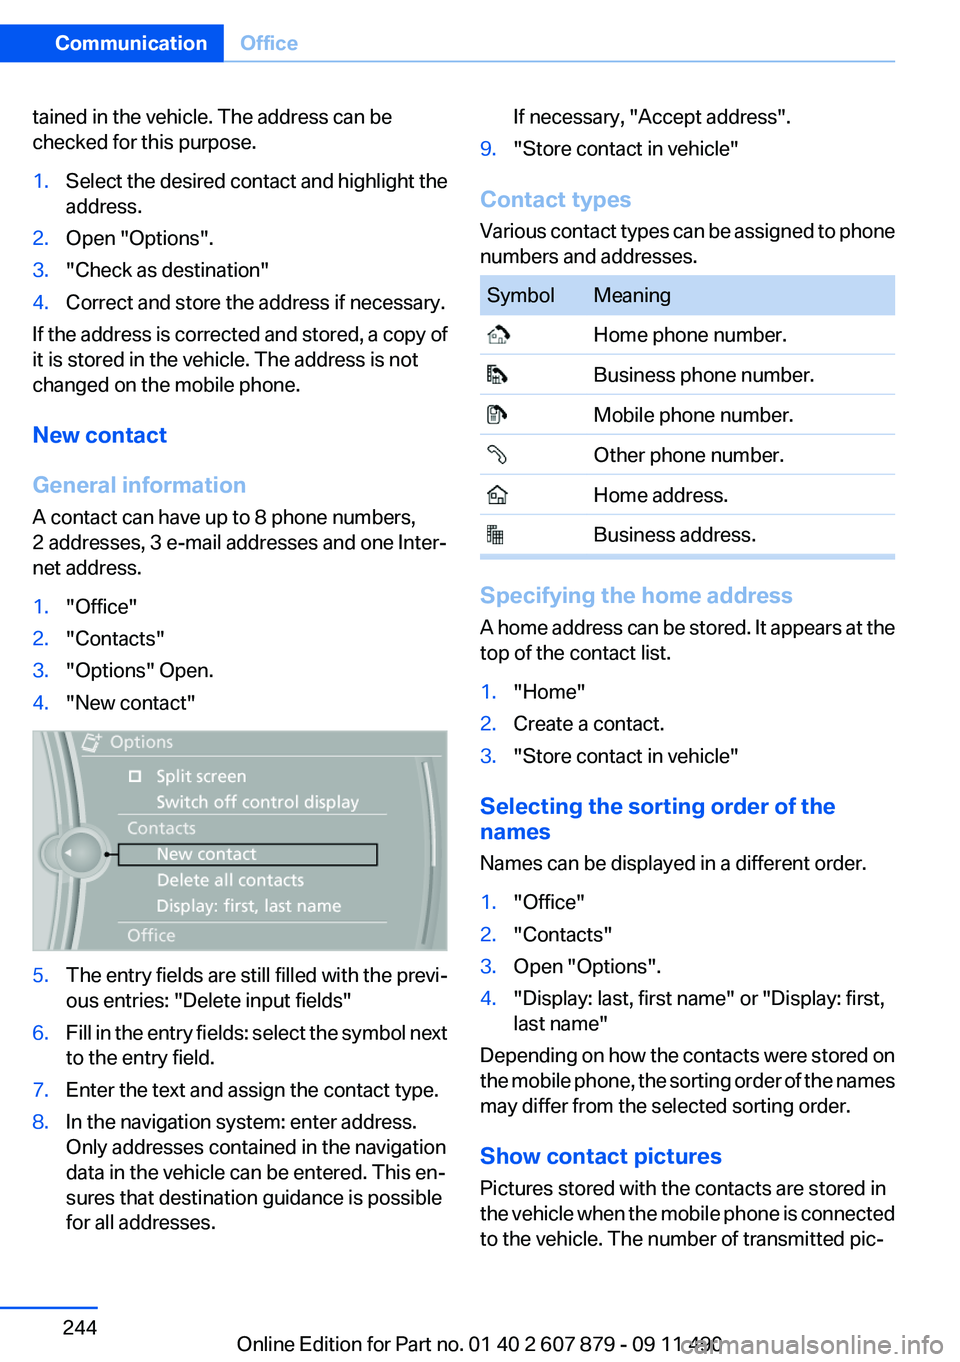
1."Office"2."Contacts"3."Options" Open.4."New contact"5.The entry fields are still filled with the previ‐
ous entries: "Delete input fields"6.Fill in the entry fields: select the symbol next
to the entry field.7.Enter the text and assign the contact type.8.In the navigation system: enter address.
Only addresses contained in the navigation
data in the vehicle can be entered. This en‐
sures that destination guidance is possible
for all addresses.If necessary, "Accept address".9."Store contact in vehicle"
Contact types
Various contact types can be assigned to phone
numbers and addresses.
SymbolMeaning Home phone number. Business phone number. Mobile phone number. Other phone number. Home address. Business address.
Specifying the home address
A home address can be stored. It appears at the
top of the contact list.
1."Home"2.Create a contact.3."Store contact in vehicle"
Selecting the sorting order of the
names
Names can be displayed in a different order.
1."Office"2."Contacts"3.Open "Options".4."Display: last, first name" or "Display: first,
last name"
Depending on how the contacts were stored on
the mobile phone, the sorting order of the names
may differ from the selected sorting order.
Show contact pictures
Pictures stored with the contacts are stored in
the vehicle when the mobile phone is connected
to the vehicle. The number of transmitted pic‐
Seite 244CommunicationOffice244
Online Edition for Part no. 01 40 2 607 879 - 09 11 490
Page 245 of 335
tures depends on the mobile phone. The mobile
phone must support this function.1."Office"2."Contacts"3."Options" Open.4."Configure Bluetooth®"5."Show images"
Display of all contact pictures is activated or de‐
activated.
Exporting/importing contacts
Contacts can be exported and imported via the
Personal Profile, refer to page 31. The contacts
stored in the vehicle are exported, but not those
from the mobile phone.
Deleting contacts
Only contacts that are stored in the vehicle are
deleted. The contacts on the mobile phone can‐
not be deleted.
1."Office"2."Contacts"3.Highlight the contact.4.Open "Options".5."Delete contact"or "Delete all contacts".6.If necessary. "Yes"
Messages
General information
Whether or not text messages and e-mails from
the mobile phone are displayed depends on
whether transmission from the mobile phone to
the vehicle is supported. Text messages and e-
mails may not be supported by the service pro‐
vider, or the function may need to be enabled
separately. After the mobile phone is first paired,
transmission may take several minutes. Mes‐
sages are only displayed in full length when the
vehicle is stationary. Messages from the addi‐
tional telephone are not transmitted.
Displaying messages1."Office"2."Messages"
A symbol identifies the type of message.
SymbolMessage type Text messages. My Info Message from the Concierge serv‐
ice. Message from BMW Info. E-mail from mobile phone.
Filtering the message list
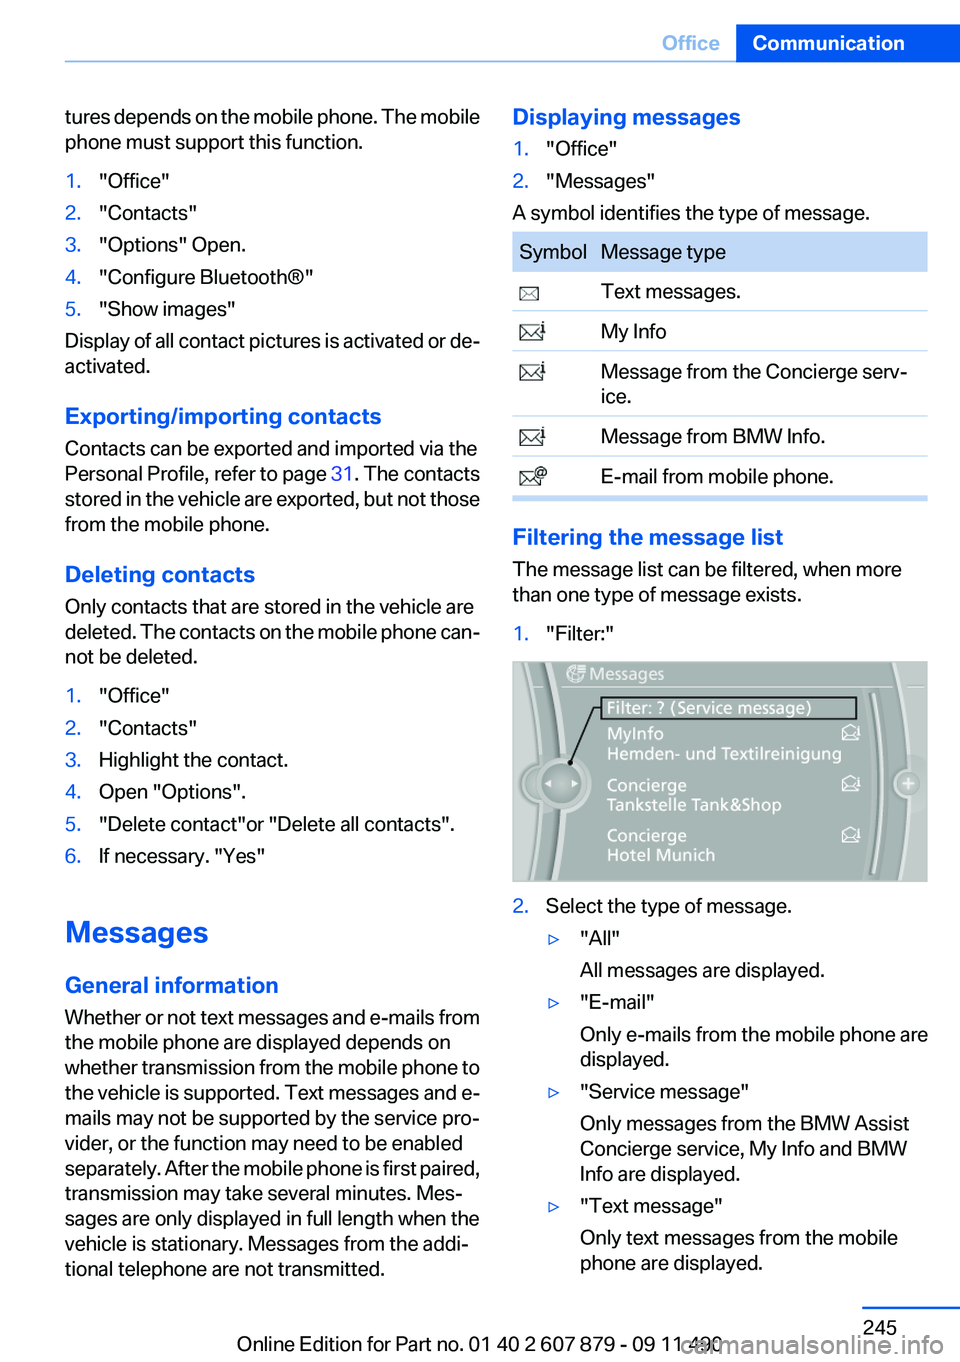
The message list can be filtered, when more
than one type of message exists.
1."Filter:"2.Select the type of message.▷"All"
All messages are displayed.▷"E-mail"
Only e-mails from the mobile phone are
displayed.▷"Service message"
Only messages from the BMW Assist
Concierge service, My Info and BMW
Info are displayed.▷"Text message"
Only text messages from the mobile
phone are displayed.Seite 245OfficeCommunication245
Online Edition for Part no. 01 40 2 607 879 - 09 11 490