2012 BMW 535I GRAN TURISMO change time
[x] Cancel search: change timePage 200 of 321
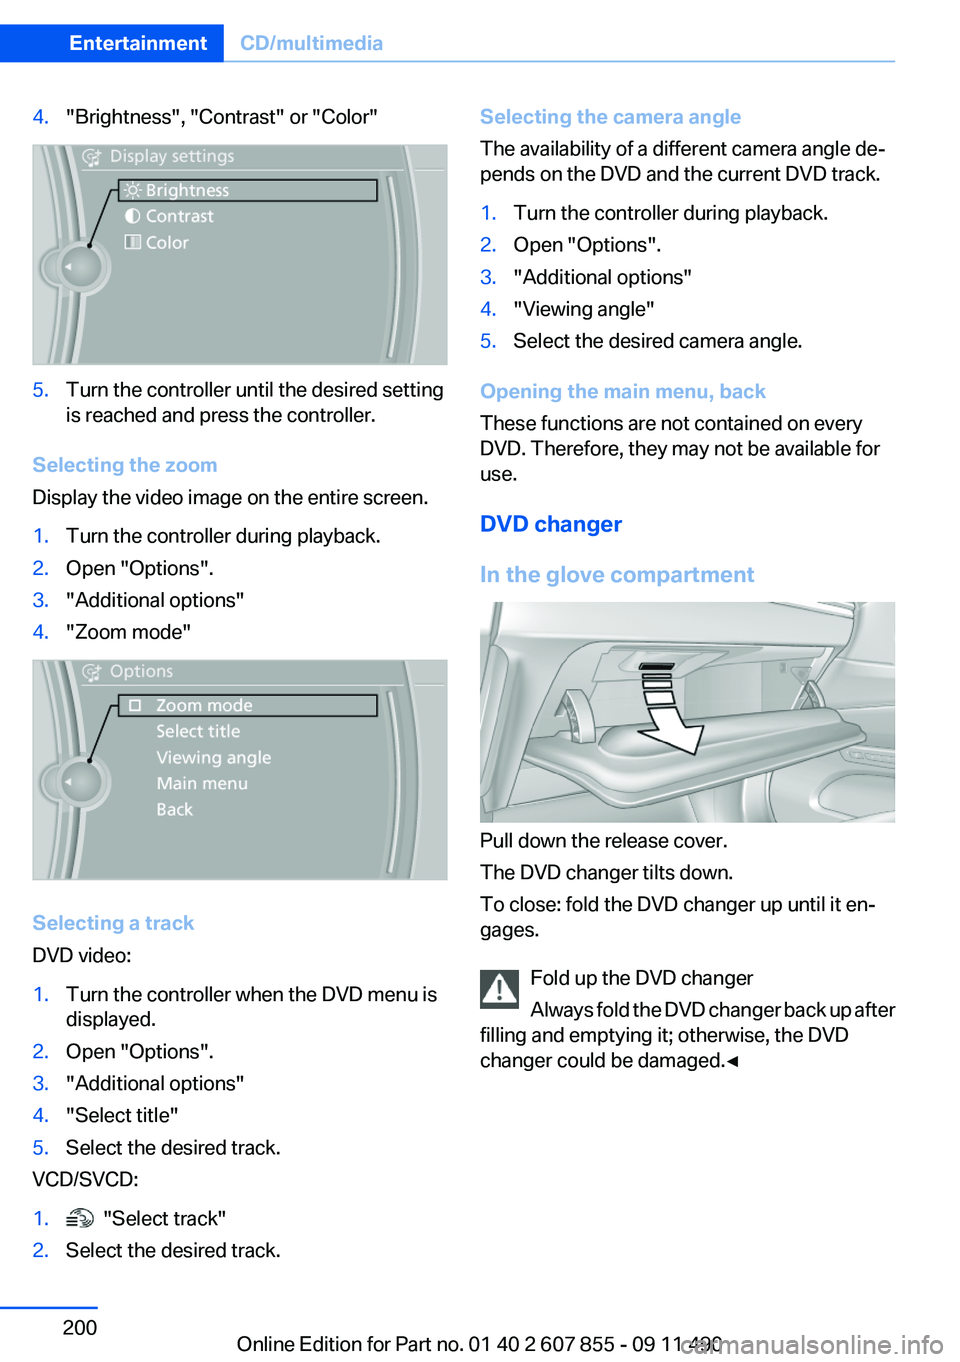
4."Brightness", "Contrast" or "Color"5.Turn the controller until the desired setting
is reached and press the controller.
Selecting the zoom
Display the video image on the entire screen.
1.Turn the controller during playback.2.Open "Options".3."Additional options"4."Zoom mode"
Selecting a track
DVD video:
1.Turn the controller when the DVD menu is
displayed.2.Open "Options".3."Additional options"4."Select title"5.Select the desired track.
VCD/SVCD:
1. "Select track"2.Select the desired track.Selecting the camera angle
The availability of a different camera angle de‐
pends on the DVD and the current DVD track.1.Turn the controller during playback.2.Open "Options".3."Additional options"4."Viewing angle"5.Select the desired camera angle.
Opening the main menu, back
These functions are not contained on every
DVD. Therefore, they may not be available for
use.
DVD changer
In the glove compartment
Pull down the release cover.
The DVD changer tilts down.
To close: fold the DVD changer up until it en‐
gages.
Fold up the DVD changer
Always fold the DVD changer back up after
filling and emptying it; otherwise, the DVD
changer could be damaged.◀
Seite 200EntertainmentCD/multimedia200
Online Edition for Part no. 01 40 2 607 855 - 09 11 490
Page 201 of 321
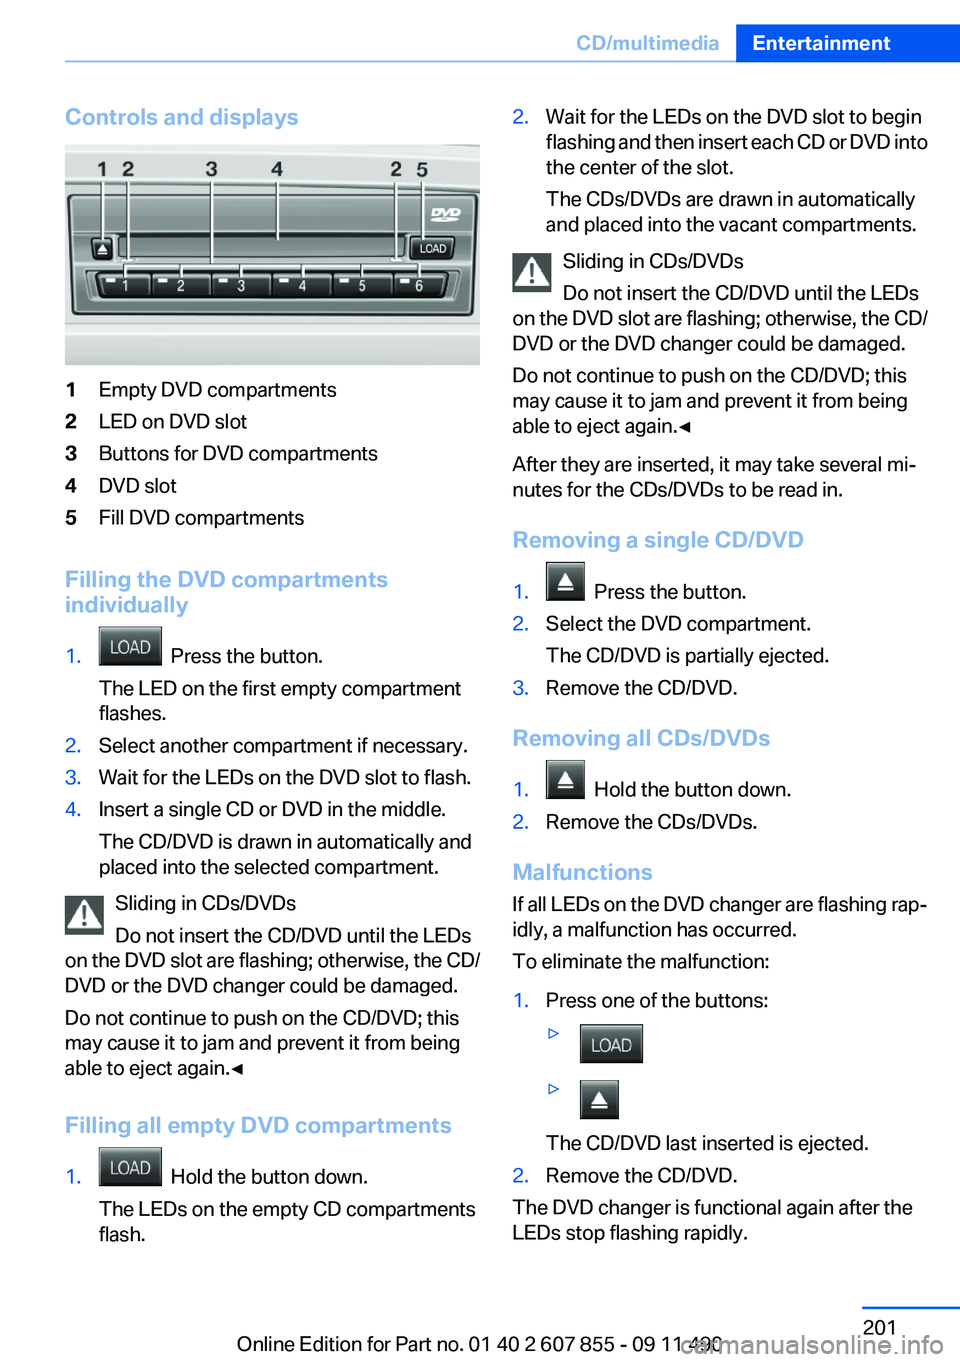
Controls and displays1Empty DVD compartments2LED on DVD slot3Buttons for DVD compartments4DVD slot5Fill DVD compartments
Filling the DVD compartments
individually
1. Press the button.
The LED on the first empty compartment
flashes.2.Select another compartment if necessary.3.Wait for the LEDs on the DVD slot to flash.4.Insert a single CD or DVD in the middle.
The CD/DVD is drawn in automatically and
placed into the selected compartment.
Sliding in CDs/DVDs
Do not insert the CD/DVD until the LEDs
on the DVD slot are flashing; otherwise, the CD/
DVD or the DVD changer could be damaged.
Do not continue to push on the CD/DVD; this
may cause it to jam and prevent it from being
able to eject again.◀
Filling all empty DVD compartments
1. Hold the button down.
The LEDs on the empty CD compartments
flash.2.Wait for the LEDs on the DVD slot to begin
flashing and then insert each CD or DVD into
the center of the slot.
The CDs/DVDs are drawn in automatically
and placed into the vacant compartments.
Sliding in CDs/DVDs
Do not insert the CD/DVD until the LEDs
on the DVD slot are flashing; otherwise, the CD/
DVD or the DVD changer could be damaged.
Do not continue to push on the CD/DVD; this
may cause it to jam and prevent it from being
able to eject again.◀
After they are inserted, it may take several mi‐
nutes for the CDs/DVDs to be read in.
Removing a single CD/DVD
1. Press the button.2.Select the DVD compartment.
The CD/DVD is partially ejected.3.Remove the CD/DVD.
Removing all CDs/DVDs
1. Hold the button down.2.Remove the CDs/DVDs.
Malfunctions
If all LEDs on the DVD changer are flashing rap‐
idly, a malfunction has occurred.
To eliminate the malfunction:
1.Press one of the buttons:▷▷
The CD/DVD last inserted is ejected.
2.Remove the CD/DVD.
The DVD changer is functional again after the
LEDs stop flashing rapidly.
Seite 201CD/multimediaEntertainment201
Online Edition for Part no. 01 40 2 607 855 - 09 11 490
Page 202 of 321
Audio playback
The audio track of a DVD can be played back
even if video playback is not possible in the ve‐
hicle.
Only the main film without the previews or extras
can be played back.
Starting playback
A DVD is located in the DVD changer.1."CD/Multimedia"2."CD/DVD"3.Select the desired DVD.
Selecting a chapter using the button
Press the button repeatedly until the
desired chapter is played.
Selecting a chapter using iDrive
1."CD/Multimedia"2."CD/DVD"3.Select the desired DVD.4.Select the desired chapter.
Fast forward/reverse Press and hold the button.
Selecting the language
The languages that are available depend on the
DVD.
1."CD/Multimedia"2."CD/DVD"3.Select the desired DVD.4.Open "Options".5."Audio/language"6.Select the desired language.Notes
CD/DVD player and changer Do not remove the cover
BMW CD/DVD players and changers are
officially designated Class 1 laser products. Do
not operate if the cover is damaged; otherwise,
severe eye damage may occur.◀
CDs and DVDs Use of CDs/DVDs▷Do not use self-recorded CDs/DVDs
with labels applied, as these can be‐
come detached during playback due
to heat buildup and can cause irrepar‐
able damage to the device.▷Only use round CDs/DVDs with a standard
diameter of 4.7 in/12 cm and do not play
CDs/DVDs with an adapter, e.g., single CDs;
otherwise, the CDs or the adapter may jam
and no longer eject.▷Do not use combined CDs/DVDs, e.g., DVD
Plus, as the CDs/DVDs can jam and will no
longer eject.◀
General malfunctions
▷CD/DVD changers and players have been
optimized for performance in vehicles. In
some instances they may be more sensitive
to faulty CDs/DVDs than stationary devices
would be.▷If a CD/DVD cannot be played, first check
whether it has been inserted correctly.
Humidity
High levels of humidity can lead to condensation
on the CD/DVD or the laser's scan lens, and
temporarily prevent playback.
Seite 202EntertainmentCD/multimedia202
Online Edition for Part no. 01 40 2 607 855 - 09 11 490
Page 206 of 321
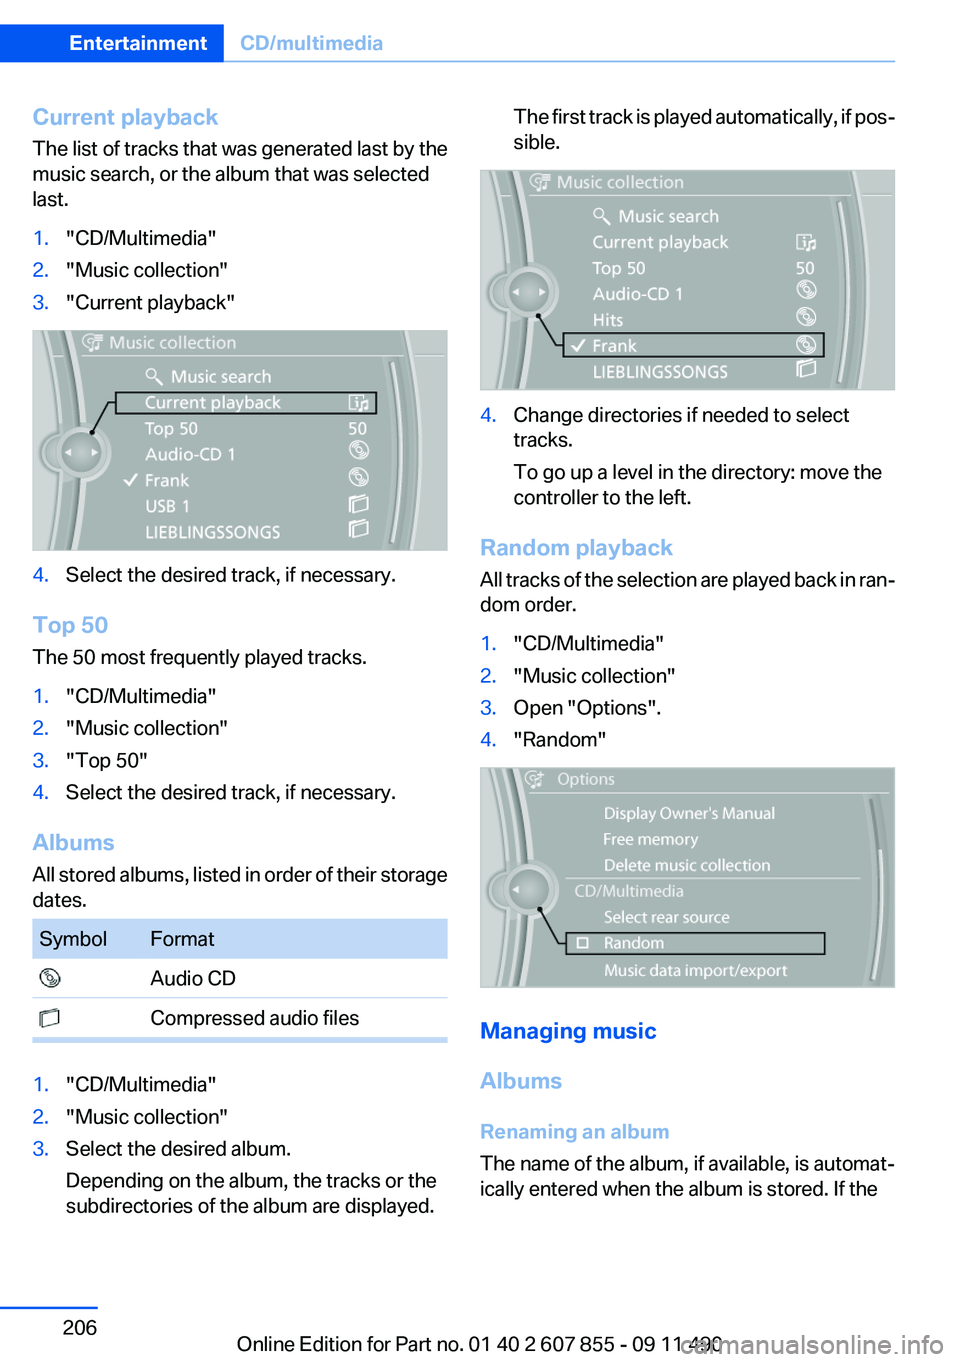
Current playback
The list of tracks that was generated last by the
music search, or the album that was selected
last.1."CD/Multimedia"2."Music collection"3."Current playback"4.Select the desired track, if necessary.
Top 50
The 50 most frequently played tracks.
1."CD/Multimedia"2."Music collection"3."Top 50"4.Select the desired track, if necessary.
Albums
All stored albums, listed in order of their storage
dates.
SymbolFormat Audio CD Compressed audio files1."CD/Multimedia"2."Music collection"3.Select the desired album.
Depending on the album, the tracks or the
subdirectories of the album are displayed.The first track is played automatically, if pos‐
sible.4.Change directories if needed to select
tracks.
To go up a level in the directory: move the
controller to the left.
Random playback
All tracks of the selection are played back in ran‐
dom order.
1."CD/Multimedia"2."Music collection"3.Open "Options".4."Random"
Managing music
Albums
Renaming an album
The name of the album, if available, is automat‐
ically entered when the album is stored. If the
Seite 206EntertainmentCD/multimedia206
Online Edition for Part no. 01 40 2 607 855 - 09 11 490
Page 207 of 321
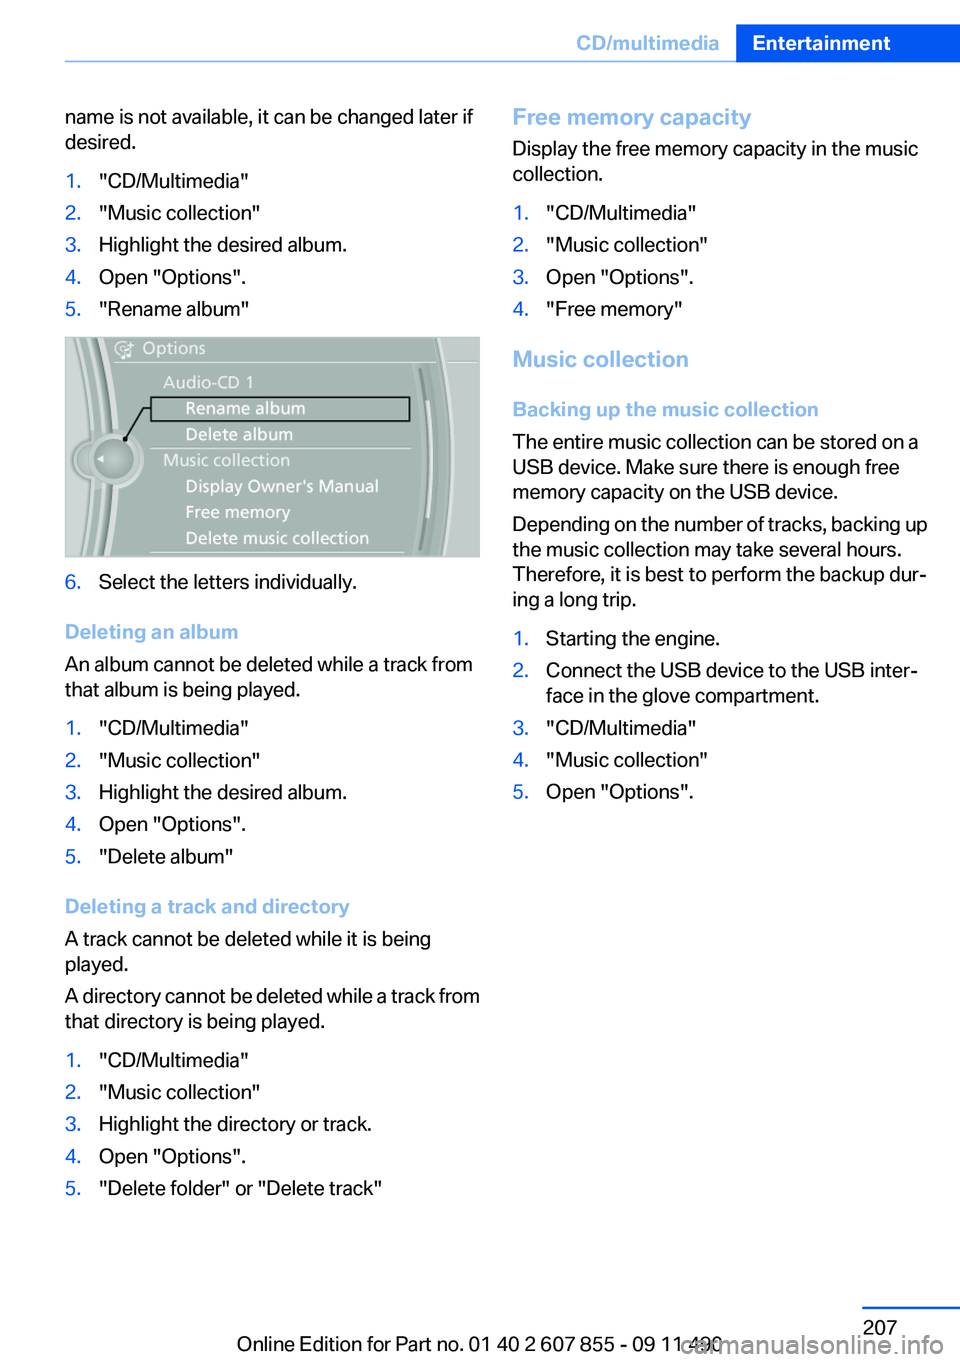
name is not available, it can be changed later if
desired.1."CD/Multimedia"2."Music collection"3.Highlight the desired album.4.Open "Options".5."Rename album"6.Select the letters individually.
Deleting an album
An album cannot be deleted while a track from
that album is being played.
1."CD/Multimedia"2."Music collection"3.Highlight the desired album.4.Open "Options".5."Delete album"
Deleting a track and directory
A track cannot be deleted while it is being
played.
A directory cannot be deleted while a track from
that directory is being played.
1."CD/Multimedia"2."Music collection"3.Highlight the directory or track.4.Open "Options".5."Delete folder" or "Delete track"Free memory capacity
Display the free memory capacity in the music
collection.1."CD/Multimedia"2."Music collection"3.Open "Options".4."Free memory"
Music collection
Backing up the music collection
The entire music collection can be stored on a
USB device. Make sure there is enough free
memory capacity on the USB device.
Depending on the number of tracks, backing up
the music collection may take several hours.
Therefore, it is best to perform the backup dur‐
ing a long trip.
1.Starting the engine.2.Connect the USB device to the USB inter‐
face in the glove compartment.3."CD/Multimedia"4."Music collection"5.Open "Options".Seite 207CD/multimediaEntertainment207
Online Edition for Part no. 01 40 2 607 855 - 09 11 490
Page 213 of 321
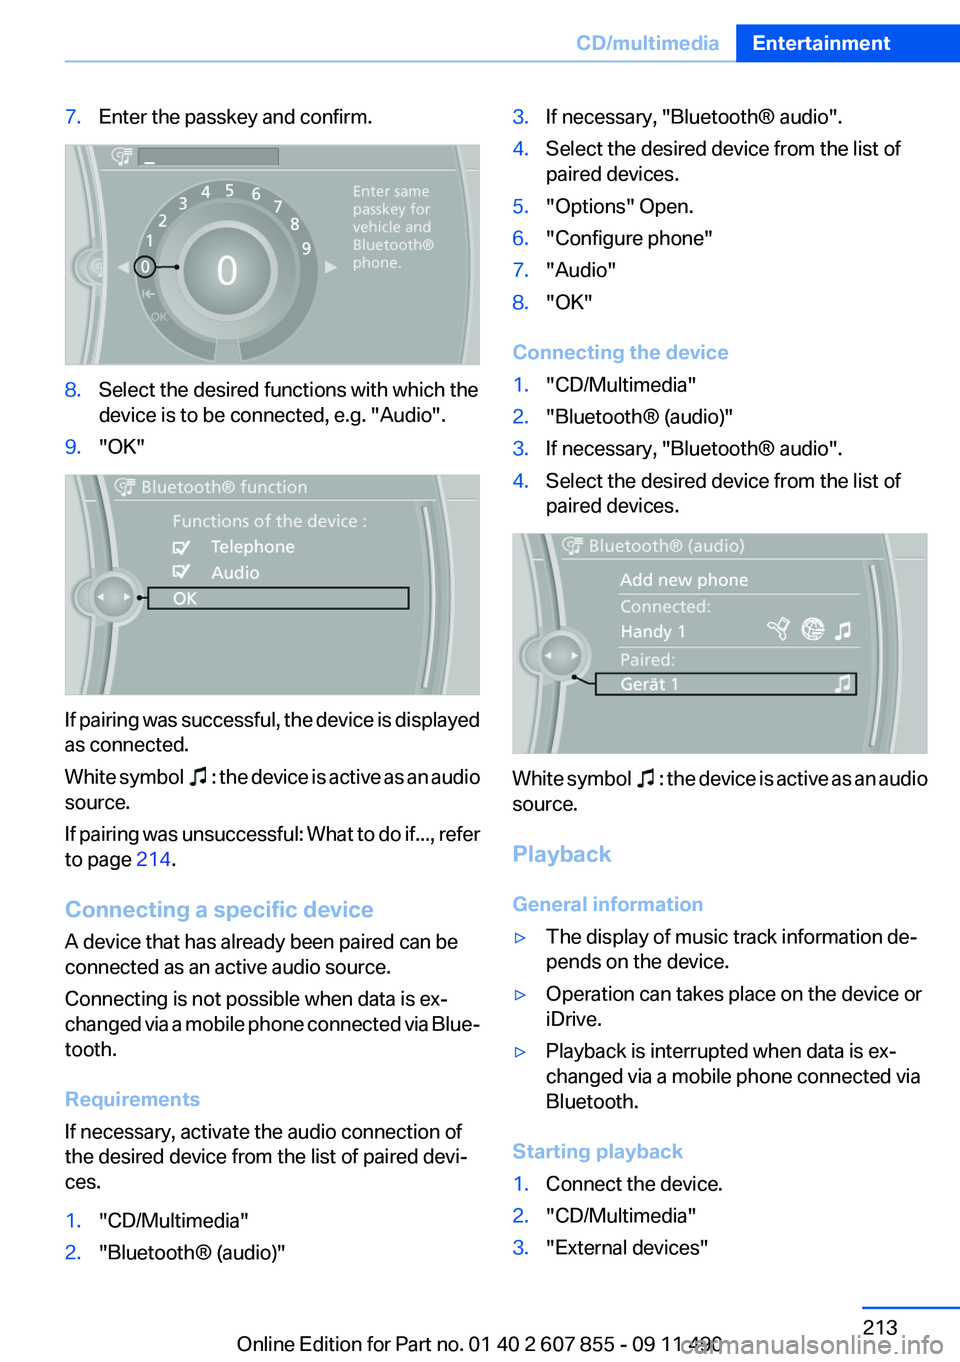
7.Enter the passkey and confirm.8.Select the desired functions with which the
device is to be connected, e.g. "Audio".9."OK"
If pairing was successful, the device is displayed
as connected.
White symbol
: the device is active as an audio
source.
If pairing was unsuccessful: What to do if..., refer
to page 214.
Connecting a specific device
A device that has already been paired can be
connected as an active audio source.
Connecting is not possible when data is ex‐
changed via a mobile phone connected via Blue‐
tooth.
Requirements
If necessary, activate the audio connection of
the desired device from the list of paired devi‐
ces.
1."CD/Multimedia"2."Bluetooth® (audio)"3.If necessary, "Bluetooth® audio".4.Select the desired device from the list of
paired devices.5."Options" Open.6."Configure phone"7."Audio"8."OK"
Connecting the device
1."CD/Multimedia"2."Bluetooth® (audio)"3.If necessary, "Bluetooth® audio".4.Select the desired device from the list of
paired devices.
White symbol : the device is active as an audio
source.
Playback
General information
▷The display of music track information de‐
pends on the device.▷Operation can takes place on the device or
iDrive.▷Playback is interrupted when data is ex‐
changed via a mobile phone connected via
Bluetooth.
Starting playback
1.Connect the device.2."CD/Multimedia"3."External devices"Seite 213CD/multimediaEntertainment213
Online Edition for Part no. 01 40 2 607 855 - 09 11 490
Page 218 of 321
Notes▷Do not cover lower screen edge, since this
is where the sensors and the infrared inter‐
face are installed.▷When loading the rear seats and adjusting
the backrest of the front seat, fold in the
screens.▷When using the through-loading system,
fold the screens down.▷When cleaning the screen, follow the care
instructions, refer to page 292.
Remote control
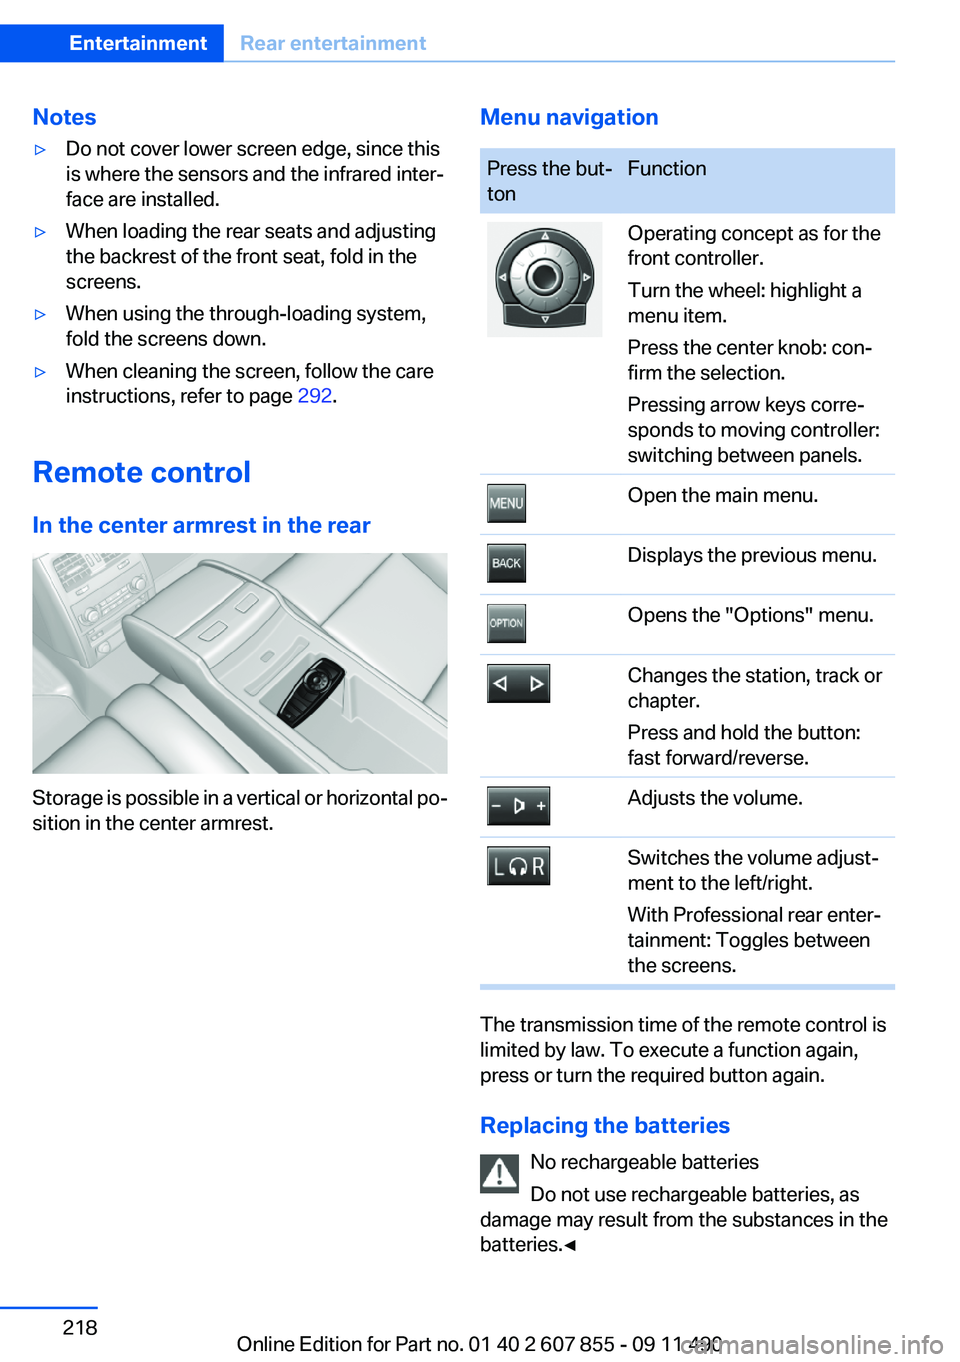
In the center armrest in the rear
Storage is possible in a vertical or horizontal po‐
sition in the center armrest.
Menu navigationPress the but‐
tonFunctionOperating concept as for the
front controller.
Turn the wheel: highlight a
menu item.
Press the center knob: con‐
firm the selection.
Pressing arrow keys corre‐
sponds to moving controller:
switching between panels.Open the main menu.Displays the previous menu.Opens the "Options" menu.Changes the station, track or
chapter.
Press and hold the button:
fast forward/reverse.Adjusts the volume.Switches the volume adjust‐
ment to the left/right.
With Professional rear enter‐
tainment: Toggles between
the screens.
The transmission time of the remote control is
limited by law. To execute a function again,
press or turn the required button again.
Replacing the batteries No rechargeable batteries
Do not use rechargeable batteries, as
damage may result from the substances in the
batteries.◀
Seite 218EntertainmentRear entertainment218
Online Edition for Part no. 01 40 2 607 855 - 09 11 490
Page 219 of 321
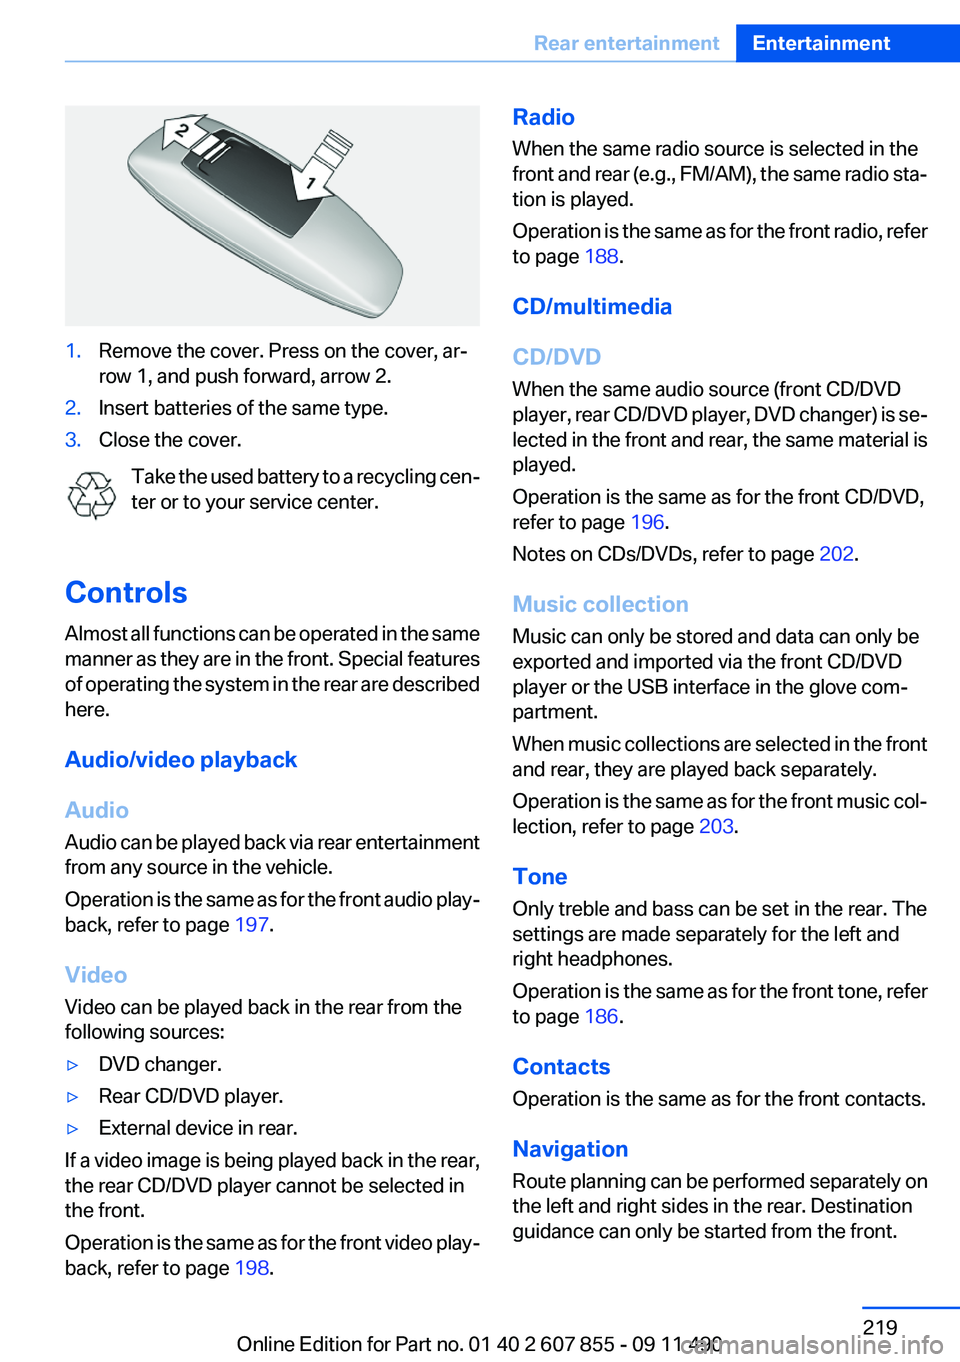
1.Remove the cover. Press on the cover, ar‐
row 1, and push forward, arrow 2.2.Insert batteries of the same type.3.Close the cover.
Take the used battery to a recycling cen‐
ter or to your service center.
Controls
Almost all functions can be operated in the same
manner as they are in the front. Special features
of operating the system in the rear are described
here.
Audio/video playback
Audio
Audio can be played back via rear entertainment
from any source in the vehicle.
Operation is the same as for the front audio play‐
back, refer to page 197.
Video
Video can be played back in the rear from the
following sources:
▷DVD changer.▷Rear CD/DVD player.▷External device in rear.
If a video image is being played back in the rear,
the rear CD/DVD player cannot be selected in
the front.
Operation is the same as for the front video play‐
back, refer to page 198.
Radio
When the same radio source is selected in the
front and rear (e.g., FM/AM), the same radio sta‐
tion is played.
Operation is the same as for the front radio, refer
to page 188.
CD/multimedia
CD/DVD
When the same audio source (front CD/DVD
player, rear CD/DVD player, DVD changer) is se‐
lected in the front and rear, the same material is
played.
Operation is the same as for the front CD/DVD,
refer to page 196.
Notes on CDs/DVDs, refer to page 202.
Music collection
Music can only be stored and data can only be
exported and imported via the front CD/DVD
player or the USB interface in the glove com‐
partment.
When music collections are selected in the front
and rear, they are played back separately.
Operation is the same as for the front music col‐
lection, refer to page 203.
Tone
Only treble and bass can be set in the rear. The
settings are made separately for the left and
right headphones.
Operation is the same as for the front tone, refer
to page 186.
Contacts
Operation is the same as for the front contacts.
Navigation
Route planning can be performed separately on
the left and right sides in the rear. Destination
guidance can only be started from the front.Seite 219Rear entertainmentEntertainment219
Online Edition for Part no. 01 40 2 607 855 - 09 11 490