2012 BMW 528I turn signal
[x] Cancel search: turn signalPage 236 of 335
Accepting a call while speaking to
another party
This function might have to be activated by the
service provider and the mobile phone must be
adjusted accordingly.
If a second call comes in during an ongoing call,
a call waiting signal is sounded where appropri‐
ate.
"Accept"
The call is accepted and the existing call is put
on hold.
Establishing a second call
Establish an additional call during an active call.
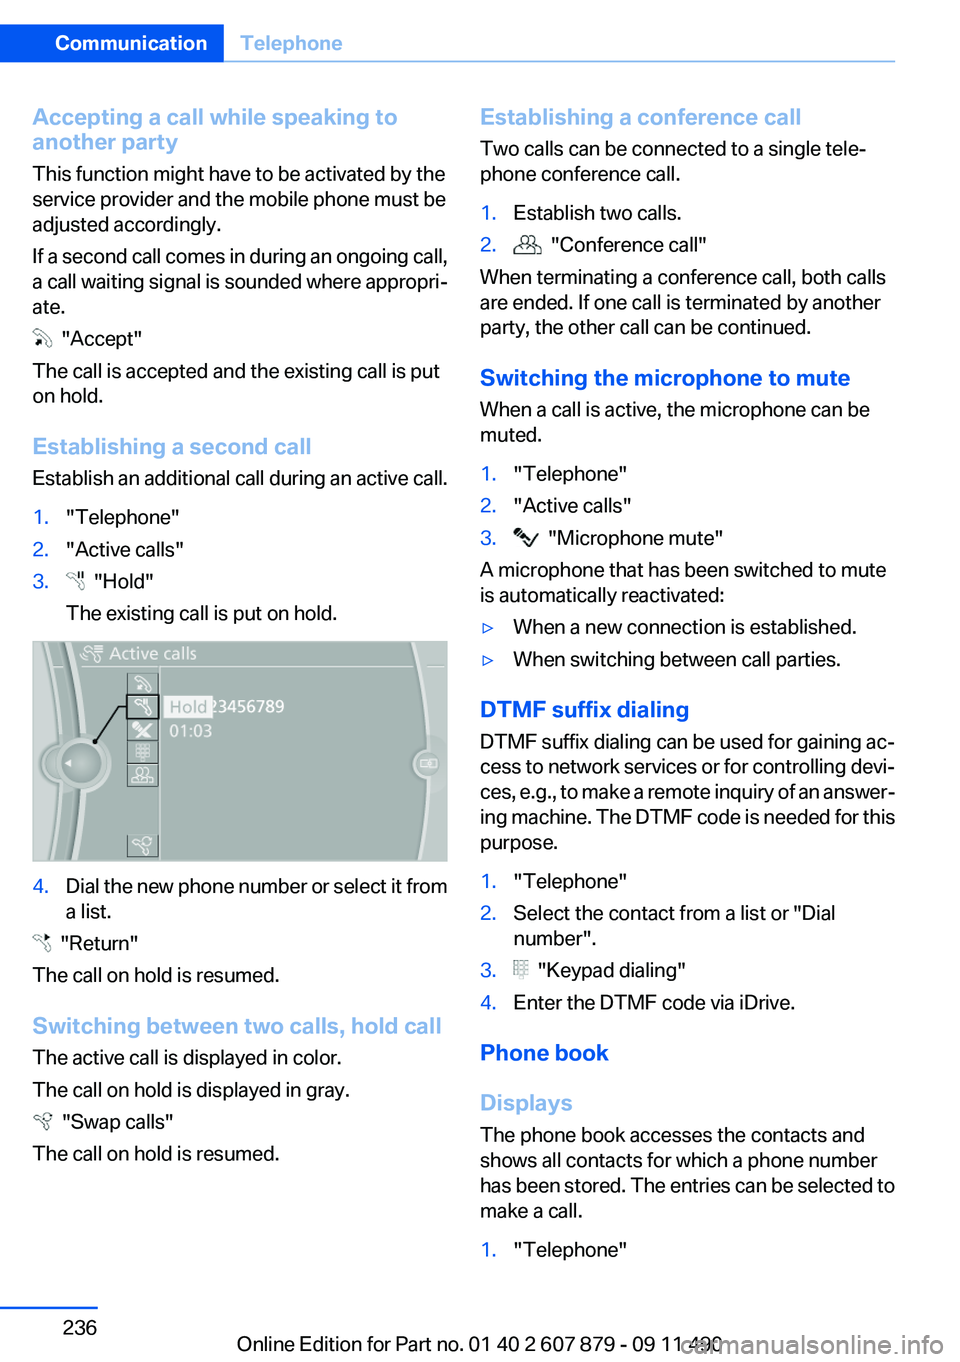
1."Telephone"2."Active calls"3. "Hold"
The existing call is put on hold.4.Dial the new phone number or select it from
a list.
"Return"
The call on hold is resumed.
Switching between two calls, hold call
The active call is displayed in color.
The call on hold is displayed in gray.
"Swap calls"
The call on hold is resumed.
Establishing a conference call
Two calls can be connected to a single tele‐
phone conference call.1.Establish two calls.2. "Conference call"
When terminating a conference call, both calls
are ended. If one call is terminated by another
party, the other call can be continued.
Switching the microphone to mute
When a call is active, the microphone can be
muted.
1."Telephone"2."Active calls"3. "Microphone mute"
A microphone that has been switched to mute
is automatically reactivated:
▷When a new connection is established.▷When switching between call parties.
DTMF suffix dialing
DTMF suffix dialing can be used for gaining ac‐
cess to network services or for controlling devi‐
ces, e.g., to make a remote inquiry of an answer‐
ing machine. The DTMF code is needed for this
purpose.
1."Telephone"2.Select the contact from a list or "Dial
number".3. "Keypad dialing"4.Enter the DTMF code via iDrive.
Phone book
Displays
The phone book accesses the contacts and
shows all contacts for which a phone number
has been stored. The entries can be selected to
make a call.
1."Telephone"Seite 236CommunicationTelephone236
Online Edition for Part no. 01 40 2 607 879 - 09 11 490
Page 291 of 335
Danger of burns
Only change bulbs when they are cool;
otherwise, there is the danger of getting
burned.◀
Working on the lighting system
When working on the lighting system, you
should always switch off the lights affected to
prevent short circuits.
To avoid possible injury or equipment damage
when replacing bulbs, observe any instructions
provided by the bulb manufacturer.◀
Do not perform work/bulb replacement on
xenon headlamps
Have any work on the xenon lighting system, in‐
cluding bulb replacement, performed only by a
service center. Due to the high voltage present
in the system, there is the danger of fatal injuries
if work is carried out improperly.◀
Do not touch the bulbs
Do not touch the glass of new bulbs with
your bare hands, as even minute amounts of
contamination will burn into the bulb's surface
and reduce its service life.
Use a clean tissue, cloth or something similar, or
hold the bulb by its base.◀
Light-emitting diodes (LEDs)
Light-emitting diodes installed behind a cover
serve as the light source for controls, display el‐
ements and other equipment.
These light-emitting diodes, which are related
to conventional lasers, are officially designated
as Class 1 light-emitting diodes.
Do not remove the covers
Do not remove the covers, and never stare
into the unfiltered light for several hours; other‐
wise, irritation of the retina could result.◀Headlamp glass
Condensation can form on the inside of the ex‐
ternal lamps in cool or humid weather. When
driving with the light switched on, the conden‐
sation evaporates after a short time. The head‐
lamp glasses do not need to be changed.
If the headlamps do not dim despite driving with
the light switched on, increasing humidity forms,
e. g. water droplets in the light, have the service
center check this.
Front lamps, bulb replacement
Halogen headlamps
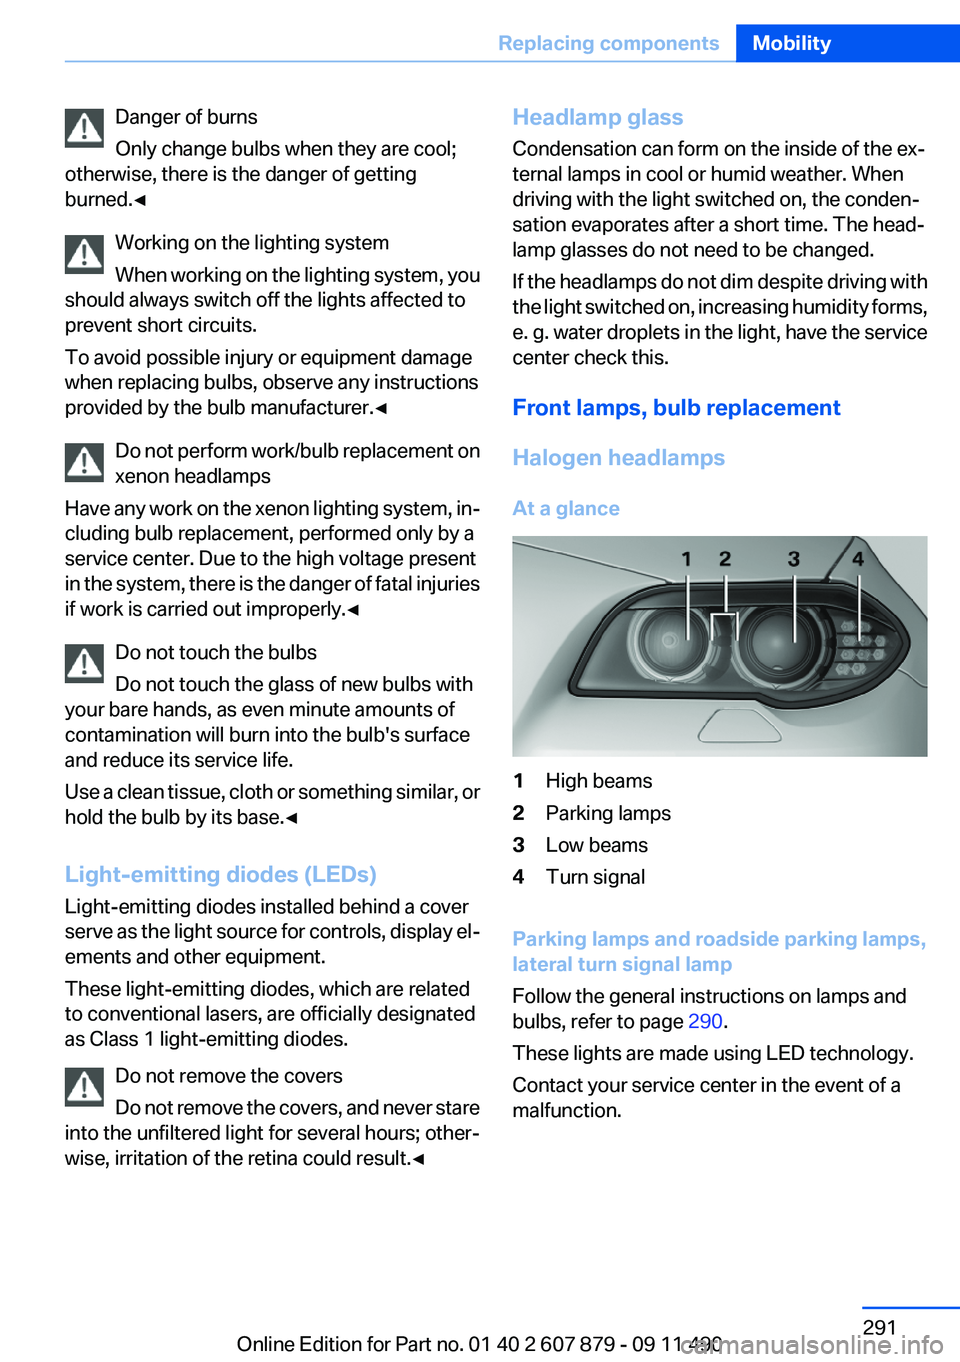
At a glance1High beams2Parking lamps3Low beams4Turn signal
Parking lamps and roadside parking lamps,
lateral turn signal lamp
Follow the general instructions on lamps and
bulbs, refer to page 290.
These lights are made using LED technology.
Contact your service center in the event of a
malfunction.
Seite 291Replacing componentsMobility291
Online Edition for Part no. 01 40 2 607 879 - 09 11 490
Page 292 of 335
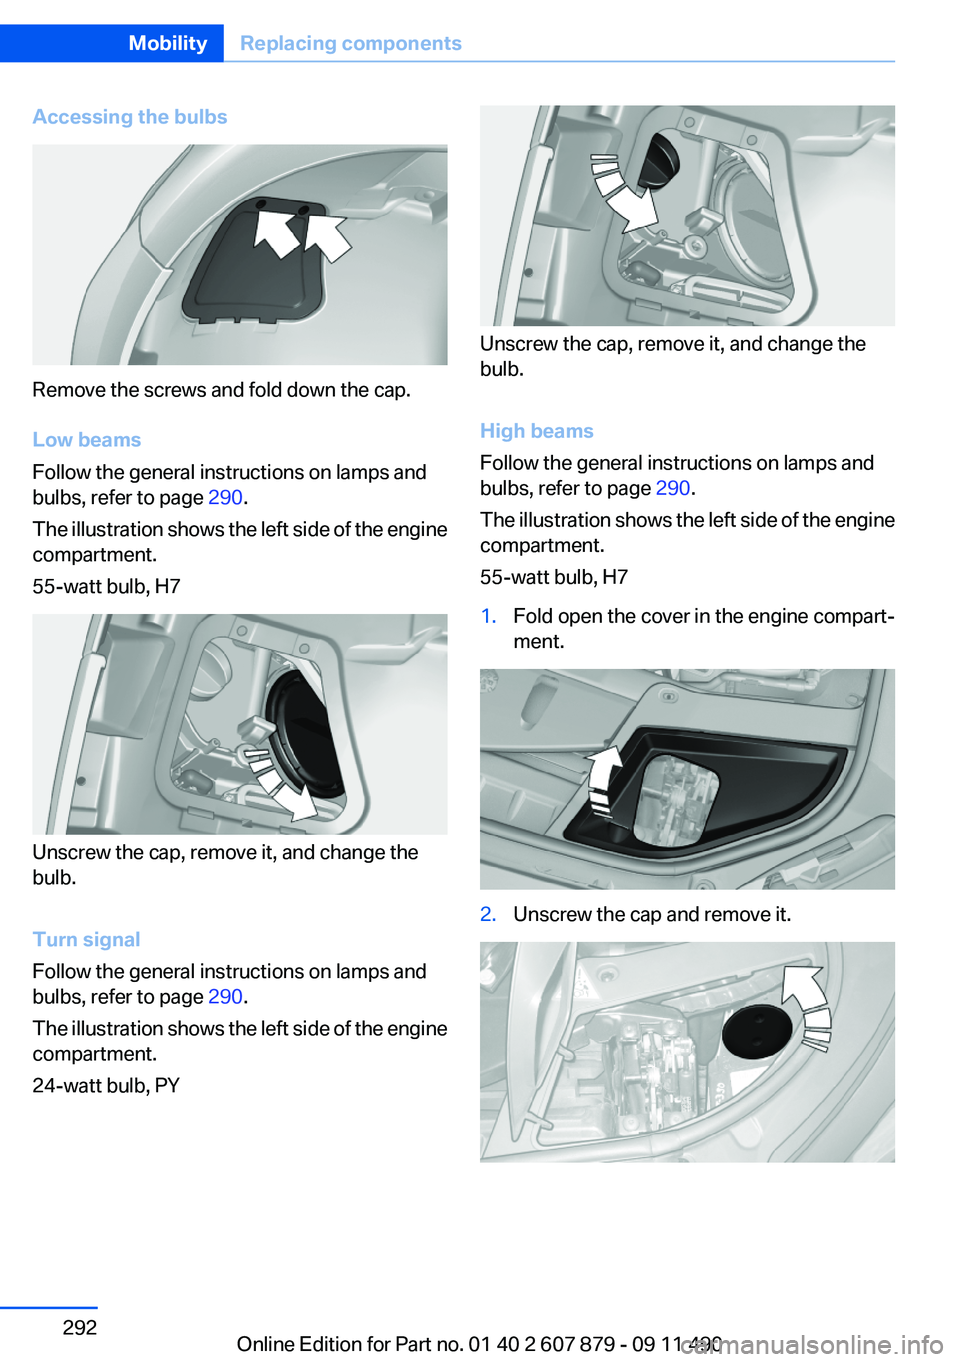
Accessing the bulbs
Remove the screws and fold down the cap.
Low beams
Follow the general instructions on lamps and
bulbs, refer to page 290.
The illustration shows the left side of the engine
compartment.
55-watt bulb, H7
Unscrew the cap, remove it, and change the
bulb.
Turn signal
Follow the general instructions on lamps and
bulbs, refer to page 290.
The illustration shows the left side of the engine
compartment.
24-watt bulb, PY
Unscrew the cap, remove it, and change the
bulb.
High beams
Follow the general instructions on lamps and
bulbs, refer to page 290.
The illustration shows the left side of the engine
compartment.
55-watt bulb, H7
1.Fold open the cover in the engine compart‐
ment.2.Unscrew the cap and remove it.Seite 292MobilityReplacing components292
Online Edition for Part no. 01 40 2 607 879 - 09 11 490
Page 293 of 335
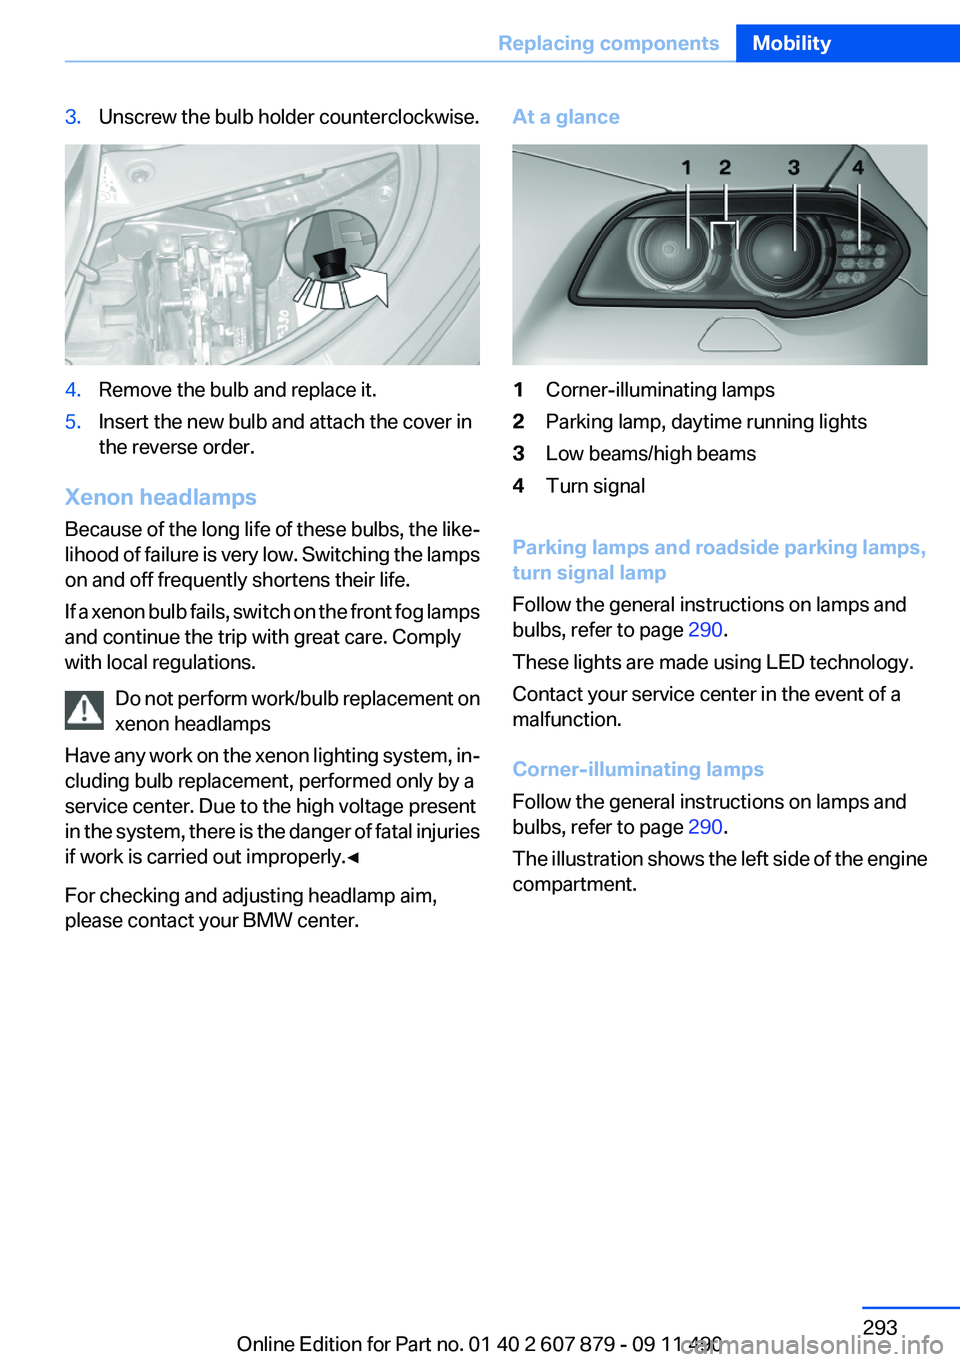
3.Unscrew the bulb holder counterclockwise.4.Remove the bulb and replace it.5.Insert the new bulb and attach the cover in
the reverse order.
Xenon headlamps
Because of the long life of these bulbs, the like‐
lihood of failure is very low. Switching the lamps
on and off frequently shortens their life.
If a xenon bulb fails, switch on the front fog lamps
and continue the trip with great care. Comply
with local regulations.
Do not perform work/bulb replacement on
xenon headlamps
Have any work on the xenon lighting system, in‐
cluding bulb replacement, performed only by a
service center. Due to the high voltage present
in the system, there is the danger of fatal injuries
if work is carried out improperly.◀
For checking and adjusting headlamp aim,
please contact your BMW center.
At a glance1Corner-illuminating lamps2Parking lamp, daytime running lights3Low beams/high beams4Turn signal
Parking lamps and roadside parking lamps,
turn signal lamp
Follow the general instructions on lamps and
bulbs, refer to page 290.
These lights are made using LED technology.
Contact your service center in the event of a
malfunction.
Corner-illuminating lamps
Follow the general instructions on lamps and
bulbs, refer to page 290.
The illustration shows the left side of the engine
compartment.
Seite 293Replacing componentsMobility293
Online Edition for Part no. 01 40 2 607 879 - 09 11 490
Page 294 of 335
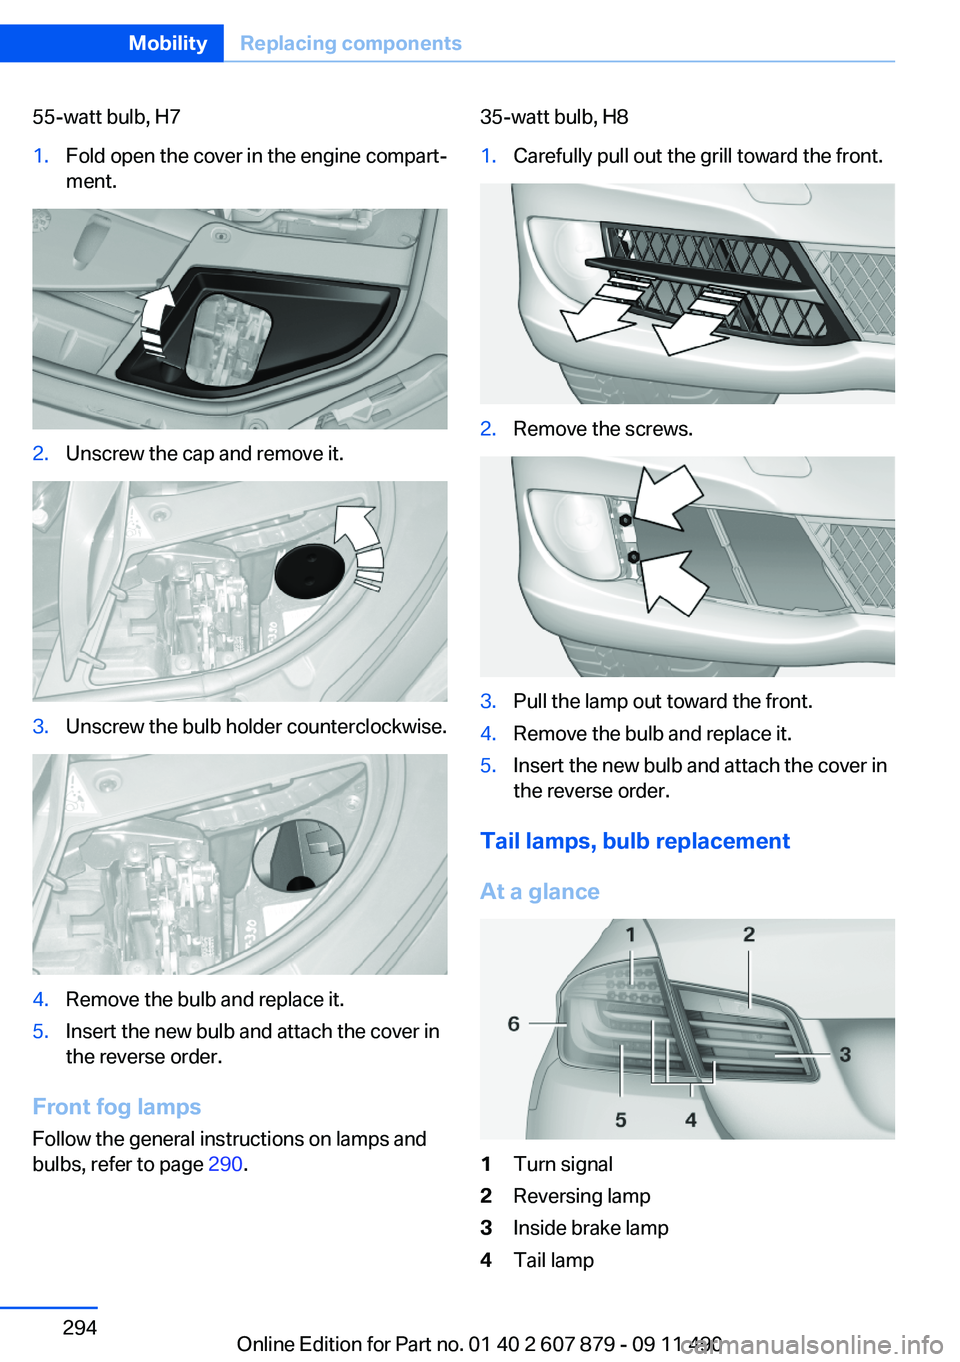
55-watt bulb, H71.Fold open the cover in the engine compart‐
ment.2.Unscrew the cap and remove it.3.Unscrew the bulb holder counterclockwise.4.Remove the bulb and replace it.5.Insert the new bulb and attach the cover in
the reverse order.
Front fog lamps
Follow the general instructions on lamps and
bulbs, refer to page 290.
35-watt bulb, H81.Carefully pull out the grill toward the front.2.Remove the screws.3.Pull the lamp out toward the front.4.Remove the bulb and replace it.5.Insert the new bulb and attach the cover in
the reverse order.
Tail lamps, bulb replacement
At a glance
1Turn signal2Reversing lamp3Inside brake lamp4Tail lampSeite 294MobilityReplacing components294
Online Edition for Part no. 01 40 2 607 879 - 09 11 490
Page 295 of 335
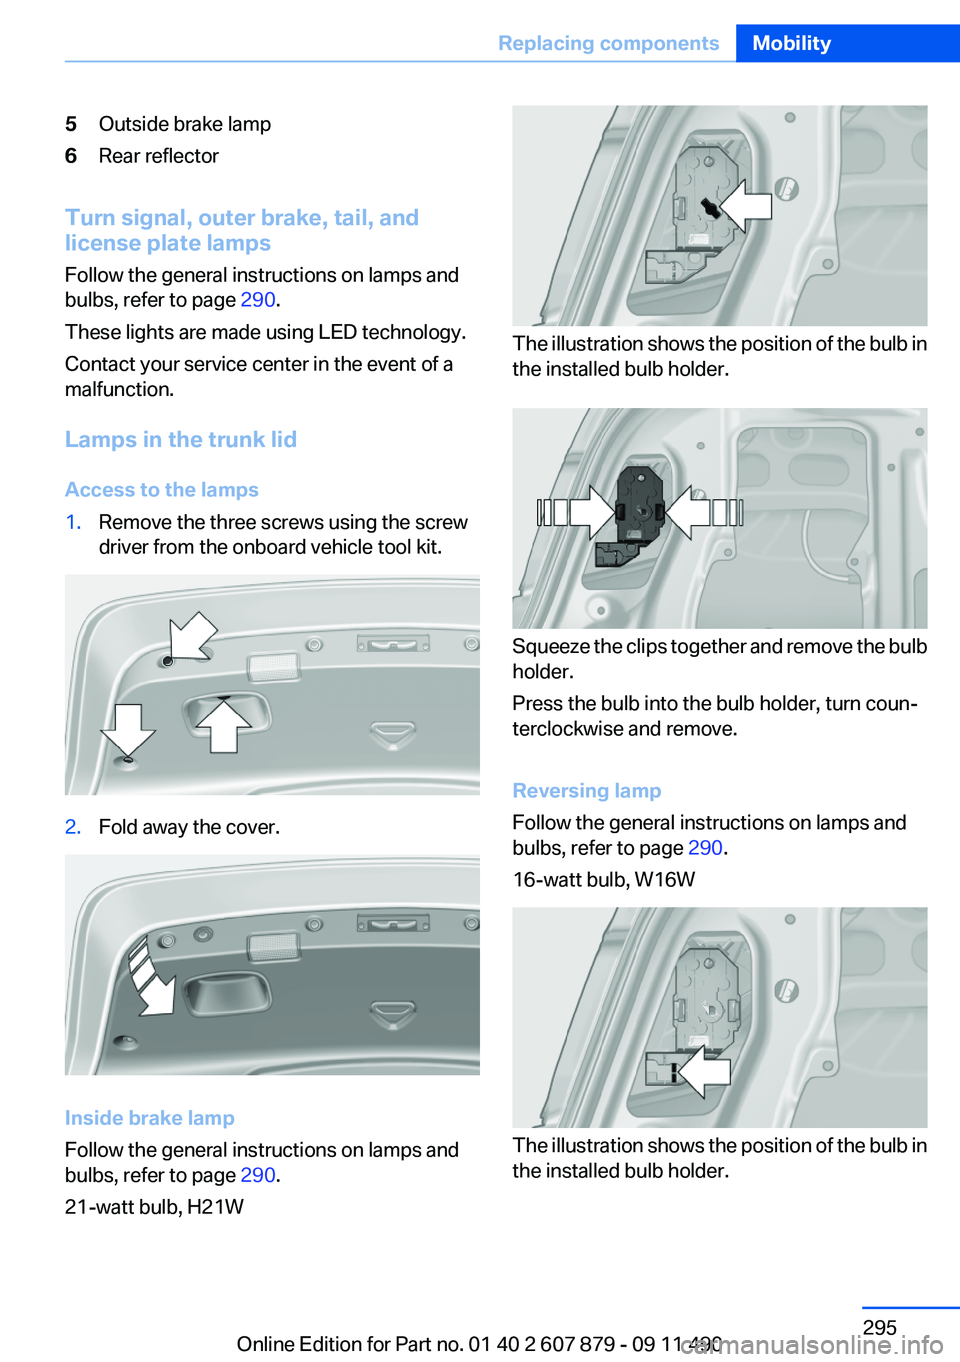
5Outside brake lamp6Rear reflector
Turn signal, outer brake, tail, and
license plate lamps
Follow the general instructions on lamps and
bulbs, refer to page 290.
These lights are made using LED technology.
Contact your service center in the event of a
malfunction.
Lamps in the trunk lid
Access to the lamps
1.Remove the three screws using the screw
driver from the onboard vehicle tool kit.2.Fold away the cover.
Inside brake lamp
Follow the general instructions on lamps and
bulbs, refer to page 290.
21-watt bulb, H21W
The illustration shows the position of the bulb in
the installed bulb holder.
Squeeze the clips together and remove the bulb
holder.
Press the bulb into the bulb holder, turn coun‐
terclockwise and remove.
Reversing lamp
Follow the general instructions on lamps and
bulbs, refer to page 290.
16-watt bulb, W16W
The illustration shows the position of the bulb in
the installed bulb holder.
Seite 295Replacing componentsMobility295
Online Edition for Part no. 01 40 2 607 879 - 09 11 490
Page 301 of 335
attempt in order to allow the discharged bat‐
tery to recharge.3.Let both engines run for several minutes.4.Disconnect the jumper cables in the reverse
order.
Check the battery and recharge if necessary.
Tow-starting and towing
Automatic transmission: transporting
your vehicle
Note
Your vehicle is not permitted to be towed.
Therefore, contact a service center in the event
of a breakdown.
Do not have the vehicle towed
Have your vehicle transported on a loading
platform only; otherwise, damage may occur.◀
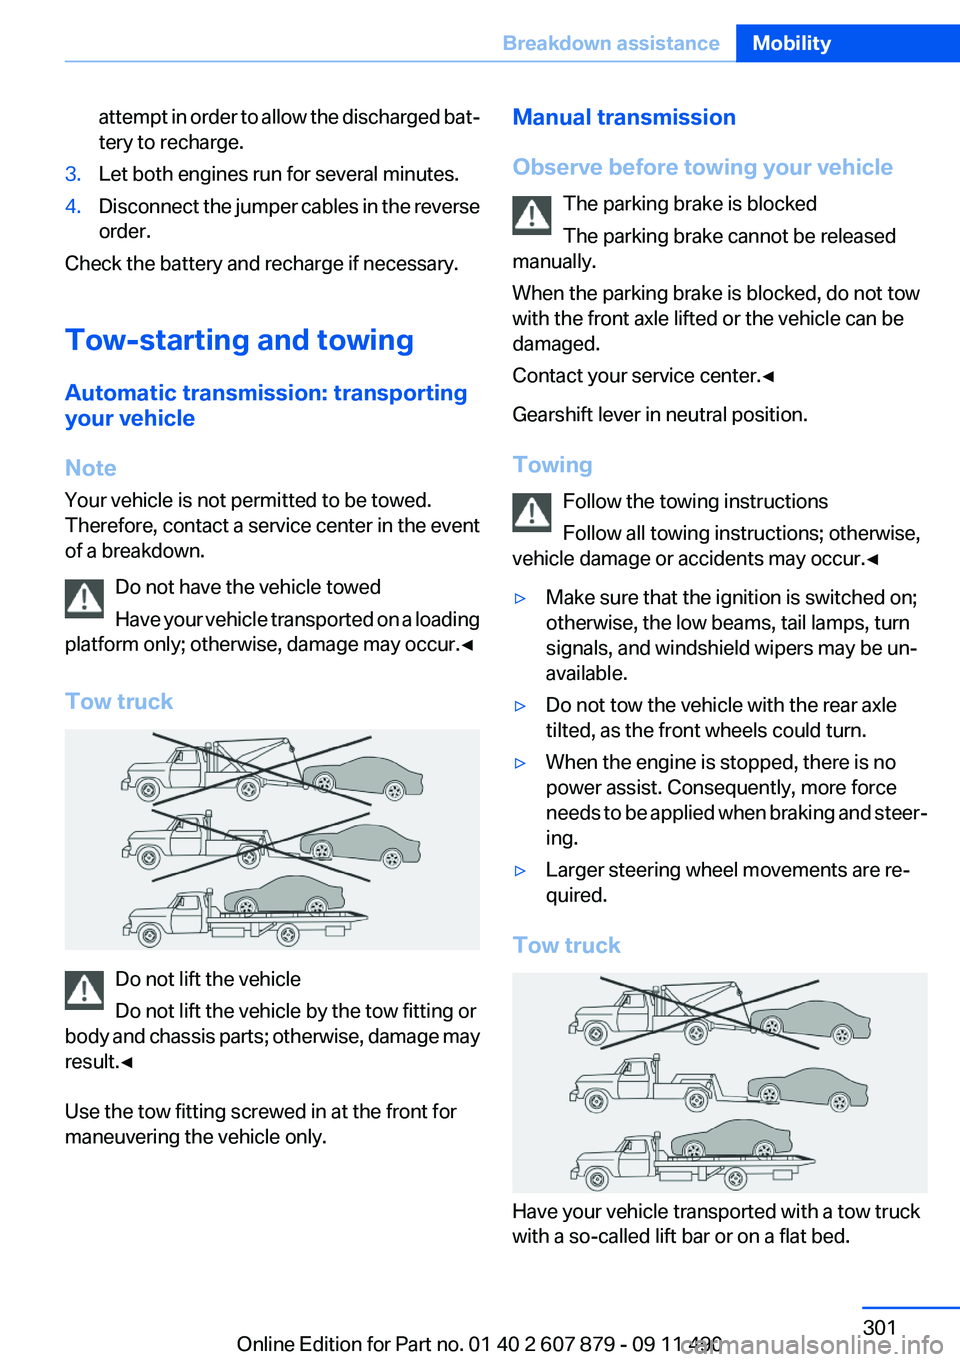
Tow truck
Do not lift the vehicle
Do not lift the vehicle by the tow fitting or
body and chassis parts; otherwise, damage may
result.◀
Use the tow fitting screwed in at the front for
maneuvering the vehicle only.
Manual transmission
Observe before towing your vehicle The parking brake is blocked
The parking brake cannot be released
manually.
When the parking brake is blocked, do not tow
with the front axle lifted or the vehicle can be
damaged.
Contact your service center.◀
Gearshift lever in neutral position.
Towing Follow the towing instructions
Follow all towing instructions; otherwise,
vehicle damage or accidents may occur.◀▷Make sure that the ignition is switched on;
otherwise, the low beams, tail lamps, turn
signals, and windshield wipers may be un‐
available.▷Do not tow the vehicle with the rear axle
tilted, as the front wheels could turn.▷When the engine is stopped, there is no
power assist. Consequently, more force
needs to be applied when braking and steer‐
ing.▷Larger steering wheel movements are re‐
quired.
Tow truck
Have your vehicle transported with a tow truck
with a so-called lift bar or on a flat bed.
Seite 301Breakdown assistanceMobility301
Online Edition for Part no. 01 40 2 607 879 - 09 11 490
Page 325 of 335
Bar for tow-starting/tow‐ing 302
Bass 190
Battery replacement, remote control, rear entertain‐
ment 222
Battery replacement, vehicle battery 296
Battery replacement, vehicle remote control 30
Battery, vehicle 296
Belts, safety belts 51
Beverage holder, cu‐ pholder 155
Blinds, sun protection 44
Bluetooth audio 216
BMW Assist 253
BMW homepage 6
BMW Internet page 6
BMW Maintenance Sys‐ tem 288
BMW Search 255
Bottle holder, refer to Cu‐ pholder 155
Brake assistant 107
Brake assistant, adaptive 107
Brake discs, breaking in 160
Brake force display 105
Brake lamps, brake force dis‐ play 105
Brake lamps, bulb replace‐ ment 295
Brake lights, adaptive 105
Brake pads, breaking in 160
Braking, notes 161
Breakdown assis‐ tance 298, 299
Breaking in 160
Brightness of Control Dis‐ play 87
Bulb replacement 290
Bulb replacement, front 291
Bulb replacement, rear 294
Bulbs and lamps 290
Button, RES 116
Button, Start/Stop 62 Bypassing, refer to starting
aid 299
C
Calendar 248
California Proposition 65 Warning 7
Camera, backup camera 128
Camera, care 307
Camera, Side View 131
Camera, Top View 130
Can holder, refer to Cu‐ pholder 155
Car battery 296
Car care products 305
Care, displays 307
Care, vehicle 305
Cargo 163
Cargo area, enlarging 150
Cargo area lid 38
Cargo area, storage compart‐ ments 156
Cargo straps, securing cargo 164
Car key, refer to Remote con‐ trol 30
Carpet, care 306
Car wash 304
Catalytic converter, refer to Hot exhaust system 161
CBS Condition Based Serv‐ ice 288
CD/DVD 200
CD/DVD player, rear 221
CDs, storing 207
Cell phone 230
Center armrest 154
Center console 14
Central locking system 33
Central screen, refer to Control Display 16
Changes, technical, refer to Safety 6
Changing parts 290
Changing wheels 296 Changing wheels/tires 278
Check Control 78
Checking the oil level 284
Children, seating position 58
Children, transporting safely 58
Child restraint fixing sys‐ tem 58
Child restraint fixing system LATCH 59
Child restraint fixing systems, mounting 58
Child safety locks 61
Child seat, mounting 58
Child seats 58
Chrome parts, care 306
Cigarette lighter 148
Cleaning, displays 307
Climate control 139
Climate control wind‐ shield 161
Clock 81
Closing/opening from in‐ side 37
Closing/opening via door lock 36
Closing/opening with remote control 34
Clothes hooks 156
Collision warning 120
Combination switch, refer to Turn signals 69
Combination switch, refer to Wiper system 69
COMFORT+ program, Driving Experience Switch 113
Comfort Access 40
COMFORT program, Driving Experience Switch 112
Computer 84
Concierge service 254
Condensation on win‐ dows 140
Condensation under the vehi‐ cle 162 Seite 325Everything from A to ZReference325
Online Edition for Part no. 01 40 2 607 879 - 09 11 490