2012 BMW 335I heating
[x] Cancel search: heatingPage 136 of 325

▷LED off: outside air flows in continuously.▷LED on, recirculated-air mode: the supply of
outside air into the vehicle is permanently
blocked.
If the windows fog over, switch off recirculated-
air mode and increase the air volume, if neces‐
sary.
Continuous recirculated-air mode
The recirculated-air mode should not be
used for an extended period of time, as the air
quality inside the vehicle deteriorates steadily. ◀
Switching the system on/off
Switching off Press the left button at the minimum
speed.
Switching on
Press any button except the seat heating but‐
tons.
Microfilter, recirculated air filter
The microfilter removes dust and pollen from
the incoming air.
The recirculated-air filter removes dust from the
interior air in recirculated-air mode.
These filters should be replaced during sched‐
uled maintenance of your vehicle., refer to
page 277
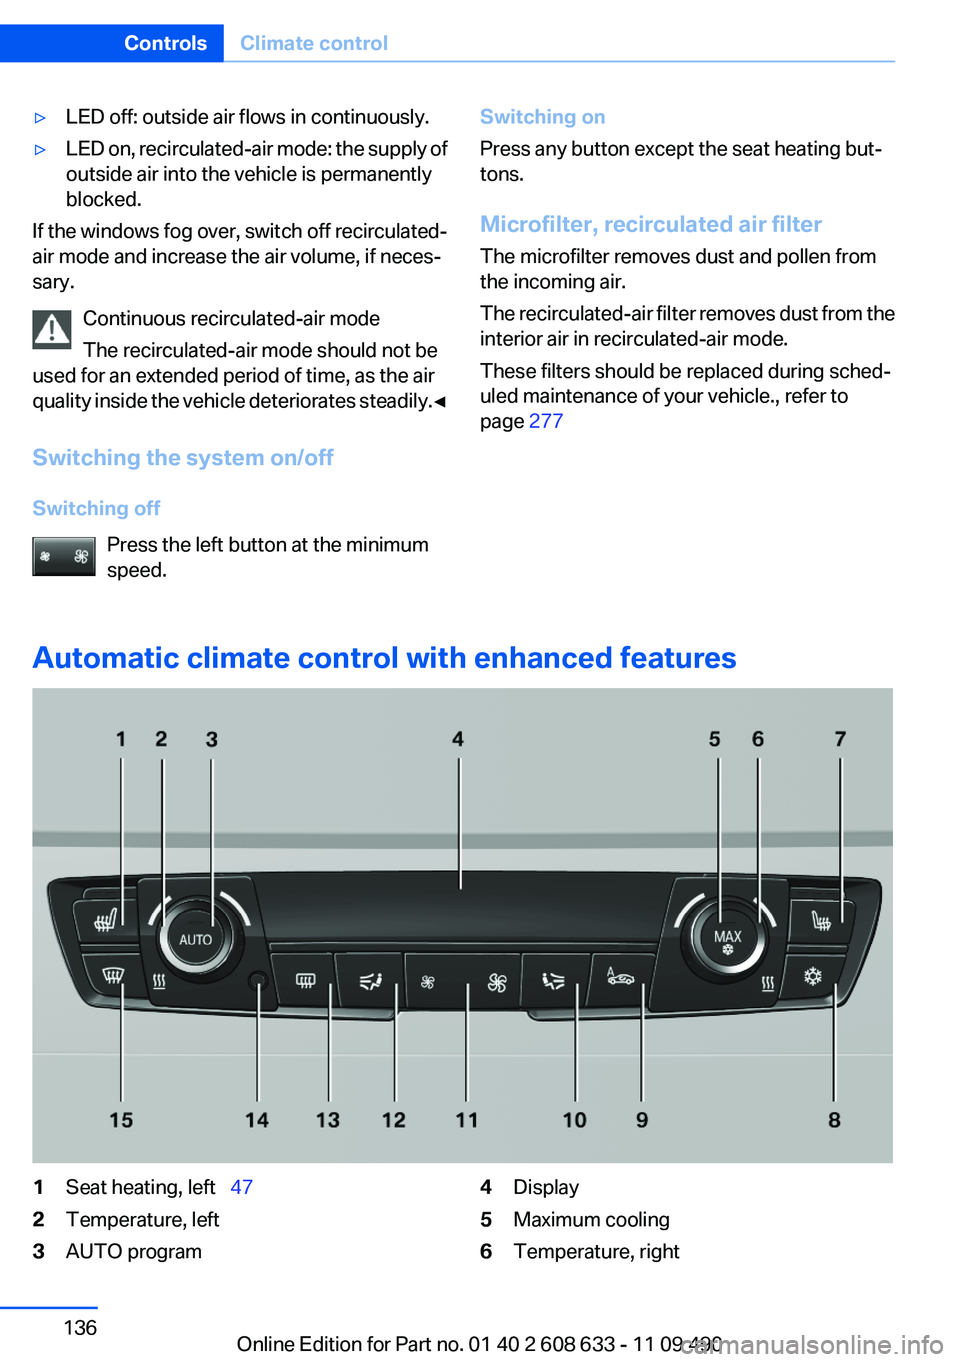
Automatic climate control with enhanced features
1Seat heating, left 472Temperature, left3AUTO program4Display5Maximum cooling6Temperature, rightSeite 136ControlsClimate control136
Online Edition for Part no. 01 40 2 608 633 - 11 09 490
Page 137 of 325

7Seat heating, right 478Cooling function9Automatic recirculated-air control/recircu‐
lated-air mode10Air distribution, right11Air flow, AUTO intensity12Air distribution, left13Rear window defroster14Interior temperature sensor — always keep
clear15Defrosting windows and removing conden‐
sationClimate control functions in detail
Temperature Turn the wheel to set the desired
temperature.
The automatic climate control reaches this tem‐
perature as quickly as possible, if necessary by
increasing the cooling or heating output, and
then keeps it constant.
Avoid rapidly switching between different tem‐
perature settings. The automatic climate control
will not have sufficient time to adjust the set
temperature.
AUTO program Press the button.
Air volume, air distribution, and tem‐
perature are controlled automatically.
Depending on the selected temperature, AUTO
intensity, and outside influences, the air is di‐
rected to the windshield, side windows, upper
body, and into the footwell.
The cooling function, refer to page 137, is
switched on automatically with the AUTO pro‐
gram.
At the same time, a condensation sensor con‐
trols the program so as to prevent window con‐
densation as much as possible.Intensity of the AUTO program
With the AUTO program switched on, automatic
control of the air volume and air distribution can
be adjusted.
Press the left or right side of the button:
decrease or increase the intensity.
The selected intensity is shown on the display
of the automatic climate control.
Maximum cooling Press the button.
The system is set to the lowest tem‐
perature, maximum air flow and recirculated-air
mode.
Air flows out of the vents for the upper body re‐
gion. Open them for this purpose.
The air is cooled fastest when the engine is run‐
ning.
The air flow can be adjusted when the program
is active.
Cooling function
The passenger compartment can only be
cooled with the engine running.
Press the button.
The air is cooled and dehumidified and
– depending on the temperature setting –
warmed again.
Depending on the weather, the windshield may
fog up briefly when the engine is started.
The cooling function is switched on automati‐
cally with the AUTO program.Seite 137Climate controlControls137
Online Edition for Part no. 01 40 2 608 633 - 11 09 490
Page 138 of 325

When using the automatic climate control, con‐
densation water, refer to page 158, develops
that exits underneath the vehicle.
Automatic recirculated-air control/
recirculated-air mode
You can respond to unpleasant odors or pollu‐
tants in the immediate environment by tempo‐
rarily suspending the supply of outside air. The
system then recirculates the air currently within
the vehicle.
Press the button repeatedly to select
an operating mode:▷LEDs off: outside air flows in continuously.▷Left LED on, automatic recirculated-air con‐
trol: a sensor detects pollutants in the out‐
side air and controls the shutoff automati‐
cally.▷Right LED on, recirculated-air mode: the
supply of outside air into the vehicle is per‐
manently blocked.
If the windows are fogged over, switch off the
recirculated-air mode and press the AUTO but‐
ton to utilize the condensation sensor. Make
sure that air can flow onto the windshield.
Continuous recirculated-air mode
The recirculated-air mode should not be
used for an extended period of time, as the air
quality inside the vehicle deteriorates steadily. ◀
Manual air distribution Press the button repeatedly to select a
program:
▷Upper body region.▷Upper body region and footwell.▷Footwell.▷Windows and footwell: driver's side only.▷Windows, upper body region and footwell:
driver's side only.
If the windows are fogged over, press the AUTO
button to utilize the condensation sensor.
Air volume, manual
To be able to manually adjust the air volume,
switch off the AUTO program first.
Press the left or right side of the button:
decrease or increase air volume.
The selected air volume is shown on the display
of the automatic climate control.
The air volume of the automatic climate control
may be reduced automatically to save battery
power.
Rear window defroster Press the button.
The rear window defroster switches off
automatically after a certain period of time.
Defrosting windows and removing
condensation
Press the button.
Ice and condensation are quickly re‐
moved from the windshield and the front side
windows.
The air volume can be adjusted when the pro‐
gram is active.
If the windows are fogged over, additionally
switch on the cooling function or press the
AUTO button to utilize the condensation sensor.
Switching the system on/off
Switching off Press the left button at the minimum
speed.
Switching on
Press any button except the seat heating but‐
tons.Seite 138ControlsClimate control138
Online Edition for Part no. 01 40 2 608 633 - 11 09 490
Page 159 of 325

LoadingVehicle equipment
All standard, country-specific and optional
equipment that is offered in the model series is
described in this chapter. Therefore, equipment
is also described that is not available in a vehicle,
e. g., because of the selected optional equip‐
ment or country variant. This also applies for
safety-related functions and systems.
General information Overloading the vehicle
To avoid exceeding the approved carrying
capacity of the tires, never overload the vehicle.
Overloading can lead to overheating and in‐
creases the rate at which damage develops in‐
side the tires. This could result in a sudden loss
of tire inflation pressure.◀
No fluids in the trunk
Make sure that fluids do not leak into the
trunk; otherwise, the vehicle may be damaged. ◀
Determining the load limit1.Locate the following statement on your ve‐
hicle’s placard:▷The combined weight of occupants and
cargo should never exceed XXX kg or
YYY lbs. Otherwise, damage to the ve‐hicle and unstable driving situations may
result.2.Determine the combined weight of the
driver and passengers that will be riding in
your vehicle.3.Subtract the combined weight of the driver
and passengers from XXX kilograms or YYY
pounds.4.The resulting figure equals the available
amount of cargo and luggage load capacity.
For example, if the YYY amount equals
1,000 lbs and there will be four 150 lbs pas‐
sengers in your vehicle, the amount of avail‐
able cargo and luggage load capacity is
400 lbs: 1,000 lbs minus 600 lbs = 400 lbs.5.Determine the combined weight of luggage
and cargo being loaded on the vehicle. That
weight may not safely exceed the available
cargo and luggage load capacity calculated
in Step 4.
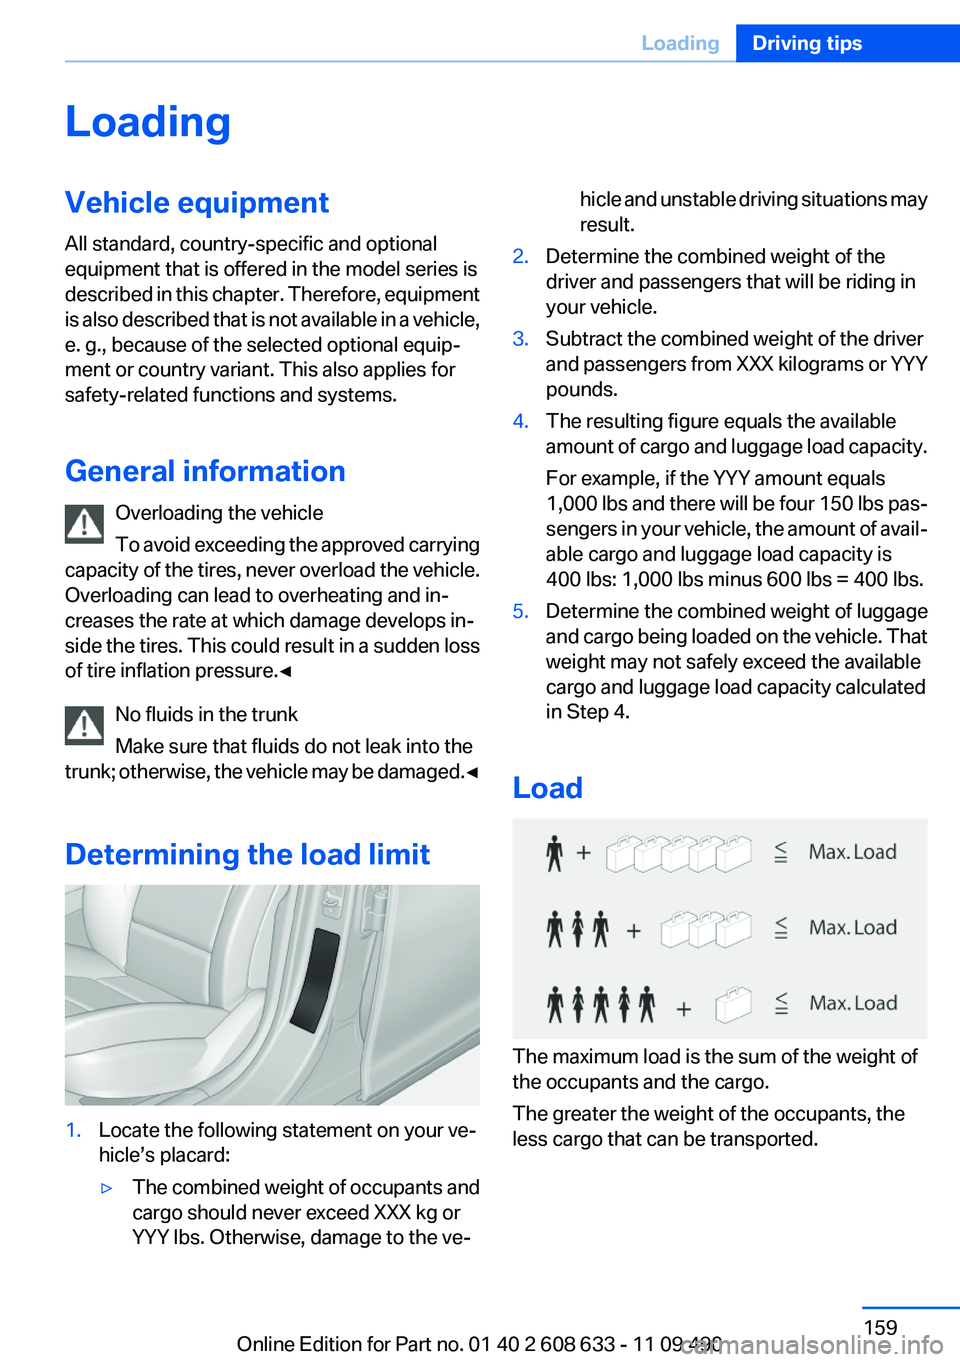
Load
The maximum load is the sum of the weight of
the occupants and the cargo.
The greater the weight of the occupants, the
less cargo that can be transported.
Seite 159LoadingDriving tips159
Online Edition for Part no. 01 40 2 608 633 - 11 09 490
Page 163 of 325

When you reach the desired speed, shift into the
highest applicable gear and drive with the en‐
gine speed as low as possible and at a constant
speed.
As a rule: driving at low engine speeds lowers
fuel consumption and reduces wear.
The gear shift indicator of your vehicle indicates
the most fuel efficient gear.
Use coasting conditions
When approaching a red light, take your foot off
the accelerator and let the vehicle coast to a halt.
On a downhill gradient, take your foot off the ac‐
celerator and let the vehicle roll.
The flow of fuel is interrupted while coasting.
Switch off the engine during
longer stops
Switch off the engine during longer stops, e.g.,
at traffic lights, railroad crossings or in traffic
congestion.
Fuel savings are achieved after the vehicle is
switched off for only approx. 4 seconds.
Switch off any functions that
are not currently needed
Functions such as seat heating and the rear win‐
dow defroster require a lot of energy and con‐
sume additional fuel, especially in city and stop-
and-go traffic.
Therefore, switch off these functions if they are
not actually needed.
Have maintenance carried out
Have vehicles maintained regularly to achieve
optimal vehicle economy and operating life.
Have the maintenance carried out by your serv‐
ice center.Please also note the BMW Maintenance Sys‐
tem, refer to page 277.
ECO PRO
The concept
ECO PRO supports a driving style that saves on
fuel consumption. For this purpose, the engine
control and comfort functions, e. g. the climate
control output, are adjusted.
In addition, context-sensitive instructions can
be displayed that assist in driving in a manner
that optimizes fuel consumption.
The extension of the range that is achieved as a
result can be displayed in the instrument cluster.
Activating ECO PRO Press button repeatedly until ECO PRO
is displayed in the instrument cluster.
Display in the instrument cluster
ECO PRO bonus range An extension of the range can be
achieved by an adjusted driving
style.
This may be displayed as the bo‐
nus range in the instrument clus‐
ter.
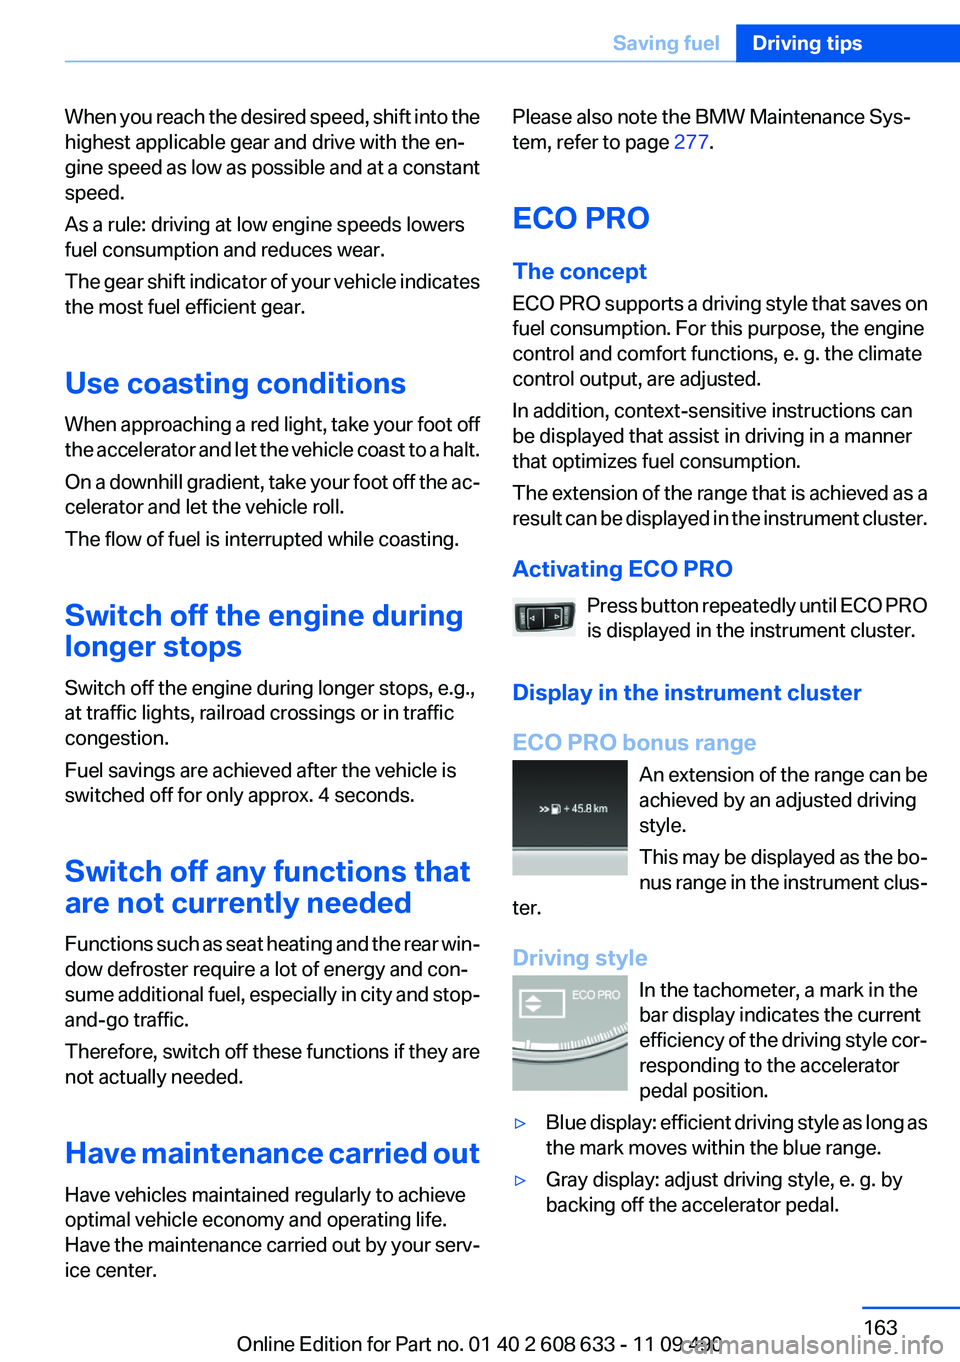
Driving style In the tachometer, a mark in the
bar display indicates the current
efficiency of the driving style cor‐
responding to the accelerator
pedal position.▷Blue display: efficient driving style as long as
the mark moves within the blue range.▷Gray display: adjust driving style, e. g. by
backing off the accelerator pedal.Seite 163Saving fuelDriving tips163
Online Edition for Part no. 01 40 2 608 633 - 11 09 490
Page 164 of 325

The display switches to blue as soon as all con‐
ditions for fuel-economy-optimized driving are
met.
ECO PRO Tip - driving instruction The arrow indicates that the driv‐
ing style can be adjusted to be
more fuel efficient by backing off
the accelerator.
Additional symbolsSymbolMeasureFor efficient driving style, back off the
accelerator.Reduce speed to the selected ECO
PRO speed.Automatic transmission: switch from
S to D or avoid manual shift interven‐
tions.Manual shift transmission: follow
shifting instructions.Manual shift transmission: engage
neutral for engine stop.
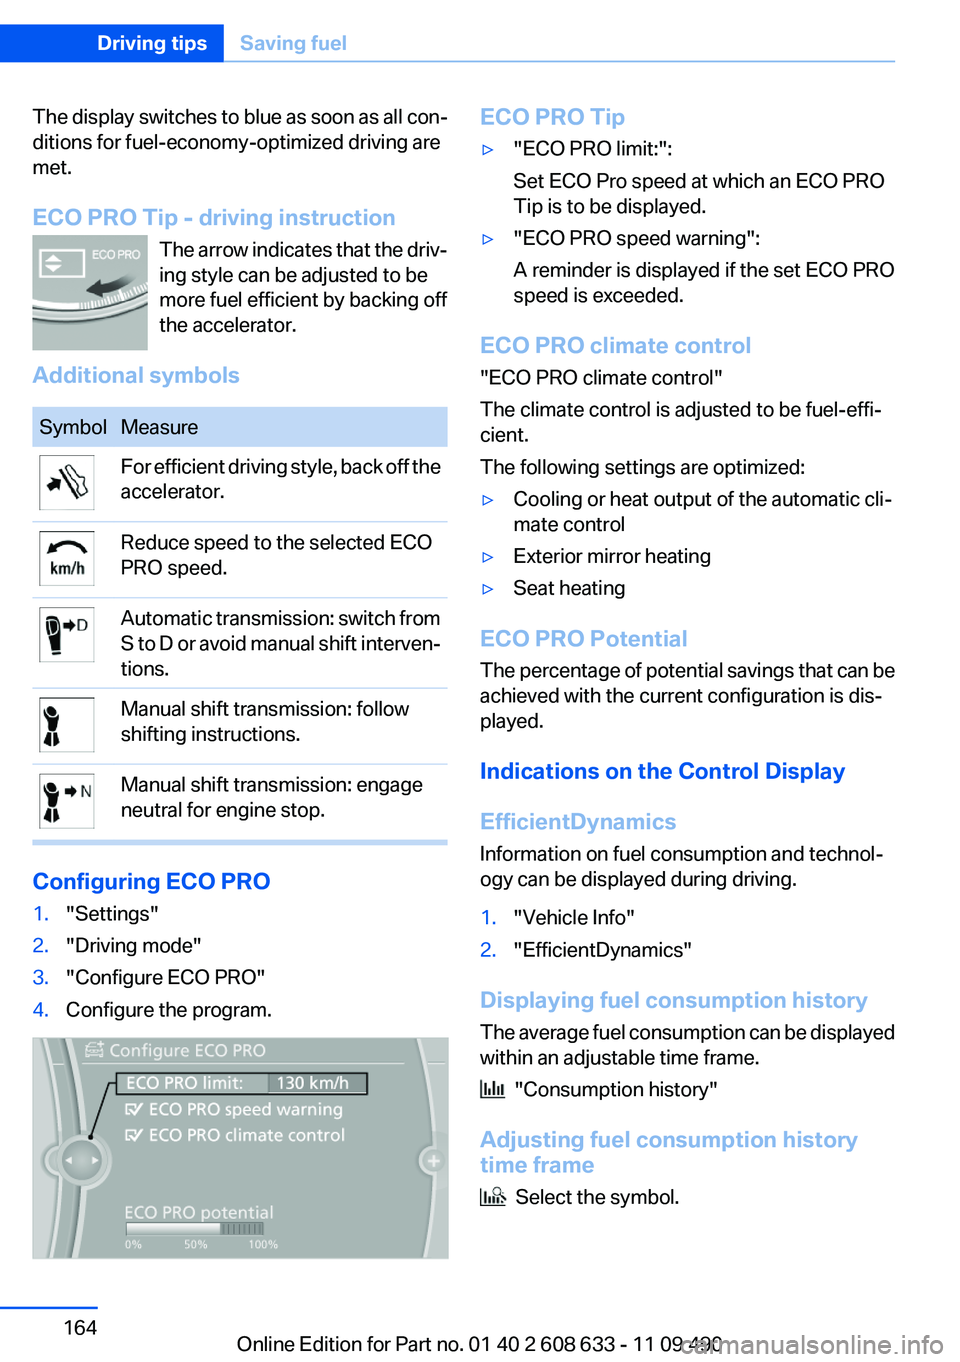
Configuring ECO PRO
1."Settings"2."Driving mode"3."Configure ECO PRO"4.Configure the program.ECO PRO Tip▷"ECO PRO limit:":
Set ECO Pro speed at which an ECO PRO
Tip is to be displayed.▷"ECO PRO speed warning":
A reminder is displayed if the set ECO PRO
speed is exceeded.
ECO PRO climate control
"ECO PRO climate control"
The climate control is adjusted to be fuel-effi‐
cient.
The following settings are optimized:
▷Cooling or heat output of the automatic cli‐
mate control▷Exterior mirror heating▷Seat heating
ECO PRO Potential
The percentage of potential savings that can be
achieved with the current configuration is dis‐
played.
Indications on the Control Display
EfficientDynamics
Information on fuel consumption and technol‐
ogy can be displayed during driving.
1."Vehicle Info"2."EfficientDynamics"
Displaying fuel consumption history
The average fuel consumption can be displayed
within an adjustable time frame.
"Consumption history"
Adjusting fuel consumption history
time frame
Select the symbol.
Seite 164Driving tipsSaving fuel164
Online Edition for Part no. 01 40 2 608 633 - 11 09 490
Page 319 of 325

Malfunction displays, refer toCheck Control 73
Manual air distribu‐ tion 135, 138
Manual air flow 135
Manual air volume 138
Manual mode, transmis‐ sion 68
Manual operation, backup camera 124
Manual operation, door lock 37
Manual operation, exterior mir‐ rors 52
Manual operation, fuel filler flap 260
Manual operation, Park Dis‐ tance Control PDC 122
Manual operation, Side View 128
Manual operation, Top View 126
Manual transmission 67
Map, destination entry 173
Map in split screen 180
Map view 178
Marking on approved tires 270
Marking, run-flat tires 271
Master key, refer to Remote control 30
Maximum cooling 137
Maximum speed, display 79
Maximum speed, winter tires 270
Measure, units of 85
Medical kit 291
Memory, seat, mirror 51
Menu, EfficientDynamics 164
Menu in instrument cluster 80
Menus, operating, iDrive 16
Menus, refer to iDrive operat‐ ing concept 18
Message list, traffic bulle‐ tins 180
Messages 241 Messages, refer to Check
Control 73
Microfilter 136, 139
Minimum tread, tires 269
Mirror 52
Mirror memory 51
Mobile communication devi‐ ces in the vehicle 157
Mobile phone 220, 228
Mode, ECO PRO 163
Modifications, technical, refer to Safety 6
Moisture in headlamp 280
Monitor, refer to Control Dis‐ play 16
Mounting of child restraint fix‐ ing systems 55
MP3 player 210
Multifunction steering wheel, buttons 12
Music collection 205
Music search 207
Music, storing 205
N
Navigation 168
Navigation data 183
Neck restraints, front, refer to Head restraints 49
Neck restraints, rear, refer to Head restraints 50
New wheels and tires 269
No Passing Information 79
Notes 245
Number of cylinders, en‐ gine 303
Nylon rope for tow-starting/ towing 294
O
OBD Onboard Diagnos‐ tics 278
Obstacle marking, backup camera 125 Odometer 76
Office 238
Oil 274
Oil, adding 274
Oil additives 275
Oil change 275
Oil change interval, service re‐ quirements 77
Oil filler neck 274
Oil types, alternative 275
Oil types, approved 275
Old batteries, disposal 288
Onboard Diagnostics OBD 278
Onboard monitor, refer to Control Display 16
Onboard vehicle tool kit 279
Opening/closing from in‐ side 37
Opening/closing via door lock 36
Opening/closing with remote control 34
Operating concept, iDrive 16
Optional equipment, standard equipment 6
Outside air, refer to Automatic recirculated-air control 138
Overheating of engine, refer to Coolant temperature 76
P
Paint, vehicle 297
Pairing, mobile phone 220, 229
Panic mode 35
Parallel parking assistant 130
Park Distance Control PDC 121
Parked-car ventilation 139
Parked vehicle, condensa‐ tion 158
Parking aid, refer to PDC 121
Parking assistant 130
Parking brake 63 Seite 319Everything from A to ZReference319
Online Edition for Part no. 01 40 2 608 633 - 11 09 490
Page 320 of 325

Parking lamps 86
Passenger side mirror, tilting downward 52
Pathway lines, backup cam‐ era 124
PDC Park Distance Con‐ trol 121
Permissible axle load 304
Personal information 238
Personal Profile 31
Pinch protection system, glass sunroof 43
Pinch protection system, win‐ dows 42
Plastic, care 298
PlugIn 255
Position, storing 170
Postal code, entering in navi‐ gation 169
Power failure 288
Power output, engine 303
Power sunroof, glass 43
Power windows 41
Pressure, tire air pres‐ sure 263
Pressure warning FTM, tires 97
Profile, refer to Personal Pro‐ file 31
Programmable memory but‐ tons, iDrive 21
Protective function, glass sun‐ roof 43
Protective function, win‐ dows 42
Push-and-turn switch, refer to Controller 16, 17
R
Radiator fluid 276
Radio 190, 198
Radio-operated key, refer to Remote control 30
Radio ready state 60
Radio stations buttons 197 Rain sensor 65
Random 199
Random playback 199
RDS 191
Reading out loud 245
Rear lamps 285
Rear socket 146
Rearview mirror 52
Rear window de‐ froster 135, 138
Recirculated-air filter 139
Recirculated air filter 136
Recirculated-air mode 135, 138
Recommended tire brands 270
Refueling 260
Remaining range 76
Reminders 245
Remote control/key 30
Remote control, malfunc‐ tion 36
Remote control, universal 141
Replacement fuse 288
Replacing parts 279
Replacing wheels/tires 269
Reporting safety defects 8
RES button 111
Reserve warning, refer to Range 76
Resetting, Tire Pressure Mon‐ itor TPM 95
Retaining straps, securing cargo 160
Retreaded tires 270
Roadside Assistance 251
Roadside parking lamps 87
Roller sunblinds 43
Roof load capacity 304
Roof-mounted luggage rack 160
Rope for tow-starting/tow‐ ing 294
Route 177
Route criteria, route 176
Route, displaying 177 Routes, avoiding 176
Route section, bypassing 177
RPM, engine 303
RSC Run Flat System Compo‐ nent, refer to Run-flat
tires 271
Rubber components, care 298
Run-flat tires 271
S
Safe braking 157
Safety 6
Safety belt reminder 49
Safety belts 48
Safety belts, care 298
Safety Package, refer to Active Protection 102
Safety switch, windows 42
Safety systems, airbags 91
Satellite radio 192
Saving fuel 162
Scale, changing during navi‐ gation 179
Screen, refer to Control Dis‐ play 16
Screwdriver 279
Screw thread for tow fit‐ ting 294
Search, refer to BMW Search 252
Seat and mirror memory 51
Seat belts, refer to Safety belts 48
Seat heating, front 47
Seat heating, rear 48
Seating position for chil‐ dren 55
Seats 45
Selection list in instrument cluster 80
Selector lever, automatic transmission 67
Sensors, care 299
Service and warranty 7 Seite 320ReferenceEverything from A to Z320
Online Edition for Part no. 01 40 2 608 633 - 11 09 490