2012 BMW 328I SEDAN trunk
[x] Cancel search: trunkPage 159 of 325
LoadingVehicle equipment
All standard, country-specific and optional
equipment that is offered in the model series is
described in this chapter. Therefore, equipment
is also described that is not available in a vehicle,
e. g., because of the selected optional equip‐
ment or country variant. This also applies for
safety-related functions and systems.
General information Overloading the vehicle
To avoid exceeding the approved carrying
capacity of the tires, never overload the vehicle.
Overloading can lead to overheating and in‐
creases the rate at which damage develops in‐
side the tires. This could result in a sudden loss
of tire inflation pressure.◀
No fluids in the trunk
Make sure that fluids do not leak into the
trunk; otherwise, the vehicle may be damaged. ◀
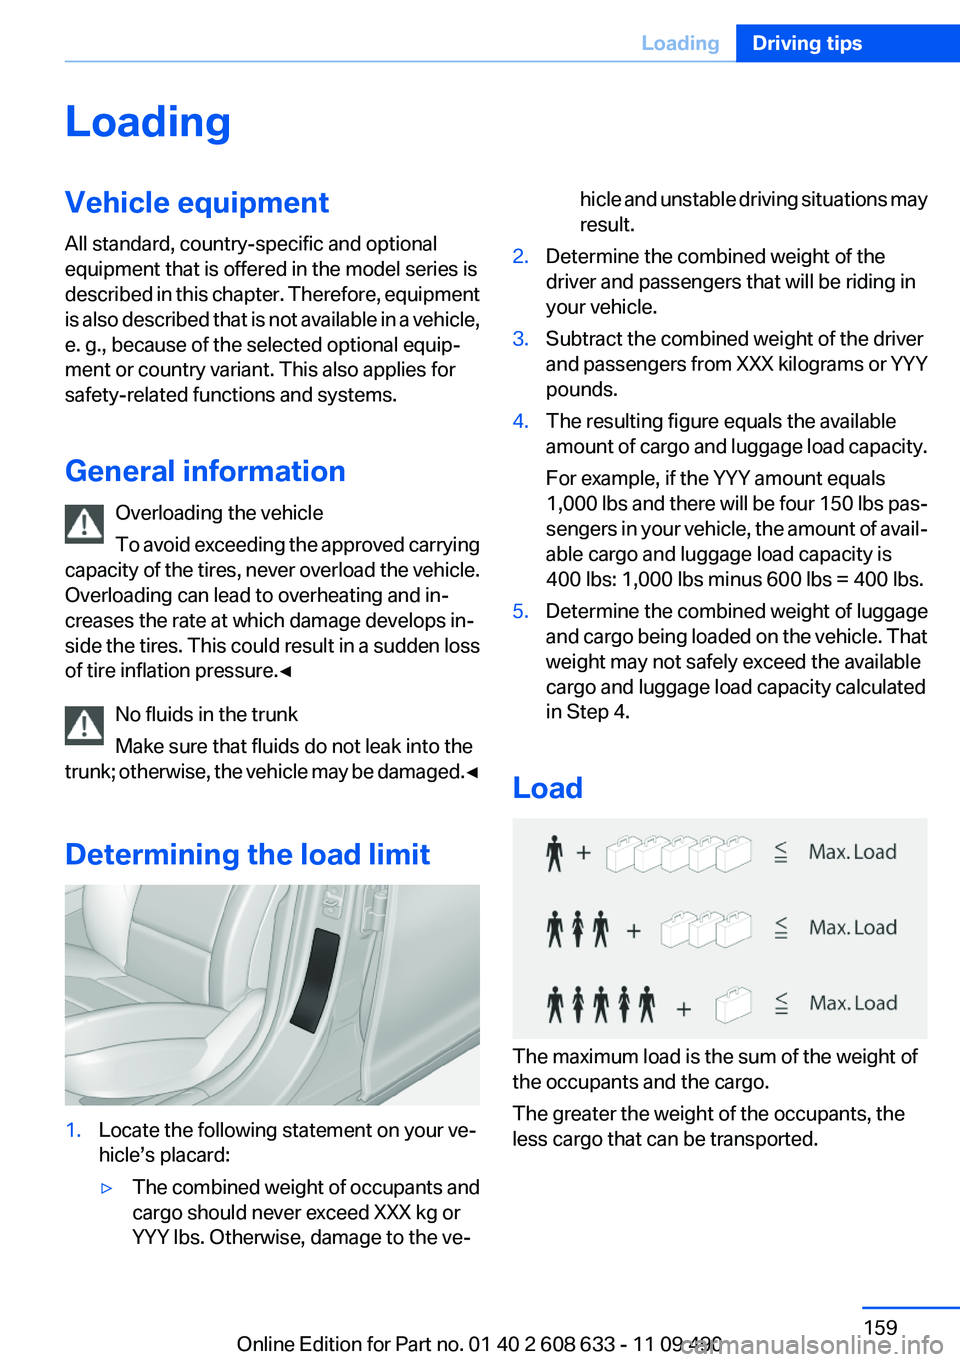
Determining the load limit1.Locate the following statement on your ve‐
hicle’s placard:▷The combined weight of occupants and
cargo should never exceed XXX kg or
YYY lbs. Otherwise, damage to the ve‐hicle and unstable driving situations may
result.2.Determine the combined weight of the
driver and passengers that will be riding in
your vehicle.3.Subtract the combined weight of the driver
and passengers from XXX kilograms or YYY
pounds.4.The resulting figure equals the available
amount of cargo and luggage load capacity.
For example, if the YYY amount equals
1,000 lbs and there will be four 150 lbs pas‐
sengers in your vehicle, the amount of avail‐
able cargo and luggage load capacity is
400 lbs: 1,000 lbs minus 600 lbs = 400 lbs.5.Determine the combined weight of luggage
and cargo being loaded on the vehicle. That
weight may not safely exceed the available
cargo and luggage load capacity calculated
in Step 4.
Load
The maximum load is the sum of the weight of
the occupants and the cargo.
The greater the weight of the occupants, the
less cargo that can be transported.
Seite 159LoadingDriving tips159
Online Edition for Part no. 01 40 2 608 633 - 11 09 490
Page 285 of 325
Tail lamps, bulb replacement
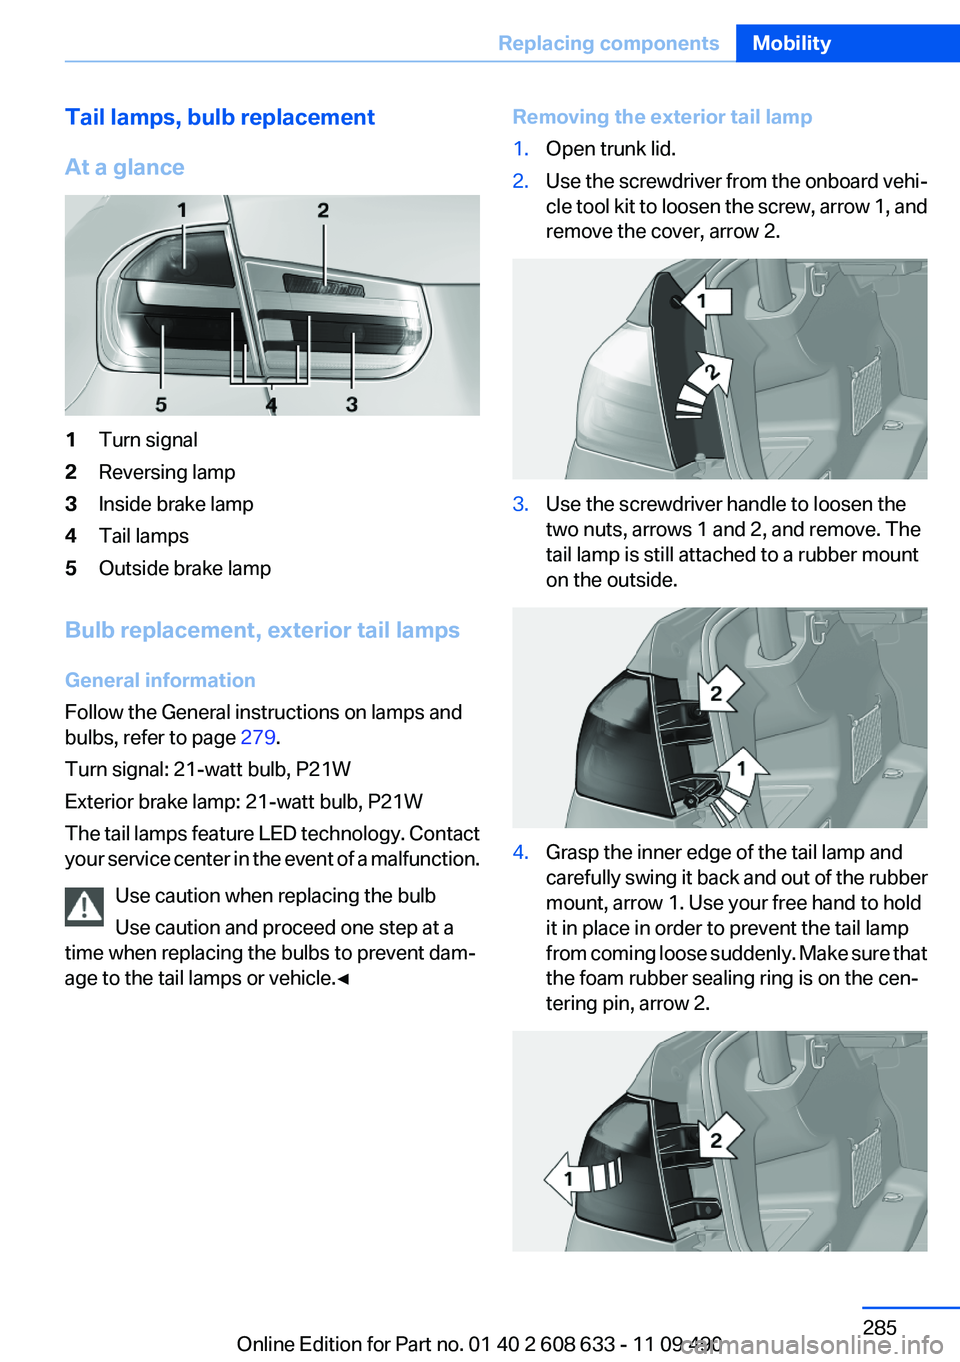
At a glance1Turn signal2Reversing lamp3Inside brake lamp4Tail lamps5Outside brake lamp
Bulb replacement, exterior tail lamps
General information
Follow the General instructions on lamps and
bulbs, refer to page 279.
Turn signal: 21-watt bulb, P21W
Exterior brake lamp: 21-watt bulb, P21W
The tail lamps feature LED technology. Contact
your service center in the event of a malfunction.
Use caution when replacing the bulb
Use caution and proceed one step at a
time when replacing the bulbs to prevent dam‐
age to the tail lamps or vehicle.◀
Removing the exterior tail lamp1.Open trunk lid.2.Use the screwdriver from the onboard vehi‐
cle tool kit to loosen the screw, arrow 1, and
remove the cover, arrow 2.3.Use the screwdriver handle to loosen the
two nuts, arrows 1 and 2, and remove. The
tail lamp is still attached to a rubber mount
on the outside.4.Grasp the inner edge of the tail lamp and
carefully swing it back and out of the rubber
mount, arrow 1. Use your free hand to hold
it in place in order to prevent the tail lamp
from coming loose suddenly. Make sure that
the foam rubber sealing ring is on the cen‐
tering pin, arrow 2.Seite 285Replacing componentsMobility285
Online Edition for Part no. 01 40 2 608 633 - 11 09 490
Page 286 of 325
5.Remove the connecting line from the clip on
the bulb holder.6.Release the catch at the top on the connec‐
tor of the connecting line and remove the
connector from the bulb holder.
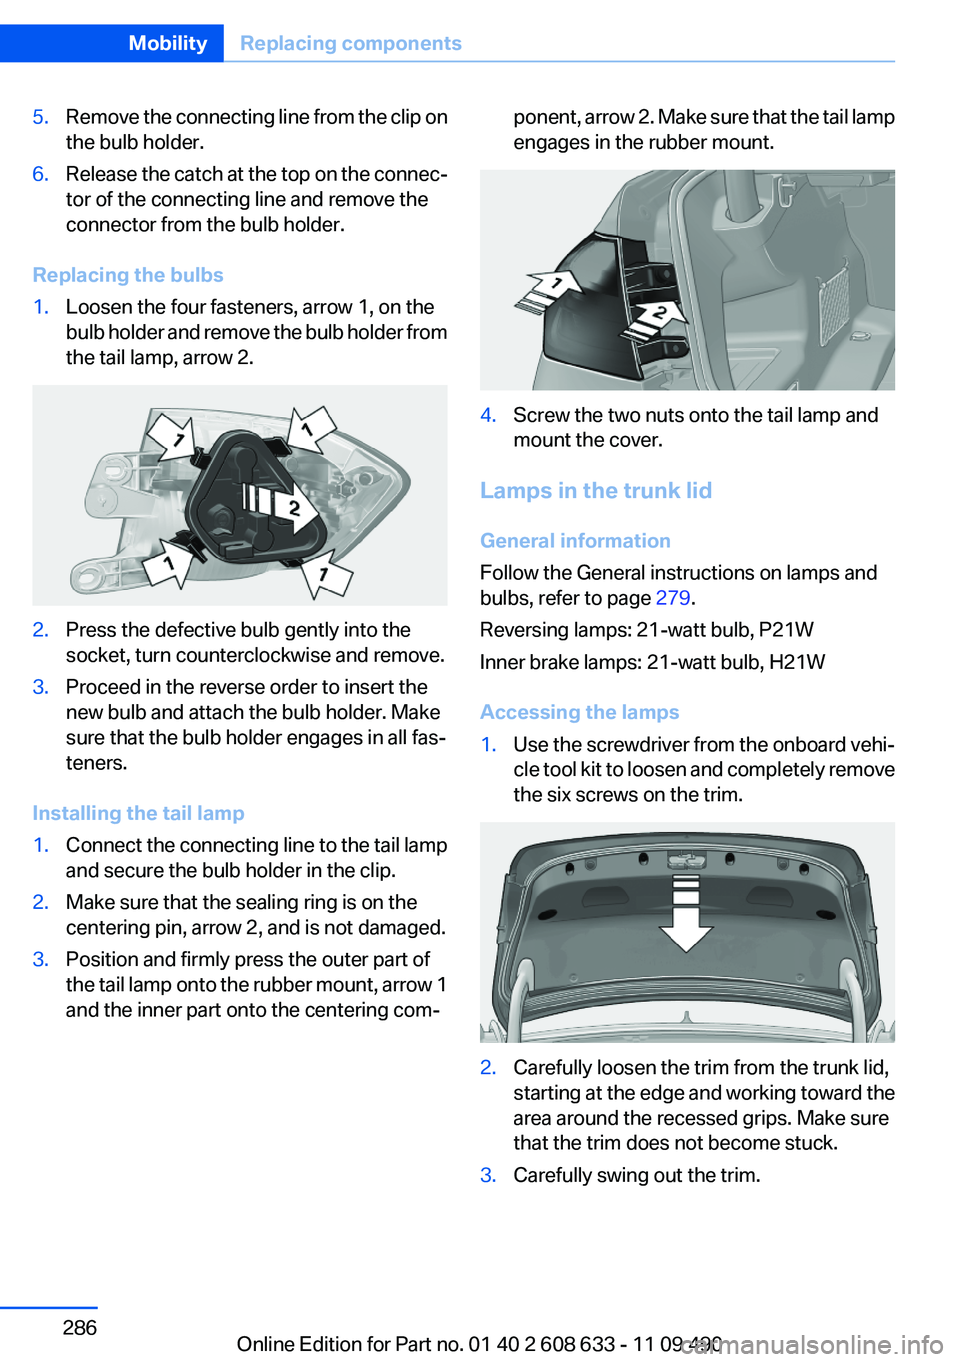
Replacing the bulbs
1.Loosen the four fasteners, arrow 1, on the
bulb holder and remove the bulb holder from
the tail lamp, arrow 2.2.Press the defective bulb gently into the
socket, turn counterclockwise and remove.3.Proceed in the reverse order to insert the
new bulb and attach the bulb holder. Make
sure that the bulb holder engages in all fas‐
teners.
Installing the tail lamp
1.Connect the connecting line to the tail lamp
and secure the bulb holder in the clip.2.Make sure that the sealing ring is on the
centering pin, arrow 2, and is not damaged.3.Position and firmly press the outer part of
the tail lamp onto the rubber mount, arrow 1
and the inner part onto the centering com‐ponent, arrow 2. Make sure that the tail lamp
engages in the rubber mount.4.Screw the two nuts onto the tail lamp and
mount the cover.
Lamps in the trunk lid
General information
Follow the General instructions on lamps and
bulbs, refer to page 279.
Reversing lamps: 21-watt bulb, P21W
Inner brake lamps: 21-watt bulb, H21W
Accessing the lamps
1.Use the screwdriver from the onboard vehi‐
cle tool kit to loosen and completely remove
the six screws on the trim.2.Carefully loosen the trim from the trunk lid,
starting at the edge and working toward the
area around the recessed grips. Make sure
that the trim does not become stuck.3.Carefully swing out the trim.Seite 286MobilityReplacing components286
Online Edition for Part no. 01 40 2 608 633 - 11 09 490
Page 287 of 325
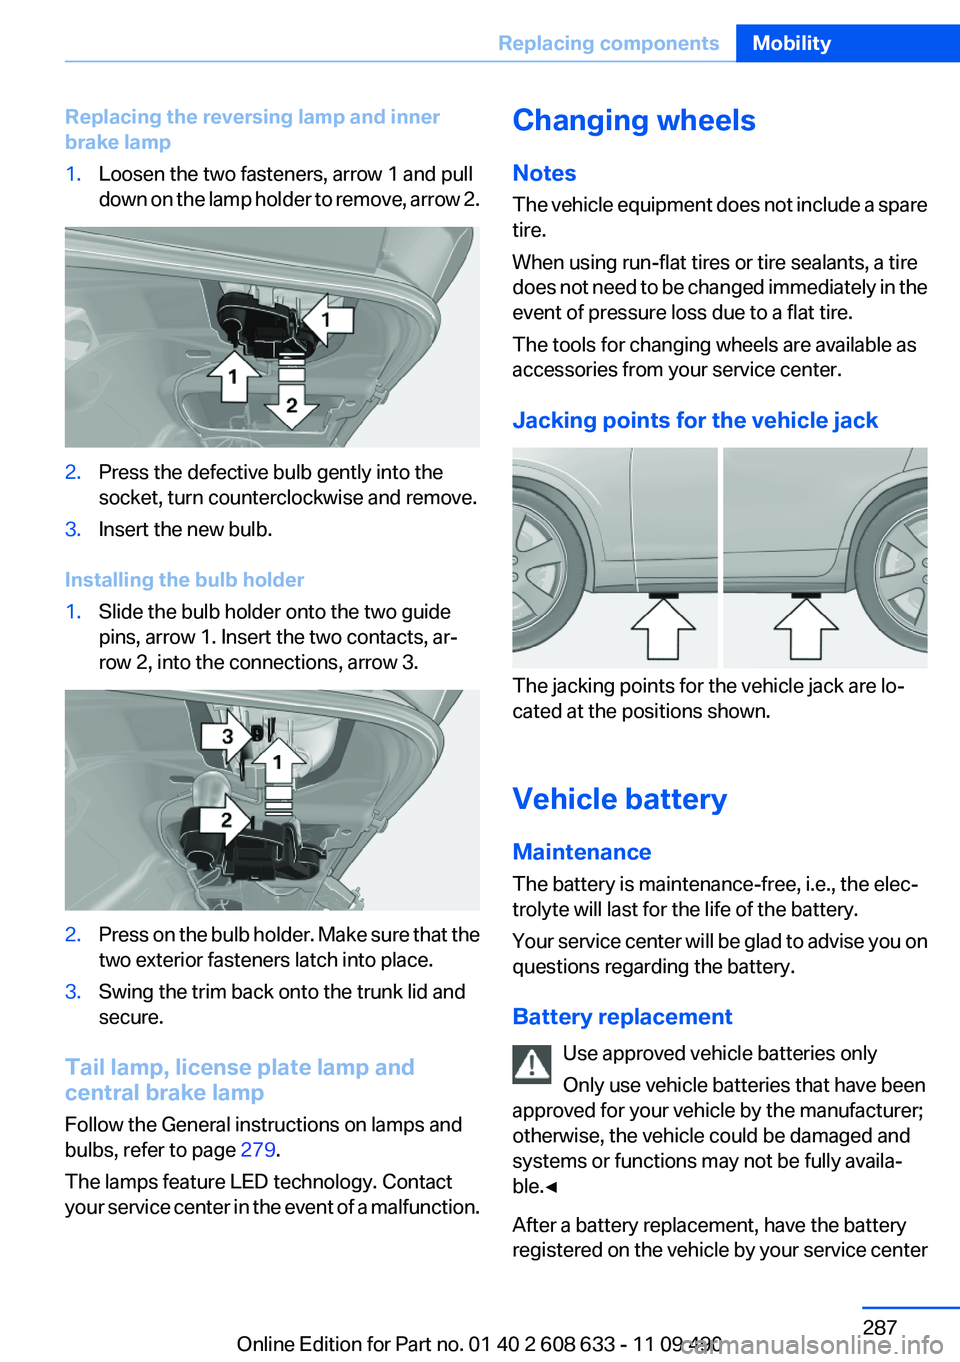
Replacing the reversing lamp and inner
brake lamp1.Loosen the two fasteners, arrow 1 and pull
down on the lamp holder to remove, arrow 2.2.Press the defective bulb gently into the
socket, turn counterclockwise and remove.3.Insert the new bulb.
Installing the bulb holder
1.Slide the bulb holder onto the two guide
pins, arrow 1. Insert the two contacts, ar‐
row 2, into the connections, arrow 3.2.Press on the bulb holder. Make sure that the
two exterior fasteners latch into place.3.Swing the trim back onto the trunk lid and
secure.
Tail lamp, license plate lamp and
central brake lamp
Follow the General instructions on lamps and
bulbs, refer to page 279.
The lamps feature LED technology. Contact
your service center in the event of a malfunction.
Changing wheels
Notes
The vehicle equipment does not include a spare
tire.
When using run-flat tires or tire sealants, a tire
does not need to be changed immediately in the
event of pressure loss due to a flat tire.
The tools for changing wheels are available as
accessories from your service center.
Jacking points for the vehicle jack
The jacking points for the vehicle jack are lo‐
cated at the positions shown.
Vehicle battery
Maintenance
The battery is maintenance-free, i.e., the elec‐
trolyte will last for the life of the battery.
Your service center will be glad to advise you on
questions regarding the battery.
Battery replacement Use approved vehicle batteries only
Only use vehicle batteries that have been
approved for your vehicle by the manufacturer;
otherwise, the vehicle could be damaged and
systems or functions may not be fully availa‐
ble.◀
After a battery replacement, have the battery
registered on the vehicle by your service center
Seite 287Replacing componentsMobility287
Online Edition for Part no. 01 40 2 608 633 - 11 09 490
Page 291 of 325
Assist Response Center contacts you and
takes further steps to help you.
Even if you are unable to respond, the BMW
Assist Response Center can take further
steps to help you under certain circumstan‐
ces.
For this purpose, data that are used to de‐
termine the necessary rescue measures,
such as the current position of the vehicle if
it can be established, are transmitted to the
BMW Assist Response Center.▷If the LED is flashing but the BMW Assist
Response Center cannot be heard on the
hands-free system, the hands-free system
may be malfunctioning. However, the BMW
Assist Response Center may still be able to
hear you.
Initiating an Emergency Request
automatically
Under certain conditions, an Emergency Re‐
quest is automatically initiated immediately after
a severe accident. Automatic Collision Notifica‐
tion is not affected by pressing the SOS button.
Warning triangle
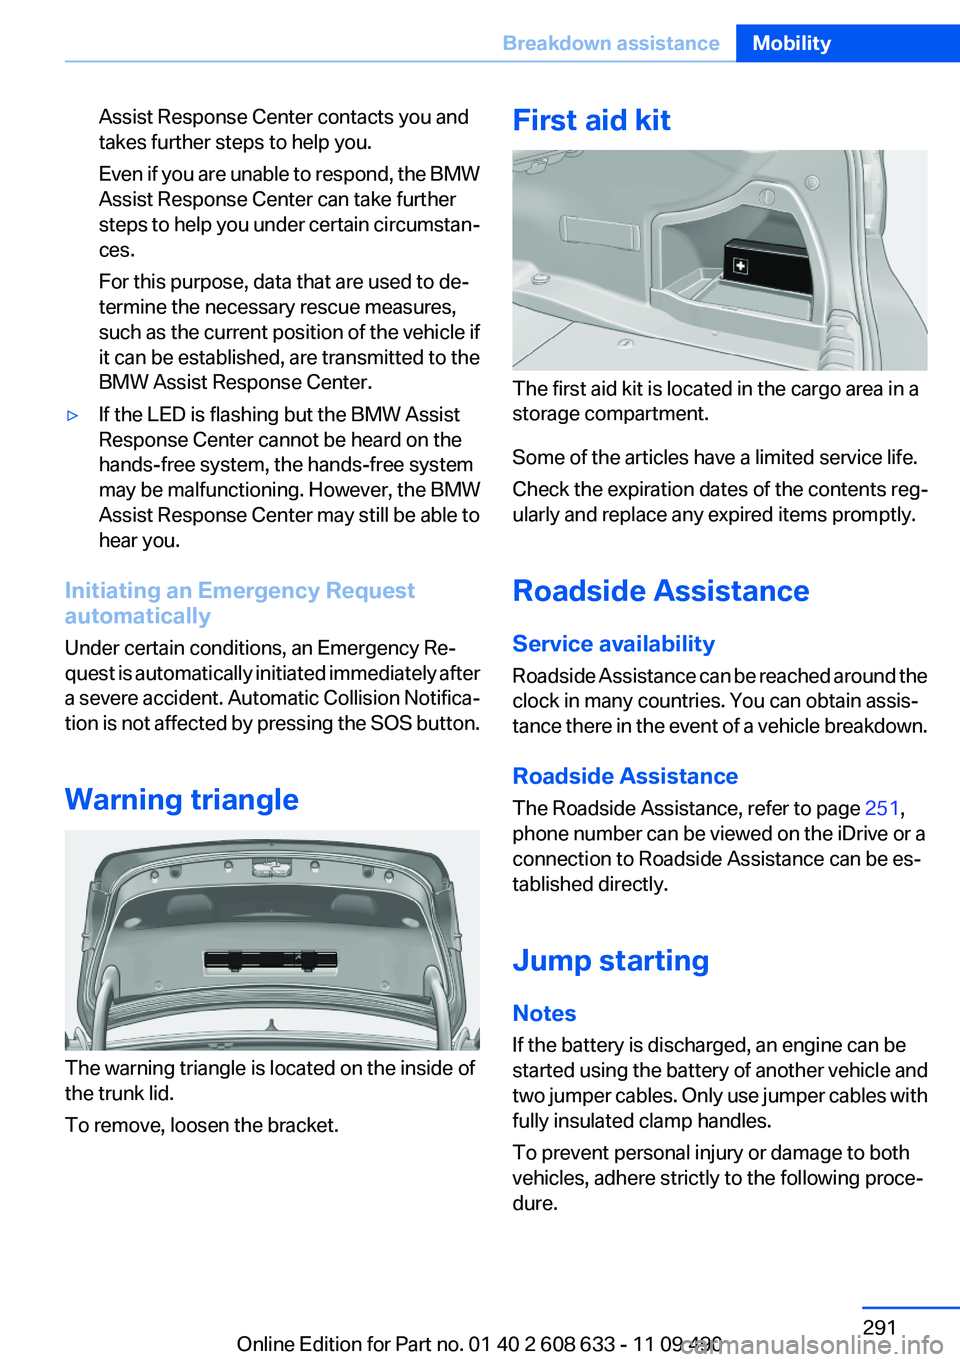
The warning triangle is located on the inside of
the trunk lid.
To remove, loosen the bracket.
First aid kit
The first aid kit is located in the cargo area in a
storage compartment.
Some of the articles have a limited service life.
Check the expiration dates of the contents reg‐
ularly and replace any expired items promptly.
Roadside Assistance
Service availability
Roadside Assistance can be reached around the
clock in many countries. You can obtain assis‐
tance there in the event of a vehicle breakdown.
Roadside Assistance
The Roadside Assistance, refer to page 251,
phone number can be viewed on the iDrive or a
connection to Roadside Assistance can be es‐
tablished directly.
Jump starting
Notes
If the battery is discharged, an engine can be
started using the battery of another vehicle and
two jumper cables. Only use jumper cables with
fully insulated clamp handles.
To prevent personal injury or damage to both
vehicles, adhere strictly to the following proce‐
dure.
Seite 291Breakdown assistanceMobility291
Online Edition for Part no. 01 40 2 608 633 - 11 09 490
Page 304 of 325
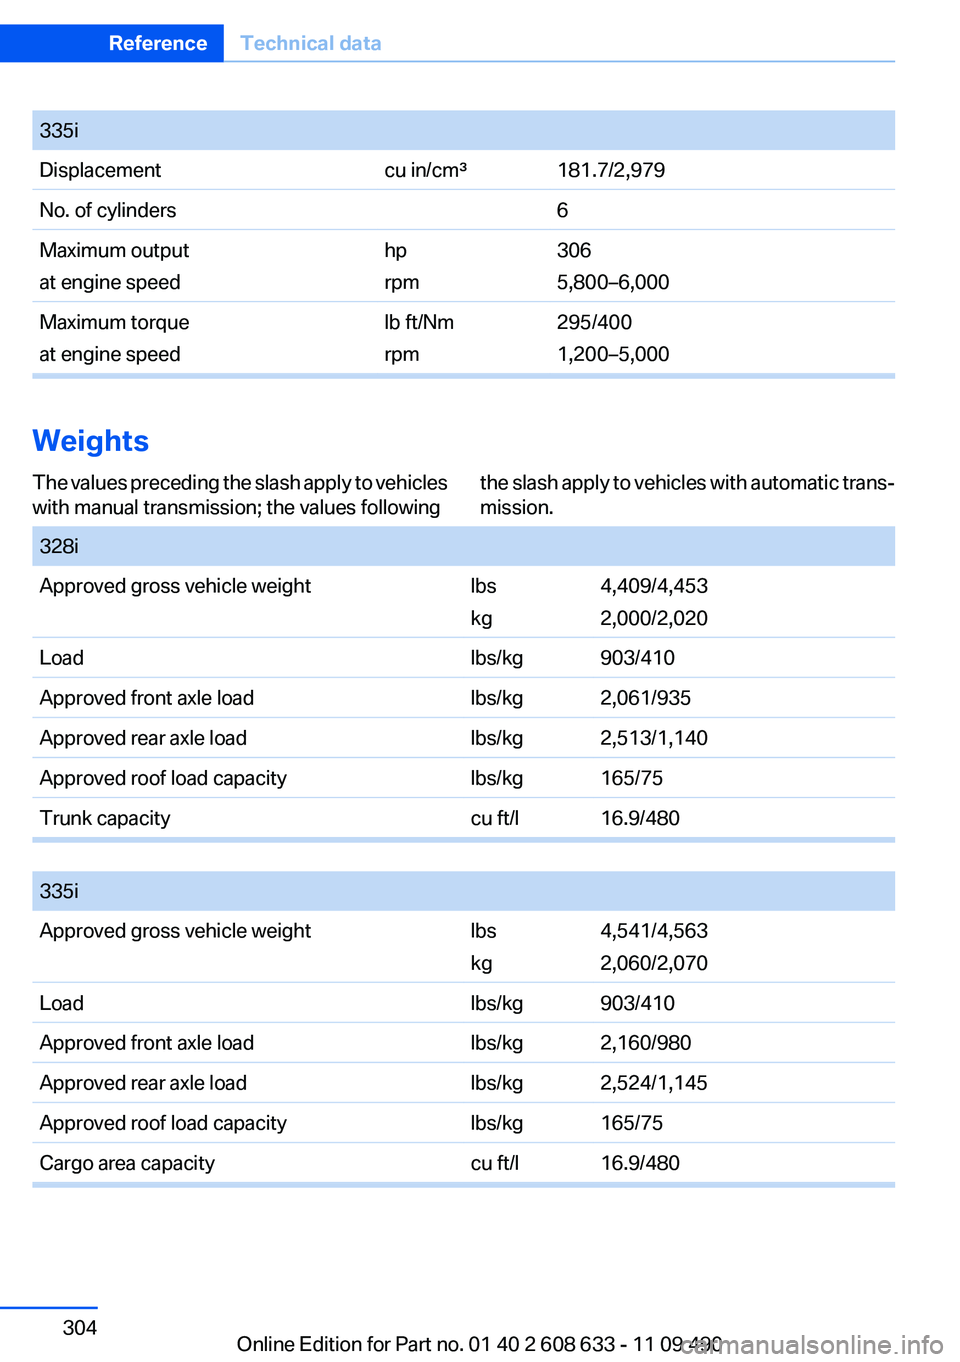
335iDisplacementcu in/cm³181.7/2,979No. of cylinders6Maximum output
at engine speedhp
rpm306
5,800–6,000Maximum torque
at engine speedlb ft/Nm
rpm295/400
1,200–5,000
Weights
The values preceding the slash apply to vehicles
with manual transmission; the values followingthe slash apply to vehicles with automatic trans‐
mission. 328iApproved gross vehicle weightlbs
kg4,409/4,453
2,000/2,020Loadlbs/kg903/410Approved front axle loadlbs/kg2,061/935Approved rear axle loadlbs/kg2,513/1,140Approved roof load capacitylbs/kg165/75Trunk capacitycu ft/l16.9/480
335iApproved gross vehicle weightlbs
kg4,541/4,563
2,060/2,070Loadlbs/kg903/410Approved front axle loadlbs/kg2,160/980Approved rear axle loadlbs/kg2,524/1,145Approved roof load capacitylbs/kg165/75Cargo area capacitycu ft/l16.9/480Seite 304ReferenceTechnical data304
Online Edition for Part no. 01 40 2 608 633 - 11 09 490
Page 316 of 325
Corrosion on brake discs 158
Cruise control 119
Cruise control, active with Stop & Go 109
Cruising range 76
Cupholder 150
Current fuel consumption 77
Current location, storing 170
Customer Relations 253
D
Damage, tires 269
Damping control, dy‐ namic 105
Data, technical 302
Date 76
Daytime running lights 87
Defrosting, refer to defrosting the windows 135
Defrosting, refer to Windows, defrosting 138
Defrosting the windows 135
Destination distance 82
Destination guidance 176
Destination guidance with in‐ termediate destinations 174
Destination input, naviga‐ tion 168
Digital clock 76
Digital compass 143
Digital radio 191
Dimensions 302
Dimmable exterior mirrors 53
Dimmable interior rearview mirror 53
Direction indicator, refer to Turn signals 64
Displacement, engine 303
Display, ECO PRO 163
Display, electronic, instrument cluster 72
Display in front wind‐ shield 128
Display lighting, refer to Instru‐ ment lighting 89 Displays 70
Displays, cleaning 299
Disposal, coolant 276
Disposal, vehicle battery 288
Distance control, refer to PDC 121
Distance, selecting for ACC 111
Distance to destination 82
Divided screen view, split screen 21
Door lock, refer to Remote control 30
Drive-off assistant 108
Drive-off assistant, refer to DSC 104
Driving Experience Switch 106
Driving instructions, breaking in 156
Driving notes, general 156
Driving stability control sys‐ tems 104
Driving tips 156
DSC Dynamic Stability Con‐ trol 104
DTC Dynamic Traction Con‐ trol 105
DVD/CD 198
DVD/CD notes 204
DVD changer 202
DVD settings 201
DVDs, storing 205
DVD, video 200
Dynamic Damping Con‐ trol 105
Dynamic destination guid‐ ance 183
Dynamic Stability Control DSC 104
Dynamic Traction Control DTC 105
E
ECO PRO 163 EfficientDynamics 164
EfficientDynamics menu, refer to ECO PRO 163
Electronic displays, instru‐ ment cluster 72
Electronic Stability Program ESP, refer to DSC 104
Emergency detection, remote control 31
Emergency release, door lock 37
Emergency release, fuel filler flap 260
Emergency Request 290
Emergency service, refer to Roadside Assistance 291
Emergency start function, en‐ gine start 31
Emergency unlocking, trunk lid 38
Energy Control 77
Energy recovery 77
Engine, automatic start/stop function 61
Engine, automatic switch- off 61
Engine compartment 272
Engine compartment, working in 273
Engine coolant 276
Engine oil 274
Engine oil, adding 274
Engine oil additives 275
Engine oil change 275
Engine oil filler neck 274
Engine oil temperature 75
Engine oil types, alterna‐ tive 275
Engine oil types, ap‐ proved 275
Engine specifications 303
Engine start during malfunc‐ tion 31
Engine start, refer to Starting the engine 60
Engine start, Starting aid 291 Seite 316ReferenceEverything from A to Z316
Online Edition for Part no. 01 40 2 608 633 - 11 09 490
Page 317 of 325
Engine stop 61
Engine temperature 75
Entering a car wash 296
Equalizer 188
Equipment, interior 141
ESP Electronic Stability Pro‐ gram, refer to DSC 104
Exchanging wheels/tires 269
Exhaust system 156
Exterior mirror, automatic dim‐ ming feature 53
Exterior mirrors 52
External devices 210
External start 291
External temperature dis‐ play 76
External temperature warn‐ ing 76
Eyes for securing cargo 160
F
Fader 188
Failure message, refer to Check Control 73
False alarm, refer to Uninten‐ tional alarm 41
Fan, refer to Air flow 135
Fan, refer to Air volume 138
Fault displays, refer to Check Control 73
Filler neck for engine oil 274
Fine wood, care 298
First aid kit 291
Fitting for towing, refer to Tow fitting 294
Flat tire, changing wheels 287
Flat Tire Monitor FTM 97
Flat tire, Tire Pressure Monitor TPM 94
Flat tire, warning lamp 95, 98
Flooding 157
Floor carpet, care 298
Floor mats, care 298
FM/AM station 190
Fogged up windows 135 Fold-out position, windshield
wipers 66
Foot brake 157
Front airbags 91
Front fog lamps 89
Front fog lamps, front, bulb re‐ placement 284
Front lamps 280
Front passenger airbags, au‐ tomatic deactivation 93
Front passenger airbags, indi‐ cator lamp 93
FTM Flat Tire Monitor 97
Fuel cap 260
Fuel consumption, current 77
Fuel consumption, refer to Average fuel consump‐
tion 82
Fuel filler flap 260
Fuel gauge 75
Fuel quality 262
Fuel, tank capacity 305
Fuse 288
G
Garage door opener, refer to Integrated universal remote
control 141
Gas station recommenda‐ tion 178
Gear change, automatic trans‐ mission 67
Gear shift indicator 78
General driving notes 156
Glass sunroof, powered 43
Glove compartment 148
Gong, volume equaliza‐ tion 189
GPS navigation 168
Gray display of the map 181
Gross vehicle weight, ap‐ proved 304
Gross weight, permissible for trailer towing 304 H
Handbrake, refer to parking brake 63
Hand-held transmitter, alter‐ nating code 142
Hazard warning flashers 290
HD Radio 191
Head airbags 91
Headlamp control, auto‐ matic 87
Headlamp courtesy delay fea‐ ture 87
Headlamp flasher 64
Headlamp glass 280
Headlamps 280
Headlamps, care 297
Headlamp washer system 65
Headliner 15
Head restraints 45
Head restraints, front 49
Head restraints, rear 50
Head-up Display 128
Head-up Display, care 299
Heavy cargo, stowing 160
Height, vehicle 302
High-beam Assistant 88
High beams 64
High beams/low beams, refer to High-beam Assistant 88
Hills 158
Hill start assistant, refer to Drive-off assistant 108
Hints 6
Holder for beverages 150
Homepage 6
Hood 273
Horn 12
Hotel function, trunk lid 38
Hot exhaust system 156
House number, entering for navigation 169
Hydroplaning 157 Seite 317Everything from A to ZReference317
Online Edition for Part no. 01 40 2 608 633 - 11 09 490