2012 BMW 328I light
[x] Cancel search: lightPage 94 of 268
Technology for driving comfort and safety
92
Status indicator on the Control Display
The color of the tires represents the status of
the tires and the system.
TPM takes into account that tire pressures
change while the vehicle is being driven. The
tire pressures do not need to be corrected
unless the TPM instructs you to do so by means
of color indicators.
Green
The tire inflation pressure corresponds to the
established target value.
"TPM active" appears on the Control Display.
One wheel yellow
There is a flat tire or substantial loss of tire pres-
sure in the indicated tire. A message appears on
the Control Display.
All wheels yellow
There is a flat tire or substantial loss of tire pres-
sure in several tires. A message appears on the
Control Display.
Gray
The system cannot detect a puncture.
Possible reasons for this:
>TPM is being reset
>Temporary malfunction caused by systems
or devices using the same radio frequency
>Malfunction
Resetting the system
Each time a tire inflation pressure has
been corrected or a wheel or tire has been
changed, reset the system.<
iDrive, for operating principle refer to page16.
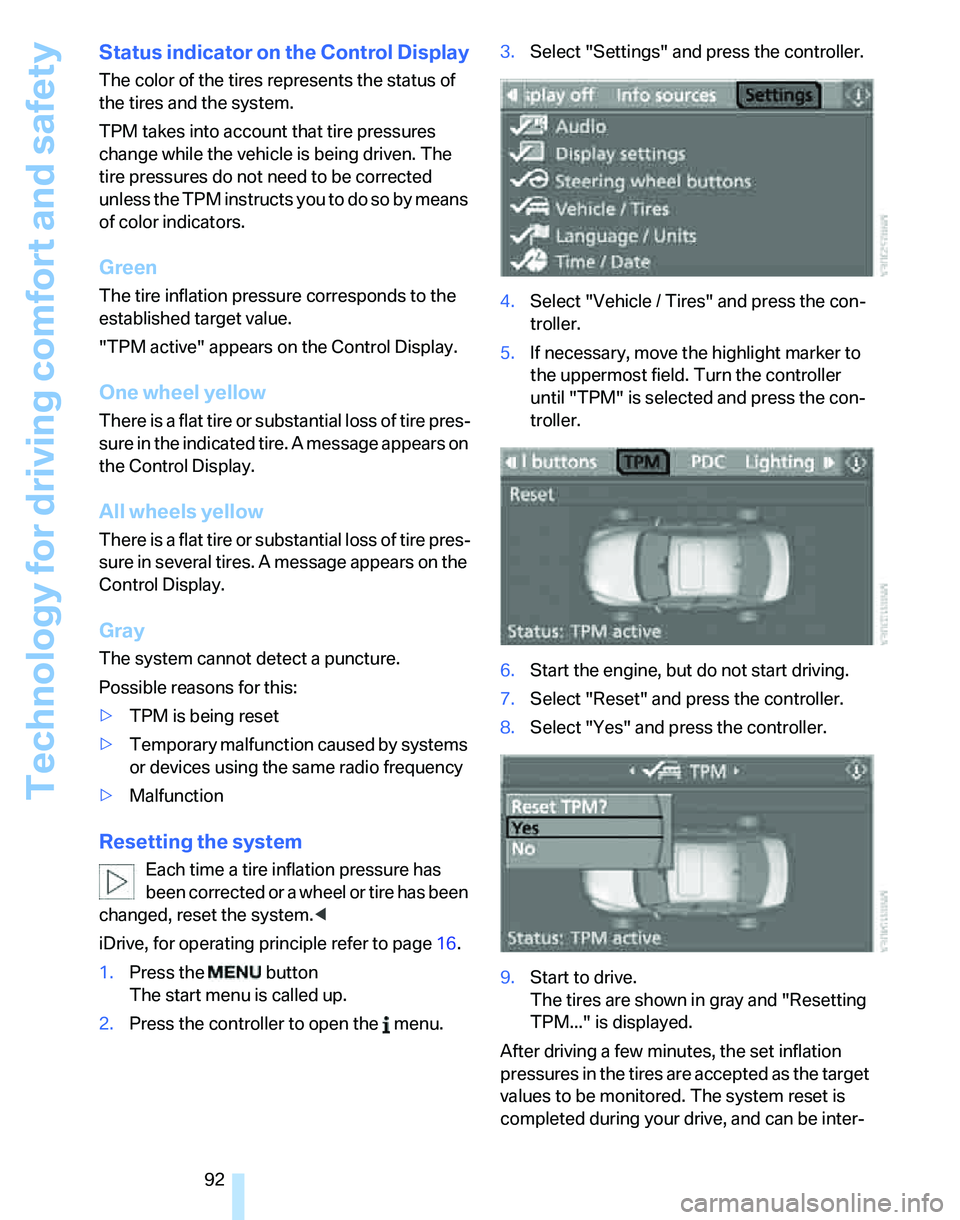
1.Press the button
The start menu is called up.
2.Press the controller to open the menu.3.Select "Settings" and press the controller.
4.Select "Vehicle / Tires" and press the con-
troller.
5.If necessary, move the highlight marker to
the uppermost field. Turn the controller
until "TPM" is selected and press the con-
troller.
6.Start the engine, but do not start driving.
7.Select "Reset" and press the controller.
8.Select "Yes" and press the controller.
9.Start to drive.
The tires are shown in gray and "Resetting
TPM..." is displayed.
After driving a few minutes, the set inflation
pressures in the tires are accepted as the target
values to be monitored. The system reset is
completed during your drive, and can be inter-
will be adapted
will be adapted
Page 95 of 268
Controls
93Reference
At a glance
Driving tips
Communications
Navigation
Entertainment
Mobility
rupted at any time. When driving resumes, the
reset is continued automatically. On the Control
Display, the tires are shown in green and "Sta-
tus: TPM active" is shown again.
If a flat tire is detected while the system is
resetting and determining the inflation
pressures, all tires on the Control Display are
displayed in yellow. The message "Tire low!" is
shown.<
Message for low tire inflation pressure
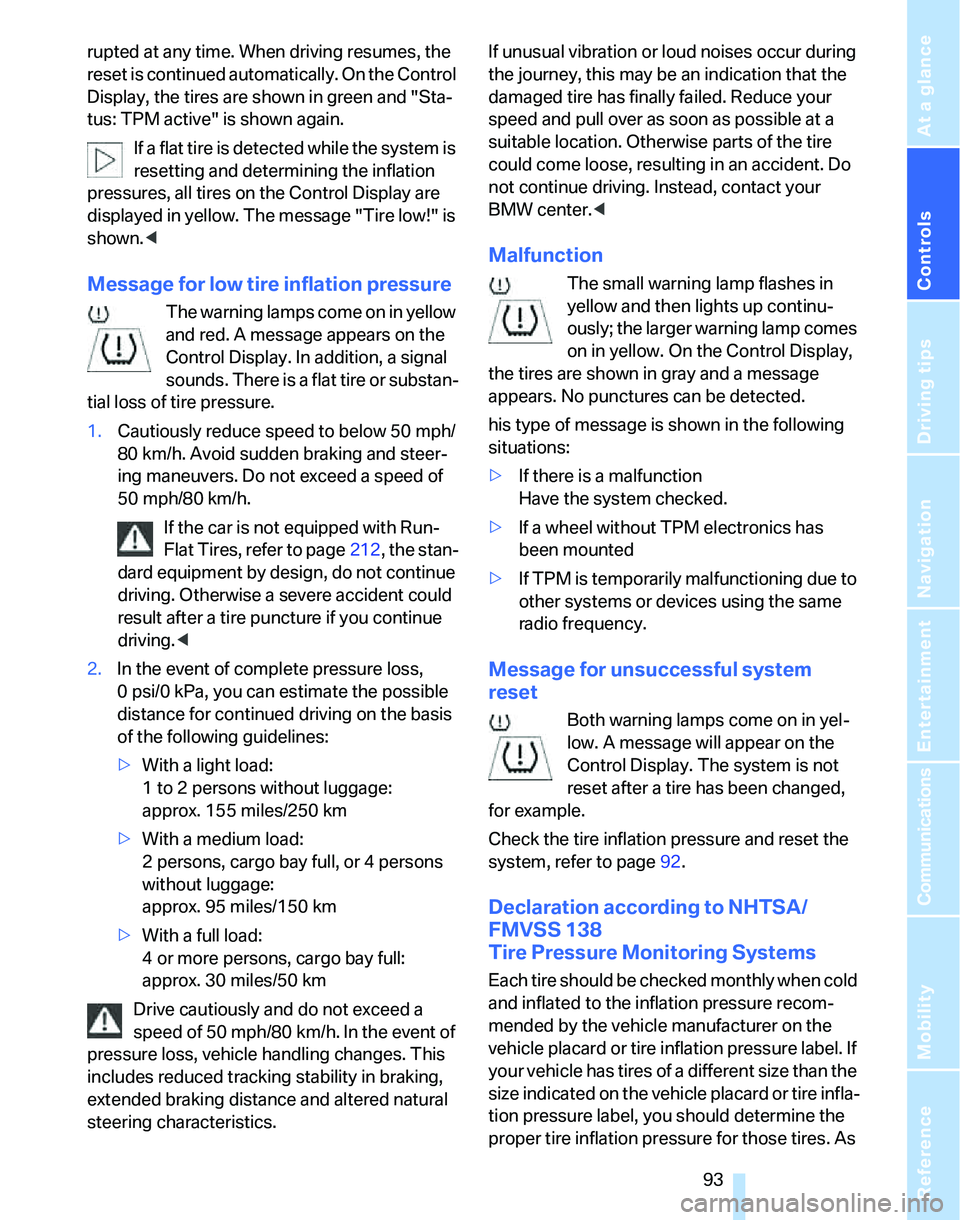
The warning lamps come on in yellow
and red. A message appears on the
Control Display. In addition, a signal
sounds. There is a flat tire or substan-
tial loss of tire pressure.
1.Cautiously reduce speed to below 50 mph/
80 km/h. Avoid sudden braking and steer-
ing maneuvers. Do not exceed a speed of
50 mph/80 km/h.
If the car is not equipped with Run-
Flat Tires, refer to page212, the stan-
dard equipment by design, do not continue
driving. Otherwise a severe accident could
result after a tire puncture if you continue
driving.<
2.In the event of complete pressure loss,
0 psi/0 kPa, you can estimate the possible
distance for continued driving on the basis
of the following guidelines:
>With a light load:
1 to 2 persons without luggage:
approx. 155 miles/250 km
>With a medium load:
2 persons, cargo bay full, or 4 persons
without luggage:
approx. 95 miles/150 km
>With a full load:
4 or more persons, cargo bay full:
approx. 30 miles/50 km
Drive cautiously and do not exceed a
speed of 50 mph/80 km/h. In the event of
pressure loss, vehicle handling changes. This
includes reduced tracking stability in braking,
extended braking distance and altered natural
steering characteristics.If unusual vibration or loud noises occur during
the journey, this may be an indication that the
damaged tire has finally failed. Reduce your
speed and pull over as soon as possible at a
suitable location. Otherwise parts of the tire
could come loose, resulting in an accident. Do
not continue driving. Instead, contact your
BMW center.<
Malfunction
The small warning lamp flashes in
yellow and then lights up continu-
ously; the larger warning lamp comes
on in yellow. On the Control Display,
the tires are shown in gray and a message
appears. No punctures can be detected.
his type of message is shown in the following
situations:
>If there is a malfunction
Have the system checked.
>If a wheel without TPM electronics has
been mounted
>If TPM is temporarily malfunctioning due to
other systems or devices using the same
radio frequency.
Message for unsuccessful system
reset
Both warning lamps come on in yel-
low. A message will appear on the
Control Display. The system is not
reset after a tire has been changed,
for example.
Check the tire inflation pressure and reset the
system, refer to page92.
Declaration according to NHTSA/
FMVSS 138
Tire Pressure Monitoring Systems
Each tire should be checked monthly when cold
and inflated to the inflation pressure recom-
mended by the vehicle manufacturer on the
vehicle placard or tire inflation pressure label. If
your vehicle has tires of a different size than the
size indicated on the vehicle placard or tire infla-
tion pressure label, you should determine the
proper tire inflation pressure for those tires. As
Page 96 of 268
Technology for driving comfort and safety
94 an added safety feature, your vehicle has been
equipped with a tire pressure monitoring sys-
tem, TPMS, that illuminates a low tire pressure
telltale when one or more of your tires are signif-
icantly under-inflated. Accordingly, when the
low tire pressure telltale illuminates, you should
stop and check your tires as soon as possible,
and inflate them to the proper pressure. Driving
on a significantly underinflated tire causes the
tire to overheat and can lead to tire failure.
Underinflation also reduces fuel efficiency and
tire tread life, and may affect the vehicle’s han-
dling and stopping ability. Please note that the
TPMS is not a substitute for proper tire mainte-
nance, and it is the driver’s responsibility to
maintain correct tire pressure, even if underin-
flation has not reached the level at which the
TPMS low tire pressure telltale illuminates.
The TPMS malfunction indicator is combined
with the low tire pressure telltale. When the sys-
tem detects a malfunction, the telltale will flash
for approximately one minute and then remain
continuously lit. This sequence will continue
upon subsequent vehicle startups as long as
the malfunction exists. When the malfunction
indicator is illuminated, the system may not be
able to detect or signal low tire pressure as
intended. TPMS malfunctions may occur for a
variety of reasons, including the installation of
replacement or alternate tires or wheels on the
vehicle that prevent the TPMS from functioning
properly. Always check the TPMS malfunction
telltale after replacing one or more tires or
wheels on your vehicle to ensure that the
replacement or alternate tires and wheels allow
the TPMS to continue to function properly.
Active steering*
The concept
Active steering varies the turning angle of the
front wheels in relation to steering wheel move-
ments. It also varies the steering force required
to turn the wheels depending on the speed at
which you are driving.
When you are driving in the low road-speed
range, e.g. in a town or when parking, the steer-ing angle increases, i.e. the steering becomes
very direct, and less effort is required to turn the
wheels. In the higher speed range, on the other
hand, the steering angle is reduced more and
more. This improves the handling capability of
your BMW over the entire speed range.
In critical situations, the system can make tar-
geted corrections to the steering angle pro-
vided by the driver and thus stabilize the vehicle
before the driver intervenes. This stabilizing
intervention is simultaneously deactivated
when DSC is switched off, refer to page88.
Malfunction
The warning lamps come on. Active
steering is no longer operational. At
low speeds, greater steering wheel
movements are required, whereas at
higher speeds the vehicle reacts more sensi-
tively to steering wheel movements. The stabil-
ity-enhancing feature may also be deactivated.
Drive cautiously and think well ahead. Have the
system checked.
If the warning lamp lights up during the first
engine starting following a power supply inter-
ruption, the system must be activated by being
initialized.
Brake Force Display
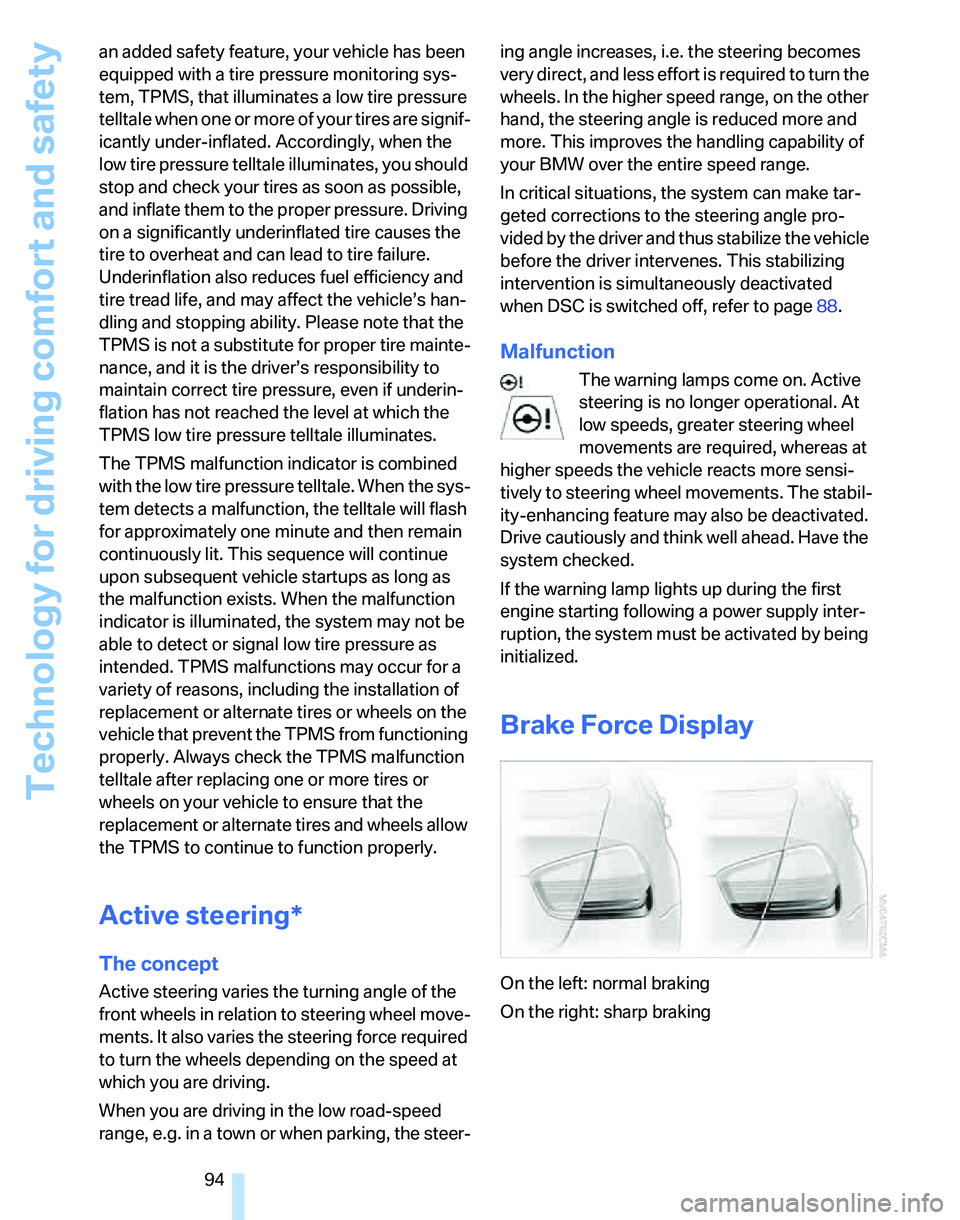
On the left: normal braking
On the right: sharp braking
Page 99 of 268

Controls
97Reference
At a glance
Driving tips
Communications
Navigation
Entertainment
Mobility
Lamps
Parking lamps/low beams
0Lamps off and daytime running lamps
1Parking lamps and daytime running lamps
2Low beams
3Automatic headlamp control
*, daytime run-
ning lamps and Adaptive Head Light
*
Parking lamps
In switch position1, the front, rear and side
vehicle lighting is switched on. You can use the
parking lamps for parking.
The parking lamps will discharge the bat-
tery. Therefore, do not leave them on for
unduly long periods of time, otherwise the bat-
tery might not have enough power to start the
engine. It is preferable to switch on the left-
hand or right-hand roadside parking lamps,
refer to page99.<
Low beams
The low beams light up when the light switch is
in position 2 and the ignition is on.
If the light switch remains in position 2, the
exterior lamps are switched off automatically
when the driver's door is opened while the igni-
tion is off.
If necessary, switch on the parking lamps as
described in the section about parking lamps.
Automatic headlamp control*
When the switch is in position3, the low beams
are switched on and off automatically depend-ing on ambient light conditions, e.g. in a tunnel,
in twilight, or if there is precipitation. The LED
next to the symbol is illuminated when the low
beams are on.
When driving into tunnels with bright overhead
lights, there may be a delay before the head-
lamps come on.
The headlamps may also come on when the
sun is sitting low on a blue sky.
The low beams remain switched on inde-
pendent of the ambient lighting condi-
tions when you switch on the fog lamps
*.<
If desired, the light switch can remain in position
3. The exterior lamps are automatically
switched off after the vehicle is parked.
The automatic headlamp control cannot
serve as a substitute for your personal
judgment in determining when the lamps
should be switched on in response to ambient
lighting conditions. For example, the system
cannot detect fog or hazy weather. To avoid
safety risks, you should always switch on the
low-beam headlamps manually under these
conditions.<
Adjusting sensitivity
You can program how sensitively the system
reacts to ambient light.
iDrive, for operating principle refer to page16.
1.Press the button.
This opens the start menu.
2.Press the controller to open the menu.
3.Select "Settings" and press the controller.
4.Select "Vehicle / Tires" and press the con-
troller.
Page 100 of 268

Lamps
98 5.Select "Lighting" and press the controller.
6.Select "Auto. headlamps" and press the
controller.
7.Select a menu item:
>"Sensitive"
>"Normal"
>"Slower"
8.Press the controller to apply the setting.
Pathway lighting
If you activate the headlamp flasher after park-
ing the car, with the lights switched off, the low
beams come on and remain on for a certain
time.
You can adjust the operating period or deacti-
vate the function.
1.Open the start menu.
2.Press the controller to open the menu.
3.Select "Settings" and press the controller.
4.Select "Vehicle / Tires" and press the con-
troller.5.Select "Lighting" and press the controller.
6.Select "Pathway lighting" and press the
controller.
7.Turn the controller to select the corre-
sponding duration.
8.Press the controller to apply the setting.
Daytime running lamps
If desired, the light switch can remain in auto-
matic headlamp control position. The exterior
lamps are automatically switched off after the
vehicle is parked.
If the light switch remains in parking lamps posi-
tion, the parking lamps are lit after the ignition is
switched off.
Activating/deactivating daytime
running lamps*
1.Open the start menu.
2.Press the controller to open the menu.
3.Select "Settings" and press the controller.
4.Select "Vehicle / Tires" and press the con-
troller.
5.Select "Lighting" and press the controller.
6.Select "Daytime running lamps" and press
the controller.
Page 101 of 268
Controls
99Reference
At a glance
Driving tips
Communications
Navigation
Entertainment
Mobility
The daytime running lamps are
switched on.
Adaptive Head Light*
The concept
Adaptive Head Light is a variable headlamp
control system that enables better illumination
of the road surface. Depending on the steering
angle and other parameters, the light from the
headlamp follows the course of the road.
Activating Adaptive Head Light
With the ignition switched on, turn the light
switch to the automatic headlamp control posi-
tion, refer to page97.
To avoid dazzling the drivers of oncoming vehi-
cles, Adaptive Head Light is not active when the
car is driven in reverse, and directs the light to
the front passenger's side when the vehicle is at
a standstill.
Malfunction
The LED next to the symbol for automatic head-
lamp control flashes. Adaptive Head Light is
malfunctioning or has failed. Have the system
checked as soon as possible.
High beams/roadside parking
lamps
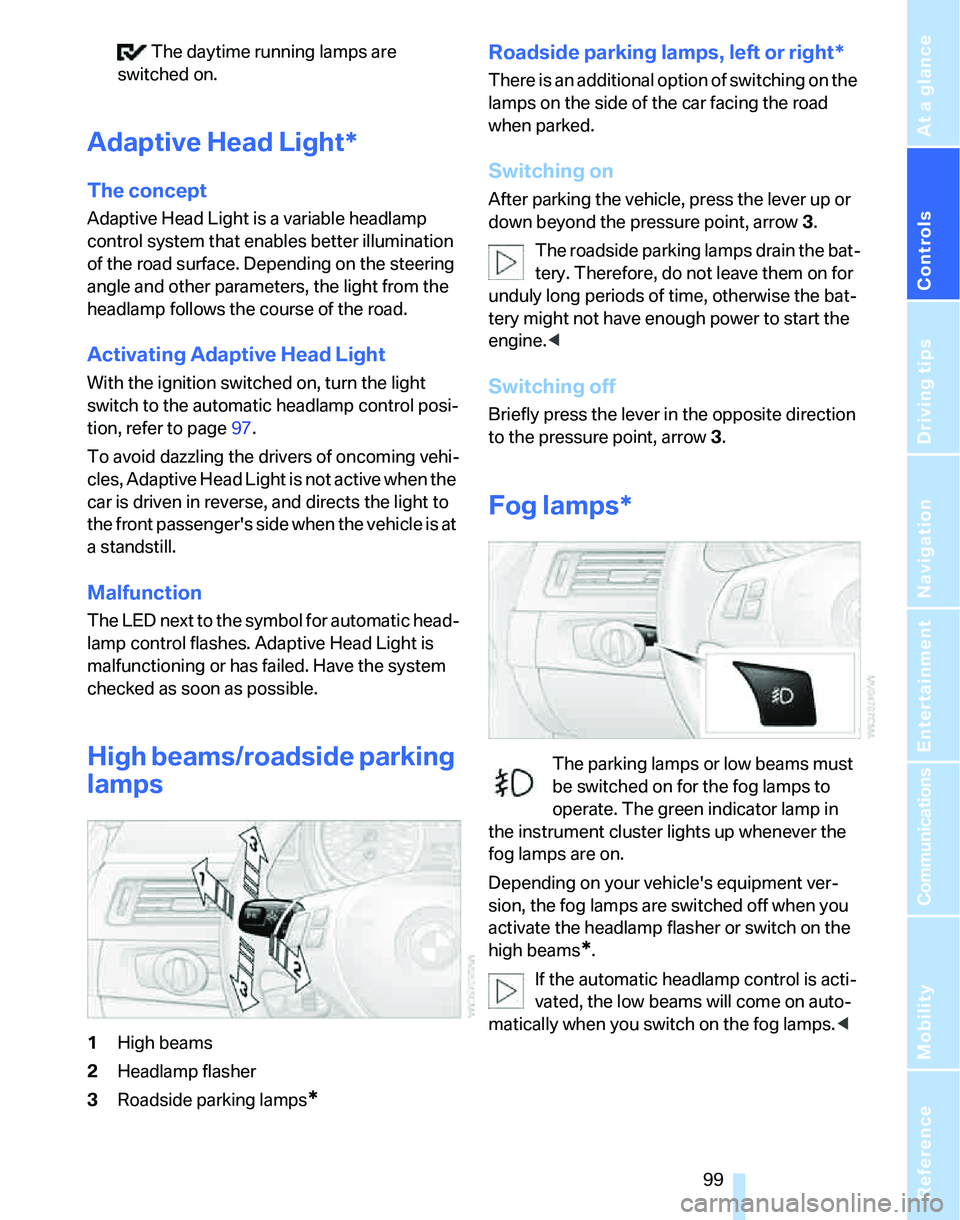
1High beams
2Headlamp flasher
3Roadside parking lamps
*
Roadside parking lamps, left or right*
There is an additional option of switching on the
lamps on the side of the car facing the road
when parked.
Switching on
After parking the vehicle, press the lever up or
down beyond the pressure point, arrow 3.
The roadside parking lamps drain the bat-
tery. Therefore, do not leave them on for
unduly long periods of time, otherwise the bat-
tery might not have enough power to start the
engine.<
Switching off
Briefly press the lever in the opposite direction
to the pressure point, arrow 3.
Fog lamps*
The parking lamps or low beams must
be switched on for the fog lamps to
operate. The green indicator lamp in
the instrument cluster lights up whenever the
fog lamps are on.
Depending on your vehicle's equipment ver-
sion, the fog lamps are switched off when you
activate the headlamp flasher or switch on the
high beams
*.
If the automatic headlamp control is acti-
vated, the low beams will come on auto-
matically when you switch on the fog lamps.<
Page 102 of 268
Lamps
100
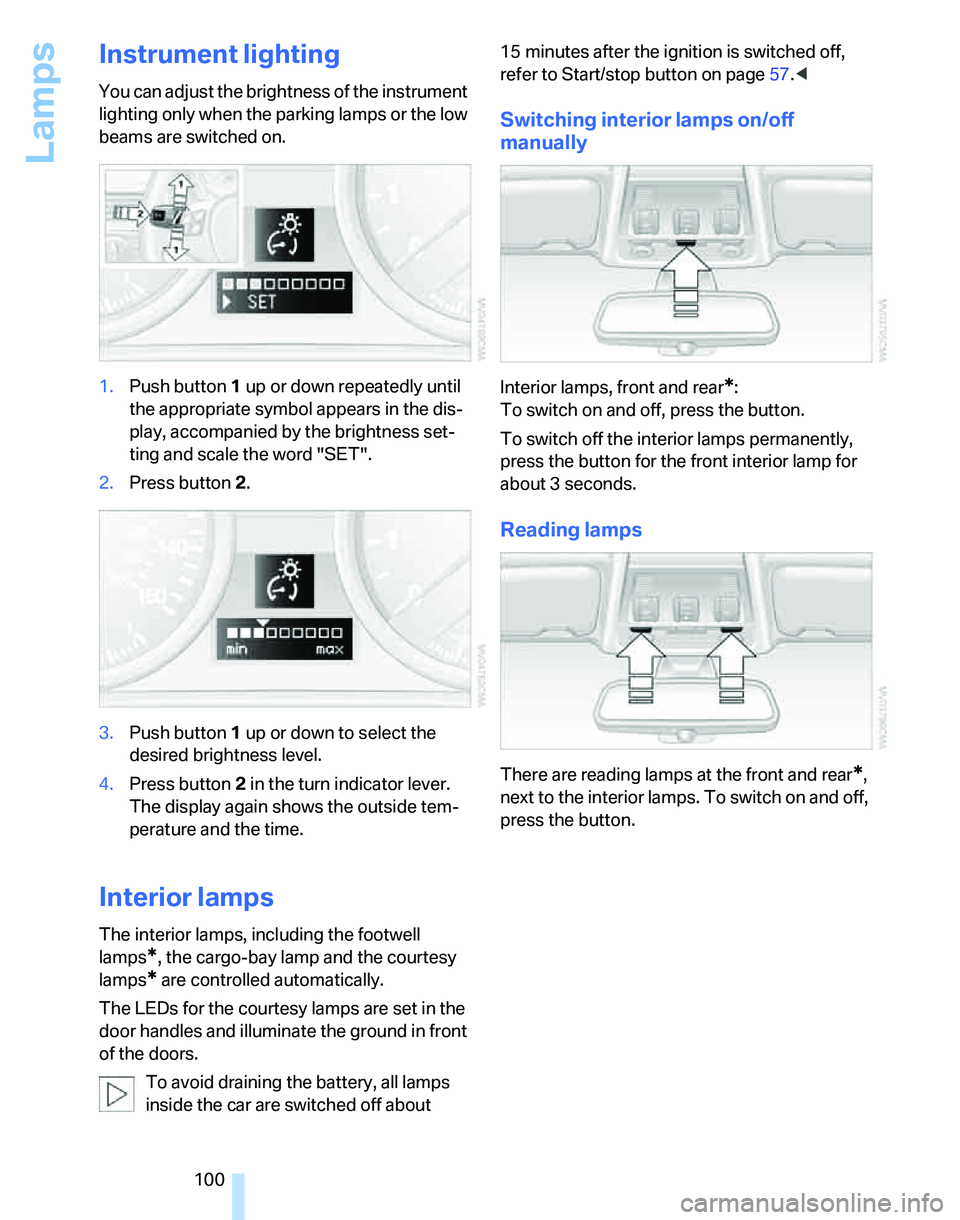
Instrument lighting
You can adjust the brightness of the instrument
lighting only when the parking lamps or the low
beams are switched on.
1.Push button 1 up or down repeatedly until
the appropriate symbol appears in the dis-
play, accompanied by the brightness set-
ting and scale the word "SET".
2.Press button 2.
3.Push button 1 up or down to select the
desired brightness level.
4.Press button 2 in the turn indicator lever.
The display again shows the outside tem-
perature and the time.
Interior lamps
The interior lamps, including the footwell
lamps
*, the cargo-bay lamp and the courtesy
lamps
* are controlled automatically.
The LEDs for the courtesy lamps
are set in the
door handles and illuminate the ground in front
of the doors.
To avoid draining the battery, all lamps
inside the car are switched off about 15 minutes after the ignition is switched off,
refer to Start/stop button on page57.<
Switching interior lamps on/off
manually
Interior lamps, front and rear*:
To switch on and off, press the button.
To switch off the interior lamps permanently,
press the button for the front interior lamp for
about 3 seconds.
Reading lamps
There are reading lamps at the front and rear*,
next to the interior lamps. To switch on and off,
press the button.
Page 105 of 268
Controls
103Reference
At a glance
Driving tips
Communications
Navigation
Entertainment
Mobility
Maximum cooling
At outside temperatures above
327/06 and when the engine is
running, you obtain a maximum
cooling effect as soon as possible.
The automatic climate control switches to the
lowest temperature and operates in recircu-
lated-air mode. Air flows at maximum rate only
from the vents for the upper body area. You
should therefore open them for maximum cool-
ing.
AUTO program
The AUTO program adjusts the air
distribution to the windshield and
side windows, towards the upper
body area and into the footwell for you. The air
flow rate and your temperature specifications
will be adapted to outside influences as a result
of seasonal changes, e.g. sunlight or window
condensation.
The cooling is switched on automatically with
the AUTO program.
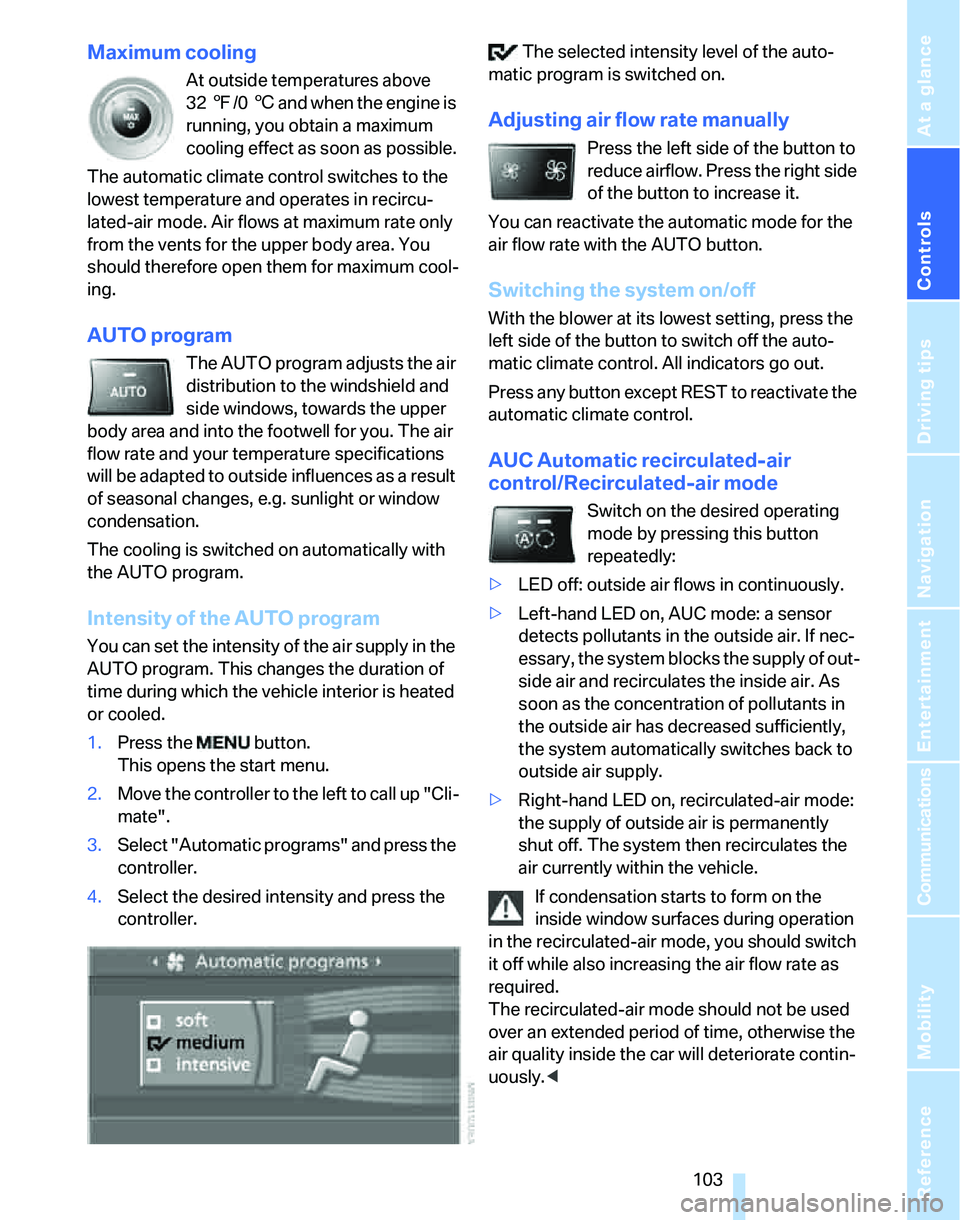
Intensity of the AUTO program
You can set the intensity of the air supply in the
AUTO program. This changes the duration of
time during which the vehicle interior is heated
or cooled.
1.Press the button.
This opens the start menu.
2.Move the controller to the left to call up "Cli-
mate".
3.Select "Automatic programs" and press the
controller.
4.Select the desired intensity and press the
controller. The selected intensity level of the auto-
matic program is switched on.
Adjusting air flow rate manually
Press the left side of the button to
reduce airflow. Press the right side
of the button to increase it.
You can reactivate the automatic mode for the
air flow rate with the AUTO button.
Switching the system on/off
With the blower at its lowest setting, press the
left side of the button to switch off the auto-
matic climate control. All indicators go out.
Press any button except REST to reactivate the
automatic climate control.
AUC Automatic recirculated-air
control/Recirculated-air mode
Switch on the desired operating
mode by pressing this button
repeatedly:
>LED off: outside air flows in continuously.
>Left-hand LED on, AUC mode: a sensor
detects pollutants in the outside air. If nec-
essary, the system blocks the supply of out-
side air and recirculates the inside air. As
soon as the concentration of pollutants in
the outside air has decreased sufficiently,
the system automatically switches back to
outside air supply.
>Right-hand LED on, recirculated-air mode:
the supply of outside air is permanently
shut off. The system then recirculates the
air currently within the vehicle.
If condensation starts to form on the
inside window surfaces during operation
in the recirculated-air mode, you should switch
it off while also increasing the air flow rate as
required.
The recirculated-air mode should not be used
over an extended period of time, otherwise the
air quality inside the car will deteriorate contin-
uously.<