2012 BMW 328I tow
[x] Cancel search: towPage 154 of 268
What to do if …
152
What to do if …
What to do if …
>a navigation DVD is inserted, but an instruc-
tion to insert the DVD appears on the Con-
trol Display?
The navigation DVD may not be the correct
DVD for the navigation system. This infor-
mation is indicated on the DVD label.
>you request the current position of your
vehicle, but do not receive a precise dis-
play?
The system is unable to receive enough
GPS signals at your current position due to
obstructions, your current position is not
yet available on your navigation DVD, or the
system is in the process of calculating your
current position. As a rule, reception is
guaranteed when you are in the open.
>the destination guidance does not accept a
destination?
The data of the destination is not stored on
the navigation DVD that is loaded. Choose a
destination as close as possible to the orig-
inal one.
>the destination guidance does not accept
an address without the street name?
On the navigation DVD, no downtown area
can be determined for the city or town
entered. Enter any street, or a destination
such as the railway station in the selected
town, and then start the destination guid-
ance.
>you want to enter a destination for the des-
tination guidance, but it is not possible to
select the letters for your desired entry?
The data of the destination is not stored on
the navigation DVD that is loaded. In this
case, the system will not offer you any let-
ters to choose from. Choose a destination
as close as possible to the original one.
>the system stops furnishing directions on
which way to turn as you approach intersec-
tions?
You are driving in an area that has not yet
been completely recorded on the naviga-tion DVD. Instead of an arrow indicating a
turn, you will see an arrow which indicates
the general direction of your planned route.
Or you have left the recommended route
and the system requires a few seconds to
calculate a new recommended route.
>the navigation system does not react to
entries?
If the battery was disconnected, it takes
about 10 minutes before the system is once
again operational.
Page 183 of 268
181
Entertainment
Reference
At a glance
Controls
Driving tips Communications
Navigation
Mobility
Operation via iDrive
You can operate the following functions using
iDrive:
>dialing phone numbers
>Selecting phone numbers from the phone
book
>Selecting stored phone numbers, e.g. from
the list of accepted calls
>Ending a call
When the ignition and radio readiness are
switched off, e.g. after taking the remote control
out of the ignition switch, you can continue an
ongoing call via the hands-free system for no
more than 25 minutes.
Requirements
The mobile phone's pairing data are stored by
the vehicle and the mobile phone is operational.
The engine is running or the ignition is switched
on.
The mobile phone is recognized by the vehicle.
iDrive, for operating principle refer to page16.
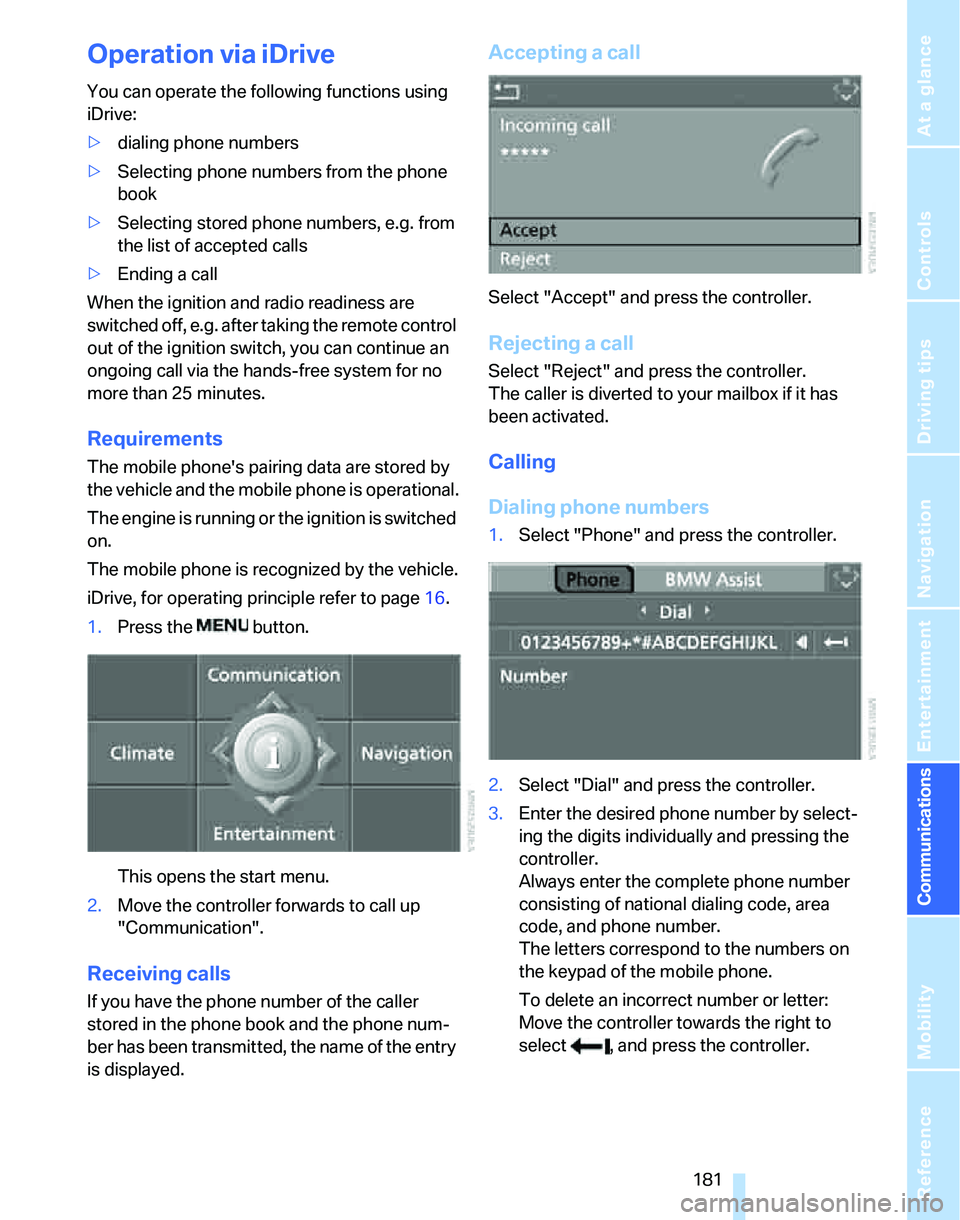
1.Press the button.
This opens the start menu.
2.Move the controller forwards to call up
"Communication".
Receiving calls
If you have the phone number of the caller
stored in the phone book and the phone num-
ber has been transmitted, the name of the entry
is displayed.
Accepting a call
Select "Accept" and press the controller.
Rejecting a call
Select "Reject" and press the controller.
The caller is diverted to your mailbox if it has
been activated.
Calling
Dialing phone numbers
1.Select "Phone" and press the controller.
2.Select "Dial" and press the controller.
3.Enter the desired phone number by select-
ing the digits individually and pressing the
controller.
Always enter the complete phone number
consisting of national dialing code, area
code, and phone number.
The letters correspond to the numbers on
the keypad of the mobile phone.
To delete an incorrect number or letter:
Move the controller towards the right to
select , and press the controller.
Page 190 of 268
Telephoning
188
Selecting an entry
The connection to the phone number of the
selected entry is established.
Redialing
The {Redial} command calls up "Redial".
Notes
The commands in English were available
as of this printing. Other languages are
currently in preparation. To operate the mobile
phone via the voice command system, refer to
page22.<
Important for voice commands
For voice commands, bear in mind the follow-
ing:
>Pronounce the commands smoothly and at
normal volume, avoiding excessive empha-
ses and pauses.
>Keep the doors, windows and glass sunroof
closed to prevent interference from outside
noise.
>Avoid ambient noise in the vehicle while
speaking.
Inserting/removing snap-in
adapter
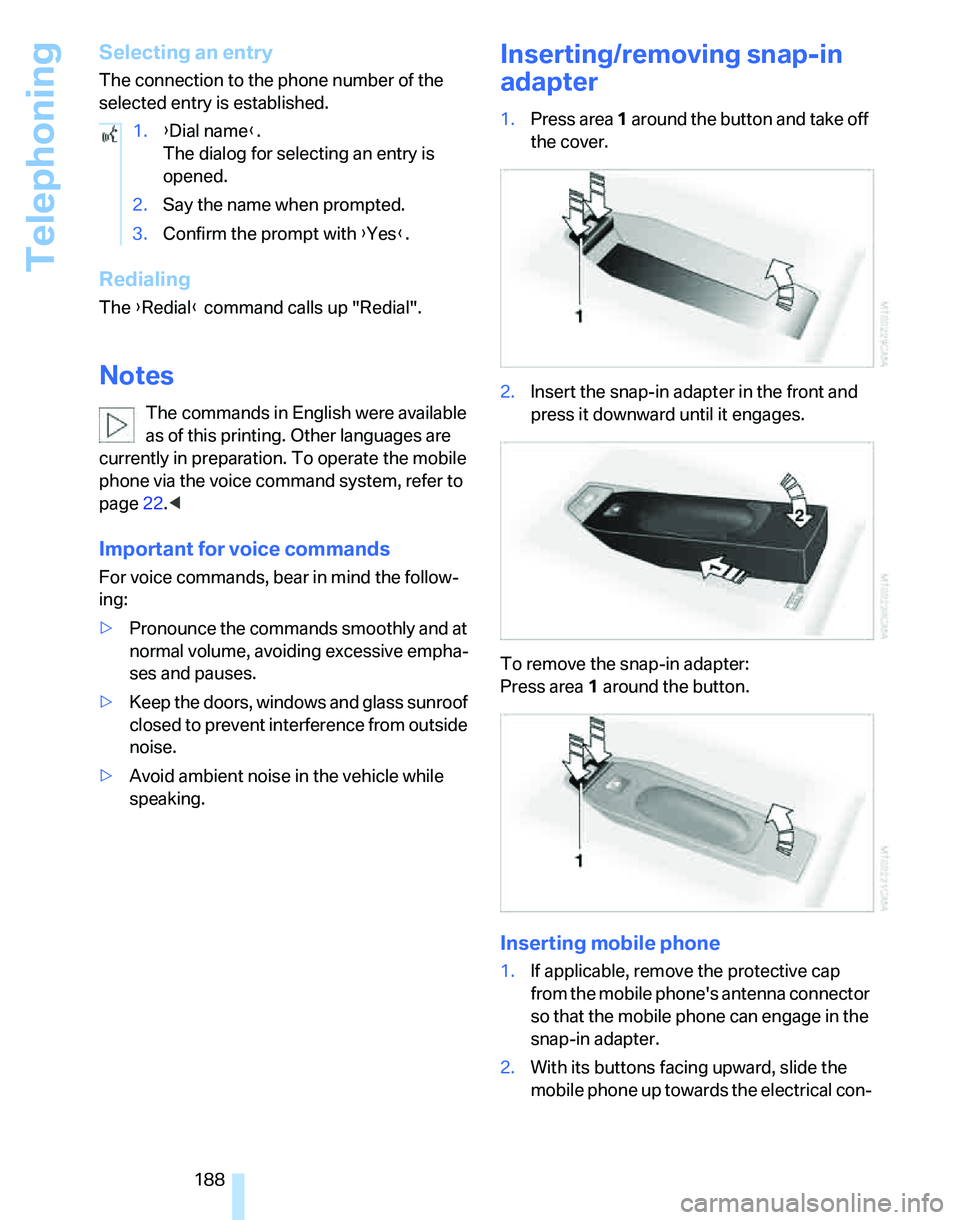
1.Press area 1 around the button and take off
the cover.
2.Insert the snap-in adapter in the front and
press it downward until it engages.
To remove the snap-in adapter:
Press area 1 around the button.
Inserting mobile phone
1.If applicable, remove the protective cap
from the mobile phone's antenna connector
so that the mobile phone can engage in the
snap-in adapter.
2.With its buttons facing upward, slide the
mobile phone up towards the electrical con- 1.{Dial name}.
The dialog for selecting an entry is
opened.
2.Say the name when prompted.
3.Confirm the prompt with {Yes}.
Page 213 of 268

Mobility
211Reference
At a glance
Controls
Driving tips
Communications
Navigation
Entertainment
Temperature
The temperature grades are A, the highest, B,
and C, representing the tire's resistance to the
generation of heat and its ability to dissipate
heat when tested under controlled conditions
on a specified indoor laboratory test wheel.
Sustained high temperature can cause the
material of the tire to degenerate and reduce
tire life, and excessive temperature can lead to
sudden tire failure. The grade C corresponds to
a level of performance which all passenger car
tires must meet under the Federal Motor Vehi-
cle Safety Standard No. 109. Grades B and A
represent higher levels of performance on the
laboratory test wheel than the minimum
required by law.
The temperature grade for this tire is
established for a tire that is properly
inflated and not overloaded. Excessive speed,
underinflation, or excessive loading, either sep-
arately or in combination, can cause heat
buildup and possible tire failure.<
RSC – Run-Flat Tires
You will recognize Run-Flat Tires by a circular
symbol containing the letters RSC on the side
of the tire, refer to page212.
M+S
Winter and all-season tires.
These have better winter properties than sum-
mer tires.
XL
Designation for specially reinforced tires.
Tire condition
Inspect your tires frequently for tread wear,
signs of damage and for foreign objects lodged
in the tread. Check the tread depth.
Minimum tread depth
The tread depth should not drop below 1/8 in/
3 mm, although, for example, European legisla-
tion only specifies a minimum tread depth of 1/16 in/1.6 mm. At tread depths below 1/8 in/
3 mm there is an increased risk of high-speed
hydroplaning, even when only small amounts of
water are present on the road surface.
When winter tires wear down past a tread depth
of 1/6 in/4 mm, they become perceptibly less
suitable for winter conditions. In the interest of
safety, new tires should be installed.
Wear indicators in the base of the tread groove
are distributed around the tire's circumference;
the letters TWI, for Tread Wear Indicator, on the
tire's sidewalls identify tires that incorporate
these wear indicators. Once the tire tread has
worn down to the wear indicators, the tire has
worn to a depth of 1/16 in/1.6 mm.
Wheel/tire damage
Please note that low-profile tires cause wheels,
tires and suspension parts to be more suscep-
tible to road hazard and consequential dam-
ages.
Unusual vibrations encountered during normal
vehicle operation can indicate tire failure or
some other vehicle defect. This can, for exam-
ple, be caused by driving over curbs. The same
applies to any other abnormal road behavior,
such as pulling severely to the right or left.
In these cases, reduce speed immedi-
ately and have wheels and tires thor-
oughly checked. To do so, drive carefully to the
nearest BMW center or tire shop that works
according to BMW repair procedures with cor-
respondingly trained personnel. If necessary,
have the vehicle towed there.
Tire damage can be extremely dangerous for
vehicle occupants and other road users.<
Page 228 of 268
Replacing components
226
Lamps in the luggage compartment lid/
tailgate
Sedan
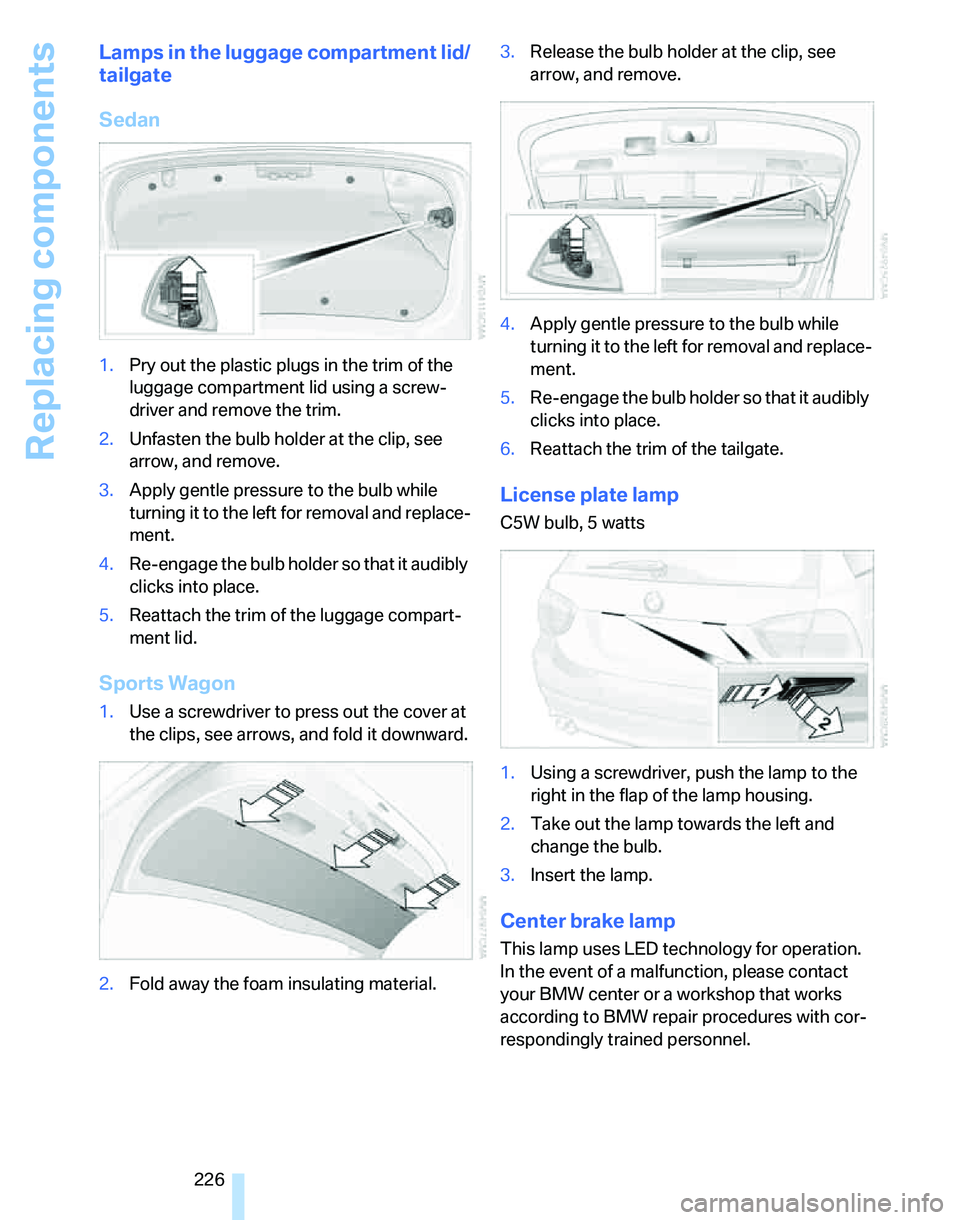
1.Pry out the plastic plugs in the trim of the
luggage compartment lid using a screw-
driver and remove the trim.
2.Unfasten the bulb holder at the clip, see
arrow, and remove.
3.Apply gentle pressure to the bulb while
turning it to the left for removal and replace-
ment.
4.Re-engage the bulb holder so that it audibly
clicks into place.
5.Reattach the trim of the luggage compart-
ment lid.
Sports Wagon
1.Use a screwdriver to press out the cover at
the clips, see arrows, and fold it downward.
2.Fold away the foam insulating material.3.Release the bulb holder at the clip, see
arrow, and remove.
4.Apply gentle pressure to the bulb while
turning it to the left for removal and replace-
ment.
5.Re-engage the bulb holder so that it audibly
clicks into place.
6.Reattach the trim of the tailgate.
License plate lamp
C5W bulb, 5 watts
1.Using a screwdriver, push the lamp to the
right in the flap of the lamp housing.
2.Take out the lamp towards the left and
change the bulb.
3.Insert the lamp.
Center brake lamp
This lamp uses LED technology for operation.
In the event of a malfunction, please contact
your BMW center or a workshop that works
according to BMW repair procedures with cor-
respondingly trained personnel.
Page 233 of 268
Mobility
231Reference
At a glance
Controls
Driving tips
Communications
Navigation
Entertainment
Connecting jumper cables
Connect the jumper cables in the correct
order, so that no sparks which could
cause injury occur.<
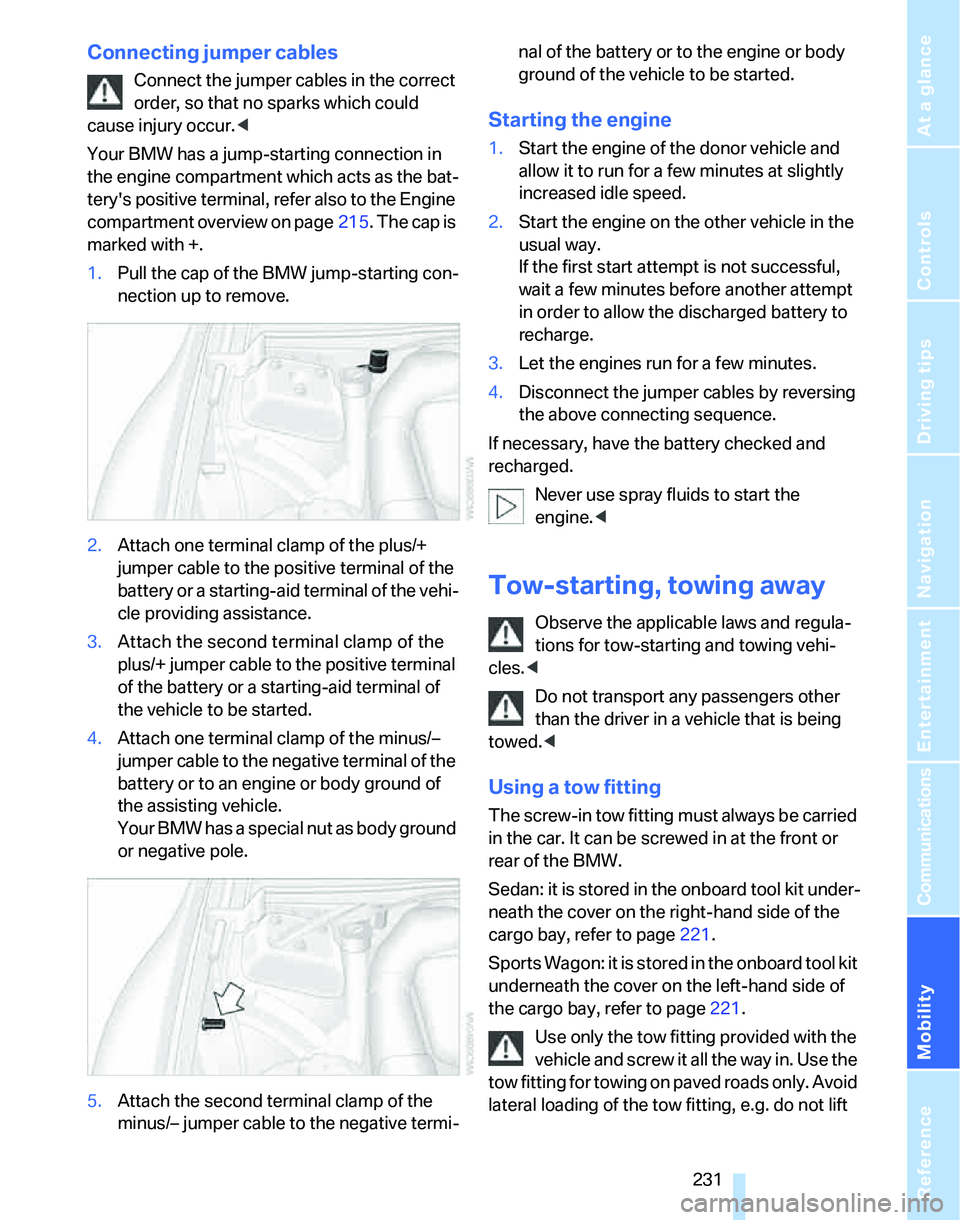
Your BMW has a jump-starting connection in
the engine compartment which acts as the bat-
tery's positive terminal, refer also to the Engine
compartment overview on page215. The cap is
marked with +.
1.Pull the cap of the BMW jump-starting con-
nection up to remove.
2.Attach one terminal clamp of the plus/+
jumper cable to the positive terminal of the
battery or a starting-aid terminal of the vehi-
cle providing assistance.
3.Attach the second terminal clamp of the
plus/+ jumper cable to the positive terminal
of the battery or a starting-aid terminal of
the vehicle to be started.
4.Attach one terminal clamp of the minus/–
jumper cable to the negative terminal of the
battery or to an engine or body ground of
the assisting vehicle.
Your BMW has a special nut as body ground
or negative pole.
5.Attach the second terminal clamp of the
minus/– jumper cable to the negative termi-nal of the battery or to the engine or body
ground of the vehicle to be started.
Starting the engine
1.Start the engine of the donor vehicle and
allow it to run for a few minutes at slightly
increased idle speed.
2.Start the engine on the other vehicle in the
usual way.
If the first start attempt is not successful,
wait a few minutes before another attempt
in order to allow the discharged battery to
recharge.
3.Let the engines run for a few minutes.
4.Disconnect the jumper cables by reversing
the above connecting sequence.
If necessary, have the battery checked and
recharged.
Never use spray fluids to start the
engine.<
Tow-starting, towing away
Observe the applicable laws and regula-
tions for tow-starting and towing vehi-
cles.<
Do not transport any passengers other
than the driver in a vehicle that is being
towed.<
Using a tow fitting
The screw-in tow fitting must always be carried
in the car. It can be screwed in at the front or
rear of the BMW.
Sedan: it is stored in the onboard tool kit under-
neath the cover on the right-hand side of the
cargo bay, refer to page221.
Sports Wagon: it is stored in the onboard tool kit
underneath the cover on the left-hand side of
the cargo bay, refer to page221.
Use only the tow fitting provided with the
vehicle and screw it all the way in. Use the
tow fitting for towing on paved roads only. Avoid
lateral loading of the tow fitting, e.g. do not lift
Page 234 of 268
Giving and receiving assistance
232 the vehicle by the tow fitting. Otherwise the tow
fitting and the vehicle could be damaged.<
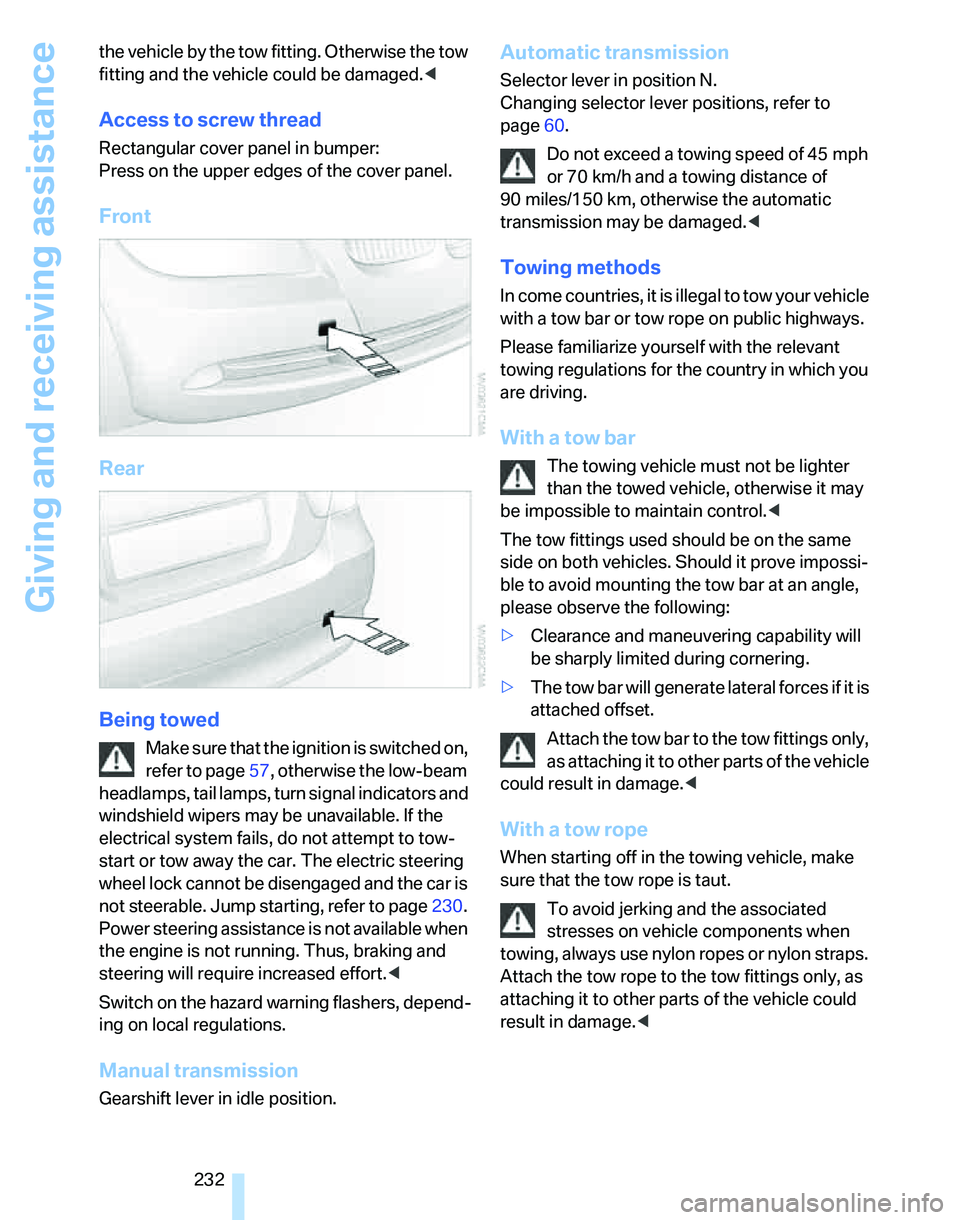
Access to screw thread
Rectangular cover panel in bumper:
Press on the upper edges of the cover panel.
Front
Rear
Being towed
Make sure that the ignition is switched on,
refer to page57, otherwise the low-beam
headlamps, tail lamps, turn signal indicators and
windshield wipers may be unavailable. If the
electrical system fails, do not attempt to tow-
start or tow away the car. The electric steering
wheel lock cannot be disengaged and the car is
not steerable. Jump starting, refer to page230.
Power steering assistance is not available when
the engine is not running. Thus, braking and
steering will require increased effort.<
Switch on the hazard warning flashers, depend-
ing on local regulations.
Manual transmission
Gearshift lever in idle position.
Automatic transmission
Selector lever in position N.
Changing selector lever positions, refer to
page60.
Do not exceed a towing speed of 45 mph
or 70 km/h and a towing distance of
90 miles/150 km, otherwise the automatic
transmission may be damaged.<
Towing methods
In come countries, it is illegal to tow your vehicle
with a tow bar or tow rope on public highways.
Please familiarize yourself with the relevant
towing regulations for the country in which you
are driving.
With a tow bar
The towing vehicle must not be lighter
than the towed vehicle, otherwise it may
be impossible to maintain control.<
The tow fittings used should be on the same
side on both vehicles. Should it prove impossi-
ble to avoid mounting the tow bar at an angle,
please observe the following:
>Clearance and maneuvering capability will
be sharply limited during cornering.
>The tow bar will generate lateral forces if it is
attached offset.
Attach the tow bar to the tow fittings only,
as attaching it to other parts of the vehicle
could result in damage.<
With a tow rope
When starting off in the towing vehicle, make
sure that the tow rope is taut.
To avoid jerking and the associated
stresses on vehicle components when
towing, always use nylon ropes or nylon straps.
Attach the tow rope to the tow fittings only, as
attaching it to other parts of the vehicle could
result in damage.<
Page 235 of 268
Mobility
233Reference
At a glance
Controls
Driving tips
Communications
Navigation
Entertainment
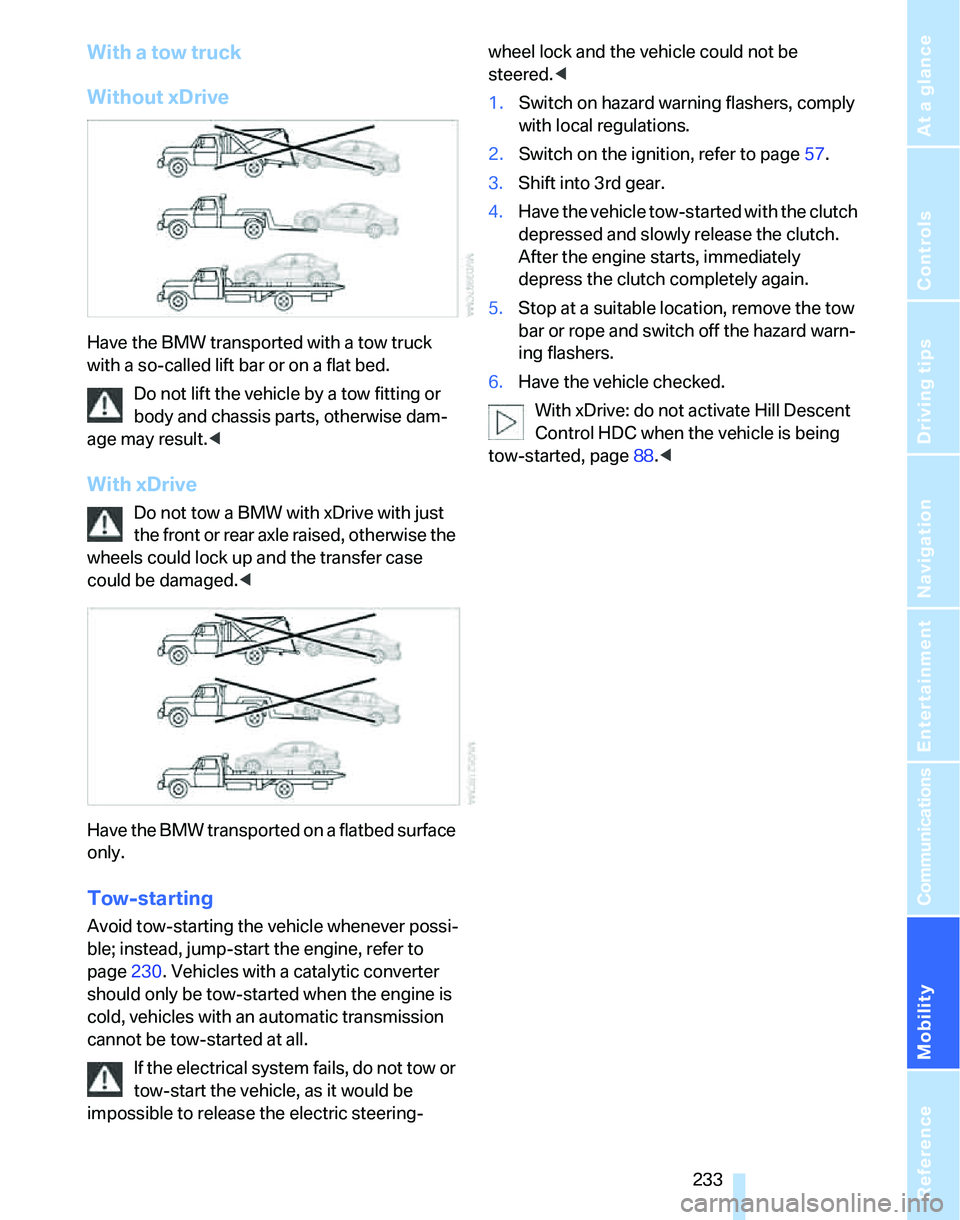
With a tow truck
Without xDrive
Have the BMW transported with a tow truck
with a so-called lift bar or on a flat bed.
Do not lift the vehicle by a tow fitting or
body and chassis parts, otherwise dam-
age may result.<
With xDrive
Do not tow a BMW with xDrive with just
the front or rear axle raised, otherwise the
wheels could lock up and the transfer case
could be damaged.<
Have the BMW transported on a flatbed surface
only.
Tow-starting
Avoid tow-starting the vehicle whenever possi-
ble; instead, jump-start the engine, refer to
page230. Vehicles with a catalytic converter
should only be tow-started when the engine is
cold, vehicles with an automatic transmission
cannot be tow-started at all.
If the electrical system fails, do not tow or
tow-start the vehicle, as it would be
impossible to release the electric steering-wheel lock and the vehicle could not be
steered.<
1.Switch on hazard warning flashers, comply
with local regulations.
2.Switch on the ignition, refer to page57.
3.Shift into 3rd gear.
4.Have the vehicle tow-started with the clutch
depressed and slowly release the clutch.
After the engine starts, immediately
depress the clutch completely again.
5.Stop at a suitable location, remove the tow
bar or rope and switch off the hazard warn-
ing flashers.
6.Have the vehicle checked.
With xDrive: do not activate Hill Descent
Control HDC when the vehicle is being
tow-started, page88.<