2012 BMW 328I COUPE steering wheel
[x] Cancel search: steering wheelPage 69 of 314
68
ControlsDriving
D Drive mode
In Drive mode, all forward gears are shifted
automatically.
Kickdown
For sudden acceleration maneuvers such as
passing, depress the accelerator past the resis-
tance point. This prov ides maximum accelera-
tion.
Sport program and
manual mode M/S
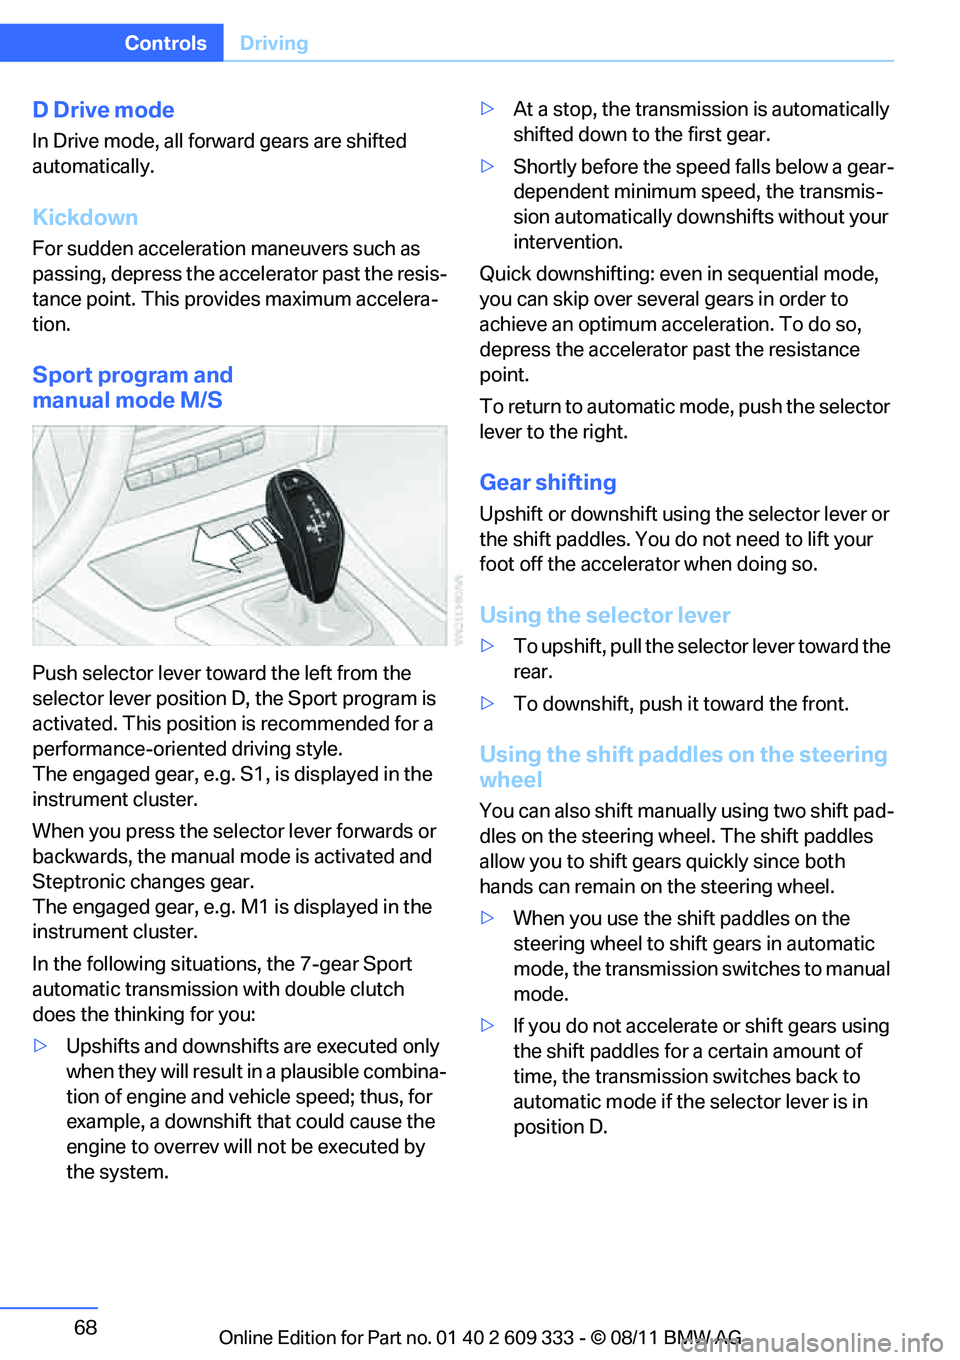
Push selector lever towa rd the left from the
selector lever position D, the Sport program is
activated. This position is recommended for a
performance-oriented driving style.
The engaged gear, e.g. S1, is displayed in the
instrument cluster.
When you press the selector lever forwards or
backwards, the manual mode is activated and
Steptronic changes gear.
The engaged gear, e.g. M1 is displayed in the
instrument cluster.
In the following situat ions, the 7-gear Sport
automatic transmission with double clutch
does the thinking for you:
> Upshifts and downshifts are executed only
when they will result in a plausible combina-
tion of engine and vehicle speed; thus, for
example, a downshift that could cause the
engine to overrev will not be executed by
the system. >
At a stop, the transmission is automatically
shifted down to the first gear.
> Shortly before the spee d falls below a gear-
dependent minimum speed, the transmis-
sion automatically down shifts without your
intervention.
Quick downshifting: even in sequential mode,
you can skip over several gears in order to
achieve an optimum acceleration. To do so,
depress the accelerator past the resistance
point.
To return to automatic mode, push the selector
lever to the right.
Gear shifting
Upshift or downshift usin g the selector lever or
the shift paddles. You do not need to lift your
foot off the accelerator when doing so.
Using the selector lever
> To upshift, pull the sele ctor lever toward the
rear.
> To downshift, push it toward the front.
Using the shift paddl es on the steering
wheel
You can also shift manua lly using two shift pad-
dles on the steering wheel. The shift paddles
allow you to shift gear s quickly since both
hands can remain on the steering wheel.
> When you use the shift paddles on the
steering wheel to shift gears in automatic
mode, the transmission switches to manual
mode.
> If you do not accelerate or shift gears using
the shift paddles for a certain amount of
time, the transmission switches back to
automatic mode if the selector lever is in
position D.
Online Edition for Part no. 01 40 2 609 333 - \251 08/11 BMW AG
Page 98 of 314

97
Technology for driving comfort and safety
Controls
Malfunction
The warning lamp lights up. A mes-
sage appears on th
e Control Display.
PDC is malfunctioning. Have the sys-
tem checked.
To avoid this problem, keep the sensors clean
and free of ice or snow in order to ensure that
they will continue to op erate effectively. When
using a high-pressure cleaner, do not spray the
sensors for extended periods of time and only
from a distance of at least 1 ft/30 cm.
Manual operation
The LED above the button also flashes.
PDC with visual warning
The approach of the vehicle to an object is
shown on the Control Display. Objects that are
farther away are displayed on the Control Dis-
play before a signal to ne sounds. The display
appears on the Control Display as soon as PDC
is activated.
System limitations
Even with PDC, final responsibility for
estimating the distance between the
vehicle and any obstructions always remains
with the driver. Even when sensors are pro-
vided, there is a blind spot in which objects can
no longer be detected. The system is also sub-
ject to the physical limit s that apply to all forms
of ultrasonic measurement, such as those
encountered with traile r towbars and hitches,
thin or wedge-shaped objects, etc. Low objects
that have already been displayed, e.g. curbs,
can disappear again from the detection area of
the sensors before or after a continuous tone
sounds. Higher, protruding objects, e.g. ledges,
cannot be detected. Therefore, always drive
cautiously; otherwise, there is a risk of personal
injury or property damage.
Loud sound sources outside or inside the car
can drown out the PDC signal. Therefore,
always drive cautiously; otherwise, there is a
risk of personal injury or property damage. <
Driving stability control
systems
Your BMW has a number of systems that help
to maintain the vehicle's stability even in
adverse driving conditions.
ABS Antilock Brake System
ABS prevents locking of the wheels during
braking. Safe steering response is maintained
even during full braking. Active safety is thus
increased.
The ABS is operational every time you start the
engine. Braking safely, refer to page140.
Electronic brake-force distribution
EBV
The system controls the brake pressure in the
rear wheels to ensure stable braking behavior.
Dynamic Brake Control DBC
When you apply the brakes rapidly, this system
automatically produces the maximum braking
force boost and thus helps to achieve the short-
est possible braking distance during full brak-
ing. This system exploits all of the benefits pro-
vided by ABS.
Do not reduce the pressu re on the brake for the
duration of the full braking application.
Dynamic Stability Control DSC
DSC prevents the driving wheels from losing
traction when you pull aw ay from rest or accel-
erate. The system also recognizes unstable
driving conditions, for example if the rear of the
car is about to swerve or if momentum is acting
at an angle past the front wheels. In these
cases, DSC helps the vehicle maintain a safe
course within physical limits by reducing engine
output and through brakin g actions at the indi-
vidual wheels.
The laws of physics cannot be repealed,
even with DSC. An appropriate driving
style always remains th e responsibility of the
driver. Therefore, do not reduce the additional
Online Edition for Part no. 01 40 2 609 333 - \251 08/11 BMW AG
Page 104 of 314
103
Technology for driving comfort and safety
Controls
>
TPM is being reset.
> Interference from systems or devices that
use the same radio frequency.
> Malfunction.
Resetting the system
Each time a tire inflation pressure has been cor-
rected or a wheel or tire has been changed,
reset the system.
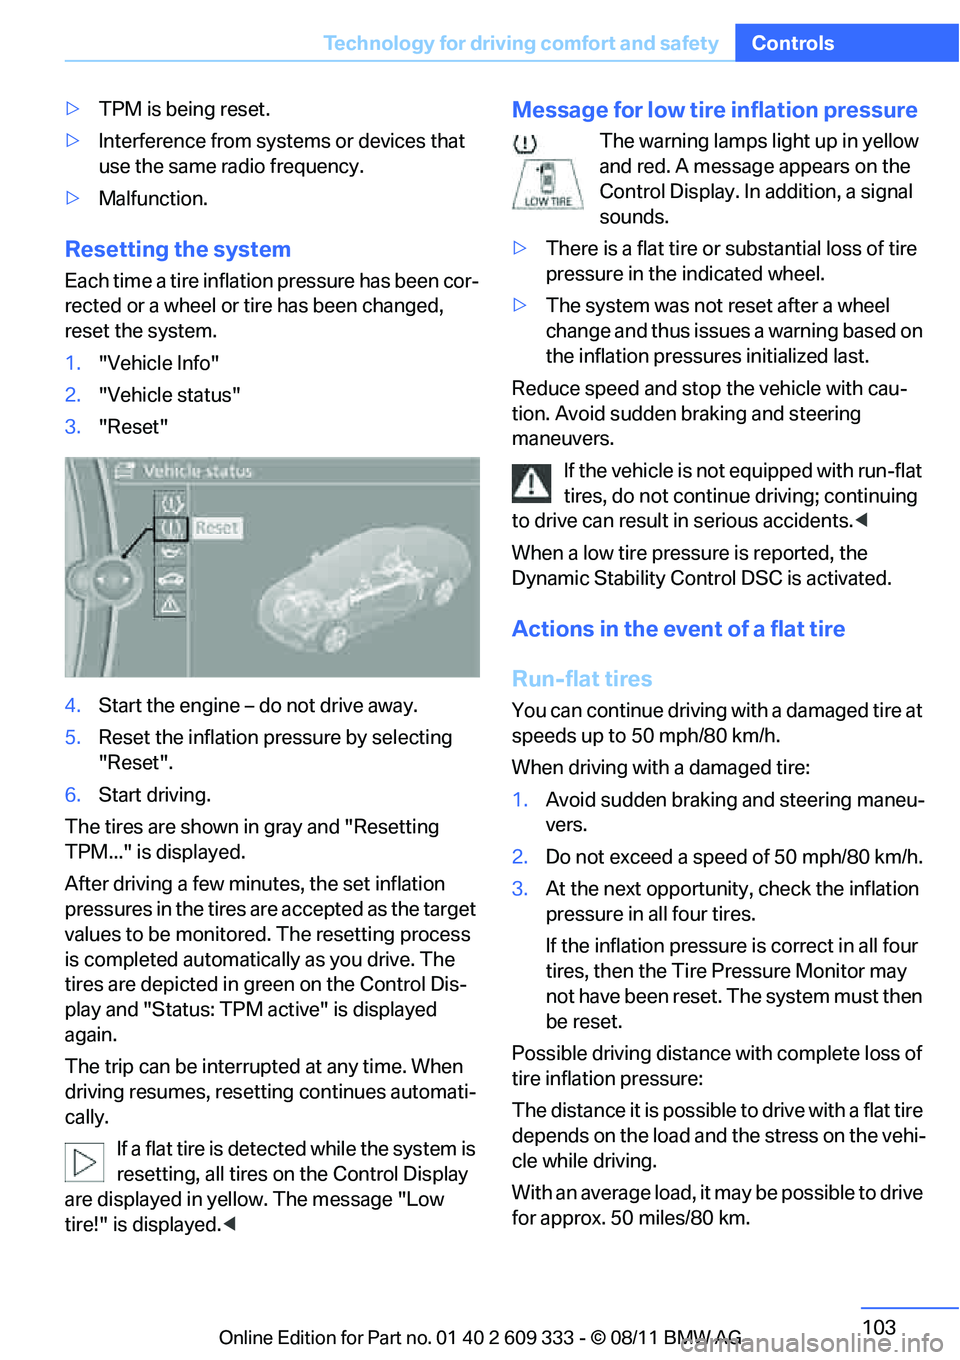
1."Vehicle Info"
2. "Vehicle status"
3. "Reset"
4. Start the engine – do not drive away.
5. Reset the inflation pr essure by selecting
"Reset".
6. Start driving.
The tires are shown in gray and "Resetting
TPM..." is displayed.
After driving a few minu tes, the set inflation
pressures in the tires are accepted as the target
values to be monitored. The resetting process
is completed automatically as you drive. The
tires are depicted in green on the Control Dis-
play and "Status: TPM active" is displayed
again.
The trip can be interrupted at any time. When
driving resumes, resetting continues automati-
cally.
If a flat tire is detected while the system is
resetting, all tires on the Control Display
are displayed in yellow. The message "Low
tire!" is displayed. <
Message for low tire inflation pressure
The warning lamps light up in yellow
and red. A message appears on the
Control Display. In addition, a signal
sounds.
> There is a flat tire or substantial loss of tire
pressure in the indicated wheel.
> The system was not reset after a wheel
change and thus issues a warning based on
the inflation pressure s initialized last.
Reduce speed and stop the vehicle with cau-
tion. Avoid sudden braking and steering
maneuvers. If the vehicle is not equipped with run-flat
tires, do not continue driving; continuing
to drive can result in serious accidents.<
When a low tire pressure is reported, the
Dynamic Stability Control DSC is activated.
Actions in the event of a flat tire
Run-flat tires
You can continue driving with a damaged tire at
speeds up to 50 mph/80 km/h.
When driving with a damaged tire:
1. Avoid sudden braking and steering maneu-
vers.
2. Do not exceed a speed of 50 mph/80 km/h.
3. At the next opportunity, check the inflation
pressure in all four tires.
If the inflation pressure is correct in all four
tires, then the Tire Pressure Monitor may
not have been reset. The system must then
be reset.
Possible driving distance with complete loss of
tire inflation pressure:
The distance it is possible to drive with a flat tire
depends on the load and the stress on the vehi-
cle while driving.
With an average load, it may be possible to drive
for approx. 50 miles/80 km.
Online Edition for Part no. 01 40 2 609 333 - \251 08/11 BMW AG
Page 106 of 314
105
Technology for driving comfort and safety
Controls
tire to overheat and ca
n lead to tire failure.
Underinflation also reduces fuel efficiency and
tire tread life, and may affect the vehicle’s han-
dling and stopping ability. Please note that the
TPMS is not a substitute for proper tire mainte-
nance, and it is the driver’s responsibility to
maintain correct tire pressure, even if underin-
flation has not reached the level at which the
TPMS low tire pressure telltale illuminates.
The TPMS malfunction in dicator is combined
with the low tire pressure telltale. When the sys-
tem detects a malfunction, the telltale will flash
for approximately one minute and then remain
continuously lit. This sequence will continue
upon subsequent vehicle startups as long as
the malfunction exists. When the malfunction
indicator is illuminated, the system may not be
able to detect or signal low tire pressure as
intended. TPMS malfunctions may occur for a
variety of reasons, includ ing the installation of
replacement or alternate tires or wheels on the
vehicle that prevent the TPMS from functioning
properly. Always check the TPMS malfunction
telltale after replacing one or more tires or
wheels on your vehicle to ensure that the
replacement or alternate tires and wheels allow
the TPMS to continue to function properly.
Active steering
The concept
Active steering varies the turning angle of the
front wheels in relation to steering wheel move-
ments. It also varies the steering force required
to turn the wheels depe nding on the speed at
which you are driving.
When you are driving in the low speed range,
e.g. in a town or when parking, the steering
angle is increased, i.e. steering becomes very
direct and less effort is required to turn the
wheels. In the higher speed range, on the other
hand, the steering angle is reduced as the
speed increases. This im proves the handling of
your BMW over the entire speed range. In critical situations,
the system can make tar-
geted corrections to the steering angle pro-
vided by the driver and thus stabilize the vehicle
before the driver intervenes. This stabilizing
intervention is simult aneously deactivated
when DSC is switched off, refer to page 98.
Malfunction
The warning lamps light up and a
message is displayed on the Control
Display. Active steering is malfunc-
tioning or is temporarily deactivated.
At low speeds, greater steering wheel move-
ments are required, whereas at higher speeds
the vehicle reacts more sensitively to steering
wheel movements. The stability-enhancing
feature may also be deactivated. Drive cau-
tiously and think well ahead.
Deactivation
Active steering is deactivated to perform an ini-
tialization. A message in dicates that the feature
is deactivated. Initializ ation may take several
minutes.
If the message does no t disappear during the
current trip, have the system checked.
Defect
If there is a defect, a corresponding text mes-
sage appears. Have the system checked.
Servotronic
The concept
The Servotronic varies the steering force
required to turn the whee ls relative to the vehi-
cle speed.
At low speeds, the steering force is strongly
assisted, i.e. less force is needed for steering.
As the vehicle speed increases, the steering
assisting power is reduced.
Online Edition for Part no. 01 40 2 609 333 - \251 08/11 BMW AG
Page 108 of 314
107
Technology for driving comfort and safety
Controls
Airbags
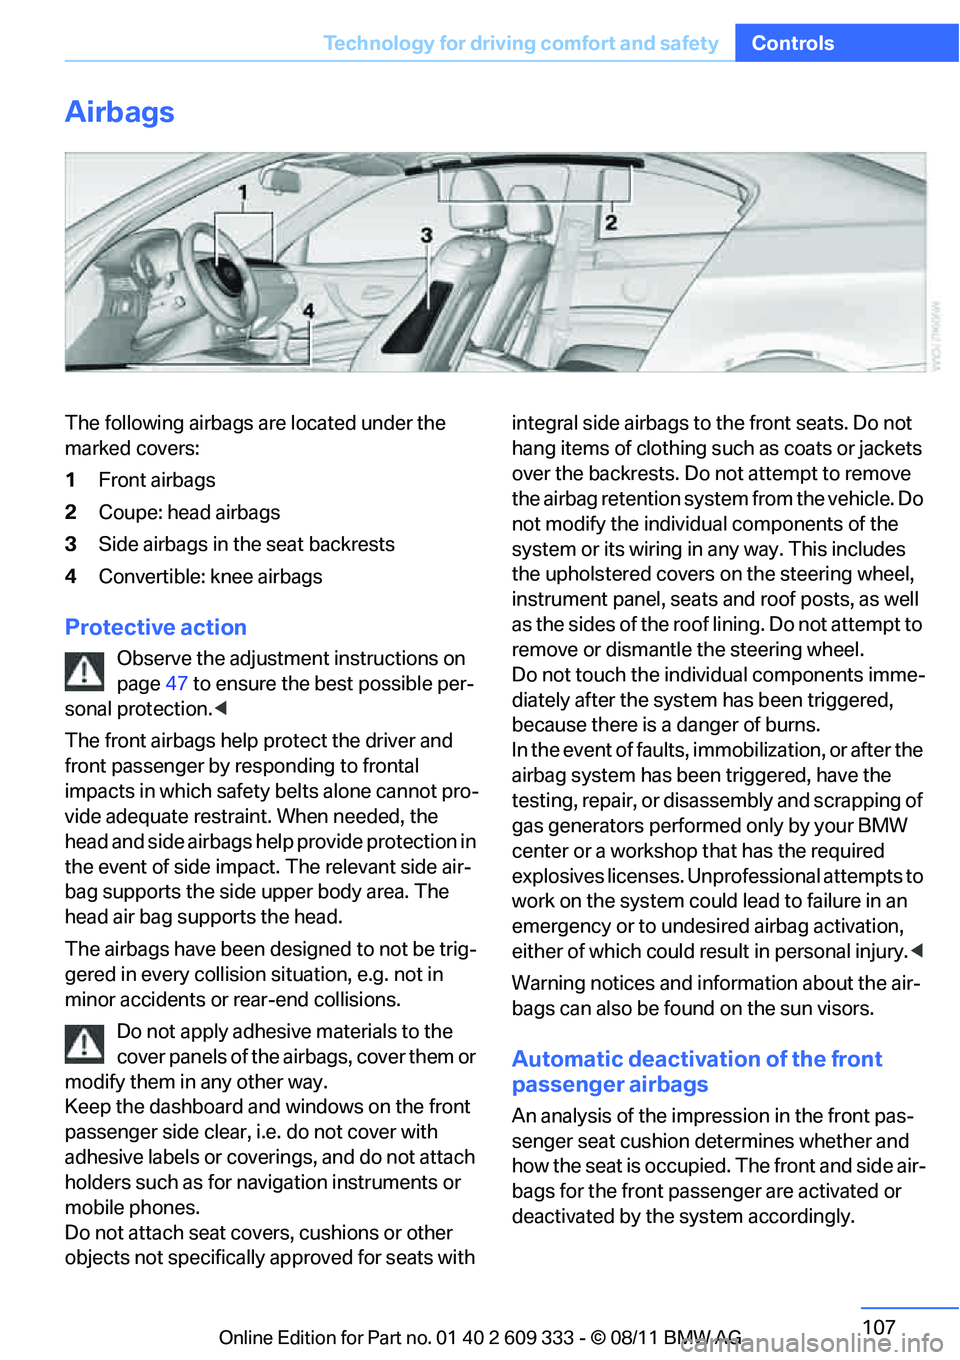
The following airbags are located under the
marked covers:
1
Front airbags
2 Coupe: head airbags
3 Side airbags in the seat backrests
4 Convertible: knee airbags
Protective action
Observe the adjustment instructions on
page 47 to ensure the best possible per-
sonal protection. <
The front airbags help protect the driver and
front passenger by responding to frontal
impacts in which safety belts alone cannot pro-
vide adequate restrain t. When needed, the
head and side airbags help provide protection in
the event of side impact. The relevant side air-
bag supports the side upper body area. The
head air bag supports the head.
The airbags have been designed to not be trig-
gered in every collision si tuation, e.g. not in
minor accidents or rear-end collisions.
Do not apply adhesive materials to the
cover panels of the airbags, cover them or
modify them in any other way.
Keep the dashboard and windows on the front
passenger side clear, i. e. do not cover with
adhesive labels or coveri ngs, and do not attach
holders such as for navi gation instruments or
mobile phones.
Do not attach seat cove rs, cushions or other
objects not specifically approved for seats with integral side airbags to the front seats. Do not
hang items of clothing such as coats or jackets
over the backrests. Do
not attempt to remove
the airbag retention system from the vehicle. Do
not modify the individu al components of the
system or its wiring in any way. This includes
the upholstered covers on the steering wheel,
instrument panel, seats and roof posts, as well
as the sides of the roof lining. Do not attempt to
remove or dismantle the steering wheel.
Do not touch the individual components imme-
diately after the system has been triggered,
because there is a danger of burns.
In the event of faults, immobilization, or after the
airbag system has been triggered, have the
testing, repair, or disassembly and scrapping of
gas generators performe d only by your BMW
center or a workshop that has the required
explosives licenses. Unprofessional attempts to
work on the system could lead to failure in an
emergency or to undesired airbag activation,
either of which could resu lt in personal injury.<
Warning notices and information about the air-
bags can also be found on the sun visors.
Automatic deactivation of the front
passenger airbags
An analysis of the impr ession in the front pas-
senger seat cushion determines whether and
how the seat is occupied. The front and side air-
bags for the front passe nger are activated or
deactivated by the system accordingly.
Online Edition for Part no. 01 40 2 609 333 - \251 08/11 BMW AG
Page 113 of 314
112
ControlsLamps
Adaptive Light Control
The concept
Adaptive Light Control is a variable headlamp
control system that en ables better illumination
of the road surface. Depending on the steering
angle and other parameters, the light from the
headlamp follows the course of the road.
I n t i g h t c u r v e s a t s p e e d s u p t o 4 0 m p h / 7 0 k m / h ,
e.g. on mountainous roads or when turning, an
additional, corner-illumina ting lamp is switched
on that lights up the inside area of the curve.
Activating Adaptive Light Control
With the ignition switched on, turn the light
switch to position 3, refer to page 110.
The corner-illuminating lamp is switched on
automatically, depending on the steering wheel
angle or turn signal indicator.
Standstill function: to avoid blinding oncoming
traffic, the Adaptive Light Control directs light
toward the front passenge r side when the vehi-
cle is at a standstill.
When you are reversing, only the corner-illumi-
nating lamps are switched on and active on
both sides.
Malfunction
The warning lamp lights up. A mes-
sage appears on the Control Display.
The Adaptive Light Control is mal-
functioning or failed. Ha ve the system checked
as soon as possible.
High beams/roadside parking
lamps
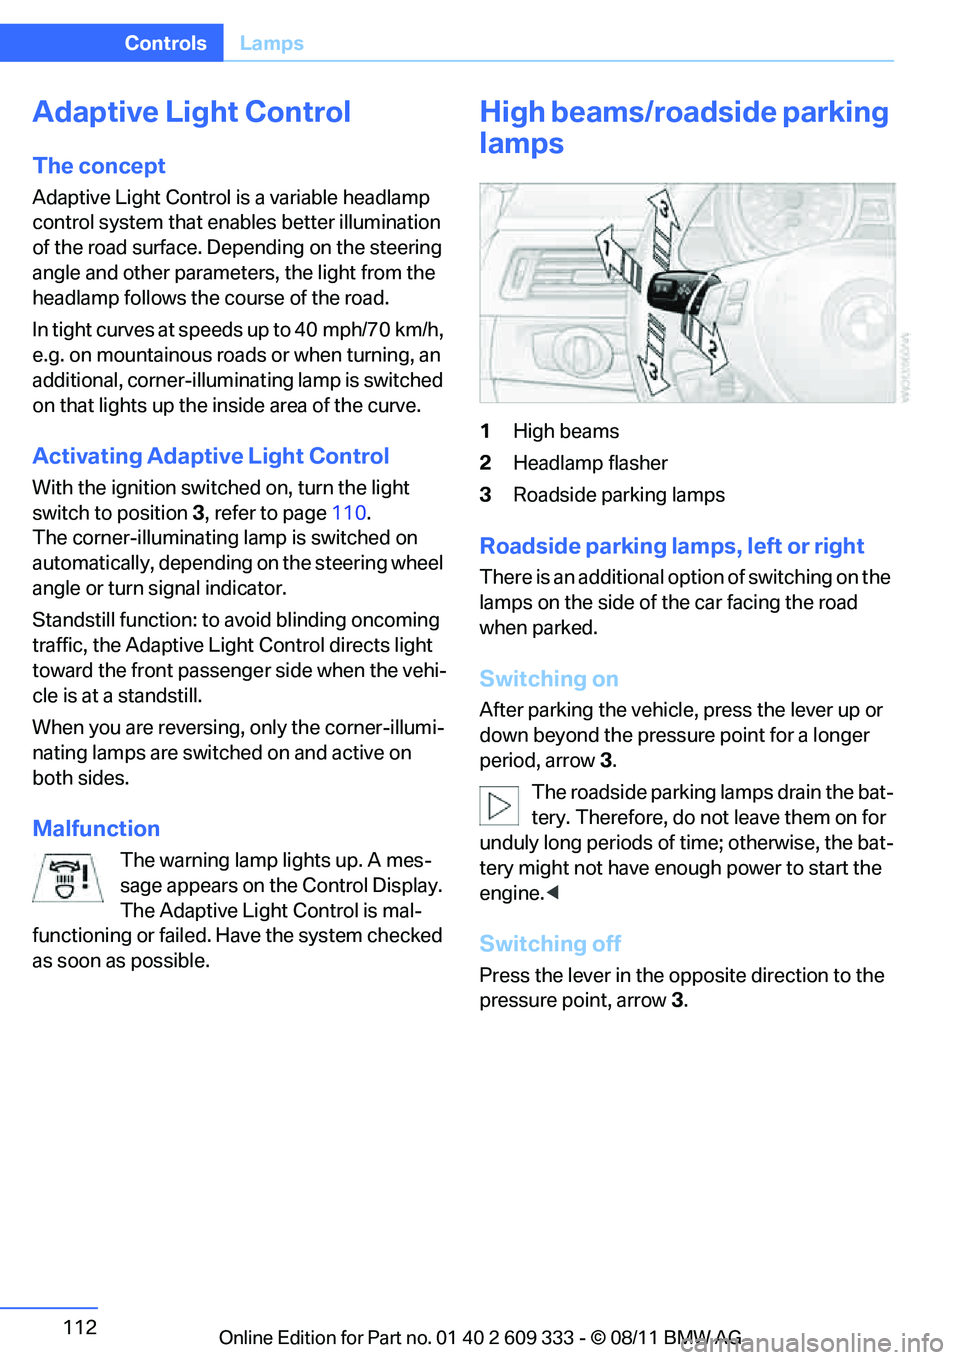
1 High beams
2 Headlamp flasher
3 Roadside parking lamps
Roadside parking lamps, left or right
There is an additional option of switching on the
lamps on the side of the car facing the road
when parked.
Switching on
After parking the vehicle, press the lever up or
down beyond the pressu re point for a longer
period, arrow 3.
The roadside parking lamps drain the bat-
tery. Therefore, do not leave them on for
unduly long periods of time; otherwise, the bat-
tery might not have enou gh power to start the
engine. <
Switching off
Press the lever in the o pposite direction to the
pressure point, arrow 3.
Online Edition for Part no. 01 40 2 609 333 - \251 08/11 BMW AG
Page 119 of 314
118
ControlsClimate
AUTO program
Press the button.
Air volume, air distribution and
temperature are controlled auto-
matically.
Depending on the selected temperature, AUTO
intensity and outside influences, the air is
directed toward the wi ndshield, the side win-
dows, the upper body and the footwell.
Pressing the AUTO button automatically
switches on the cooling function.
At the same time, a condensation sensor con-
trols the program so as to prevent window con-
densation as much as possible.
The program is switched off when the air distri-
bution is set manually or the button is pressed
again.
Intensity of the AUTO program
With the AUTO progra m switched on, auto-
matic control of the air volume and air distribu-
tion can be adjusted:
Press the left side of the button to
reduce the intensity. Press the
right side of the button to
increase it.
The selected intensity is shown on the display
of the automatic climate control.
Convertible program
The Convertible program is active when the
hardtop is open and the AUTO program is
switched on. In the Convertible program, the
automatic climate control is optimized for driv-
ing with the hardtop open . In addition, the air
volume is increased as vehicle speed increases.
The effectiveness of the Convertible pro-
gram can be enhanced considerably by
installing the wind deflector. <
Adjusting air volume manually
To be able to manually adjust the air volume,
switch off the AUTO program first.
Press the left side of the button to
reduce the air volume. Press the
right side of the button to
increase it.
The air flow rate is lowered or switched off
entirely to reduce the drain on the battery. The
display remains the same.
Automatic recirculated air control
AUC/Recirculated air mode
You can respond to unpleasant odors or pollut-
ants in the immediate environment by tempo-
rarily suspending the supply of outside air. The
system then recirculates the air currently within
the vehicle.
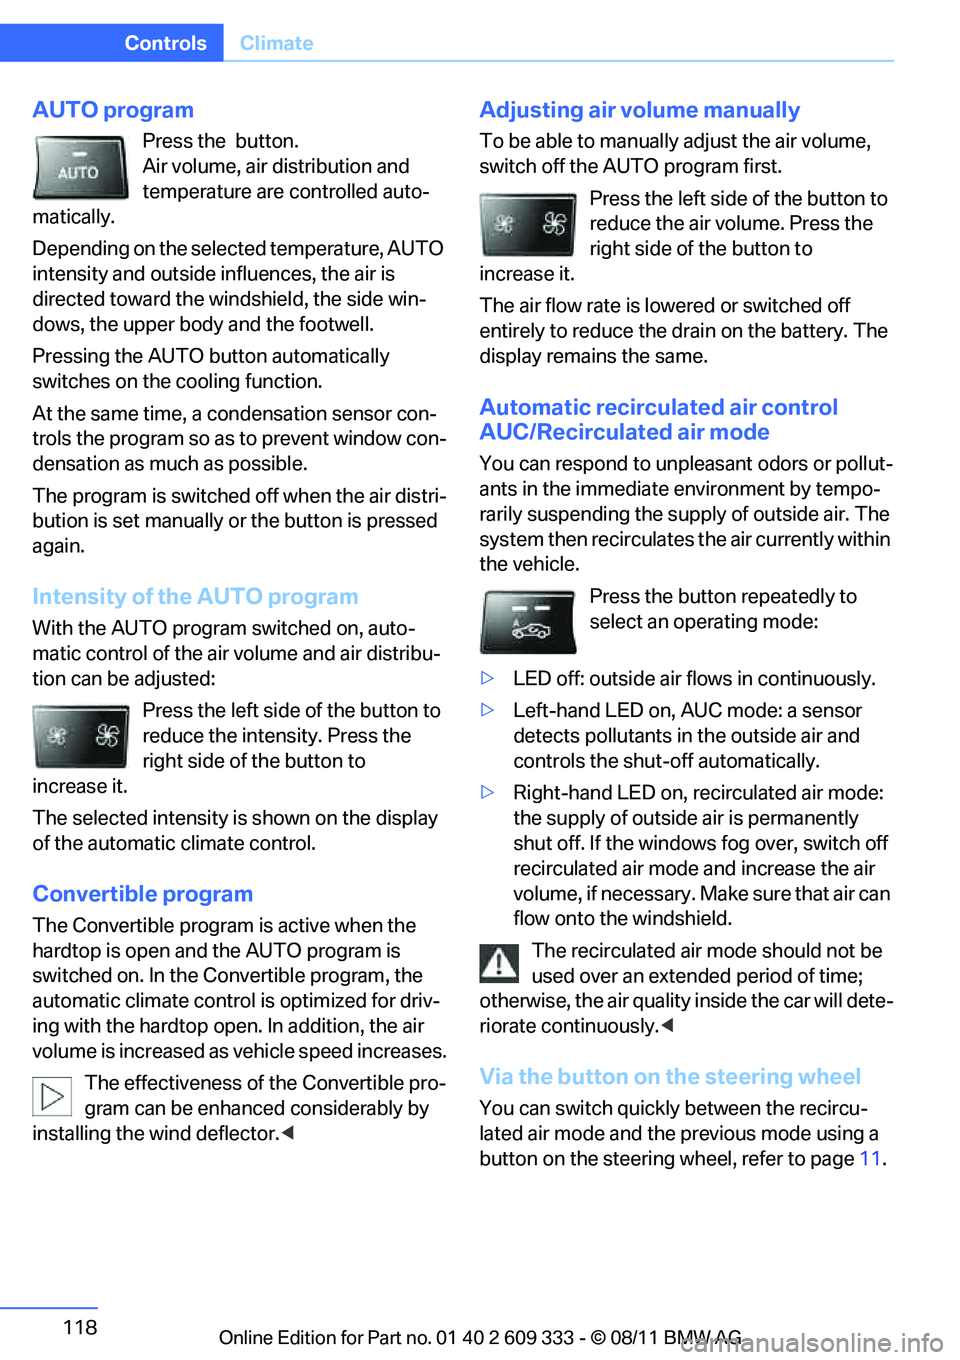
Press the button repeatedly to
select an operating mode:
> LED off: outside air fl ows in continuously.
> Left-hand LED on, AUC mode: a sensor
detects pollutants in the outside air and
controls the shut-off automatically.
> Right-hand LED on, recirculated air mode:
the supply of outside air is permanently
shut off. If the windows fog over, switch off
recirculated air mode and increase the air
volume, if necessary. Ma ke sure that air can
flow onto the windshield.
The recirculated air mode should not be
used over an extended period of time;
otherwise, the air quality inside the car will dete-
riorate continuously. <
Via the button on the steering wheel
You can switch quickly between the recircu-
lated air mode and the previous mode using a
button on the steering wheel, refer to page 11.
Online Edition for Part no. 01 40 2 609 333 - \251 08/11 BMW AG
Page 157 of 314
156
NavigationDestination entry
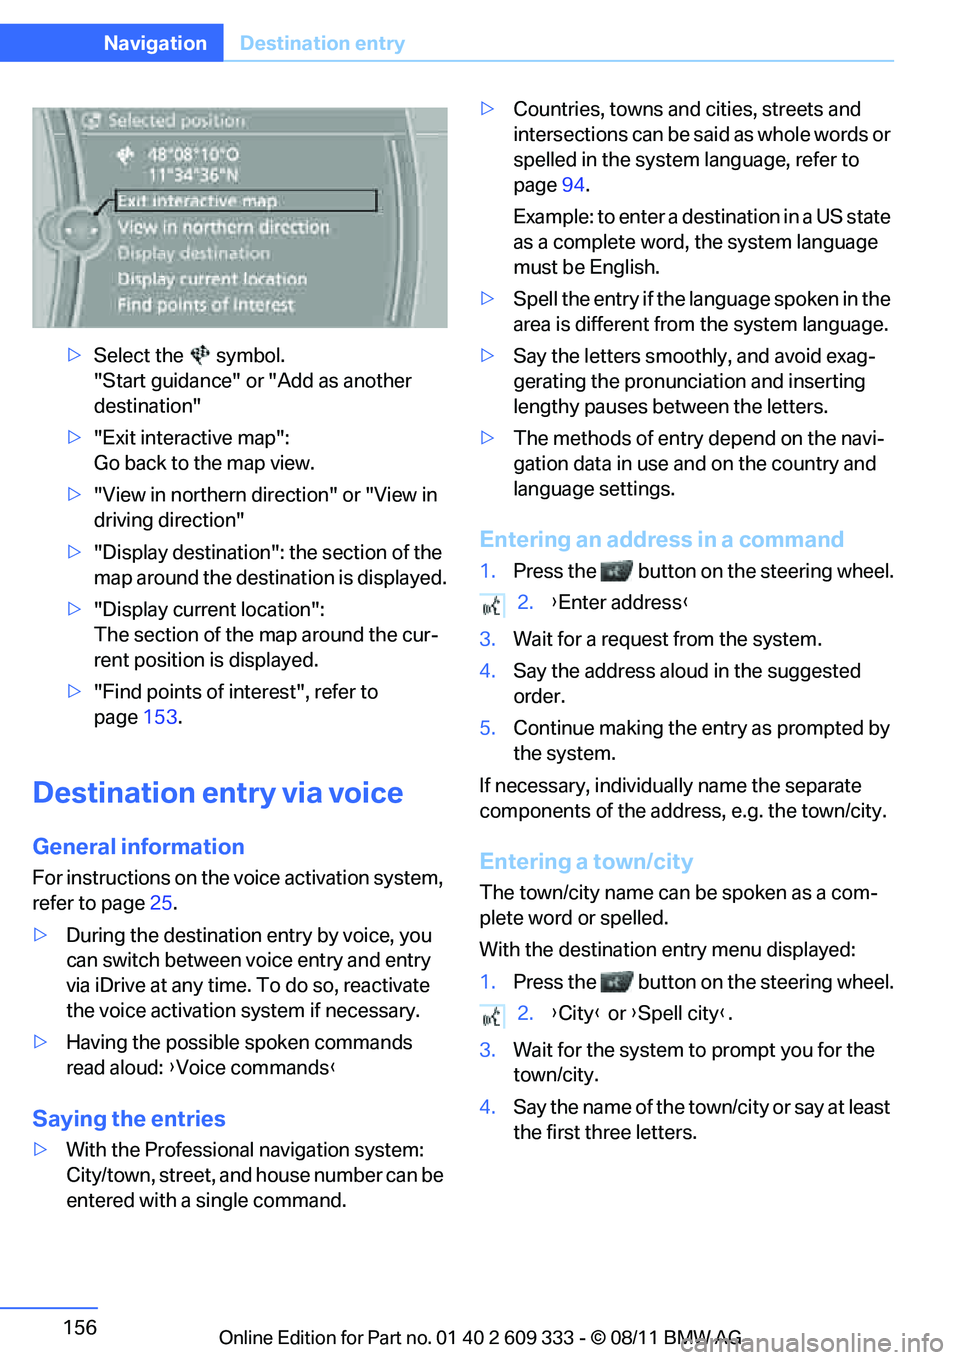
>Select the symbol.
"Start guidance" or "Add as another
destination"
> "Exit interactive map":
Go back to the map view.
> "View in northern direction" or "View in
driving direction"
> "Display destination": the section of the
map around the destination is displayed.
> "Display current location":
The section of the map around the cur-
rent position is displayed.
> "Find points of interest", refer to
page 153.
Destination entry via voice
General information
For instructions on the voice activation system,
refer to page 25.
> During the destination entry by voice, you
can switch between voice entry and entry
via iDrive at any time. To do so, reactivate
the voice activation system if necessary.
> Having the possible spoken commands
read aloud: {Voice commands }
Saying the entries
>With the Professional navigation system:
City/town, street, and house number can be
entered with a single command. >
Countries, towns and cities, streets and
intersections can be said as whole words or
spelled in the system language, refer to
page 94.
Example: to enter a destination in a US state
as a complete word, the system language
must be English.
> Spell the entry if the language spoken in the
area is different from the system language.
> Say the letters smoothly, and avoid exag-
gerating the pronunciation and inserting
lengthy pauses between the letters.
> The methods of entry depend on the navi-
gation data in use and on the country and
language settings.
Entering an address in a command
1. Press the button on the steering wheel.
3. Wait for a request from the system.
4. Say the address aloud in the suggested
order.
5. Continue making the entry as prompted by
the system.
If necessary, individua lly name the separate
components of the addres s, e.g. the town/city.
Entering a town/city
The town/city name can be spoken as a com-
plete word or spelled.
With the destination entry menu displayed:
1.Press the button on the steering wheel.
3. Wait for the system to prompt you for the
town/city.
4. Say the name of the tow n/city or say at least
the first three letters.
2. {Enter address }
2. {City } or {Spell city }.
Online Edition for Part no. 01 40 2 609 333 - \251 08/11 BMW AG