2012 BMW 135I COUPE seats
[x] Cancel search: seatsPage 53 of 272
Controls
51Reference
At a glance
Driving tips
Communications
Navigation
Entertainment
Mobility
Closing
Make sure you hear the latch plate engage in
the belt buckle.
The upper belt anchor is suitable for adults of
any stature as long as the seat is adjusted prop-
erly, refer to page46.
Opening
1.Grasp the belt firmly.
2.Press the red button in the buckle.
3.Guide the belt into its reel.
Safety belt reminder for front seats
The indicator lamps light up and an
acoustic signal sounds. In addition, a
message appears on the Control Dis-
play. Check whether the safety belt
has been fastened correctly.
The 'Fasten safety belts' reminder is issued as
long as the driver's safety belt has not been fas-
tened. The 'Fasten safety belts' reminder is also
issued above approx. 5 mph/8 km/h if the front
passenger safety belt has not been fastened, if
there are objects on the front passenger seat or
if the driver or front passenger unfasten their
safety belts.
Damage to safety belts
If the safety belts are damaged or
stressed in an accident: have the belt sys-
tem, including any belt tensioners or child
restraint systems, replaced and the belt
anchors checked. Have this work done only by
your BMW center or at a workshop that works
according to BMW repair procedures with cor-
respondingly trained personnel. Otherwise, it is not guaranteed that the safety devices will func-
tion properly.<
Mirrors
Exterior mirrors
The front passenger's mirror is more con-
vex than the driver's mirror. The objects
seen in the mirror are closer than they appear.
Do not gauge your distance from traffic behind
you on the basis of what you see in the mirror;
otherwise, there is an increased risk of an acci-
dent.<
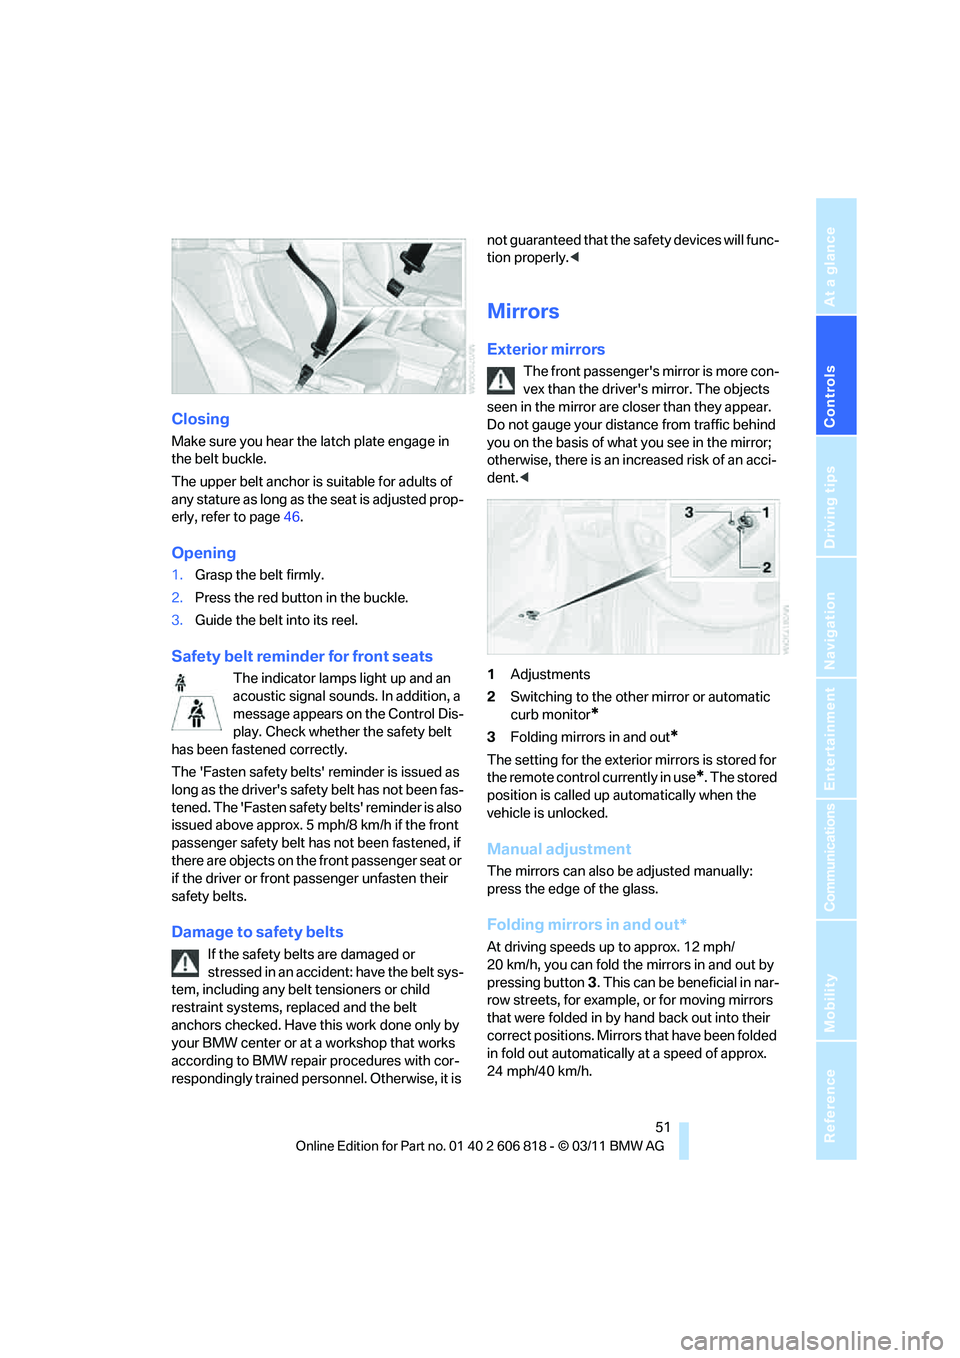
1Adjustments
2Switching to the other mirror or automatic
curb monitor
*
3Folding mirrors in and out*
The setting for the exterior mirrors is stored for
the remote control currently in use
*. The stored
position is called up automatically when the
vehicle is unlocked.
Manual adjustment
The mirrors can also be adjusted manually:
press the edge of the glass.
Folding mirrors in and out*
At driving speeds up to approx. 12 mph/
20 km/h, you can fold the mirrors in and out by
pressing button3. This can be beneficial in nar-
row streets, for example, or for moving mirrors
that were folded in by hand back out into their
correct positions. Mirrors that have been folded
in fold out automatically at a speed of approx.
24 mph/40 km/h.
Page 57 of 272
Controls
55Reference
At a glance
Driving tips
Communications
Navigation
Entertainment
Mobility
To lock the safety belt
1.Secure the child restraint system with the
belt.
2.Pull the belt strap all the way out.
3.Allow the belt strap to retract and pull it taut
against the child restraint system.
The safety belt is locked.
To unlock the safety belt
1.Open the belt buckle.
2.Remove the child restraint system.
3.Allow the safety belt strap to retract all the
way.
LATCH child restraint fixing
system
LATCH: Lower Anchors and Tethers for CHil-
dren.
To install and use the LATCH child
restraint system, follow the operating and
safety instructions provided by the manufac-
turer of the system; otherwise, the protective
function of the seat may be compromised.<
Mounts for the lower LATCH anchors
Before installing the child seat, pull the belt out
of the area for the child restraint fixing system.
Ensure that both lower LATCH anchors
are correctly engaged and that the child
restraint system is resting firmly against the
backrest; otherwise, the protective function of
the seat may be compromised.<
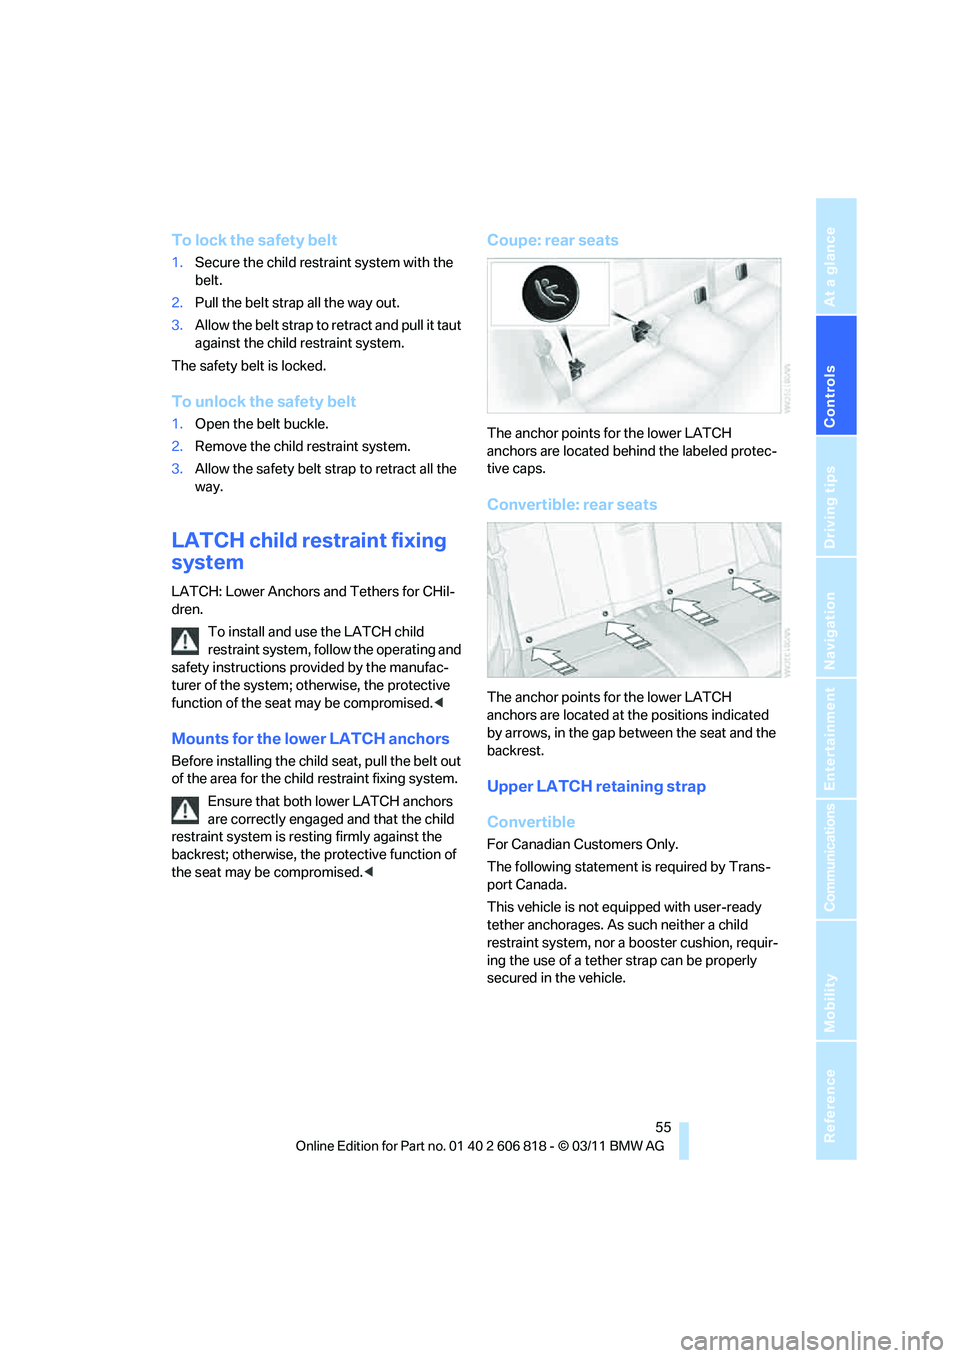
Coupe: rear seats
The anchor points for the lower LATCH
anchors are located behind the labeled protec-
tive caps.
Convertible: rear seats
The anchor points for the lower LATCH
anchors are located at the positions indicated
by arrows, in the gap between the seat and the
backrest.
Upper LATCH retaining strap
Convertible
For Canadian Customers Only.
The following statement is required by Trans-
port Canada.
This vehicle is not equipped with user-ready
tether anchorages. As such neither a child
restraint system, nor a booster cushion, requir-
ing the use of a tether strap can be properly
secured in the vehicle.
Page 93 of 272
Controls
91Reference
At a glance
Driving tips
Communications
Navigation
Entertainment
Mobility
adhesive labels or coverings, and do not attach
holders such as for navigation instruments and
mobile phones.
Do not attach seat covers, cushions or other
objects not specifically approved for seats with
integral side airbags to the front seats. Do not
hang items of clothing such as coats or jackets
over the backrests. Do not attempt to remove
the airbag retention system from the vehicle. Do
not modify the individual components of the
system or its wiring in any way. This includes
the upholstered covers on the steering wheel,
instrument panel, seats and roof posts, as well
as the sides of the roof lining. Do not attempt to
remove or dismantle the steering wheel.
Do not touch the individual components imme-
diately after the system has been triggered,
because there is a danger of burns.
In the event of malfunctions, deactivation or
triggering of the airbag restraint system, have
the testing, repair, removal and disposal of air-
bag generators executed only by a BMW center
or a workshop that works according to repair
procedures of BMW with correspondingly
trained personnel and that has the required
explosives licenses. Unprofessional attempts to
work on the system could lead to failure in an
emergency or to undesired airbag activation,
either of which could result in personal injury.<
Warning notices and information about the air-
bags can also be found on the sun visors.
Automatic deactivation of the front
passenger airbags
An analysis of the impression in the front pas-
senger seat cushion determines whether and
how the seat is occupied. The front and side air-
bags for the front passenger are activated or
deactivated by the system accordingly.
The indicator lamp above the interior
rearview mirror shows the current status
of the front passenger airbags, deactivated or
activated, refer to Status of front passenger air-
bags below.<
Before transporting a child on the front
passenger seat, read the safety precau-
tions and handling instructions under Trans-
porting children safely, refer to page54.The front and side airbags can also be deacti-
vated by adolescents and adults sitting in cer-
tain positions; the indicator lamp for the front
passenger airbags lights up. In such cases, the
passenger should change his or her sitting
position so that the front passenger airbags are
activated and the indicator lamp goes out. If the
desired airbag status cannot be achieved by
changing the sitting position, transport the rele-
vant passenger on a rear seat. Do not attach
seat covers, seat cushion padding, ball mats or
other items to the front passenger seat unless
they are specifically recommended by BMW.
Do not place any items under the seat which
could press against the seat from below. Other-
wise, a correct analysis of the seat cushion is
not ensured.<
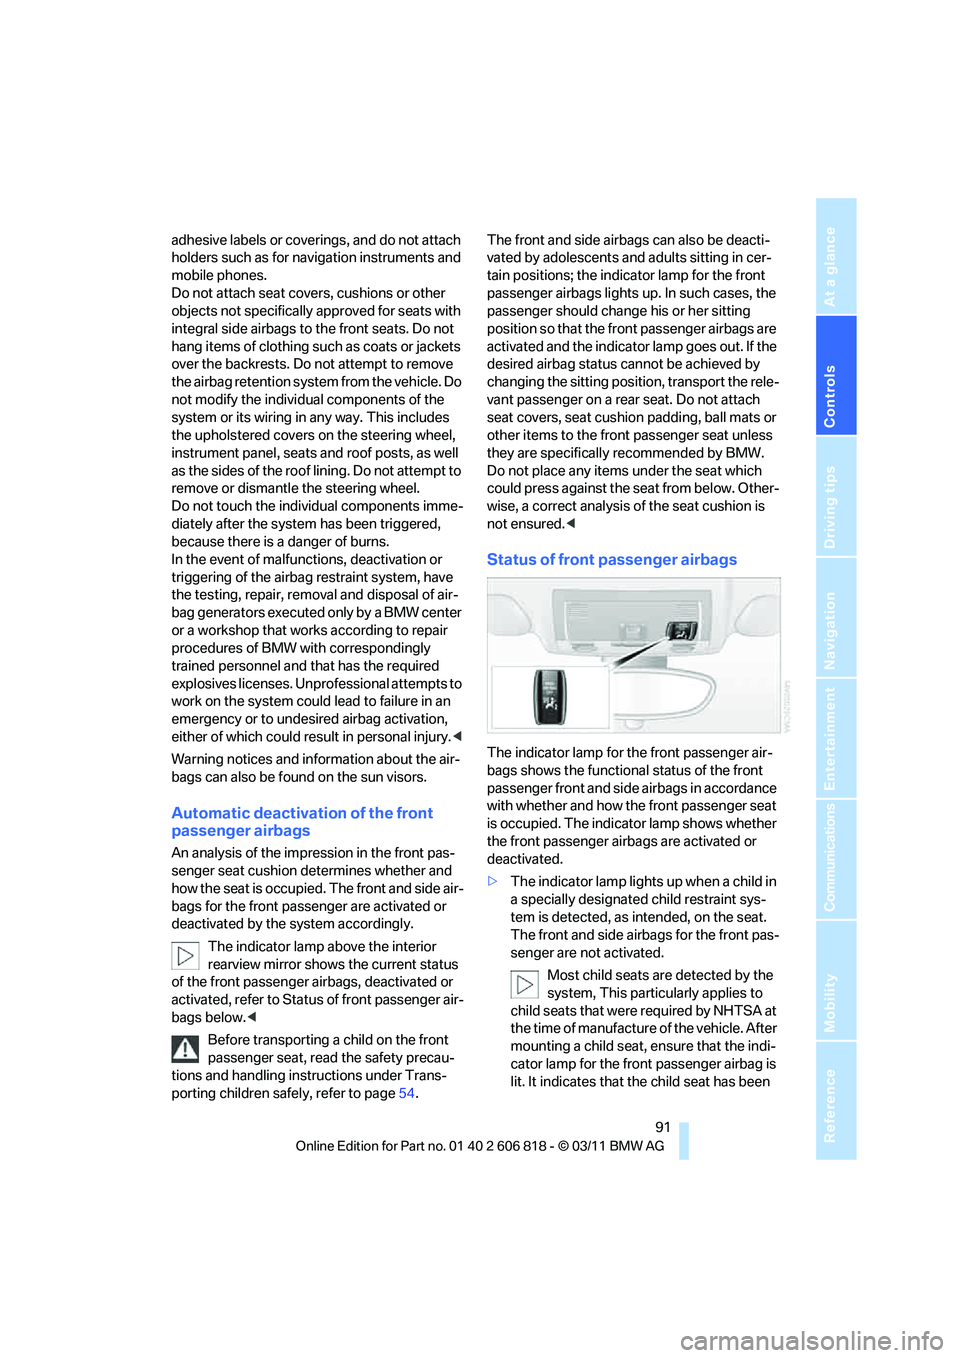
Status of front passenger airbags
The indicator lamp for the front passenger air-
bags shows the functional status of the front
passenger front and side airbags in accordance
with whether and how the front passenger seat
is occupied. The indicator lamp shows whether
the front passenger airbags are activated or
deactivated.
>The indicator lamp lights up when a child in
a specially designated child restraint sys-
tem is detected, as intended, on the seat.
The front and side airbags for the front pas-
senger are not activated.
Most child seats are detected by the
system, This particularly applies to
child seats that were required by NHTSA at
the time of manufacture of the vehicle. After
mounting a child seat, ensure that the indi-
cator lamp for the front passenger airbag is
lit. It indicates that the child seat has been
Page 110 of 272
Practical interior accessories
108 >Do not connect USB hard discs.
>Do not use the USB interface to recharge
external devices.
Center armrest
Storage compartment
The center armrest between the front seats
contains a credit card holder and, depending on
the equipment version, a compartment or a
snap-in adapter
*.
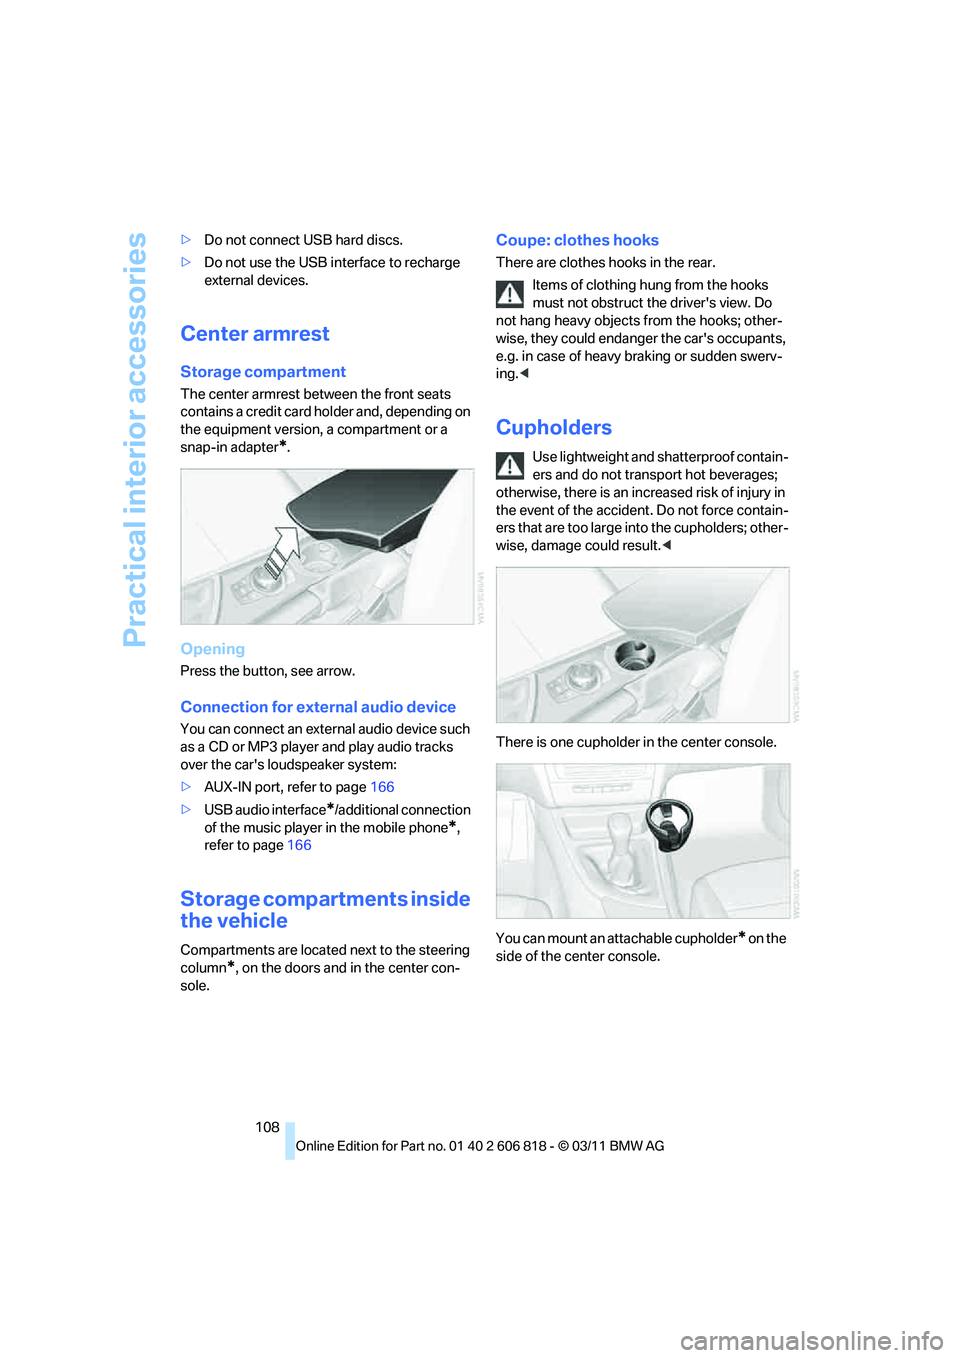
Opening
Press the button, see arrow.
Connection for external audio device
You can connect an external audio device such
as a CD or MP3 player and play audio tracks
over the car's loudspeaker system:
>AUX-IN port, refer to page166
>USB audio interface
*/additional connection
of the music player in the mobile phone
*,
refer to page166
Storage compartments inside
the vehicle
Compartments are located next to the steering
column
*, on the doors and in the center con-
sole.
Coupe: clothes hooks
There are clothes hooks in the rear.
Items of clothing hung from the hooks
must not obstruct the driver's view. Do
not hang heavy objects from the hooks; other-
wise, they could endanger the car's occupants,
e.g. in case of heavy braking or sudden swerv-
ing.<
Cupholders
Use lightweight and shatterproof contain-
ers and do not transport hot beverages;
otherwise, there is an increased risk of injury in
the event of the accident. Do not force contain-
ers that are too large into the cupholders; other-
wise, damage could result.<
There is one cupholder in the center console.
You can mount an attachable cupholder
* on the
side of the center console.
Page 113 of 272
Controls
111Reference
At a glance
Driving tips
Communications
Navigation
Entertainment
Mobility
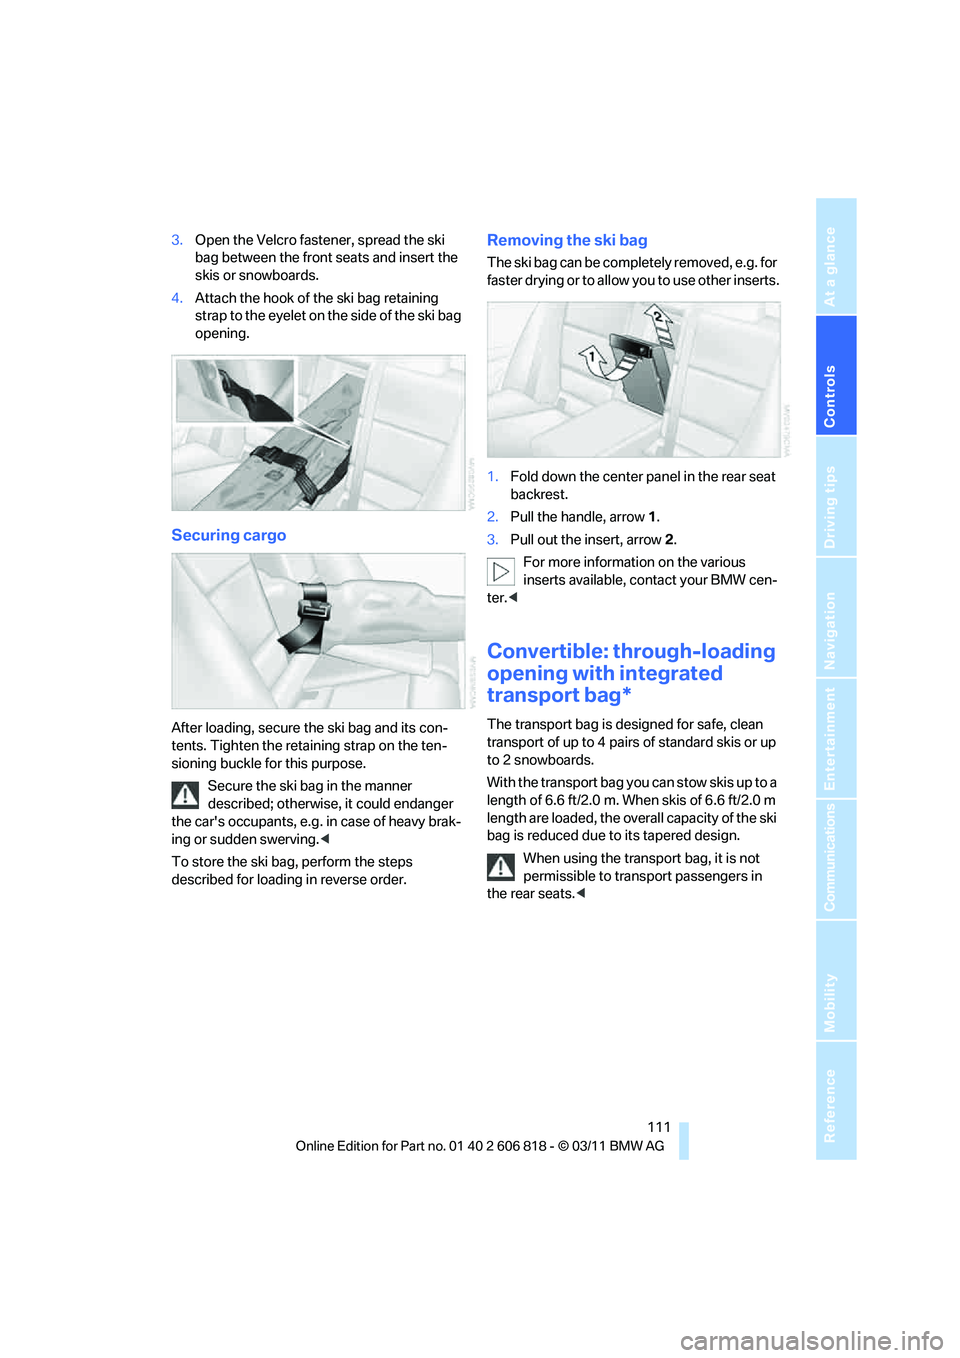
3.Open the Velcro fastener, spread the ski
bag between the front seats and insert the
skis or snowboards.
4.Attach the hook of the ski bag retaining
strap to the eyelet on the side of the ski bag
opening.
Securing cargo
After loading, secure the ski bag and its con-
tents. Tighten the retaining strap on the ten-
sioning buckle for this purpose.
Secure the ski bag in the manner
described; otherwise, it could endanger
the car's occupants, e.g. in case of heavy brak-
ing or sudden swerving.<
To store the ski bag, perform the steps
described for loading in reverse order.
Removing the ski bag
The ski bag can be completely removed, e.g. for
faster drying or to allow you to use other inserts.
1.Fold down the center panel in the rear seat
backrest.
2.Pull the handle, arrow1.
3.Pull out the insert, arrow 2.
For more information on the various
inserts available, contact your BMW cen-
ter.<
Convertible: through-loading
opening with integrated
transport bag*
The transport bag is designed for safe, clean
transport of up to 4 pairs of standard skis or up
to 2 snowboards.
With the transport bag you can stow skis up to a
length of 6.6 ft/2.0 m. When skis of 6.6 ft/2.0 m
length are loaded, the overall capacity of the ski
bag is reduced due to its tapered design.
When using the transport bag, it is not
permissible to transport passengers in
the rear seats.<
Page 114 of 272
Practical interior accessories
112
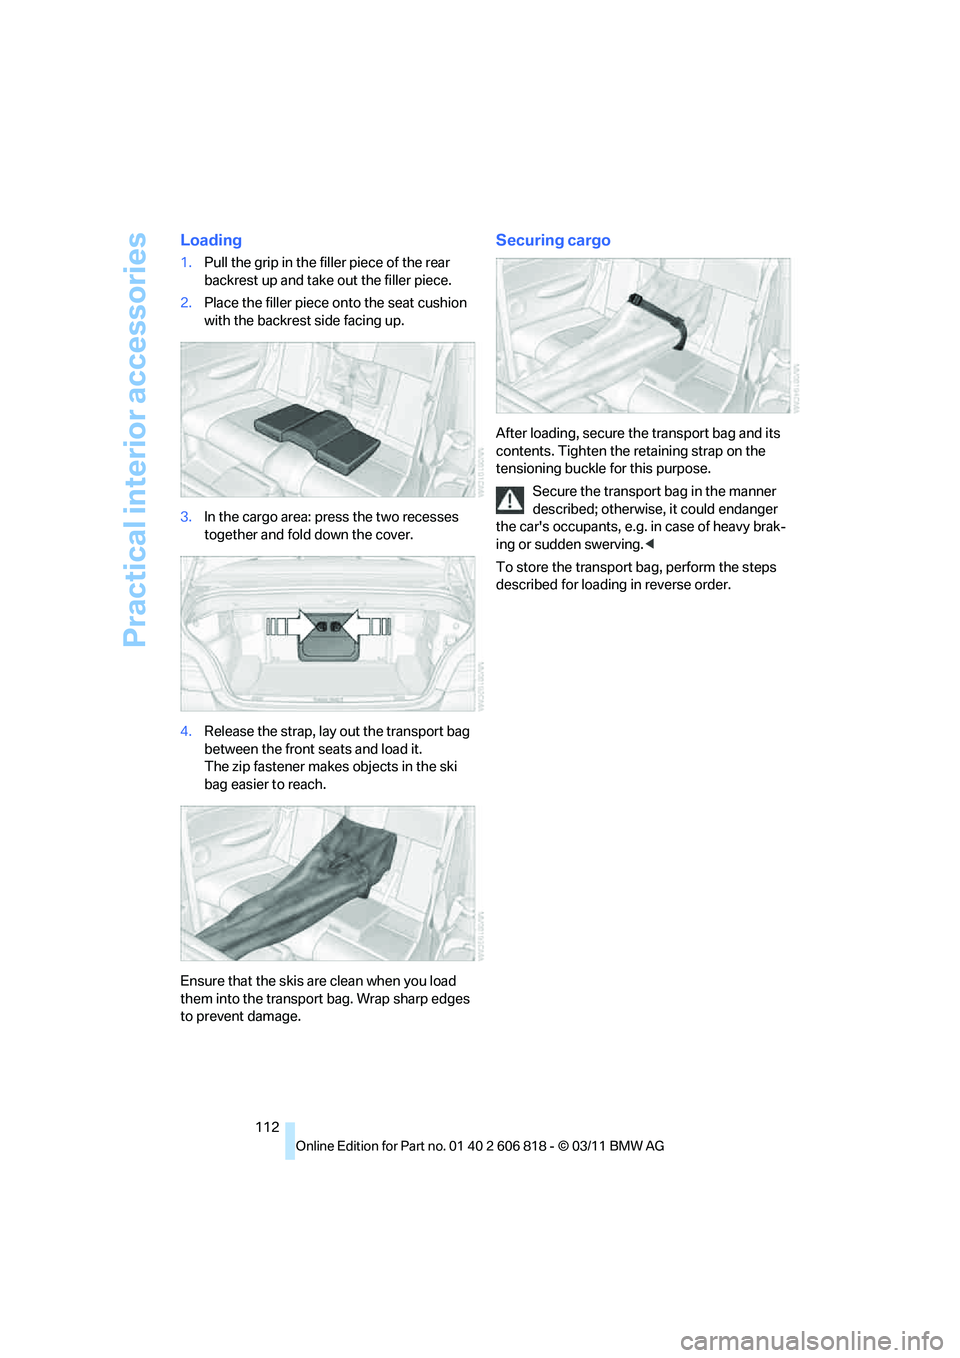
Loading
1.Pull the grip in the filler piece of the rear
backrest up and take out the filler piece.
2.Place the filler piece onto the seat cushion
with the backrest side facing up.
3.In the cargo area: press the two recesses
together and fold down the cover.
4.Release the strap, lay out the transport bag
between the front seats and load it.
The zip fastener makes objects in the ski
bag easier to reach.
Ensure that the skis are clean when you load
them into the transport bag. Wrap sharp edges
to prevent damage.
Securing cargo
After loading, secure the transport bag and its
contents. Tighten the retaining strap on the
tensioning buckle for this purpose.
Secure the transport bag in the manner
described; otherwise, it could endanger
the car's occupants, e.g. in case of heavy brak-
ing or sudden swerving.<
To store the transport bag, perform the steps
described for loading in reverse order.
Page 256 of 272
Everything from A to Z
254
Everything from A to Z
Index
A
ABS Antilock Brake
System83
Acceleration assistant, refer to
Launch Control66
Accessories, refer to Your
individual vehicle5
Accident, reporting, refer to
Emergency Request234
Activated-charcoal filter102
Active steering89
Adaptive Light Control95
Additives
– coolant219
– engine oil219
Address, entering125,131
Address for navigation
– entering125
Adjusting temperature100
Airbags90
– sitting safely45
– warning lamp92
Air conditioner99
Air distribution
– automatic100
Airing, refer to Ventilation102
Air outlets, refer to Air
vents99
Air pressure, checking, refer
to Tire inflation
pressure208
Air recirculation, refer to
Recirculated air mode101
Air vents99
Air volume101
AKI, refer to Fuel grade207
Alarm system34
– avoiding unintentional
alarms35
– interior motion sensor35
– switching off an alarm34
– tilt alarm sensor35Albums of music
collection163
ALL program101
All-season tires, refer to
Winter tires215
AM, waveband147
Ambient air, refer to
Recirculated air mode101
Antifreeze
– coolant219
– washer fluid68
Antilock Brake System
ABS83
Anti-theft alarm system, refer
to Alarm system34
Anti-theft system29
Appointments, refer to
Calendar193
Approved axle loads, refer to
Weights245
Approved engine oils219
Approved gross vehicle
weight, refer to Weights245
Apps202
Armrest, refer to Center
armrest108
Arrival time
– computer72
Ashtray109
Assistance systems, refer to
Dynamic Stability Control
DSC83
AUC Automatic recirculated
air control101
Audible instructions, refer to
Voice instructions136
Audio144
– controls144
– switching on/off144
– tone control144
– volume144Automatic
– air distribution100
– air volume100
– cruise control68
– headlamp control94
Automatic car washes223
Automatic climate control99
Automatic curb monitor52
Automatic high beams and
low beams, refer to High-
beam Assistant96
Automatic lamps
– refer to Welcome lamps94
Automatic recirculated air
control AUC101
Automatic Service
Request202
Automatic transmission with
Steptronic59
– selector lever lock60
– shiftlock60
– towing236
– tow-starting236
AUTO program for automatic
climate control100
AUX-IN port166
Available services202
Average fuel consumption72
– setting the units74
Average speed72
Avoid highways in
navigation134
Avoiding unintentional
alarms35
Axle loads, refer to
Weights245
B
Backrests, refer to Seats46
Backrest width adjustment47
Back seats, refer to Rear seats
– adjusting head restraints48
Page 258 of 272
Everything from A to Z
256 Cargo area lid, refer to Trunk
lid33
Cargo area net, refer to
Securing cargo120
Cargo loading119
– securing cargo120
– stowing cargo120
– vehicle119
Car jack
– jacking points232
Car key, refer to Integrated
key/remote control28
Car phone
– installation location, refer to
Center armrest108
– refer to separate Owner's
Manual
Car phone, refer to
Telephone176
Car radio, refer to Radio147
Car shampoo224
Car wash223
Catalytic converter, refer to
Hot exhaust system117
CD, audio playback155
CD changer155,159
– controls144
– fast forward/reverse157
– filling or emptying the
magazine159
– random play sequence156
– selecting a track155
– switching on/off144
– tone control144
– volume144
CD player155
– controls144
– fast forward/reverse157
– random order156
– selecting a track155
– switching on/off144
– tone control144
– volume144
Center armrest108
Center brake lamp, replacing
bulb231
Center console, refer to
Around the center
console14Central key, refer to Integrated
key/remote control28
Central locking
– from inside32
– from outside29
Central locking system29
– Comfort Access35
Changes, technical, refer to
For your own safety5
Changing bulbs227
Changing gears64
Changing the language on the
Control Display81
Changing wheels231
Chassis number, refer to
Engine compartment217
Check Control78
Child restraint fixing system
LATCH55
Child restraint systems54
Child seats54
Chrome parts225
Chrome polish225
Cigarette lighter109
Cleaning headlamps67
– washer fluid68
Cleaning your BMW, refer to
Care223
Climate control
– automatic air
distribution100
Clock70
– 12h/24h mode77
– setting the time and date77
– setting time76
Closing
– from inside32
– from outside29
Clothes hooks108
Cold start, refer to Starting the
engine58
Comfort Access35
– replacing the battery37
Comfort access, refer to
Comfort Access35
Comfort area, refer to Around
the center console14Compartment for remote
control, refer to Ignition
lock57
Compass106
Computer71
– displays on Control
Display72
Computer, refer to iDrive16
Concierge service199
Condensation, refer to When
the vehicle is parked119
Condition Based Service
CBS221
Configuring settings, refer to
Personal Profile28
Confirmation signals for
locking/unlocking the
vehicle30
ConnectedDrive198
Connecting vacuum cleaner,
refer to Connecting
electrical appliances109
Consumption, refer to
Average fuel
consumption72
Contacts188
– deleting190,197
– exporting/importing197
– new contact189
Control Center, refer to
iDrive16
Control Display16,17
Control Display, refer to iDrive
– switching on/off17
Controller, refer to iDrive16
Controls and displays10
Convenient opening and
closing
– windows30
– windows with Comfort
Access36
– with Comfort Access36
Convenient start, refer to
Starting the engine58
Convertible
– rollover protection
system92
– top40
– wind deflector43