2012 BMW 135I CONVERTIBLE Indicator
[x] Cancel search: IndicatorPage 14 of 272
Dashboard
12
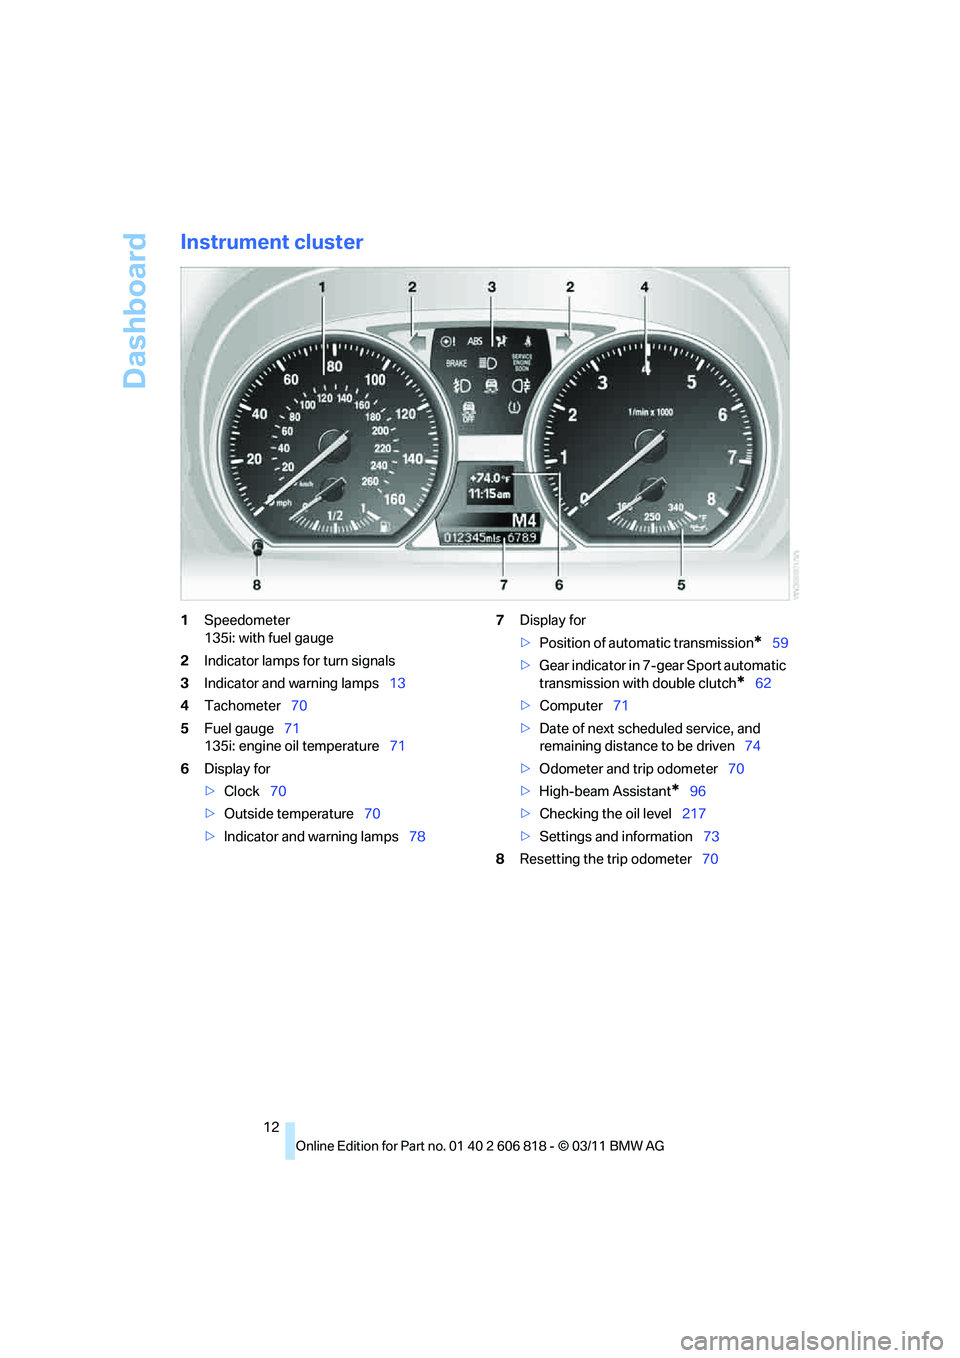
Instrument cluster
1Speedometer
135i: with fuel gauge
2Indicator lamps for turn signals
3Indicator and warning lamps13
4Tachometer70
5Fuel gauge71
135i: engine oil temperature71
6Display for
>Clock70
>Outside temperature70
>Indicator and warning lamps787Display for
>Position of automatic transmission
*59
>Gear indicator in 7-gear Sport automatic
transmission with double clutch
*62
>Computer71
>Date of next scheduled service, and
remaining distance to be driven74
>Odometer and trip odometer70
>High-beam Assistant
*96
>Checking the oil level217
>Settings and information73
8Resetting the trip odometer70
Page 15 of 272
At a glance
13Reference
Controls
Driving tips
Communications
Navigation
Entertainment
Mobility
Indicator and warning lamps
The concept
Indicator and warning lamps can light up in a
variety of combinations and colors.
Several of the lamps are checked for proper
functioning and light up temporarily when the
engine is started or the ignition is switched on.
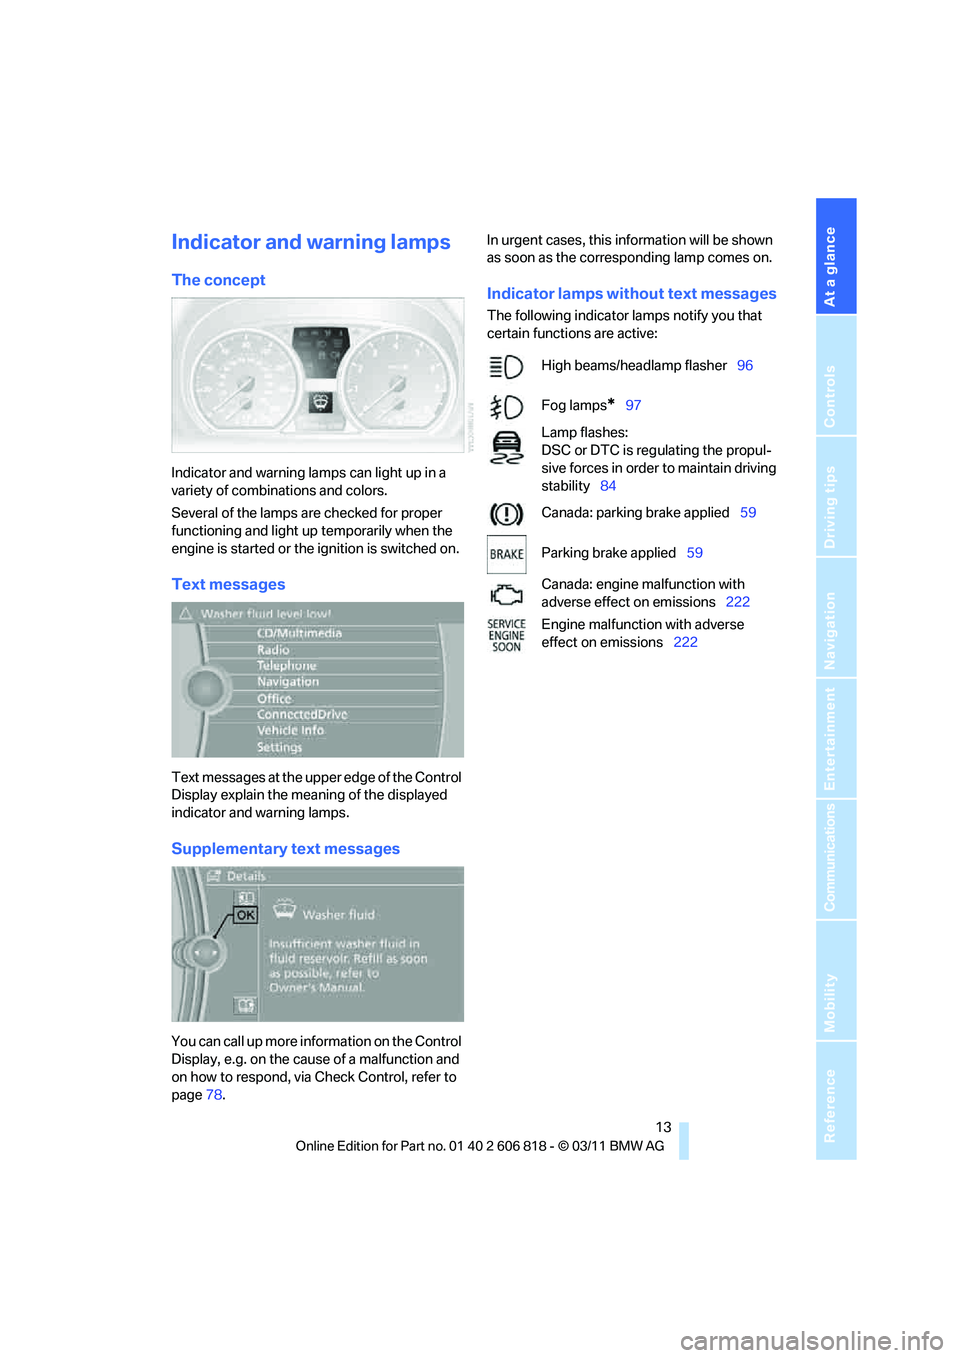
Text messages
Text messages at the upper edge of the Control
Display explain the meaning of the displayed
indicator and warning lamps.
Supplementary text messages
You can call up more information on the Control
Display, e.g. on the cause of a malfunction and
on how to respond, via Check Control, refer to
page78.In urgent cases, this information will be shown
as soon as the corresponding lamp comes on.
Indicator lamps without text messages
The following indicator lamps notify you that
certain functions are active:
High beams/headlamp flasher96
Fog lamps
*97
Lamp flashes:
DSC or DTC is regulating the propul-
sive forces in order to maintain driving
stability84
Canada: parking brake applied59
Parking brake applied59
Canada: engine malfunction with
adverse effect on emissions222
Engine malfunction with adverse
effect on emissions222
Page 37 of 272

Controls
35Reference
At a glance
Driving tips
Communications
Navigation
Entertainment
Mobility
Indicator lamp displays
>The indicator lamp under the inside rear-
view mirror flashes continuously: the sys-
tem is armed.
>The indicator lamp flashes after locking:
doors, hood or trunk lid are not properly
closed. Even if you do not close the alerted
area, the system begins to monitor the
remaining areas, and the indicator lamp
flashes continuously after approx.
10 seconds. The interior m o t i o n s e n s o r a n d
the tilt alarm sensor are not activated.
>The indicator lamp goes out after unlocking:
your vehicle has not been disturbed while
you were away.
>If the indicator lamp flashes after unlocking
until the remote control is inserted in the
ignition, but for no longer than approx.
5 minutes: your vehicle has been disturbed
while you were away.
Tilt alarm sensor
The tilt of the vehicle is monitored. The alarm
system reacts, e.g. to attempts to steal a wheel
or tow the vehicle.
Interior motion sensor
Coupe
In order for the interior motion sensor to func-
tion properly, the windows and glass roof
* must
be completely closed.
Convertible
The interior of the car is monitored up to the
height of the seat cushions. This way, the anti-
theft alarm system including the interior motion sensor are armed, even if the convertible top is
open. Falling objects, e.g. tree leaves, may trig-
ger a false alarm, refer to Avoiding false alarms.
Avoiding unintentional alarms
The tilt alarm sensor and interior motion sensor
may be switched off at the same time. This pre-
vents unintentional alarms, e.g. in the following
situations:
>In duplex garages
>During transport on car-carrying trains,
boats/ships or on a trailer
>When animals are to remain in the vehicle
Switching off tilt alarm sensor and
interior motion sensor
Press the button on the remote control
again as soon as the vehicle is locked.
The indicator lamp lights up briefly and then
flashes continuously. The tilt alarm sensor and
the interior motion sensor are switched off until
the next time the vehicle is unlocked and subse-
quently locked again.
Comfort Access*
Comfort Access enables you to enter your vehi-
cle without needing to hold the remote control
in your hand. All you need to do is wear the
remote control close to your body, e.g. in your
jacket pocket. The vehicle detects the corre-
sponding remote control within the immediate
vicinity or in the passenger compartment.
Comfort Access supports the following func-
tions:
>Unlocking/locking the vehicle
>Unlocking the trunk lid separately
>Engine starting
>Convenient closing
Functional requirement
>The vehicle or the trunk lid can only be
locked when the vehicle detects that the
remote control currently in use is outside of
the vehicle.
Page 39 of 272
Controls
37Reference
At a glance
Driving tips
Communications
Navigation
Entertainment
Mobility
afterward, insert the remote control into the
ignition lock.
Warning lamps
The warning lamp in the instrument
cluster lights up when you attempt to
start the engine: the engine cannot
be started. The remote control is not inside the
vehicle or is malfunctioning. Take the remote
control with you inside the vehicle or have it
checked. If necessary, insert another remote
control into the ignition lock.
The warning lamp in the instrument
cluster lights up while the engine is
running: the remote control is no
longer inside the vehicle. After the engine is
switched off, the engine can only be restarted
within approx. 10 seconds.
The indicator lamp in the instrument
cluster comes on and a message
appears on the Control Display:
replace the battery in the remote control.
Replacing the battery
The remote control for Comfort Access con-
tains a battery that will need to be replaced from
time to time.
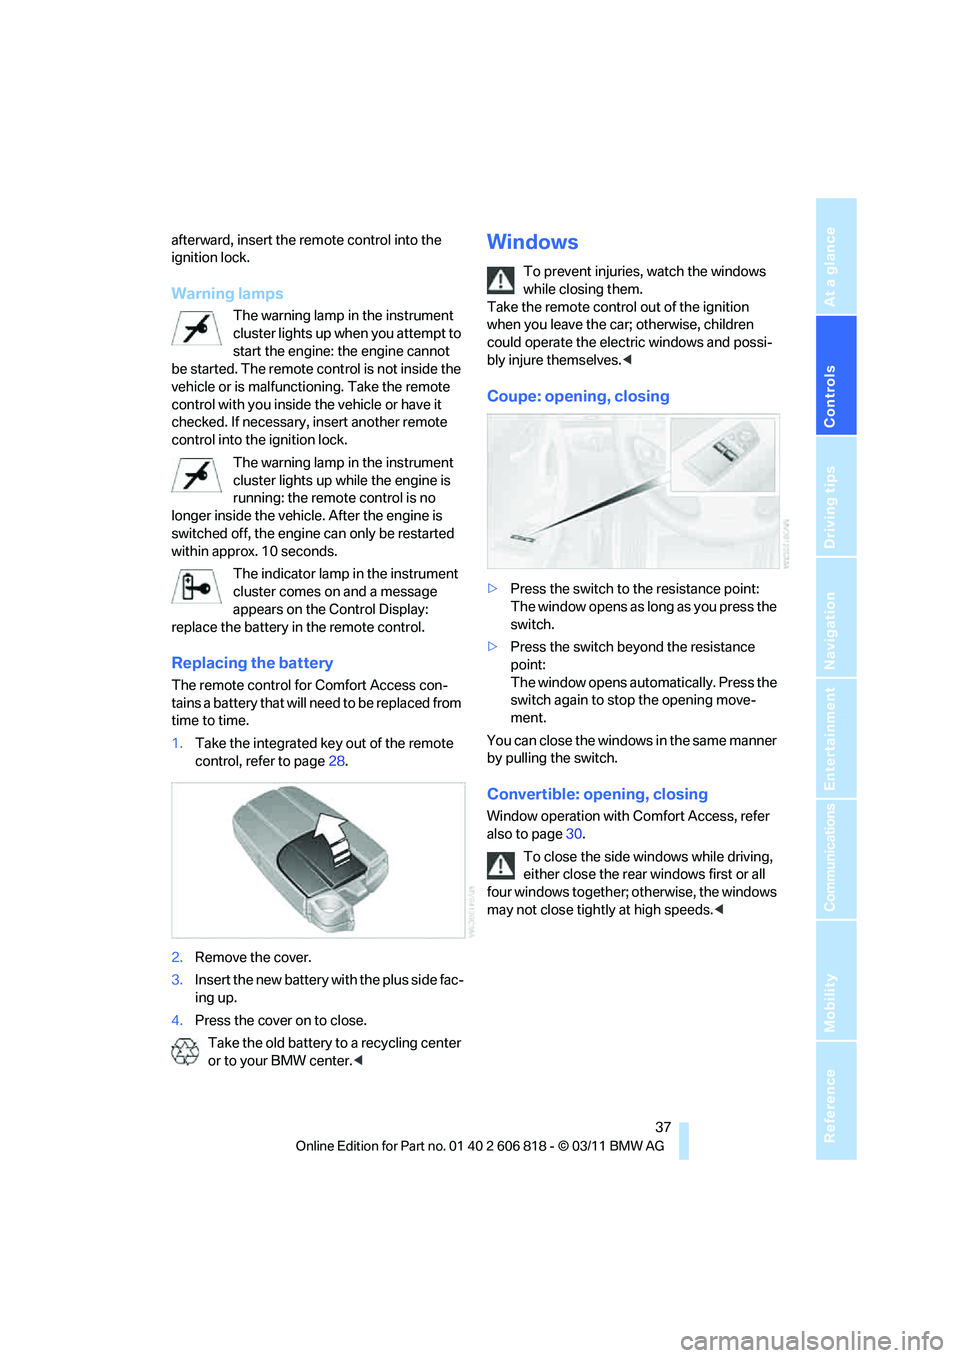
1.Take the integrated key out of the remote
control, refer to page28.
2.Remove the cover.
3.Insert the new battery with the plus side fac-
ing up.
4.Press the cover on to close.
Take the old battery to a recycling center
or to your BMW center.<
Windows
To prevent injuries, watch the windows
while closing them.
Take the remote control out of the ignition
when you leave the car; otherwise, children
could operate the electric windows and possi-
bly injure themselves.<
Coupe: opening, closing
>Press the switch to the resistance point:
The window opens as long as you press the
switch.
>Press the switch beyond the resistance
point:
The window opens automatically. Press the
switch again to stop the opening move-
ment.
You can close the windows in the same manner
by pulling the switch.
Convertible: opening, closing
Window operation with Comfort Access, refer
also to page30.
To close the side windows while driving,
either close the rear windows first or all
four windows together; otherwise, the windows
may not close tightly at high speeds.<
Page 53 of 272
Controls
51Reference
At a glance
Driving tips
Communications
Navigation
Entertainment
Mobility
Closing
Make sure you hear the latch plate engage in
the belt buckle.
The upper belt anchor is suitable for adults of
any stature as long as the seat is adjusted prop-
erly, refer to page46.
Opening
1.Grasp the belt firmly.
2.Press the red button in the buckle.
3.Guide the belt into its reel.
Safety belt reminder for front seats
The indicator lamps light up and an
acoustic signal sounds. In addition, a
message appears on the Control Dis-
play. Check whether the safety belt
has been fastened correctly.
The 'Fasten safety belts' reminder is issued as
long as the driver's safety belt has not been fas-
tened. The 'Fasten safety belts' reminder is also
issued above approx. 5 mph/8 km/h if the front
passenger safety belt has not been fastened, if
there are objects on the front passenger seat or
if the driver or front passenger unfasten their
safety belts.
Damage to safety belts
If the safety belts are damaged or
stressed in an accident: have the belt sys-
tem, including any belt tensioners or child
restraint systems, replaced and the belt
anchors checked. Have this work done only by
your BMW center or at a workshop that works
according to BMW repair procedures with cor-
respondingly trained personnel. Otherwise, it is not guaranteed that the safety devices will func-
tion properly.<
Mirrors
Exterior mirrors
The front passenger's mirror is more con-
vex than the driver's mirror. The objects
seen in the mirror are closer than they appear.
Do not gauge your distance from traffic behind
you on the basis of what you see in the mirror;
otherwise, there is an increased risk of an acci-
dent.<
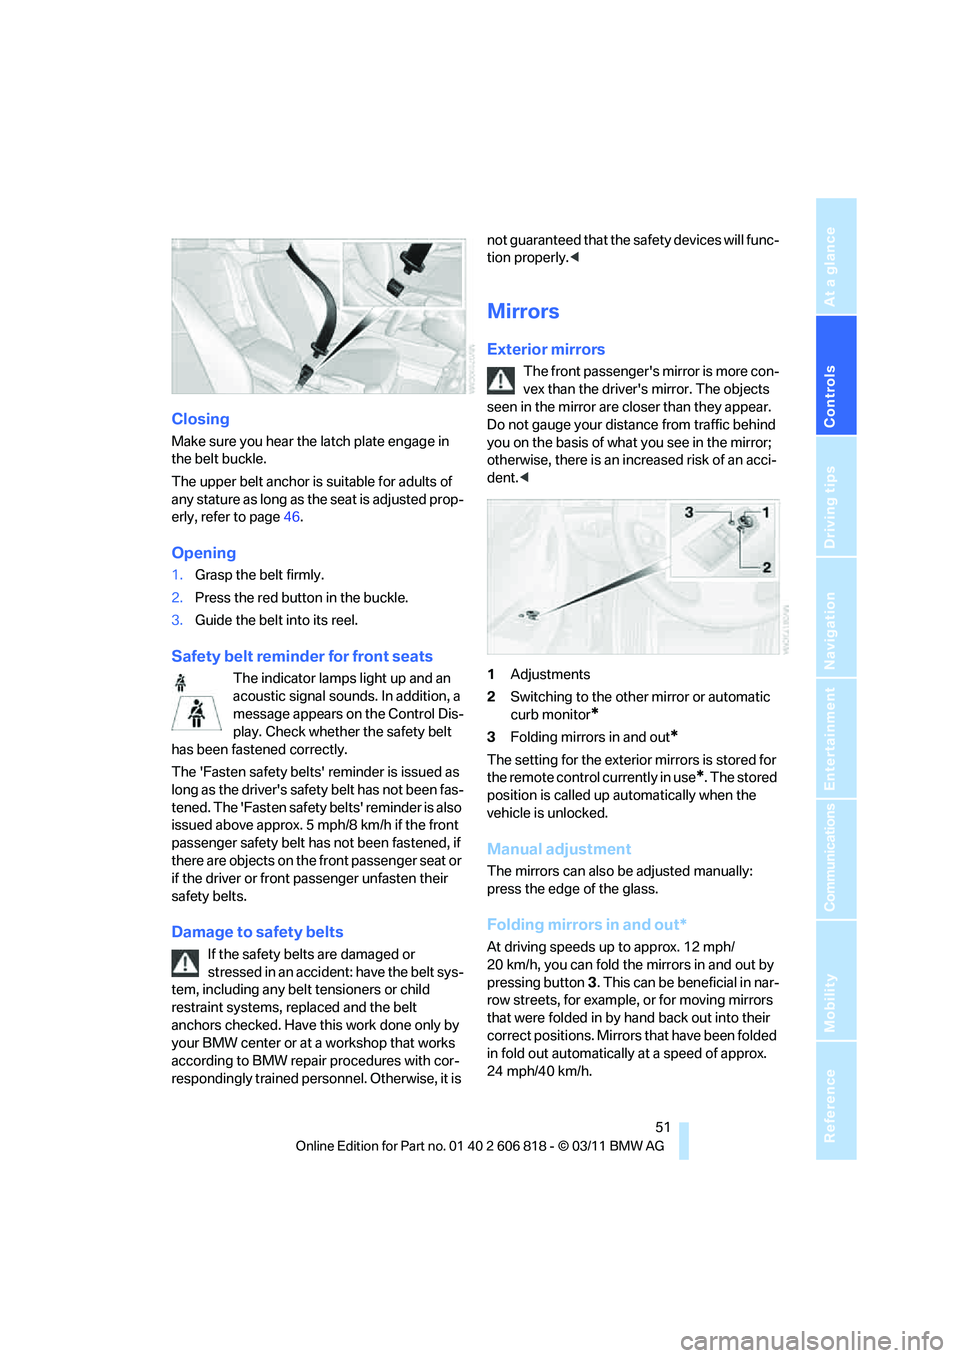
1Adjustments
2Switching to the other mirror or automatic
curb monitor
*
3Folding mirrors in and out*
The setting for the exterior mirrors is stored for
the remote control currently in use
*. The stored
position is called up automatically when the
vehicle is unlocked.
Manual adjustment
The mirrors can also be adjusted manually:
press the edge of the glass.
Folding mirrors in and out*
At driving speeds up to approx. 12 mph/
20 km/h, you can fold the mirrors in and out by
pressing button3. This can be beneficial in nar-
row streets, for example, or for moving mirrors
that were folded in by hand back out into their
correct positions. Mirrors that have been folded
in fold out automatically at a speed of approx.
24 mph/40 km/h.
Page 60 of 272

Driving
58
Radio readiness and ignition off
All indicator and warning lamps as well as dis-
plays in the instrument cluster go out.
Starting the engine
Do not run the engine in enclosed areas;
otherwise, the inhalation of toxic exhaust
gases can cause loss of consciousness and
death. The exhaust gases contain carbon mon-
oxide, an odorless and colorless, but highly
toxic gas. Never leave an unattended vehicle
with the engine running; otherwise, such a vehi-
cle represents a potential safety hazard.
Before leaving the car with the engine running,
place the transmission in neutral or move the
selector lever to position P and forcefully apply
the parking brake to prevent the car from mov-
ing.<
Do not wait for the engine to warm up while the
vehicle remains stationary. Start driving right
away, but at moderate engine speeds.
Avoid frequent starting in quick succes-
sion or repeated start attempts in which
the engine does not start. Otherwise, the fuel is
not burned or incompletely burned and there is
a danger of overheating and damaging the cat-
alytic converter.<
Manual transmission
Remote control in the ignition lock or, with
Comfort Access, inside the vehicle, refer to
page35.
1.Depress the brake.
2.Depress the clutch and shift into neutral.
3.Press the Start/Stop button.The starter operates automatically for a certain
time, and stops automatically as soon as the
engine has started.
Automatic transmission
Remote control in the ignition lock or, with
Comfort Access, inside the vehicle, refer to
page35.
1.Depress the brake.
2.Move the selector lever to position P.
3.Press the Start/Stop button.
The starter operates automatically for a certain
time, and stops automatically as soon as the
engine has started.
Sport automatic transmission with
double clutch
Remote control in the ignition lock or, with
Comfort Access, inside the vehicle, refer to
page35.
1.Depress the brake.
2.Press the Start/Stop button.
The engine starts independent of the current
transmission position.
Switching off the engine
Always take the remote control with you
when you leave the vehicle.
When parking, apply the parking brake force-
fully; otherwise, the vehicle could begin to roll.<
Manual transmission
1.With the car at a standstill, press the Start/
Stop button.
2.Shift into first gear or reverse.
3.Forcefully apply the parking brake.
4.Removing the remote control from the igni-
tion lock, refer to page57.
Automatic transmission
1.With the car at a standstill, move the selec-
tor lever to position P.
2.Press the Start/Stop button.
Page 61 of 272
Controls
59Reference
At a glance
Driving tips
Communications
Navigation
Entertainment
Mobility
3.Forcefully apply the parking brake.
4.Removing the remote control from the igni-
tion lock, refer to page57.
Sport automatic transmission with
double clutch
1.With the car at a standstill, press the Start/
Stop button.
If the transmission is shifted into N when the
engine is switched off, you will be notified
visually and acoustically of this fact.
2.Forcefully apply the parking brake.
3.Remove remote control from the ignition
lock, refer to page57. The transmission is
automatically shifted into transmission
position P.
Parking brake
The parking brake is primarily intended to pre-
vent the vehicle from rolling while parked; it
brakes the rear wheels.
Indicator lamp
The indicator lamp is lit, and when you
drive off a signal sounds in addition.
The parking brake is still applied.
Indicator lamp for Canadian models.
Applying
The lever locks in position automatically.
Releasing
Pull slightly upwards, press the button and
lower the lever.In exceptional cases, if the parking brake
has to be used to slow or stop the car, do
not pull the lever up too hard. In doing so, con-
tinuously press the button of the parking brake
lever.
Otherwise, excessive force on the parking
brake can lock up the rear wheels and cause the
rear of the car to swerve.<
To prevent corrosion and one-sided brak-
ing action, occasionally apply the parking
brake lightly when the vehicle is slowly coming
to a stop if the traffic conditions are suitable.
The brake lamps do not light up when the park-
ing brake is applied.<
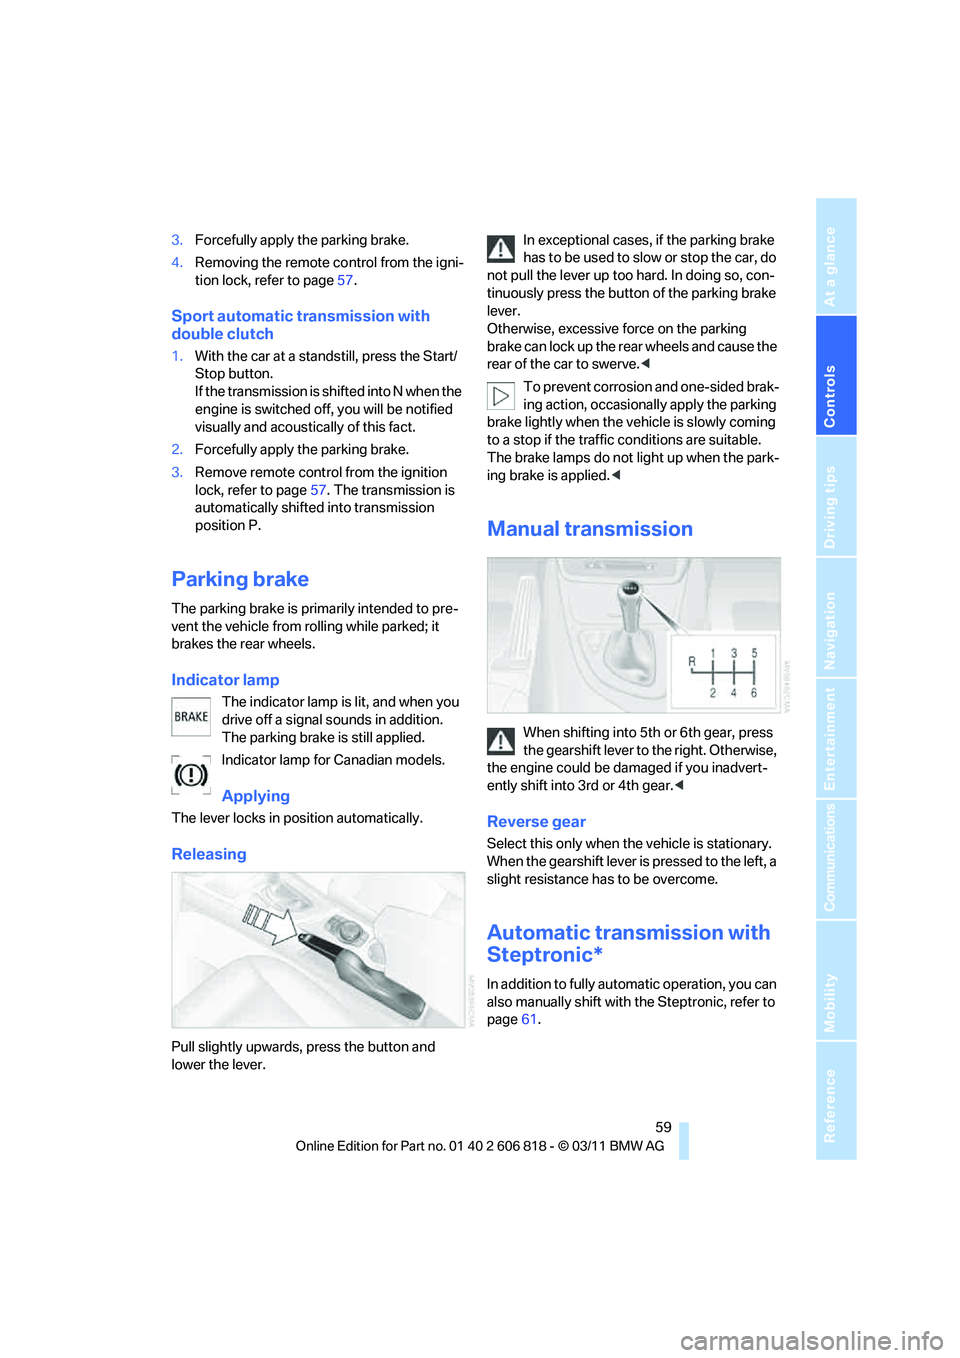
Manual transmission
When shifting into 5th or 6th gear, press
the gearshift lever to the right. Otherwise,
the engine could be damaged if you inadvert-
ently shift into 3rd or 4th gear.<
Reverse gear
Select this only when the vehicle is stationary.
When the gearshift lever is pressed to the left, a
slight resistance has to be overcome.
Automatic transmission with
Steptronic*
In addition to fully automatic operation, you can
also manually shift with the Steptronic, refer to
page61.
Page 64 of 272

Driving
62 3.Using the screwdriver from the onboard
vehicle tool kit, refer to page227, press the
red lever, see arrow, while moving the
selector lever to the desired position.
7-gear Sport automatic
transmission with double
clutch*
The concept
The 7-gear Sport automatic transmission with
double clutch is an automated manual trans-
mission with two clutches and secondary gear
sets in which the clutching and shifting is han-
dled by an electrohydraulic system.
With the 7-gear Sport automatic transmission
with double clutch, the gears are shifted without
an interruption in driving power.
You operate the 7-gear Sport automatic trans-
mission with double clutch using the selector
lever and two shift paddles on the steering
wheel.
It offers you the following functions:
>Either manual or automatic mode: sequen-
tial mode or drive mode
>Automatic downshifting and protection
against incorrect gear selection, even in
sequential mode
>Acceleration assistant, Launch Control,
refer to page66
>Automatic intermediate throttle application
System limitations
The 7-gear Sport automatic transmission with
double clutch has an overheating protection
that protects the clutch from extreme loads.
The indicator lamp lights up in yellow if
the transmission becomes too warm.
Avoid high engine loads and frequent
accelerations from zero. If the transmission is
overheated, the indicator lamp lights up in red
and the power flow to the motor is interrupted. It
is only possible to continue driving once the
transmission has cooled down.
Avoid frequent powerful accelerations from
zero and do not hold the vehicle on inclines by
pressing lightly on the accelerator while letting
the clutch slip, as this may cause the transmis-
sion to overheat.
Selector lever positions
P R N D M/S + –
The selector lever position and the engaged
gear are displayed, e.g. M4.
Engaging selector lever positions
>The selector lever can be moved out of
position P only with the engine running:
interlock.
>Before moving the lever away from P or N
with the vehicle stationary, first depress the
brake; otherwise, the desired shift will not
be executed: shiftlock.