2012 BMW 135I CONVERTIBLE change time
[x] Cancel search: change timePage 157 of 272
Navigation
Entertainment
Driving tips
155Reference
At a glance
Controls
Communications
Mobility
CD/DVD player and CD changer
CD/DVD playback
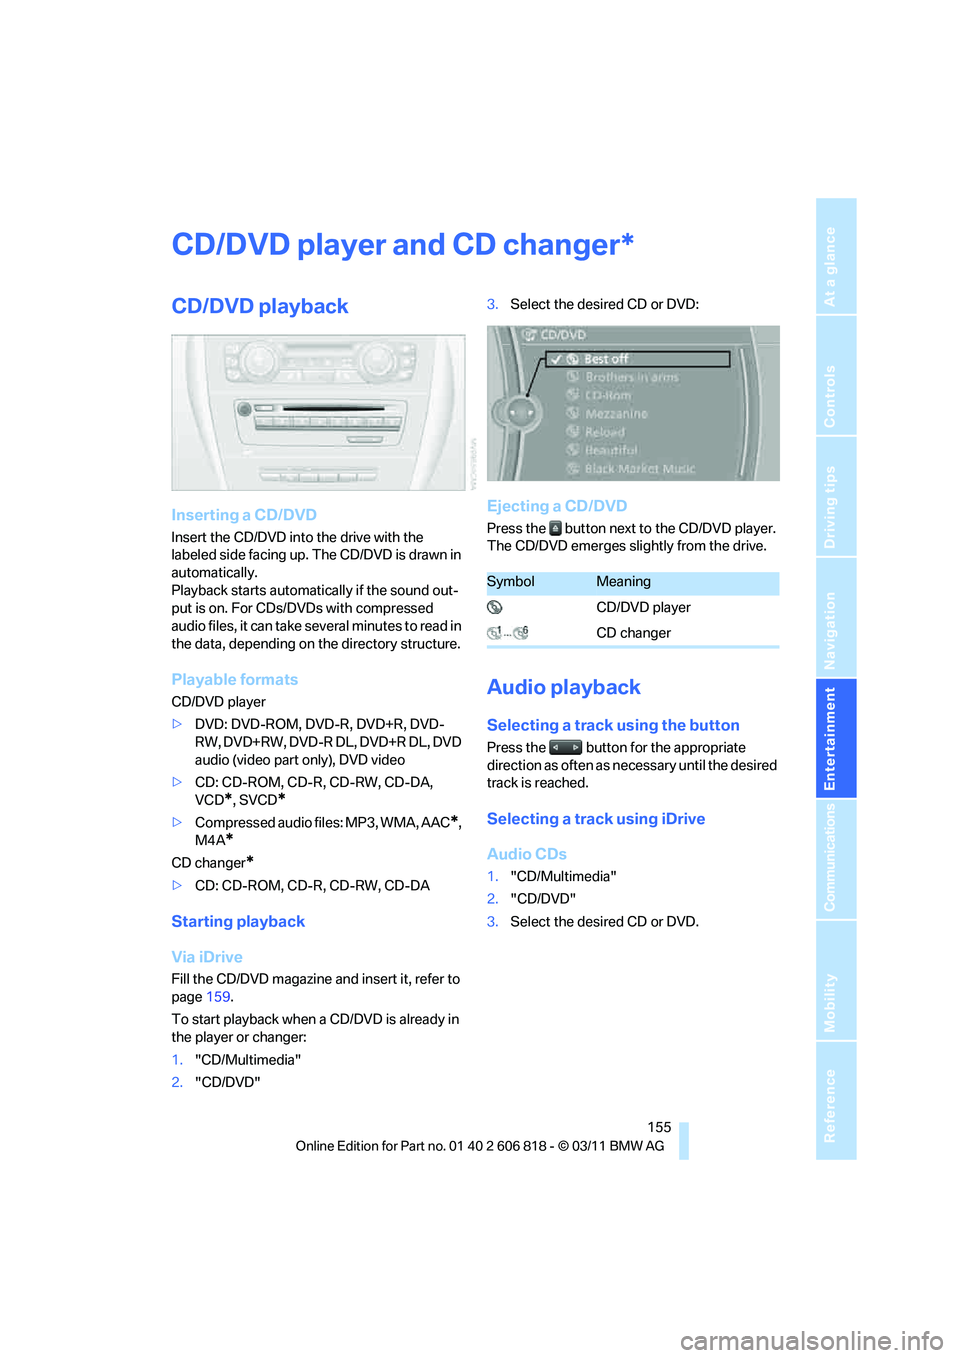
Inserting a CD/DVD
Insert the CD/DVD into the drive with the
labeled side facing up. The CD/DVD is drawn in
automatically.
Playback starts automatically if the sound out-
put is on. For CDs/DVDs with compressed
audio files, it can take several minutes to read in
the data, depending on the directory structure.
Playable formats
CD/DVD player
>DVD: DVD-ROM, DVD-R, DVD+R, DVD-
RW, DVD+RW, DVD-R DL, DVD+R DL, DVD
audio (video part only), DVD video
>CD: CD-ROM, CD-R, CD-RW, CD-DA,
VCD
*, SVCD*
>Compressed audio files: MP3, WMA, AAC*,
M4A
*
CD changer*
>CD: CD-ROM, CD-R, CD-RW, CD-DA
Starting playback
Via iDrive
Fill the CD/DVD magazine and insert it, refer to
page159.
To start playback when a CD/DVD is already in
the player or changer:
1."CD/Multimedia"
2."CD/DVD"3.Select the desired CD or DVD:
Ejecting a CD/DVD
Press the button next to the CD/DVD player.
The CD/DVD emerges slightly from the drive.
Audio playback
Selecting a track using the button
Press the button for the appropriate
direction as often as necessary until the desired
track is reached.
Selecting a track using iDrive
Audio CDs
1."CD/Multimedia"
2."CD/DVD"
3.Select the desired CD or DVD.
*
SymbolMeaning
CD/DVD player
CD changer
Page 158 of 272
CD/DVD player and CD changer
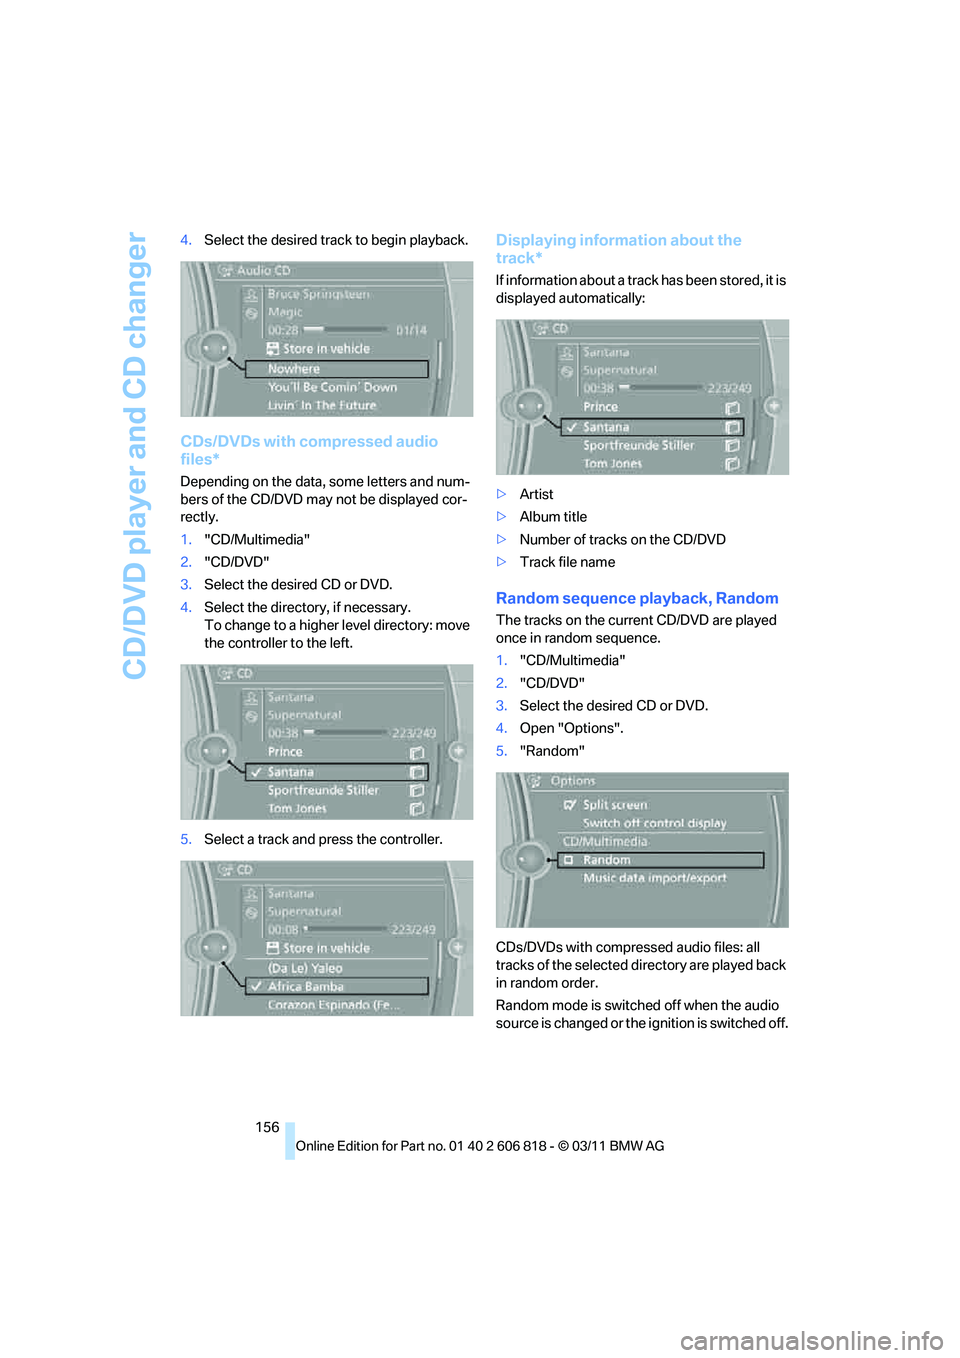
156 4.Select the desired track to begin playback.
CDs/DVDs with compressed audio
files*
Depending on the data, some letters and num-
bers of the CD/DVD may not be displayed cor-
rectly.
1."CD/Multimedia"
2."CD/DVD"
3.Select the desired CD or DVD.
4.Select the directory, if necessary.
To change to a higher level directory: move
the controller to the left.
5.Select a track and press the controller.
Displaying information about the
track*
If information about a track has been stored, it is
displayed automatically:
>Artist
>Album title
>Number of tracks on the CD/DVD
>Track file name
Random sequence playback, Random
The tracks on the current CD/DVD are played
once in random sequence.
1."CD/Multimedia"
2."CD/DVD"
3.Select the desired CD or DVD.
4.Open "Options".
5."Random"
CDs/DVDs with compressed audio files: all
tracks of the selected directory are played back
in random order.
Random mode is switched off when the audio
source is changed or the ignition is switched off.
Page 166 of 272
Music collection
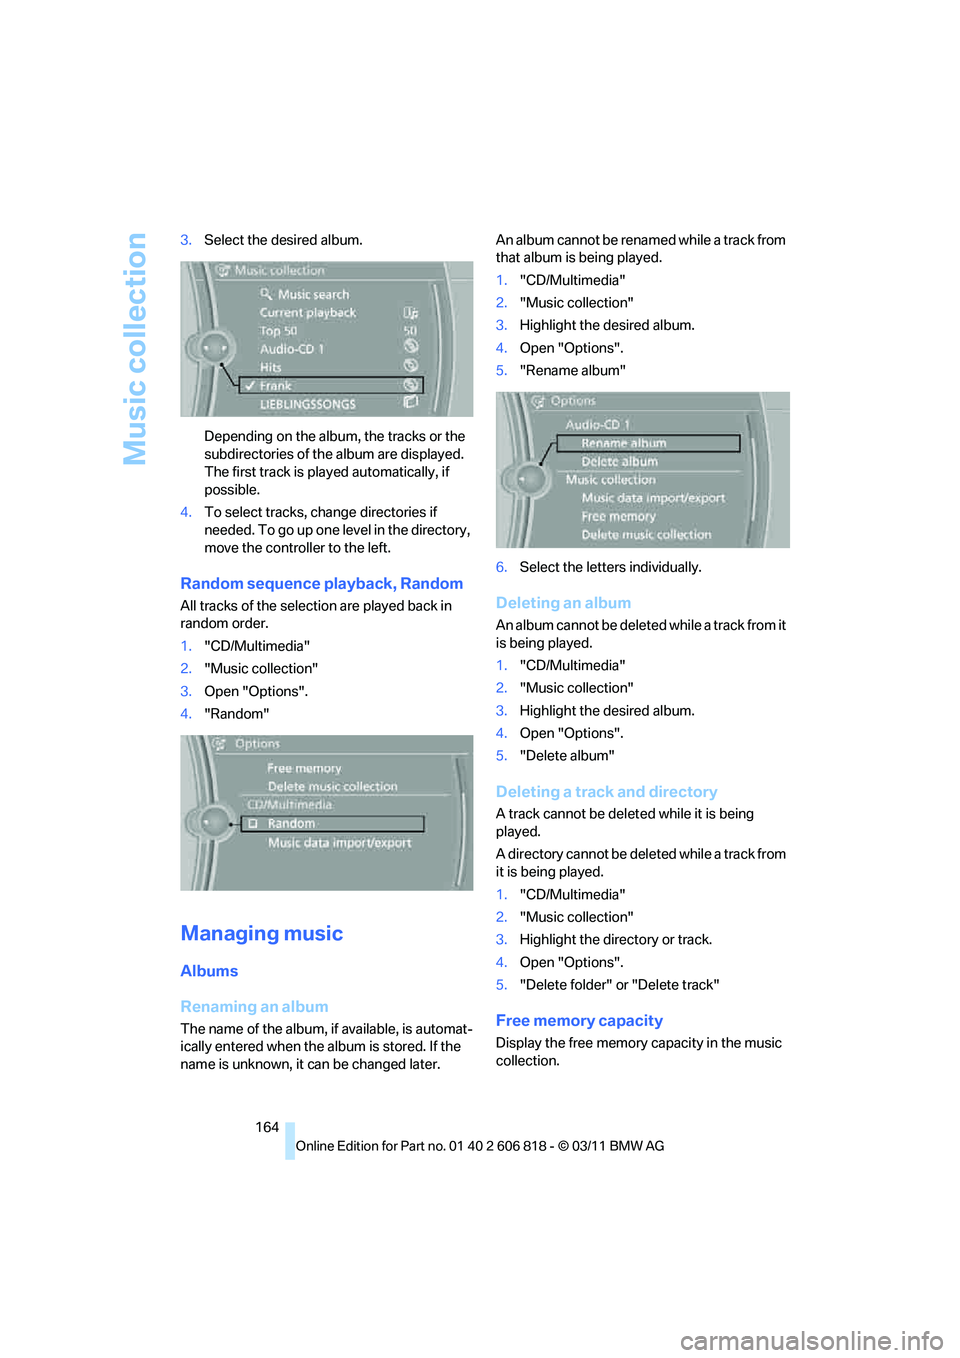
164 3.Select the desired album.
Depending on the album, the tracks or the
subdirectories of the album are displayed.
The first track is played automatically, if
possible.
4.To select tracks, change directories if
needed. To go up one level in the directory,
move the controller to the left.
Random sequence playback, Random
All tracks of the selection are played back in
random order.
1."CD/Multimedia"
2."Music collection"
3.Open "Options".
4."Random"
Managing music
Albums
Renaming an album
The name of the album, if available, is automat-
ically entered when the album is stored. If the
name is unknown, it can be changed later.An album cannot be renamed while a track from
that album is being played.
1."CD/Multimedia"
2."Music collection"
3.Highlight the desired album.
4.Open "Options".
5."Rename album"
6.Select the letters individually.
Deleting an album
An album cannot be deleted while a track from it
is being played.
1."CD/Multimedia"
2."Music collection"
3.Highlight the desired album.
4.Open "Options".
5."Delete album"
Deleting a track and directory
A track cannot be deleted while it is being
played.
A directory cannot be deleted while a track from
it is being played.
1."CD/Multimedia"
2."Music collection"
3.Highlight the directory or track.
4.Open "Options".
5."Delete folder" or "Delete track"
Free memory capacity
Display the free memory capacity in the music
collection.
Page 171 of 272
Navigation
Entertainment
Driving tips
169Reference
At a glance
Controls
Communications
Mobility
1."CD/Multimedia"
2."External devices"
3.Select the symbol.
4."Video"
5.Select the directory, if necessary.
To change to a higher level directory: move
the controller to the left.
6.Select the desired video file to begin play-
back.
Video menu
Notes
Do not expose the audio device to extreme
environmental conditions, e.g. very high tem-
peratures, refer to the operating instructions of
the audio device.
Depending on the configuration of the audio
files, e.g. bit rates greater than 256 KBit/s, the
files may not play back correctly in every case.
Notes on connecting
>The connected audio device is supplied
with a maximum current of 500 mA, if the
device supports this. For this reason, do not
connect the device to a charging socket in
the vehicle; otherwise, it may not be possi-
ble to ensure correct playback.
>Do not forcibly connect the plug to the USB
interface.
>Do not connect devices such as fans or
lamps to the USB audio interface.
>Do not connect USB hard drives.
>Do not use the USB audio interface to
charge external devices.
Bluetooth audio*
Overview
>It is possible to use Bluetooth to play music
files from external devices, e.g. audio
devices or mobile phones.
Using a mobile phone as an audio source,
refer to page166.
>Bluetooth® is a registered trademark of
Bluetooth® SIG, Inc.
>Sound is output over the vehicle speakers.
>The volume of the sound output depends
on the device. If necessary, change the vol-
ume setting on the device.
>Up to four external devices can be paired
with the vehicle.
Requirements
>Suitable device. For information, go to
www.bmwusa.com/bluetooth.
>Device operational.
>Ignition switched on.
>Bluetooth activated in vehicle, refer to
page178, and in the device.
>Activating Bluetooth audio, refer to
page177.
>Bluetooth presets in the device are
required, e.g. connection not confirmed or
visible, refer to owner's manual for the
device.
>A number with at least 4 and at most
16 digits has been established as the Blue-
tooth passkey. Only required once for pair-
ing.
Pairing and connecting
Only pair the device when the vehicle is
stopped; otherwise, inattention may lead
to endangerment of passengers or other road
users.<
1."CD/Multimedia"
2."Bluetooth® (audio)"
3."Bluetooth® audio" if applicable
4."Add new phone"
SymbolFormat
Next video file
Previous video file
It may be necessary to click the
symbol twice in order to play the
previous video file.
Page 172 of 272
External devices
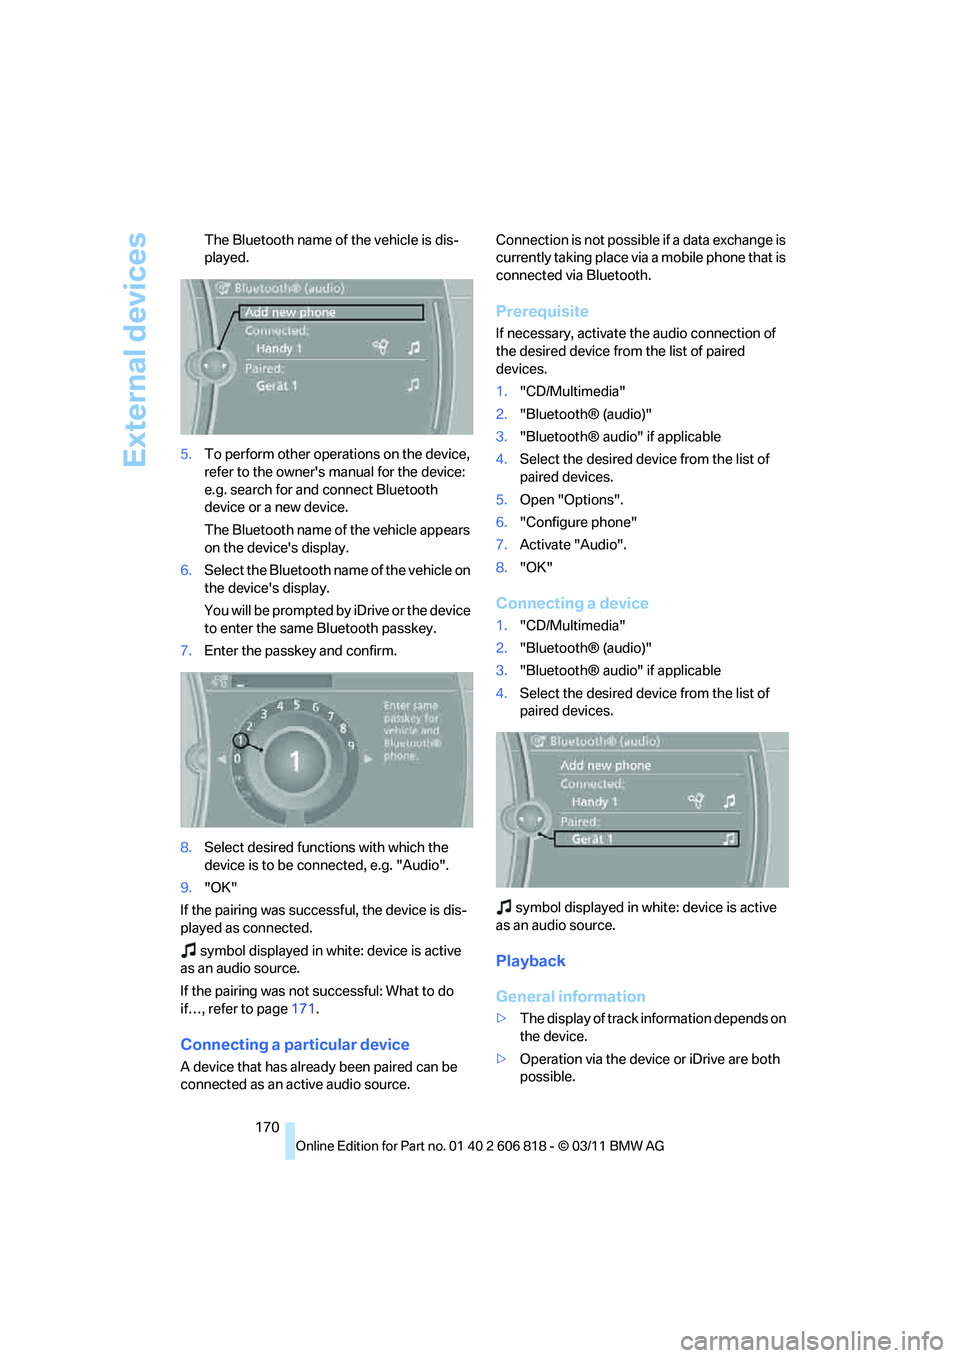
170 The Bluetooth name of the vehicle is dis-
played.
5.To perform other operations on the device,
refer to the owner's manual for the device:
e.g. search for and connect Bluetooth
device or a new device.
The Bluetooth name of the vehicle appears
on the device's display.
6.Select the Bluetooth name of the vehicle on
the device's display.
You will be prompted by iDrive or the device
to enter the same Bluetooth passkey.
7.Enter the passkey and confirm.
8.Select desired functions with which the
device is to be connected, e.g. "Audio".
9."OK"
If the pairing was successful, the device is dis-
played as connected.
symbol displayed in white: device is active
as an audio source.
If the pairing was not successful: What to do
if…, refer to page171.
Connecting a particular device
A device that has already been paired can be
connected as an active audio source.Connection is not possible if a data exchange is
currently taking place via a mobile phone that is
connected via Bluetooth.
Prerequisite
If necessary, activate the audio connection of
the desired device from the list of paired
devices.
1."CD/Multimedia"
2."Bluetooth® (audio)"
3."Bluetooth® audio" if applicable
4.Select the desired device from the list of
paired devices.
5.Open "Options".
6."Configure phone"
7.Activate "Audio".
8."OK"
Connecting a device
1."CD/Multimedia"
2."Bluetooth® (audio)"
3."Bluetooth® audio" if applicable
4.Select the desired device from the list of
paired devices.
symbol displayed in white: device is active
as an audio source.
Playback
General information
>The display of track information depends on
the device.
>Operation via the device or iDrive are both
possible.
Page 173 of 272
Navigation
Entertainment
Driving tips
171Reference
At a glance
Controls
Communications
Mobility
>Playback is interrupted if a data exchange is
taking place with a mobile phone that is
connected via Bluetooth.
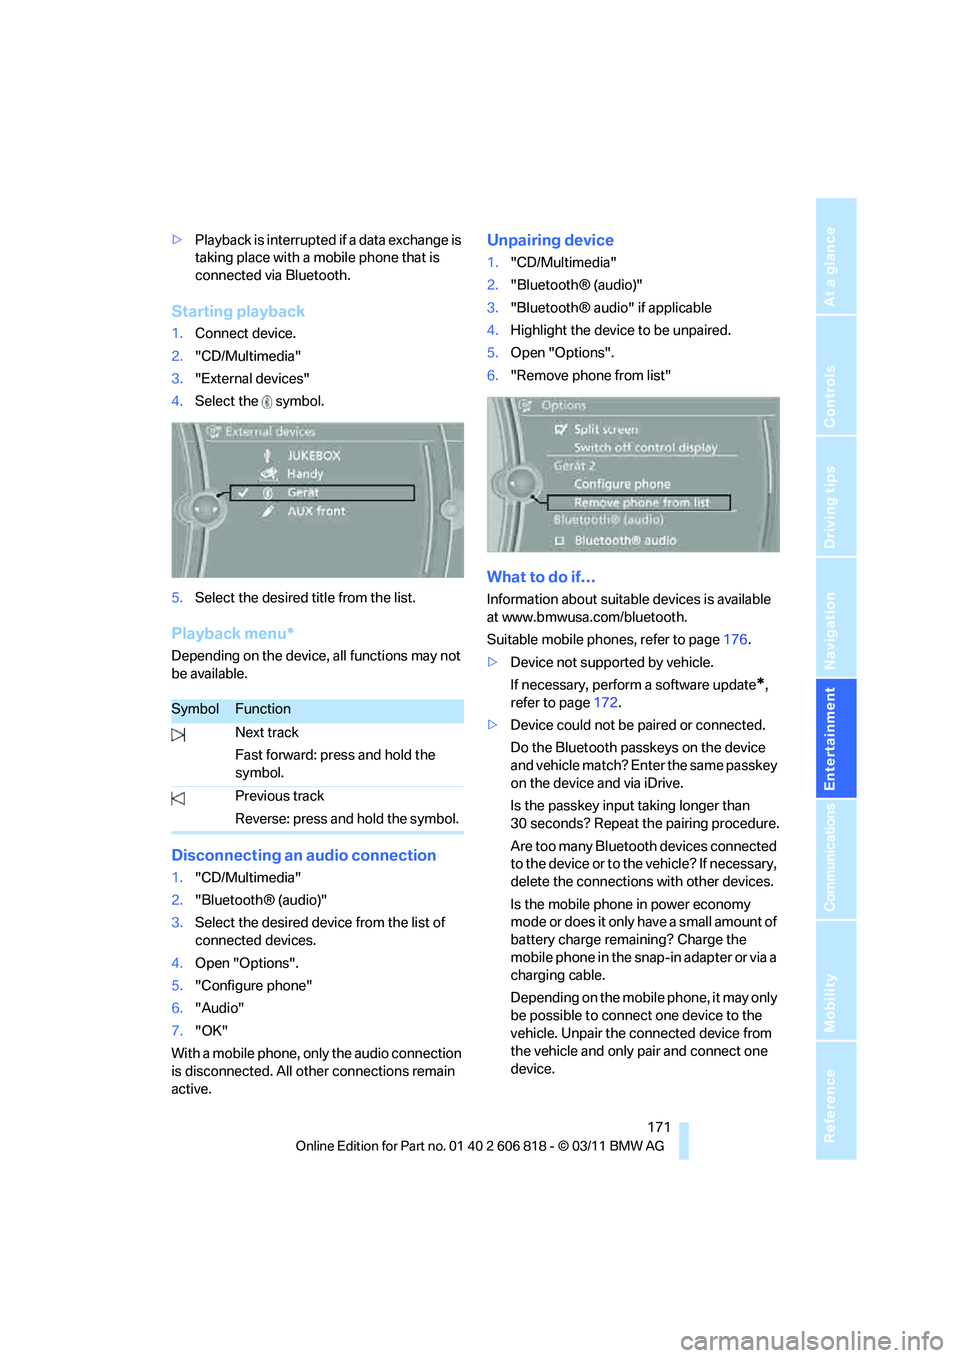
Starting playback
1.Connect device.
2."CD/Multimedia"
3."External devices"
4.Select the symbol.
5.Select the desired title from the list.
Playback menu*
Depending on the device, all functions may not
be available.
Disconnecting an audio connection
1."CD/Multimedia"
2."Bluetooth® (audio)"
3.Select the desired device from the list of
connected devices.
4.Open "Options".
5."Configure phone"
6."Audio"
7."OK"
With a mobile phone, only the audio connection
is disconnected. All other connections remain
active.
Unpairing device
1."CD/Multimedia"
2."Bluetooth® (audio)"
3."Bluetooth® audio" if applicable
4.Highlight the device to be unpaired.
5.Open "Options".
6."Remove phone from list"
What to do if…
Information about suitable devices is available
at www.bmwusa.com/bluetooth.
Suitable mobile phones, refer to page176.
>Device not supported by vehicle.
If necessary, perform a software update
*,
refer to page172.
>Device could not be paired or connected.
Do the Bluetooth passkeys on the device
and vehicle match? Enter the same passkey
on the device and via iDrive.
Is the passkey input taking longer than
30 seconds? Repeat the pairing procedure.
Are too many Bluetooth devices connected
to the device or to the vehicle? If necessary,
delete the connections with other devices.
Is the mobile phone in power economy
mode or does it only have a small amount of
battery charge remaining? Charge the
mobile phone in the snap-in adapter or via a
charging cable.
Depending on the mobile phone, it may only
be possible to connect one device to the
vehicle. Unpair the connected device from
the vehicle and only pair and connect one
device.
SymbolFunction
Next track
Fast forward: press and hold the
symbol.
Previous track
Reverse: press and hold the symbol.
Page 229 of 272
Mobility
227Reference
At a glance
Controls
Driving tips
Communications
Navigation
Entertainment
Replacing components
Onboard vehicle tool kit
The onboard vehicle tool kit is stored below the
floor mat in the cargo area.
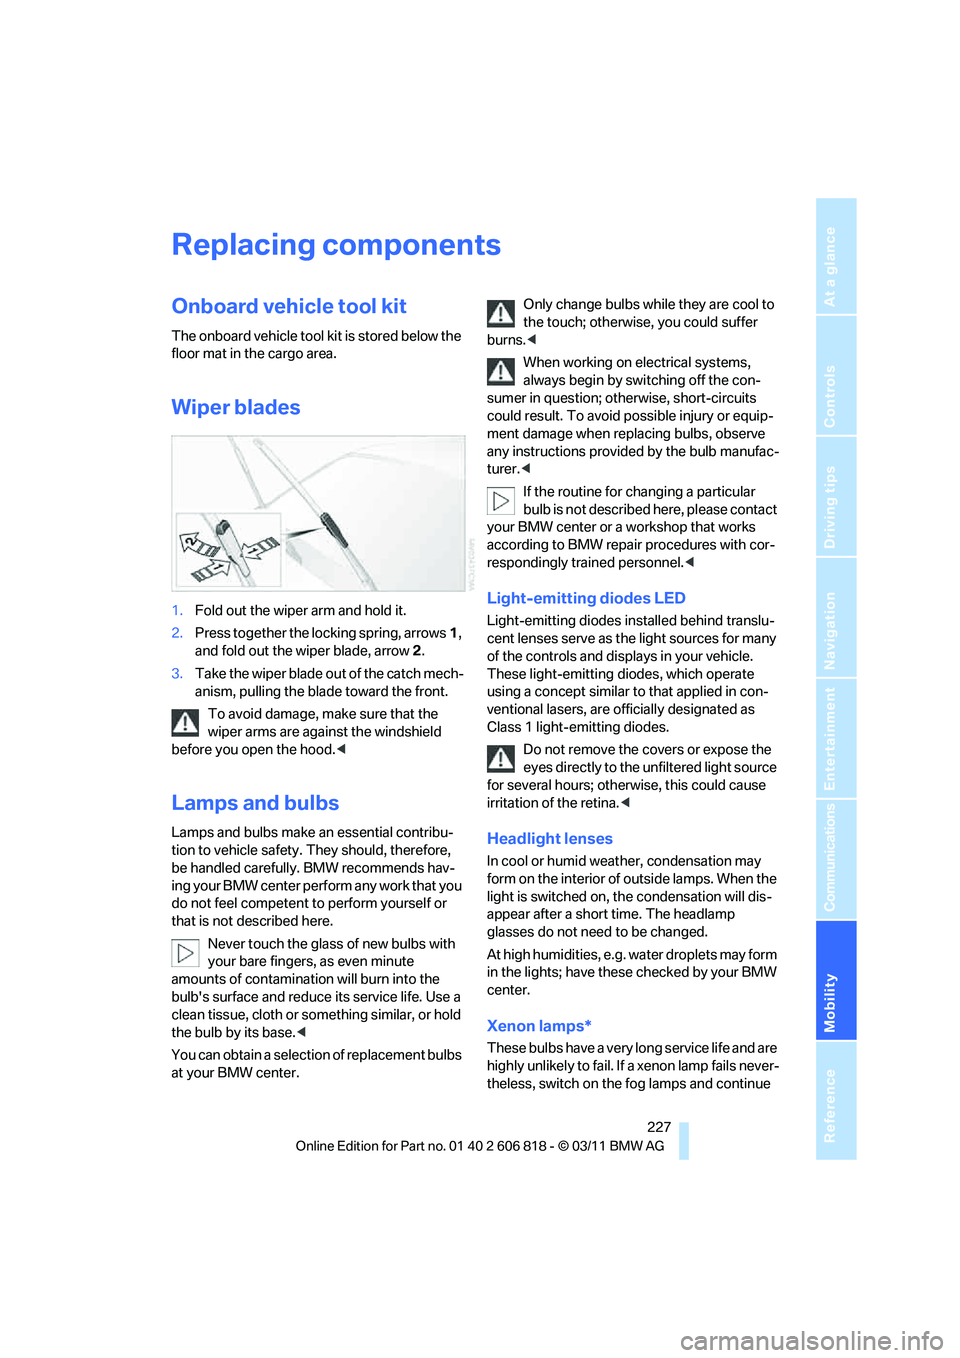
Wiper blades
1.Fold out the wiper arm and hold it.
2.Press together the locking spring, arrows1,
and fold out the wiper blade, arrow2.
3.Take the wiper blade out of the catch mech-
anism, pulling the blade toward the front.
To avoid damage, make sure that the
wiper arms are against the windshield
before you open the hood.<
Lamps and bulbs
Lamps and bulbs make an essential contribu-
tion to vehicle safety. They should, therefore,
be handled carefully. BMW recommends hav-
ing your BMW center perform any work that you
do not feel competent to perform yourself or
that is not described here.
Never touch the glass of new bulbs with
your bare fingers, as even minute
amounts of contamination will burn into the
bulb's surface and reduce its service life. Use a
clean tissue, cloth or something similar, or hold
the bulb by its base.<
You can obtain a selection of replacement bulbs
at your BMW center.Only change bulbs while they are cool to
the touch; otherwise, you could suffer
burns.<
When working on electrical systems,
always begin by switching off the con-
sumer in question; otherwise, short-circuits
could result. To avoid possible injury or equip-
ment damage when replacing bulbs, observe
any instructions provided by the bulb manufac-
turer.<
If the routine for changing a particular
bulb is not described here, please contact
your BMW center or a workshop that works
according to BMW repair procedures with cor-
respondingly trained personnel.<
Light-emitting diodes LED
Light-emitting diodes installed behind translu-
cent lenses serve as the light sources for many
of the controls and displays in your vehicle.
These light-emitting diodes, which operate
using a concept similar to that applied in con-
ventional lasers, are officially designated as
Class 1 light-emitting diodes.
Do not remove the covers or expose the
eyes directly to the unfiltered light source
for several hours; otherwise, this could cause
irritation of the retina.<
Headlight lenses
In cool or humid weather, condensation may
form on the interior of outside lamps. When the
light is switched on, the condensation will dis-
appear after a short time. The headlamp
glasses do not need to be changed.
At high humidities, e.g. water droplets may form
in the lights; have these checked by your BMW
center.
Xenon lamps*
These bulbs have a very long service life and are
highly unlikely to fail. If a xenon lamp fails never-
theless, switch on the fog lamps and continue
Page 231 of 272
Mobility
229Reference
At a glance
Controls
Driving tips
Communications
Navigation
Entertainment
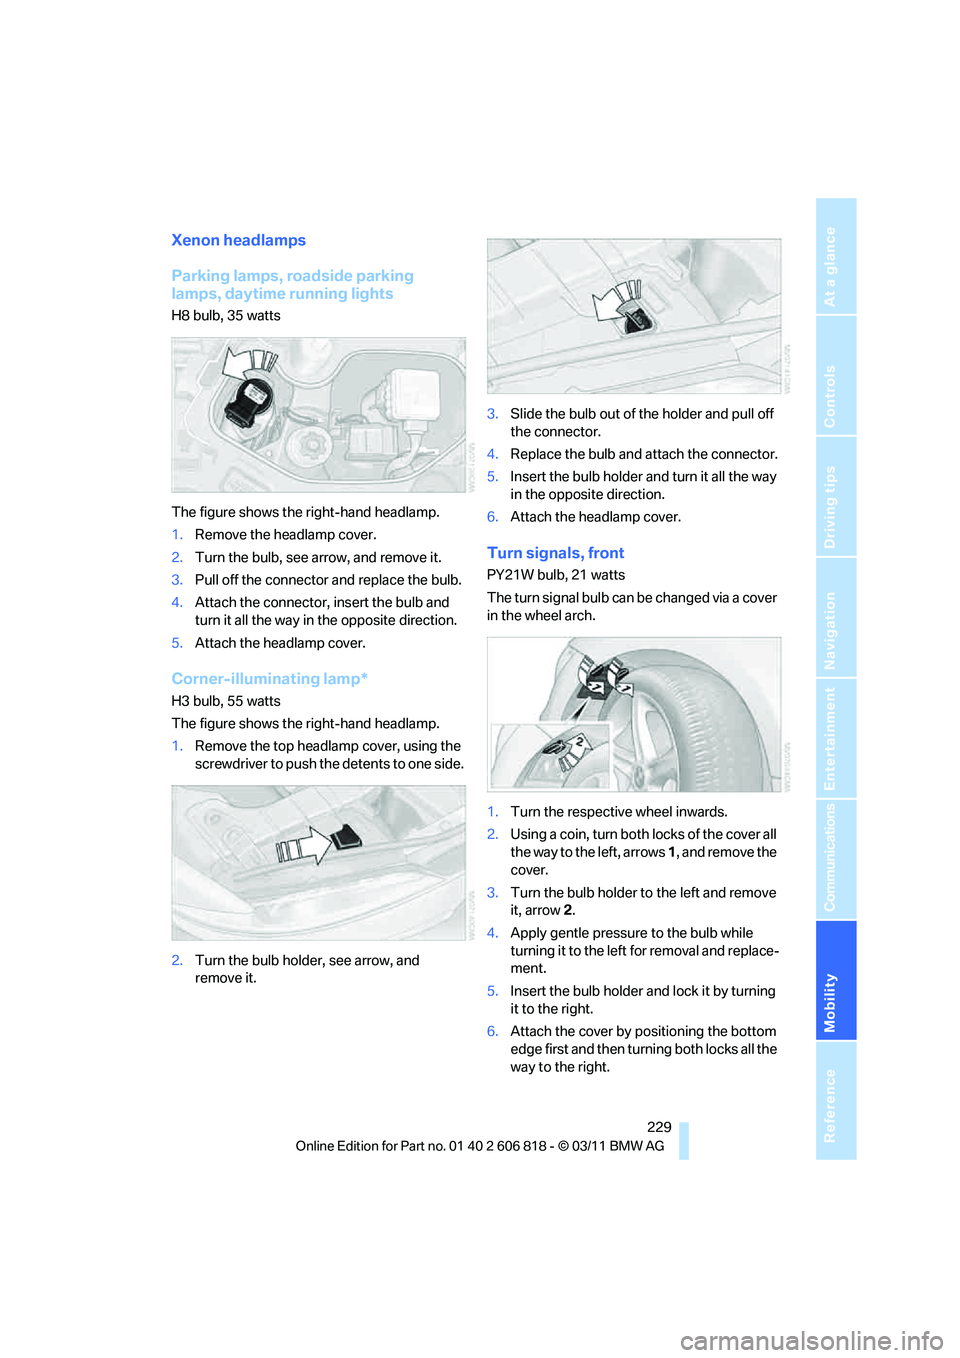
Xenon headlamps
Parking lamps, roadside parking
lamps, daytime running lights
H8 bulb, 35 watts
The figure shows the right-hand headlamp.
1.Remove the headlamp cover.
2.Turn the bulb, see arrow, and remove it.
3.Pull off the connector and replace the bulb.
4.Attach the connector, insert the bulb and
turn it all the way in the opposite direction.
5.Attach the headlamp cover.
Corner-illuminating lamp*
H3 bulb, 55 watts
The figure shows the right-hand headlamp.
1.Remove the top headlamp cover, using the
screwdriver to push the detents to one side.
2.Turn the bulb holder, see arrow, and
remove it.3.Slide the bulb out of the holder and pull off
the connector.
4.Replace the bulb and attach the connector.
5.Insert the bulb holder and turn it all the way
in the opposite direction.
6.Attach the headlamp cover.
Turn signals, front
PY21W bulb, 21 watts
The turn signal bulb can be changed via a cover
in the wheel arch.
1.Turn the respective wheel inwards.
2.Using a coin, turn both locks of the cover all
the way to the left, arrows 1, and remove the
cover.
3.Turn the bulb holder to the left and remove
it, arrow2.
4.Apply gentle pressure to the bulb while
turning it to the left for removal and replace-
ment.
5.Insert the bulb holder and lock it by turning
it to the right.
6.Attach the cover by positioning the bottom
edge first and then turning both locks all the
way to the right.