2012 BMW 128I CONVERTIBLE remote control
[x] Cancel search: remote controlPage 80 of 272

Controls overview
78
Date
The settings are stored for the remote control
currently in use, refer also to Personal Profile on
page28.
Setting the date
In the instrument cluster
To set the dd/mm or mm/dd date format, refer
to Setting the date format below.
1.Push button1 in the turn signal/high beam
lever up or down repeatedly until the appro-
priate symbol appears in the display,
accompanied by the date and the word
"SET".
2.Press button2.
3.Use button1 to set the day of the month.
4.Press button2 to confirm the entry.
5.Set the month and the yea r i n t he s a m e w a y .
6.Press button 2.
The system stores the new date.
Via iDrive
1."Settings"
2."Time/Date"
3."Date:"
4.Turn the controller until the desired day is
displayed, and press the controller.
5.Create the necessary settings for the
month and year.
The date is stored.
Setting the date format
1."Settings"
2."Time/Date"
3."Format:"
4.Select the desired format.
The date format is stored.
Check Control
The concept
The Check Control monitors vehicle functions
and alerts you to any malfunctions in the sys-
tems monitored. Such a Check Control mes-
sage includes indicator and warning lamps in
the instrument cluster and, in some circum-
stances, an acoustic signal as well as text mes-
sages at the top of the Control Display.
Indicator and warning lamps
Indicator and warning lamps can light up in a
variety of combinations and colors.
Several of the lamps are checked for proper
functioning and light up temporarily when the
engine is started or the ignition is switched on.
Page 83 of 272
Controls
81Reference
At a glance
Driving tips
Communications
Navigation
Entertainment
Mobility
4.Press the controller.
Settings on the Control
Display
Language on the Control Display
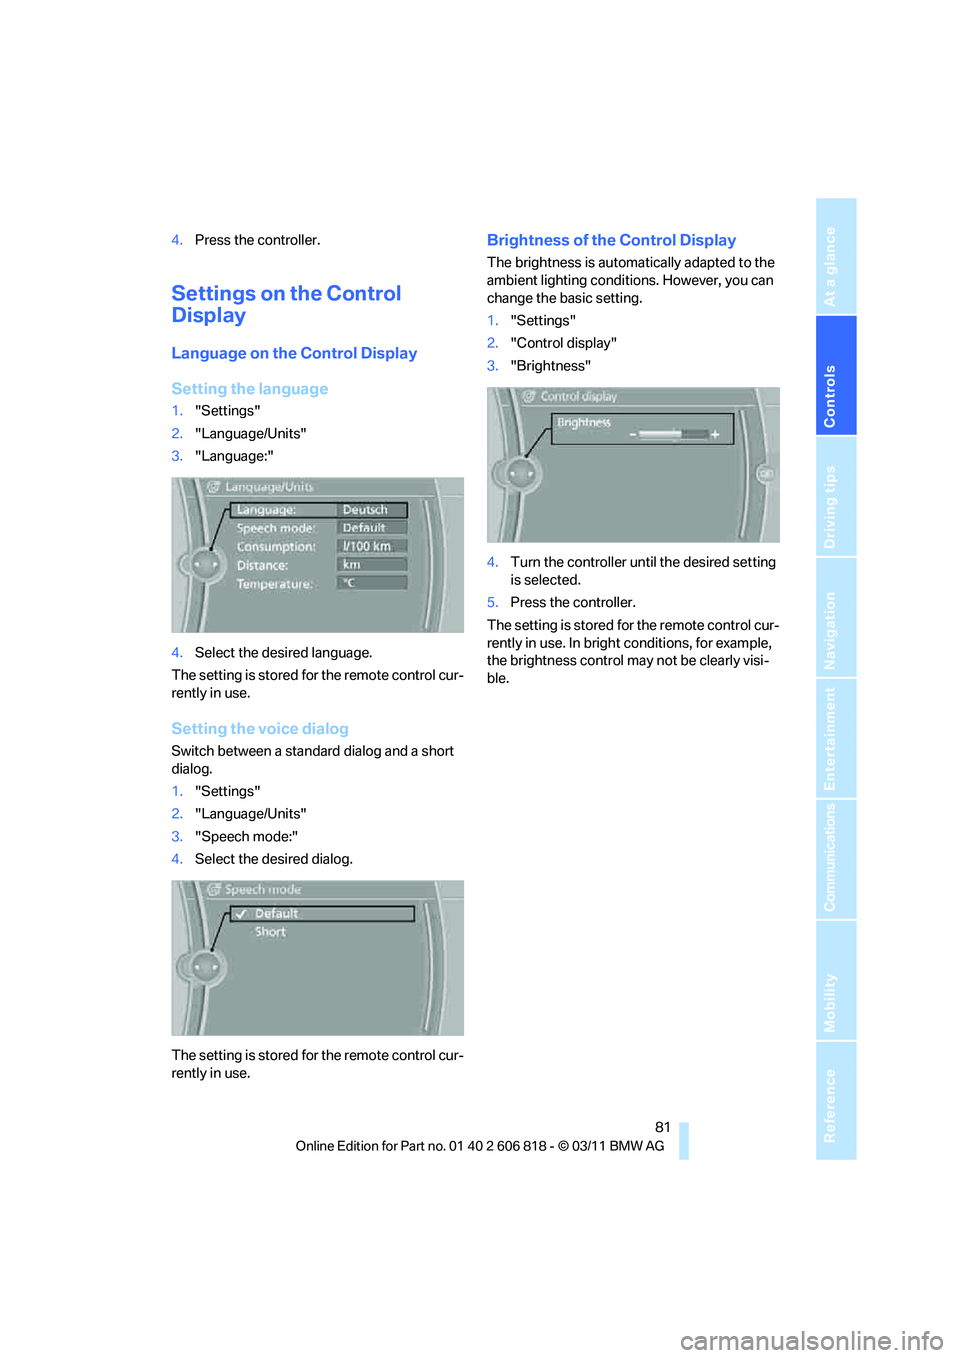
Setting the language
1."Settings"
2."Language/Units"
3."Language:"
4.Select the desired language.
The setting is stored for the remote control cur-
rently in use.
Setting the voice dialog
Switch between a standard dialog and a short
dialog.
1."Settings"
2."Language/Units"
3."Speech mode:"
4.Select the desired dialog.
The setting is stored for the remote control cur-
rently in use.
Brightness of the Control Display
The brightness is automatically adapted to the
ambient lighting conditions. However, you can
change the basic setting.
1."Settings"
2."Control display"
3."Brightness"
4.Turn the controller until the desired setting
is selected.
5.Press the controller.
The setting is stored for the remote control cur-
rently in use. In bright conditions, for example,
the brightness control may not be clearly visi-
ble.
Page 97 of 272
Controls
95Reference
At a glance
Driving tips
Communications
Navigation
Entertainment
Mobility
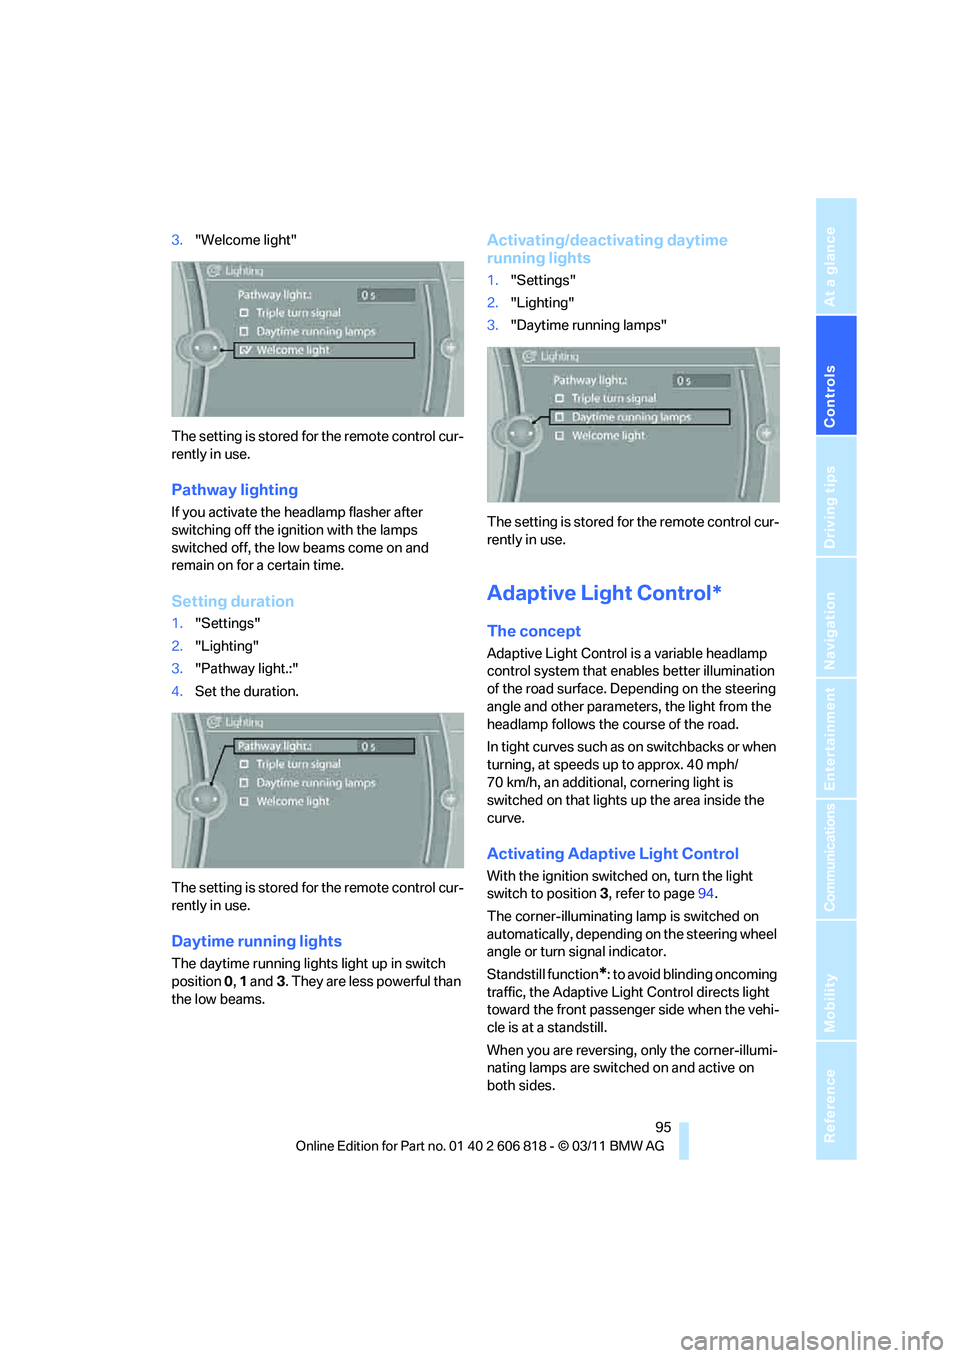
3."Welcome light"
The setting is stored for the remote control cur-
rently in use.
Pathway lighting
If you activate the headlamp flasher after
switching off the ignition with the lamps
switched off, the low beams come on and
remain on for a certain time.
Setting duration
1."Settings"
2."Lighting"
3."Pathway light.:"
4.Set the duration.
The setting is stored for the remote control cur-
rently in use.
Daytime running lights
The daytime running lights light up in switch
position 0, 1 and3. They are less powerful than
the low beams.
Activating/deactivating daytime
running lights
1."Settings"
2."Lighting"
3."Daytime running lamps"
The setting is stored for the remote control cur-
rently in use.
Adaptive Light Control*
The concept
Adaptive Light Control is a variable headlamp
control system that enables better illumination
of the road surface. Depending on the steering
angle and other parameters, the light from the
headlamp follows the course of the road.
In tight curves such as on switchbacks or when
turning, at speeds up to approx. 40 mph/
70 km/h, an additional, cornering light is
switched on that lights up the area inside the
curve.
Activating Adaptive Light Control
With the ignition switched on, turn the light
switch to position 3, refer to page94.
The corner-illuminating lamp is switched on
automatically, depending on the steering wheel
angle or turn signal indicator.
Standstill function
*: to avoid blinding oncoming
traffic, the Adaptive Light Control directs light
toward the front passenger side when the vehi-
cle is at a standstill.
When you are reversing, only the corner-illumi-
nating lamps are switched on and active on
both sides.
Page 99 of 272

Controls
97Reference
At a glance
Driving tips
Communications
Navigation
Entertainment
Mobility
To reactivate the system, briefly push the
turn signal/high beam lever toward the high
beams again.
>Use the headlamp flasher as usual with the
low beams switched on.
System limitations
The High-beam Assistant cannot serve
as a substitute for the driver's personal
judgment of when to use the high beams.
Therefore, manually switch off the high beams
in situations where this is required to avoid a
safety risk.<
The system is not fully functional in situations
such as the following, and driver intervention
may be necessary:
>In very unfavorable weather conditions,
such as fog or heavy precipitation
>In detecting poorly-lit road users, such as
pedestrians, cyclists, horseback riders and
wagons; when driving close to train or ship
traffic; and at animal crossings
>In tight curves, on hilltops or in depressions,
in cross traffic or half-obscured oncoming
traffic on highways
>In poorly lit towns and cities and in the pres-
ence of highly reflective signs
>At low speeds
>When the windshield in front of the interior
rearview mirror is fogged over, dirty or cov-
ered with stickers, etc.
>If the sensor is dirty. Clean the sensor on
the front of the interior rearview mirror using
a cloth moistened with a small amount of
glass cleaner
Activating via iDrive
1."Settings"
2."Lighting"
3."High beam assistant"
The setting is stored for the remote control cur-
rently in use.
Fog lamps*
To switch on/off, press the button.
The parking lamps or low beams must
be switched on for the fog lamps to
operate. The green indicator lamp in
the instrument cluster lights up whenever the
fog lamps are on.
The fog lamps are switched off while you acti-
vate the headlamp flasher or switch on the high
beams.
If the automatic headlamp control is acti-
vated, the low beams will come on auto-
matically when you switch on the fog lamps.<
Page 102 of 272

Climate
100
Automatic climate control
Comfortable interior climate
AUTO program7 offers the ideal air distribution
and air volume for almost all conditions, refer to
AUTO program below. All you need to do is
select an interior temperature which is comfort-
able for you.
The following sections inform you in detail
about how to adjust the settings.
Most settings are stored for the remote control
currently in use, refer also to Personal Profile
settings on page28.
Adjusting air distribution manually
The air distribution can be
switched on and off manually. The
air is directed to the windshield, to
the upper body area and to the
footwell.
The automatic air distribution can be switched
back on by pressing the AUTO button. The
cooling function is switched on automatically
and the manual air distribution setting is
cleared.
Temperature
Turn to set the desired tempera-
ture.
The automatic climate control
achieves this temperature as
quickly as possible regardless of the season,
using maximum cooling or heating power if nec-
essary, and then maintains it.
Avoid rapid switching between different tem-
perature settings. The automatic climate con-
trol will not have sufficient time to adjust the set
temperature.
Maximum heating power can be obtained with
the highest setting, regardless of the outside
temperature.
The system cools steadily in the lowest setting,
regardless of the outside temperature.
Maximum cooling
Press the button.
The system is set to the lowest
temperature, maximum air volume
and recirculated air mode.
Air flows out of the vent outlets for the upper
body region. Open them for this purpose.
Air is cooled as quickly as possible
>Above an outside temperature of approx.
327/06
>When the engine is running
AUTO program
Press the button.
Air volume, air distribution and
temperature are controlled auto-
matically.
Depending on the selected temperature, AUTO
intensity and outside influences, the air is
directed toward the windshield, the side win-
dows, the upper body and the footwell.
Pressing the AUTO button automatically
switches on the cooling function.
At the same time, a condensation sensor con-
trols the program so as to prevent window con-
densation as much as possible.
The program is switched off when the air distri-
bution is set manually or the button is pressed
again.
Intensity of the AUTO program
With the AUTO program switched on, auto-
matic control of the air volume and air distribu-
tion can be adjusted:
Press the left side of the button to
reduce the intensity. Press the
right side of the button to increase
it.
The selected intensity is shown on the display
of the automatic climate control.
Convertible Program
The Convertible Program is active when the
convertible top is open and the AUTO program
is switched on. During the Convertible Program,
Page 106 of 272
Practical interior accessories
104
Practical interior accessories
Integrated universal remote
control*
The concept
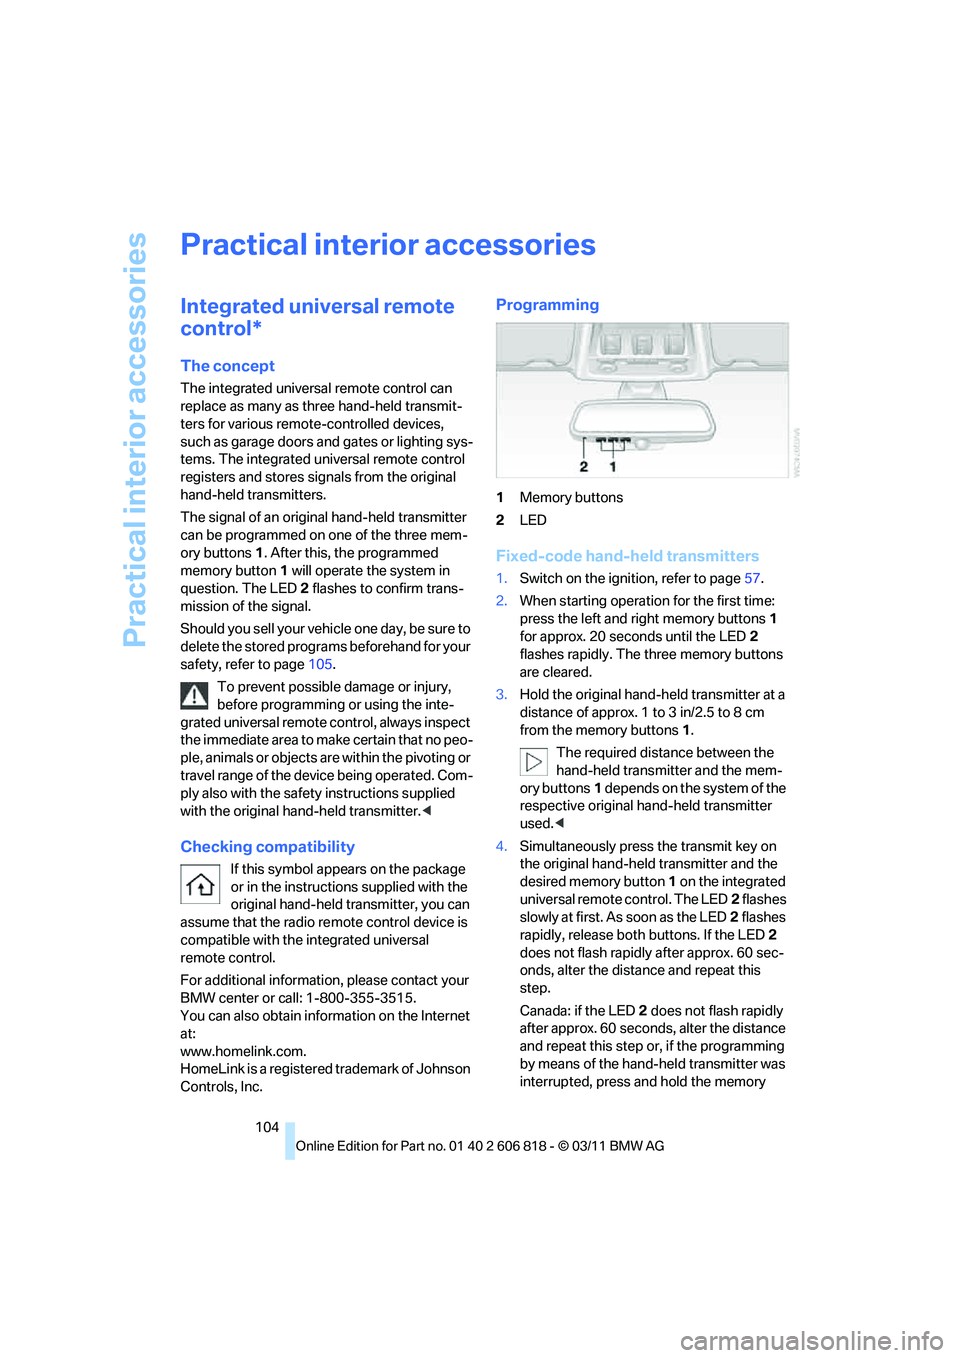
The integrated universal remote control can
replace as many as three hand-held transmit-
ters for various remote-controlled devices,
such as garage doors and gates or lighting sys-
tems. The integrated universal remote control
registers and stores signals from the original
hand-held transmitters.
The signal of an original hand-held transmitter
can be programmed on one of the three mem-
ory buttons1. After this, the programmed
memory button1 will operate the system in
question. The LED2 flashes to confirm trans-
mission of the signal.
Should you sell your vehicle one day, be sure to
delete the stored programs beforehand for your
safety, refer to page105.
To prevent possible damage or injury,
before programming or using the inte-
grated universal remote control, always inspect
the immediate area to make certain that no peo-
ple, animals or objects are within the pivoting or
travel range of the device being operated. Com-
ply also with the safety instructions supplied
with the original hand-held transmitter.<
Checking compatibility
If this symbol appears on the package
or in the instructions supplied with the
original hand-held transmitter, you can
assume that the radio remote control device is
compatible with the integrated universal
remote control.
For additional information, please contact your
BMW center or call: 1-800-355-3515.
You can also obtain information on the Internet
at:
www.homelink.com.
HomeLink is a registered trademark of Johnson
Controls, Inc.
Programming
1Memory buttons
2LED
Fixed-code hand-held transmitters
1.Switch on the ignition, refer to page57.
2.When starting operation for the first time:
press the left and right memory buttons1
for approx. 20 seconds until the LED2
flashes rapidly. The three memory buttons
are cleared.
3.Hold the original hand-held transmitter at a
distance of approx. 1 to 3 in/2.5 to 8 cm
from the memory buttons1.
The required distance between the
hand-held transmitter and the mem-
ory buttons1 depends on the system of the
respective original hand-held transmitter
used.<
4.Simultaneously press the transmit key on
the original hand-held transmitter and the
desired memory button1 on the integrated
universal remote control. The LED2 flashes
slowly at first. As soon as the LED2 flashes
rapidly, release both buttons. If the LED2
does not flash rapidly after approx. 60 sec-
onds, alter the distance and repeat this
step.
Canada: if the LED2 does not flash rapidly
after approx. 60 seconds, alter the distance
and repeat this step or, if the programming
by means of the hand-held transmitter was
interrupted, press and hold the memory
Page 107 of 272
Controls
105Reference
At a glance
Driving tips
Communications
Navigation
Entertainment
Mobility
button and then press and release the but-
ton on the hand-held transmitter several
times, holding it for 2 seconds each time.
5.To program other original hand-held trans-
mitters, repeat steps 3 and 4.
The corresponding memory button1 is now
programmed with the signal of the original
hand-held transmitter.
You can operate the device while the ignition is
switched on.
If the device fails to function even after
repeated programming, check whether
the original hand-held transmitter uses an alter-
nating-code system. To do so, either read the
instructions for the original hand-held transmit-
ter or hold down the programmed memory but-
ton 1 of the integrated universal remote control.
If the LED2 on the integrated universal remote
control flashes rapidly and then remains lit for
about two seconds, the original hand-held
transmitter uses an alternating-code system.
If it uses an alternating-code system, program
the memory buttons1 as described under
Alternating-code hand-held transmitters.<
Alternating-code hand-held
transmitters
To program the integrated universal remote
control, consult the operating instructions for
the device to be set. You will find information
there on the possibilities for synchronization.
When programming hand-held transmitters
that employ an alternating code, please observe
the following supplementary instructions:
Programming will be easier with the aid of
a second person.<
1.Park your vehicle within the range of the
remote-controlled device.
2.Program the integrated universal remote
control as described above in the section
Fixed-code hand-held transmitters.
3.Locate the button on the receiver of the
device to be set, e.g. on the drive unit.
4.Press the button on the receiver of the
device to be set. After step 4, you have
approx. 30 seconds for step 5.5.Press and hold the programmed memory
button1 of the integrated universal remote
control for about 3 seconds.
Repeat this operation, if necessary up to
three times.
The corresponding memory button1 is now
programmed with the signal of the original
hand-held transmitter.
If you have any questions, please contact
your BMW center.<
Deleting all stored programs
Press the left and right memory buttons1 for
approx. 20 seconds until the LED2 flashes rap-
idly: all stored programs are deleted.
Reassigning individual programs
1.Hold the original hand-held transmitter at a
distance of approx. 1 to 3 in/2.5 to 8 cm
from the memory buttons1.
The required distance between the
hand-held transmitter and the mem-
ory buttons1 depends on the system of the
respective original hand-held transmitter
used.<
2.Press the desired memory button1 of the
integrated universal remote control.
If the LED2 flashes slowly after approx.
20 seconds, press the transmit key of the
original hand-held transmitter. Release
both buttons as soon as the LED2 flashes
rapidly. If the LED2 does not flash rapidly
after approx. 60 seconds, alter the distance
and repeat this step.
Canada: if the LED2 does not flash rapidly
after approx. 60 seconds, alter the distance
and repeat this step or, if the programming
by means of the hand-held transmitter was
interrupted, press and hold the memory
button and then press and release the but-
ton on the hand-held transmitter several
times, holding it for 2 seconds each time.
Page 109 of 272
Controls
107Reference
At a glance
Driving tips
Communications
Navigation
Entertainment
Mobility
Calibrating the digital compass
The digital compass must be calibrated in the
following situations:
>An incorrect compass direction is shown.
>The compass direction shown does not
change although the direction of travel
does.
>Not all compass directions are shown.
Procedure
1.Make sure that no large metal objects or
overhead power lines are in the vicinity of
your vehicle and that you have enough
space to drive in a circle.
2.Set the currently valid compass zone.
3.Convertible: ensure that the convertible top
is fully closed.
4.Press the adjustment button for approx.
6-7 seconds to call up C. Then drive in at
least one full circle at a speed of no more
than 4 mph/7 km/h.
If calibration is successful, the display
changes from C to a compass direction.
5.Convertible: open the convertible top fully
and repeat step 4.
Setting right-hand/left-hand steering
Your digital compass is factory-set to right-
hand or left-hand steering, in accordance with
your vehicle.
Set the language
You can set the language of the display:
Press the adjustment button for approx.
12-13 seconds. Briefly press the adjustment
button again to switch between English, "E",
and German, "O".
The setting is automatically saved after approx.
10 seconds.
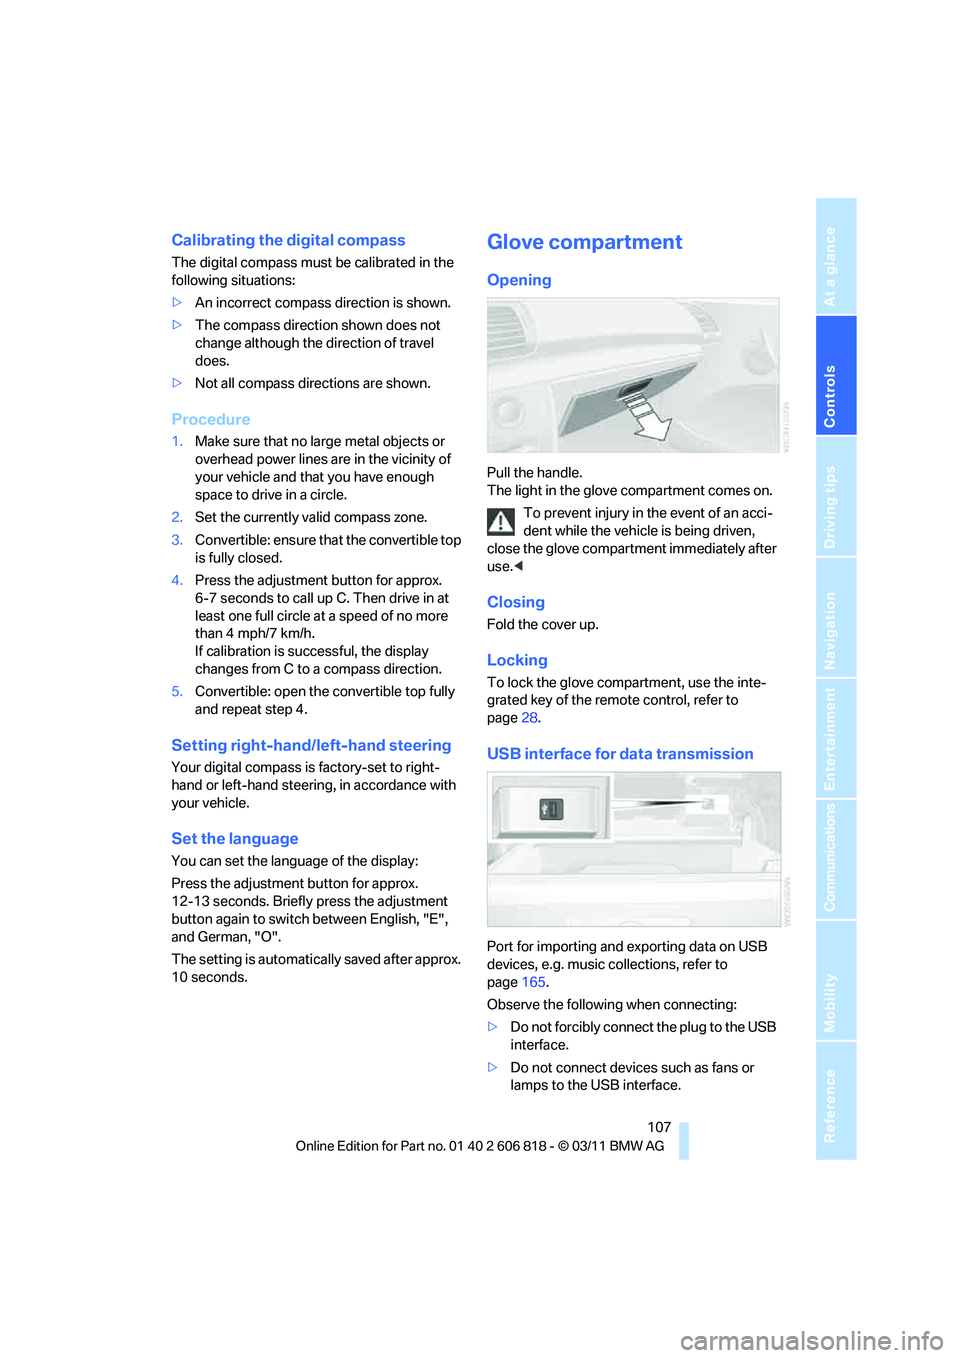
Glove compartment
Opening
Pull the handle.
The light in the glove compartment comes on.
To prevent injury in the event of an acci-
dent while the vehicle is being driven,
close the glove compartment immediately after
use.<
Closing
Fold the cover up.
Locking
To lock the glove compartment, use the inte-
grated key of the remote control, refer to
page28.
USB interface for data transmission
Port for importing and exporting data on USB
devices, e.g. music collections, refer to
page165.
Observe the following when connecting:
>Do not forcibly connect the plug to the USB
interface.
>Do not connect devices such as fans or
lamps to the USB interface.