Page 166 of 324

165
Continued
Features
HomeLink® Universal TransceiverThe HomeLink® Universal Transceiver can be programmed to operate up to three
remote controlled devices around your home, such as garage doors, lighting, or
home security systems.
Refer to the safety information that comes with your garage door opener to test that
the safety features are functioning properly. If you do not have the safety
information, contact the manufacturer.
Before programming HomeLink, make sure that people and objects are out of the
way of the garage or gate to prevent potential injury or damage.
When programming a garage door opener, park just outside the garage door’s
path.Training HomeLink
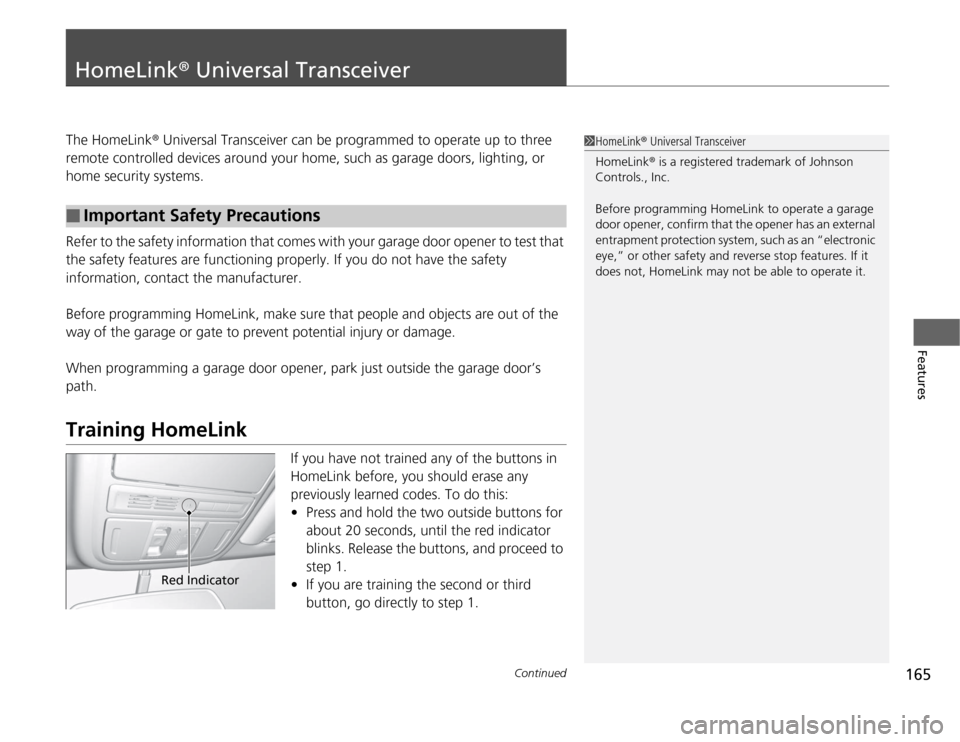
If you have not trained any of the buttons in
HomeLink before, you should erase any
previously learned codes. To do this:
•Press and hold the two outside buttons for
about 20 seconds, until the red indicator
blinks. Release the buttons, and proceed to
step 1.
•If you are training the second or third
button, go directly to step 1.
■
Important Safety Precautions
1HomeLink® Universal Transceiver
HomeLink® is a registered trademark of Johnson
Controls., Inc.
Before programming HomeLink to operate a garage
door opener, confirm that the opener has an external
entrapment protection system, such as an “electronic
eye,” or other safety and reverse stop features. If it
does not, HomeLink may not be able to operate it.
Red Indicator
Page 183 of 324

182Driving
Before DrivingDriving PreparationCheck the following items before you start driving.
•Make sure there are no obstructions on the windows, door mirrors, exterior
lights, or other parts of the vehicle.
uRemove any frost, snow, or ice.
uRemove any snow on the roof, as this can slip down and obstruct your field of
vision while driving. If frozen solid, remove ice once it has softened.
uWhen removing ice from around the wheels, be sure not to damage the wheel
or wheel components.
•Make sure the hood is securely closed.
uIf the hood opens while driving, your front view will be blocked.
•Make sure the tires are in good condition.
uCheck air pressure, check for damage and excessive wear.
2Checking and Maintaining Tires P. 259
•Make sure there are no people or objects behind or around the vehicle.
uThere are blind spots from the inside.■
Exterior Checks
1Exterior Checks
NOTICEWhen doors are frozen shut, use warm water around
the door edges to melt any ice. Do not try to force
them open, as this can damage the rubber trim
around the doors. When done, wipe dry to avoid
further freezing.
Do not pour warm water into the key cylinder.
You will be unable to insert key if the water freezes in
the hole.
Page 184 of 324

Continued
183
uuBefore DrivinguDriving Preparation
Driving
•Store or secure all items on board properly.
uCarrying too much cargo, or improperly storing it, can affect your vehicle’s
handling, stability, stopping distance, and tires, and make it unsafe.
2Maximum Load Limit P. 185
•Do not pile items higher than the seat height.
uThey can block your view and may be thrown forward in the event of sudden
braking.
•Do not place anything in the front seat footwells. Make sure to secure the floor
mat.
uAn object or unsecured floor mat can interfere with your brake and accelerator
pedal operation while driving.
•If you have any animals on board, do not let them move around in the vehicle.
uThey may interfere with driving and a crash could occur.
•Securely close and lock all doors and the trunk.
2Locking/Unlocking the Doors from the Inside P. 93
•Adjust your seating position properly.
uAdjust the head restraint, too.
2Adjusting the Seats P. 116
2Adjusting the Head Restraints P. 118
•Adjust the mirrors and steering wheel properly for your driving.
uAdjust them while sitting in the proper driving position.
2Adjusting the Mirror P. 114
2Adjusting the Steering Wheel P. 113
■
Interior Checks
1Interior Checks
The headlight aim is set by the factory, and does not
need to be adjusted. However, if you regularly carry
heavy items in the trunk or tow a trailer, have the
aiming readjusted at a dealer or by a qualified
technician.
Page 189 of 324

uuTowing a TraileruTowing Preparation
188Driving
Towing equipment varies by the size of your trailer, how much load you are towing,
and where you are towing.■
Hitches
The hitch must be of an approved type and properly bolted to the underbody.
■
Safety chains
Always use safety chains when you tow a trailer. Leave enough slack to allow the
trailer to turn corners easily, but do not allow the chains to drag on the ground.
■
Trailer brakes
There are two common types of trailer brakes: surge and electric. Surge brakes are
common for boat trailers, since the brakes will get wet. If you choose electric brakes,
be sure they are electronically actuated. Do not attempt to attach trailer brakes to
your vehicle’s hydraulic system, as it will lower braking effectiveness and create a
potential hazard.
■
Additional towing equipment
Many states and provinces/territories require special outside mirrors when towing a
trailer. Even if mirrors are not required in your locale, you should install special
mirrors if visibility is restricted in any way.
■
Trailer light
Trailer lights and equipment must comply with federal, state, province/territory, and
local regulations. Check with your local trailer sales or rental agency for the
requirements in the area where you plan to tow.
■
Towing Equipment and Accessories
1Towing Equipment and Accessories
Make sure that all equipment is properly installed and
maintained, and that it meets federal, state, province/
territory, and local regulations.
Consult your trailer sales or rental agency if any other
items are recommended or required for your towing
situation.
The lighting and wiring of trailers can vary by type
and brand. If a connector is required, it should only
be installed by a qualified technician.
Page 190 of 324

189
uuTowing a TraileruDriving Safely with a Trailer
Continued
Driving
Driving Safely with a Trailer•Have the trailer properly serviced and keep it in good condition.
•Make sure that all the weights and load in the vehicle and trailer are within limits.
2Towing Load Limits P. 187
•Securely attach the hitch, safety chains, and other necessary parts to the trailer.
•Securely store all the items in and on the trailer so that they do not shift while
driving.
•Check if the lights and brakes on the trailer are working properly.
•Check the pressures of the trailer tires, including the spare.
•Drive slower than normal.
•Obey posted speed limits for vehicles with trailers.
•Use the
(D
position when towing a trailer on level roads.
•Turn more slowly and with a wider turning arc than normal.
•Allow more time and distance for braking.
•Do not brake or turn suddenly.
■
Things You Need To Know Before Towing a Trailer
■
Towing Speeds and Gears
■
Turning and Braking
1Driving Safely with a Trailer
Parking
In addition to the normal precautions, place wheel
chocks at each of the trailer’s tires.
Automatic transmission models
Page 192 of 324

191
Continued
Driving
When DrivingStarting the Engine
1.Make sure the parking brake is applied.
2.Check that the shift lever is in
(P
, then
depress the brake pedal.
uAlthough it is possible to start the vehicle
in
(N
, it is safer to start it in
(P
.
2.Check that the shift lever is in
(N
. Then
depress the brake pedal with your right
foot, and the clutch pedal with your left
foot.
uThe clutch pedal must be fully depressed
to start the engine.
1Starting the Engine
Keep your foot firmly on the brake pedal when
starting the engine.
The engine is harder to start in cold weather and in
thinner air found at altitudes above 8,000 feet (2,400
meters).
When starting the engine in cold weather, turn off all
electrical accessories such as the lights, climate
control system, and rear defogger in order to reduce
battery drain.
If exhaust sounds abnormal or you can smell exhaust
gas inside the vehicle, have your vehicle checked by a
dealer. There may be a problem with the engine or
exhaust system.
Brake Pedal
Automatic transmission models
Brake Pedal Clutch Pedal
Manual transmission models
Page 196 of 324
195
uuWhen DrivinguShifting
Continued
Driving
ShiftingChange the shift position in accordance with your driving needs.■
Shift lever positionsAutomatic transmission models
1Shifting
You cannot turn the ignition switch to LOCK
(0
and
remove the key unless the shift lever is in
(P
.
The vehicle may move forward very slightly even in
(N
while the engine is cold.
Depress the brake pedal firmly and, when necessary,
apply the parking brake.
Park
Used when parking or starting the
engine
Reverse
Used when reversing
Neutral
Used when idling
Drive
Used for:●Normal driving (gears change
between 1st and 5th automatically)●Temporarily driving in the sequential
mode
Drive (S)
Used for:●Automatically changing gears
between 1st and 4th (4th gear is used
only at high speed)●Driving in the sequential mode
Page 197 of 324

uuWhen DrivinguShifting
196Driving
■
Shift Lever Operation
1Shift Lever Operation
NOTICEWhen you change the shift lever from
(D
to
(R
and
vice versa, come to a complete stop and keep the
brake pedal depressed.
Operating the shift lever before the vehicle has come
to a complete standstill can damage the transmission.
Use the shift lever position indicator to check the
lever position before pulling away.
Whichever position the shift lever is in when driving,
a blinking
(D
indicator indicates a transmission
problem.
Avoid sudden acceleration and have the transmission
checked by a dealer as soon as possible.
The fuel supply may be cut off if you drive at engine
speeds in or over the tachometer red zone (engine
speed limit). If this happens, you may experience a
slight jolt.
It may not be possible to operate the shift lever if the
brake pedal is applied while the shift lever release
button is held down.
Depress the brake pedal first.
Tachometer’s red zone
Shift Lever Position Indicator
Depress the brake pedal and
press the shift lever release button to
shift.
Shift without pressing the shift lever
release button.
Press the shift lever release button
and shift.M (Sequential Shift mode) Indicator/
Gear Position Indicator