Page 138 of 253

136Audio
Playing FM/AM RadioSelecting FM/AM Mode1.Press the FM/AM button.
Press the FM/AM button again, if necessary, to select the frequency band (AM,
FM1, FM2).
2. Select a station using the buttons (Preset, SCAN) or bars (SKIP, TUNE).
On the FM bands, you can also use the CATEGORY bar and TITLE button to
select a station provided by the Radio Data System (RDS).
The band and frequency are displayed on the display.
Audio Screen ControlH AUDIO button (in FM/AM mode)
Control the audio system through the navigation screen. 1.Move e to select a frequency band
( AM , FM1 , or FM2 ).
2. Rotate i to select a preset
station. Press u .
Press and hold u until a beep
sounds to store the current
station in a preset button.
Move r to select AUDIO
MENU . 2Audio Menu
P. 137
1Playing FM/AM Radio
d “Display audio screen”
You can control the radio using voice control
commands.
2 Radio Commands P. 239
A visual guide helps you operate the audio
system.
2 System Controls P. 4
2 Basic Operation P. 6
The ST indicator comes on the display for stereo
FM broadcasts. Stereo re production in AM is not
available.
The radio can receive the complete AM and FM
bands:
AM band: 530 to 1710 kHz
FM band: 87.7 to 107.9 MHz
You can store six AM stati ons and 12 FM stations
in the preset buttons. FM1 and FM2 let you store
six stations each.
Stereo indicator Frequency band
Preset stations
TSX_KA-31TL1820.book 136 ページ 2011年6月24日 金曜日 午後3時43分
Page 142 of 253

140Audio
Playing XM® RadioSelecting XM Mode1.Press the XM button.
Press the XM button again, if necess ary, to select the band (XM1, XM2).
2. Select a channel using the buttons (Preset, SCAN, TITLE) and the bars (SKIP, TUNE,
CATEGORY).
The band and channel are displayed on the display.
Audio Screen ControlH AUDIO button (in XM mode)
Control the audio system through the navigation screen. 1.Move e to select the channel band
( XM1 , XM2).
2. Rotate i to select a preset
channel. Press u.
Press and hold u until a beep
sounds to store the current
channel in a preset button.
Move r to select AUDIO
MENU . 2Audio Menu
P. 141
1Playing XM® Radio
d “Display audio screen”
You can control the radio using voice control
commands.
2 Radio Commands P. 239
A visual guide helps you operate the audio
system.
2 System Controls P. 4
2 Basic Operation P. 6
In the channel mode, all available channels are
selectable. In the categor y mode, you can select
a channel within a category (Jazz, Rock, Classical,
etc.).
There may be instance s when XM® Radio does
not broadcast all the data fields (artist name,
title). This does not indica te a problem with your
audio system.
You can store 12 XM stat ions in the preset
buttons. XM1 and XM2 let you store six stations
each.
XM® Radio display messag es will be displayed
on the audio screen.
2 XM® Radio Display Messages P. 144
Channel band
Preset channels
TSX_KA-31TL1820.book 140 ページ 2011年6月24日 金曜日 午後3時43分
Page 147 of 253

145Audio
Playing a DiscSelecting Disc Mode1.Press the DISC/HDD button to play a CD or other disc.
2. Insert a disc into the disc slot.
The disc automatically begins playing.
3. Select a track using the buttons (TITLE , SCAN) and the bars (SKIP, TUNE,
CATEGORY).
The track number and elapsed time ar e displayed on the display. Title
information for audio CDs is displayed if found in the Gracenote® Album Info
(Gracenote® Media Database) stored on the built-in hard disc drive (HDD). Text
information stored on MP3/WMA/ AAC discs is also displayed.
Audio Screen ControlHAUDIO button (in DISC mode)
Control the audio system through the navigation screen. Rotate i to select a track. Press u.
Move e to select FOLDER LIST to
display the list of folders on MP3/
WMA/AAC discs having a folder
structure. 2 Playing MP3/WMA/AAC Discs P. 147Move r to select AUDIO MENU
to display the Audio Menu. 2 Audio Menu
P. 146
1Recording a Note
d “Display audio screen”
You can control the disc using voice control
commands.
2 Disc Commands P. 240
A visual guide helps you operate the audio
system.
2 System Controls P. 4
2 Basic Operation P. 6
Do not use discs with a dhesive labels. The label
can cause the disc to jam in the unit.
WMA tracks protected by digital rights
management (DRM) cannot be played. The
audio system displays UNSUPPORTED, then skips
to the next track.
If there is a problem, you may see an error
message on the display.
2 Error Messages P. 217
If you eject the disc but do not remove it from
the slot, the system reloads the disc automatically
after severa l seconds.
Pausing a Disc
Press the preset 1 button. To resume playing the
disc, press the button again.
Disc mode
Track list
TSX_KA-31TL1820.book 145 ページ 2011年6月24日 金曜日 午後3時43分
Page 152 of 253
150
Playing Hard Disc Drive (HDD) Audio
Audio Screen Control
Audio
Audio Screen ControlHAUDIO button (in HDD mode)
Control the audio screen through the navigation system. Rotate i to select a track. Press u.
Move w or y to select ALBUM-
or ALBUM+ to change albums.Move e to select MUSIC SEARCH
to display the Music Search Menu. 2 Searching for Music
P. 154
Move r to select AUDIO MENU . 2Audio Menu
P. 150
Audio MenuHAUDIO button (in HDD mode)
AUDIO MENU
Rotate i to select an item. Press u.
HDD mode
Track list
1 Repeat, Random, and Scan Play
1. Rotate i to select Repeat, Random , or
Scan . Press u.
2. Rotate i to select an option. Press u.
TSX_KA-31TL1820.book 150 ページ 2011年6月24日 金曜日 午後3時43分
Page 160 of 253

158
Playing Hard Disc Drive (HDD) Audio
Updating Gracenote® Album Info
Audio
Updating Gracenote® Album InfoHAUDIO button (in HDD or DISC mode)
AUDIO MENU
HDD Setup
Update the Gracenote® Album Info (Gra cenote® Media Database) that is included
with the navigation system.
1.Insert the update disc into the disc
slot or connect the USB flash drive
that includes the update.
2. Rotate i to select Gracenote
Info. Update . Press u.
3. Rotate i to select USB or Disc
update source media. Press u.
4. Rotate i to select Yes on the
confirmation screen. Press u.
The system updates the
Gracenote information.
5. Rotate i to select OK on the
confirmation screen. Press u.
1Updating Gracenote® Album Info
To acquire updated files:•Consult your dealer.•U.S.: Visit www.acura.com .•Canada: Visit www.acura.ca.
Once you perform an update, any information
you edited before will be overwritten or erased.
Maximum capacity Remaining capacity
Gracenote version
number
TSX_KA-31TL1820.book 158 ページ 2011年6月24日 金曜日 午後3時43分
Page 162 of 253

160
Playing an iPod®
Selecting iPod® Mode
Audio
Selecting iPod® Mode1.Connect the iPod® to the USB adapter cable in the console compartment.
2. Press the AUX button until you get to iPod® mode.
3. Select a track using the iPod® menu on the screen.
The current track number and total number of tracks are displayed on the
display.
Audio Screen ControlHAUDIO button (in iPod® mode)
Control the audio screen through the navigation system. Rotate i to select a track. Press u.
Move e to select MUSIC SEARCH
to change songs in the track list. 2Searching for Music
P. 162
Move r to select AUDIO MENU . 2Audio Menu
P. 161
1Playing an iPod®
d “Display audio screen”
You can control the iPod® using voice control
commands.
2 iPod® Commands P. 241
A visual guide helps you operate the audio
system.
2 System Controls P. 4
2 Basic Operation P. 6
Available operating functi ons vary on models or
versions. Some functions may not be available on
the vehicle’s audio system.
If there is a problem, you may see an error
message on the display.
2 Error Messages P. 217
iPod® mode
Track list
TSX_KA-31TL1820.book 160 ページ 2011年6月24日 金曜日 午後3時43分
Page 165 of 253

163Audio
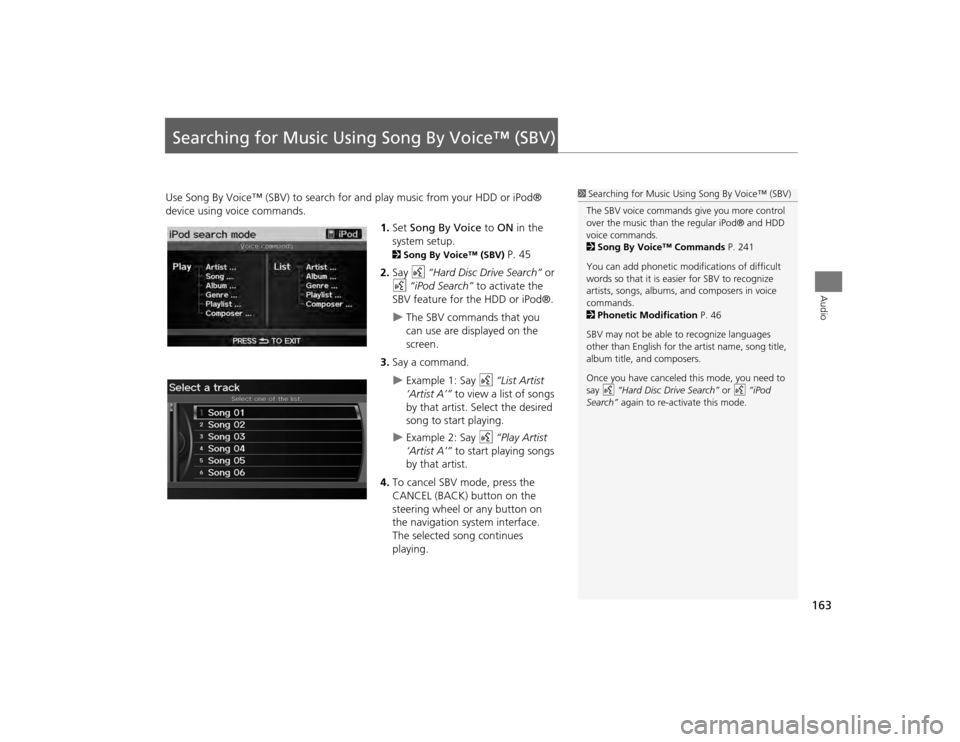
Searching for Music Using Song By Voice™ (SBV)Use Song By Voice™ (SBV) to search for and play music from your HDD or iPod®
device using voice commands.
1.Set Song By Voice to ON in the
system setup.
2 Song By Voice™ (SBV)
P. 45
2. Say d “Hard Disc Drive Search” or
d “iPod Search” to activate the
SBV feature for the HDD or iPod®.
The SBV commands that you
can use are displayed on the
screen.
3. Say a command.
Example 1: Say d “List Artist
‘Artist A’” to view a list of songs
by that artist. Select the desired
song to start playing.
Example 2: Say d “Play Artist
‘Artist A’” to start playing songs
by that artist.
4. To cancel SBV mode, press the
CANCEL (BACK) button on the
steering wheel or any button on
the navigation system interface.
The selected song continues
playing.
1Searching for Music Using Song By Voice™ (SBV)
The SBV voice commands give you more control
over the music than the regular iPod® and HDD
voice commands.
2 Song By Voice™ Commands P. 241
You can add phonetic modi fications of difficult
words so that it is easier for SBV to recognize
artists, songs, albums, and composers in voice
commands.
2 Phonetic Modification P. 46
SBV may not be able to recognize languages
other than English for the artist name, song title,
album title, and composers.
Once you have canceled this mode, you need to
say d “Hard Disc Drive Search” or d “iPod
Search” again to re-activate this mode.
TSX_KA-31TL1820.book 163 ページ 2011年6月24日 金曜日 午後3時43分
Page 167 of 253

165
Playing a USB Flash Drive
Selecting USB Mode
Audio
Selecting USB Mode1.Connect the USB flash drive to the USB adapter cable in the console
compartment.
2. Press the AUX button until you get to USB mode.
3. Select a track using skip, scan, folder list, or track list.
The current track number and folder number are displayed on the display.
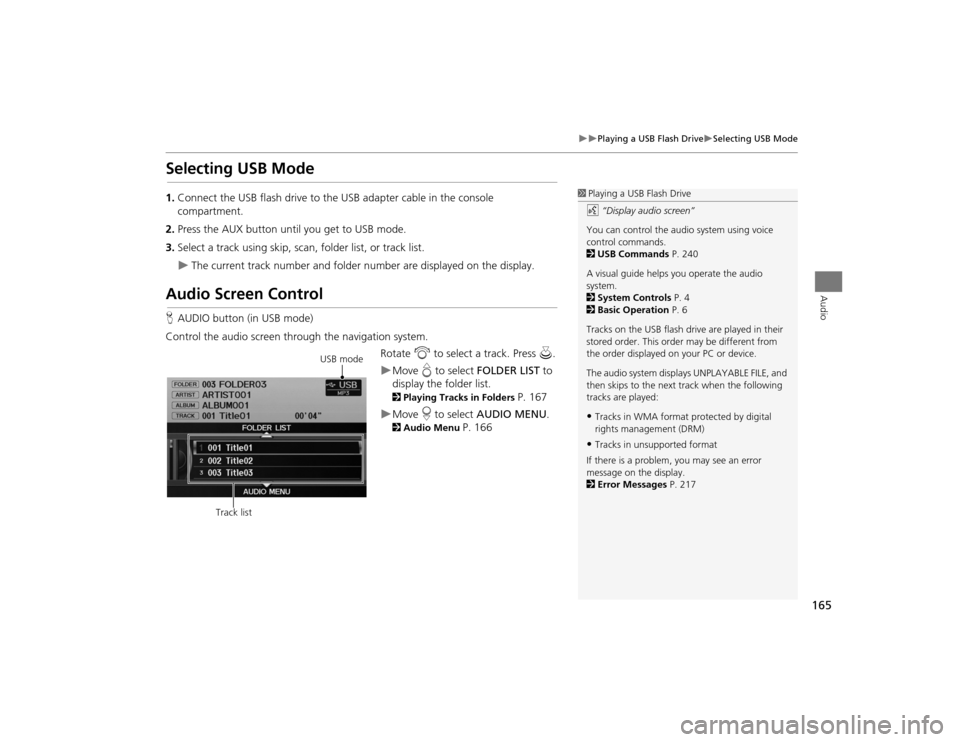
Audio Screen ControlHAUDIO button (in USB mode)
Control the audio screen through the navigation system. Rotate i to select a track. Press u.
Move e to select FOLDER LIST to
display the folder list. 2 Playing Tracks in Folders
P. 167
Move r to select AUDIO MENU . 2Audio Menu
P. 166
1Playing a USB Flash Drive
d “Display audio screen”
You can control the audio system using voice
control commands.
2 USB Commands P. 240
A visual guide helps you operate the audio
system.
2 System Controls P. 4
2 Basic Operation P. 6
Tracks on the USB flash drive are played in their
stored order. This orde r may be different from
the order displayed on your PC or device.
The audio system displa ys UNPLAYABLE FILE, and
then skips to the next track when the following
tracks are played:•Tracks in WMA format protected by digital
rights management (DRM)•Tracks in unsupported format
If there is a problem, you may see an error
message on the display.
2 Error Messages P. 217
USB mode
Track list
TSX_KA-31TL1820.book 165 ページ 2011年6月24日 金曜日 午後3時43分