Page 203 of 650
CONT INUED
The message reminds you that the
keyless access remote is locked in
the keyless access remote slot, and
that the power mode is in the
ACCESSORY or ON position. To
remove the keyless access remote,
turn the power mode of f by pressing
the engine start/stop button twice
(in ACCESSORY mode) or once (in
ON mode) without pressing the
brake pedal.
When the keyless access remote
system main switch in the glove box
is set to OFF, the multi-information
display will show the ‘‘TO UNLOCK
KEYLESS REMOTE TURN OFF
POWER’’ message after you shiftTo unlock the keyless access remote: On automatic transmission models
K eyless A ccess System
Inst rument s and Cont rols
199
11/01/14 18:28:53 31TK4630_204
In ACCESSORY mode, the
‘‘ACCESSORY MODE’’ message will
be displayed a f ew seconds af ter the
‘‘TO UNLOCK KEYLESS REMOTE
TURN OFF POWER’’ message
to Park. is displayed.
2012 TL
Page 204 of 650
To remove the keyless access remote:On automatic transmission models
If the vehicle is lef t in the
ACCESSORY mode, the ‘‘TO TURN
VEHICLE OFF’’ message is shown
on the multi-information display
when you open the driver’s door. If
the vehicle is lef t in the VEHICLE
OFF (LOCK) mode with the keyless
access remote in the slot, the
‘‘REMOVE KEYLESS REMOTE
FROM SLOT’’ message is shown on
the multi-information display.If youturnoff thevehicleandleave
the remote in the keyless access
remote slot, you will also hear a
reminder beeper.
TheshiftlevermustbeinPark
bef ore you can press the engine
start/stop button twice without
pressing the brake pedal to set the
vehicle into the VEHICLE OFF
(LOCK) mode.
K eyless A ccess System
200
11/01/14 18:29:02 31TK4630_205
Inst rument s and Cont rols
2012 TL
Page 219 of 650

�ÎYour vehicle has two accessory
power sockets. One is next to the
shif t lever. The other is in the
console compartment.
To access the f ront accessory socket,
slide the lid f orward until it latches.
To close it, push in on the lid to slide
it backward.To use an accessory power socket,
the ignition switch must be in the
ACCESSORY (I) or ON (II) position.Each socket is intended to supply
power for 12 volt DC accessories
that are rated 120 watts or
less (10 amps).
None of the sockets will power
an automotive type cigarette
lighter element.
Make sure to put the socket cover
back in place to prevent any small
foreign objects from getting into
A ccessory Power Sockets
Interior Convenience Items
Inst rument s and Cont rols
215
CONSOLE COMPARTMENT
Slide the lid
forward. Pull up the lid.
FRONT
11/01/14 18:31:18 31TK4630_220
the socket.
�Î
Models equipped with the keyless access
system have an engine start/stop button instead
is the equivalent of ON (II). For more information,
see pages
:
184 and 187.
of an ignition switch. ) ACCESSORY Mode is
the equivalent of ACCESSORY (I), and ON Mode
2012 TL
Page 240 of 650

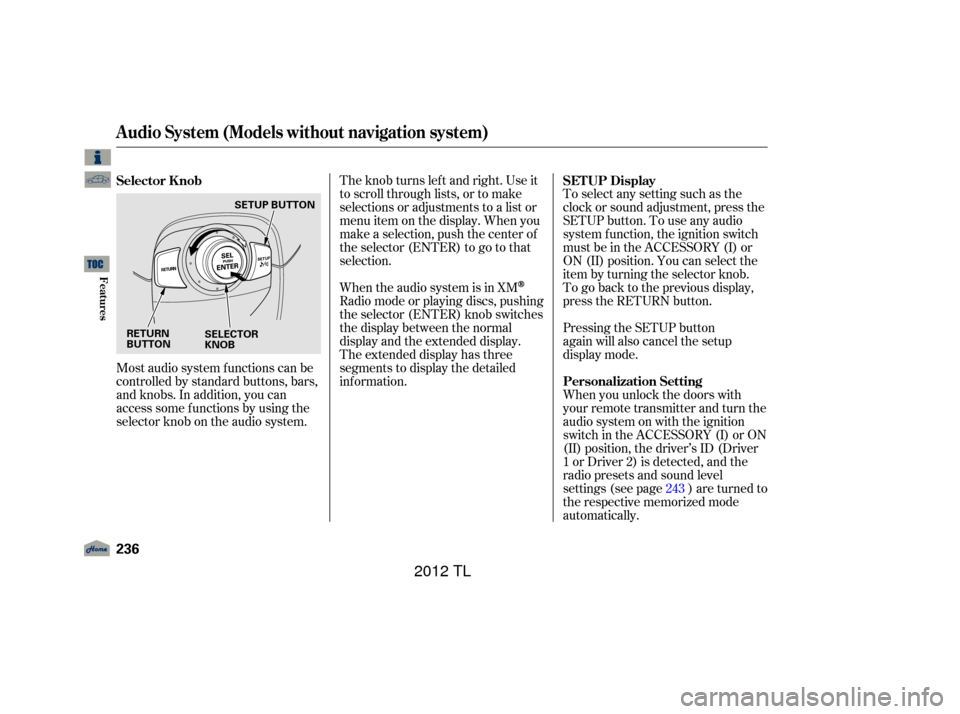
Most audio system f unctions can be
controlled by standard buttons, bars,
and knobs. In addition, you can
access some f unctions by using the
selector knob on the audio system.The knob turns lef t and right. Use it
to scroll through lists, or to make
selections or adjustments to a list or
menu item on the display. When you
make a selection, push the center of
the selector (ENTER) to go to that
selection.
When the audio system is in XM
Radio mode or playing discs, pushing
the selector (ENTER) knob switches
the display between the normal
display and the extended display.
The extended display has three
segments to display the detailed
inf ormation.
To select any setting such as the
clock or sound adjustment, press the
SETUP button. To use any audio
system f unction, the ignition switch
must be in the ACCESSORY (I) or
ON (II) position. You can select the
item by turning the selector knob.
To go back to the previous display,
press the RETURN button.
Pressing the SETUP button
again will also cancel the setup
display mode.
When you unlock the doors with
your remote transmitter and turn the
audio system on with the ignition
switch in the ACCESSORY (I) or ON
(II) position, the driver’s ID (Driver
1orDriver2)isdetected,andthe
radio presets and sound level
settings (see page ) are turned to
the respective memorized mode
automatically.
243
Selector K nob
SET UP Display
Personalization Setting
Audio System (Models without navigation system)
236
RETURN
BUTTON SELECTOR
KNOBSETUP BUTTON
11/01/14 18:34:54 31TK4630_241
Features
2012 TL
Page 242 of 650

�µ
�µ �µ
The ignition switch must be in the
ACCESSORY (I) or ON (II) position.
Turn the system on by pushing the
VOL/ (power/volume) knob or
the AM/FM button. Adjust the
volume by turning the VOL/ knob.
The band and f requency that the
radio was last tuned to are displayed.
To change bands, press the AM/FM
button. On the FM band, ST will be
displayed if the station is
broadcasting in stereo. Stereo
reproduction in AM is not available.
On the AM band, AM noise
reduction turns on automatically. You can use any of f ive methods to
f ind radio stations on the selected
band: tune, skip, scan, the preset
buttons, and auto select.
On the FM band, you can also use
the f eatures provided by the radio
data system (RDS). For more
information on the RDS, see
.
Use the selector knob to
tune the radio to a desired f requency.
Turn the knob right to tune to a
higher f requency, or lef t to tune to a
lower f requency.
The skip f unction searches
up and down f rom the current
f requency to f ind a station with a
strong signal. To activate it, press
and hold the or side of the
SKIP bar until you hear a beep, then
release it. The scan f unction samples
all stations with strong signals on the
selected band. To activate it, press
the SCAN button, then release it.
You will see SCAN in the display.
When the system finds a strong
signal, it will stop and play that
station f or about 10 seconds.
If you do nothing, the system will
scan f or the next strong station and
play it f or 10 seconds. When it plays
a station that you want to listen to,
press the SCAN button again.
To Play the Radio
To Select a Station
TUNE
SK IPSCAN
Playing the A M/FM Radio (Models without navigation system)
238
11/01/14 18:35:15 31TK4630_243
page 240
Features
2012 TL
Page 251 of 650

�µ
To listen to XM Radio, turn the
ignition switch to the ACCESSORY
(I) or ON (II) position, and press the
button. The last channel you
listened to will show in the display.
Adjust the volume by turning the
VOL/ knob.
To switch between
channel mode and category mode,
press and hold the TITLE button
until the mode changes.
In the channel mode, you can select
all of the available channels. In the
category mode, such as Jazz, Rock,
Classical, etc., you can select all of
the channels within that category.
Each time you press and release the
TITLE button, the display changes in
the f ollowing sequence: name, title,
and category. You can also change the mode from
the menu items. Press the SETUP
button to display the menu items,
then turn the selector knob to select
MODE/CATEGORY or MODE/
CHANNEL and press the selector
knob (ENTER). Each time you press
and release the selector knob
(ENTER), the display changes
between CHANNEL and
CATEGORY. To enter the setting,
press the TITLE button.
You may experience periods when
XM Radio does not transmit the
artist’s name and song title
inf ormation. If this happens, there is
nothing wrong with your system.
Your vehicle is capable of receiving
XM
Radio anywhere in the United
States and Canada, except Hawaii,
Alaska,andPuertoRico.XMisa
registered trademark of Sirius XM
Radio
,Inc.andXMCANADAis a
registered business name of
Canadian Satellite Radio Inc.
XM Radio receives signals f rom two
satellites to produce clear, high-
quality digital reception. It of f ers
many channels in several categories.
Along with a large selection of
dif f erent types of music, XM Radio
allows you to view channel and
category selections in the display.
CONT INUED
Operating the XM Radio
MODE
Playing the XMRadio (Models without navigation system)
Features
247
11/01/14 18:36:53 31TK4630_252
2012 TL
Page 256 of 650

If your XM Radio service has expired
or you purchased your vehicle f rom
a previous owner, you can listen to a
sampling of the broadcasts available
on XM Radio. With the ignition
switch in the ACCESSORY (I) or the
ON (II) position, press thebutton. A variety of music
types and styles will play. If you decide to purchase XM radio
service, contact XM Radio at
,orat
1-800-852-9696. In Canada, contact
XM CANADA
at , or
at 1-877-209-0079. You will need to
give them your radio I.D. number
and your credit card number. To get
your radio I.D. number, press the button, then turn the
selector knob until ‘‘CH 000’’ appears
in the display. Your I.D. will appear
in the display.
After you’ve registered with XM
Radio, keep your audio system in the
XM Radio mode while you wait f or
activation. This should take about 30
minutes. While waiting f or activation, make
sure your vehicle remains in an open
area with good reception. Once your
audio system is activated,
‘‘CATEGORY’’ or ‘‘CHANNEL’’ will
appear in the display, and you’ll be
able to listen to XM Radio broadcasts.
XM Radio will continue to send an
activation signal to your vehicle f or
at least 12 hours from the activation
request. If the service has not been
activated after 36 hours, contact
XM
Radio. In Canada, contact XM
CANADA
.
www.xmradio.com
www.xmradio.ca
Playing the XMRadio (Models without navigation system)
Receiving XM Radio Service
252
11/01/14 18:37:43 31TK4630_257
Features
2012 TL
Page 258 of 650

You operate the disc changer with
the same controls used f or the radio.
To select the disc changer, press the
CD button. You will see ‘‘CD’’ in the
display. The disc and track numbers,
andtheelapsedtimeareshownin
the display. You can also select the
displayed inf ormation with the
TITLE button (see page ). The
system will continuously play a disc
until you change modes. To load or play discs, the ignition
switch must be in the ACCESSORY
(I) or ON (II) position.A disc compressed in AAC f ormat
cannot be played in this audio
system.
Video CDs and DVDs do not work in
this unit.
Depending on the sof tware the f iles
were made with, it may not be
possible to play some f iles, or display
some text data.
This audio system can also play
CD-Rs and CD-RWs compressed in
MP3 or WMA f ormat. When playing
a disc in MP3, you will see ‘‘MP3’’ in
the display. In WMA f ormat, ‘‘WMA’’
will appear in the display. The disc,
f older and track numbers are
displayed. You can select up to 255
folders or tracks.
256
To Play a Disc
Playing Discs (Models without navigation system)
254
Do not use discs with adhesive labels.
The label can curl up and cause the
disc to jam in the unit.
11/01/14 18:37:59 31TK4630_259
Features
2012 TL