Page 213 of 650
To close:Insert the key in the driver’s door
lock.
Turn the key counterclockwise,
then release it.
Turn the key counterclockwise
again, and hold it. All four
windows and the moonroof start to
close. To stop the windows and
the moonroof , release the key.
To close the windows and the
moonroof f urther, turn and hold
the key again (within 10 seconds
of step 2). If the windows and the
moonroof stop bef ore the desired
position, repeat steps 2 and 3.
1.
2.
4. 3.
Power Windows
Inst rument s and Cont rols
209
NOTE:
11/01/14 18:30:30 31TK4630_214
2012 TL
Page 215 of 650

To open or close the moonroof
partially, lightly pull the switch back
or push it f orward and hold it. The
moonroof will stop when you release
the switch.
If the moonroof runs into any
obstacle while it is closing
automatically, it will reverse
direction, and then stop. To close the
moonroof , remove the obstacle, then
use the moonroof switch again.
Auto reverse stops sensing when the
moonroof is almost closed. You
should always check that all
passengers and objects are away
f rom the moonroof bef ore closing it.You can open and close the
moonroof f or up to 10 minutes af ter
you turn of f the ignition switch, on
models with keyless access system,
set the power mode to VEHICLE
OFF (LOCK). Opening either f ront
door cancels this f unction.
You can use the remote transmitter/
keyless access remote or the key/
built-in key to operate the moonroof
f rom the outside. Ref er to page
f or details.
207
Auto Reverse
Moonroof
Inst rument s and Cont rols
211
If you try to open the moonroof in
below-f reezing temperatures, or when
it is covered with snow or ice, you can
damage the moonroof panel or its
motor.
11/01/14 18:30:48 31TK4630_216
2012 TL
Page 220 of 650
To open the console compartment,
push in on the lever and lif t the
armrest. To close, lower the armrest,
and push it down until it latches.
Make sure to slide back the tray
bef ore opening the console
compartment.
Open the glove box by pulling out
thehandle.Closeitwithafirmpush.
Lock or unlock the glove box with
the master key or the built-in key on
models with keyless access system.
The glove box light comes on only
when the parking lights are on. Console Compartment
Glove Box
Interior Convenience Items
216
GLOVE BOX To lock
An open glove box can cause
serious injury to your passenger
inacrash,evenifthe
passenger is wearing the seat
belt.
Always keep the glove box
closed while driving.
11/01/14 18:31:28 31TK4630_221
Inst rument s and Cont rols
2012 TL
Page 224 of 650

Door (Door activated position):
OFF position:
After all doors are closed tightly, the
lights dim slightly, then f ade out in
about 30 seconds.
To change the ‘‘INTERIOR LIGHT
DIMMING TIME’’ setting, see page .
With any door left open, the
lights stay on about 15 minutes,
then go out. The individual map lights in the
f ront and rear come on when any
door is opened, when the remote
transmitter (the keyless access
remote on models with keyless
access system) is used to unlock
the doors. When the doors are
closed, each light can be turned on
and of f by pushing the map light
button ( / ).
The rear individual map lights
cannot be turned on. The f ront individual map lights
canbeturnedonandoff by
pressing each map light button
(/).
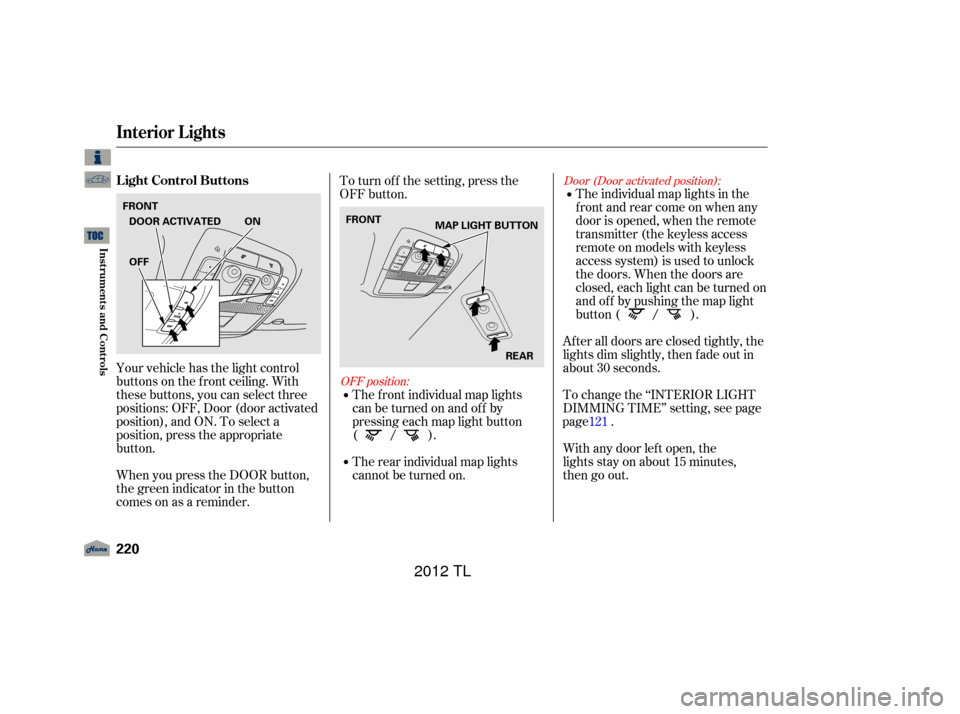
To turn off the setting, press the
OFF button.
Your vehicle has the light control
buttons on the f ront ceiling. With
these buttons, you can select three
positions: OFF, Door (door activated
position), and ON. To select a
position, press the appropriate
button.
When you press the DOOR button,
the green indicator in the button
comesonasareminder.
Interior Lights
Light Control Buttons
220
MAPLIGHTBUTTON
FRONT
REAR
FRONT
ON
DOOR ACTIVATED
OFF
11/01/14 18:32:15 31TK4630_225
page 121
Inst rument s and Cont rols
2012 TL
Page 225 of 650

Turn on the f ront individual map
lights by pushing each map light
button ( / ). Push the
button again to turn it off. When the
door activated position is selected
with the light control button, the rear
map lights can be turned on by
pushing each map light button
( / ). Push the button
again to turn it off.
The lights also come on when the
key is removed f rom the ignition
switch.
The lights also come on when the
power mode is set to VEHICLE OFF
(LOCK).
All the individual map lights come
on and stay on. If any map light is lef t on when the
ignition switch is turned of f or the
VEHICLE OFF (LOCK) mode is set,
and all doors are closed, it will turn
of f when the vehicle is locked with
the remote transmitter (the keyless
access remote on models with
keyless access system), or after
ON position:
On models without keyless access
system
On models with keyless access system
Interior Lights
Individual Map L ights
Inst rument s and Cont rols
221
FRONT
REAR
11/01/14 18:32:26 31TK4630_226
30 minutes.
2012 TL
Page 227 of 650
Your vehicle has a keyless access
remote slot light. The light comes on
when you:Open any door. Set the vehicle mode to VEHICLE
OFF (LOCK).
Remove the keyless access remote
f rom the keyless access remote
slot.
After all doors are closed tightly, the
light dims slightly, then f ades out in
about 30 seconds (depending on the
interior light dimming timer setting).
The light turns of f bef ore 30 seconds
have elapsed if you lock the driver’s
door.
Interior Lights
On models with Keyless Access
K eyless A ccess Remote Slot L ight
Inst rument s and Cont rols
223
LIGHTS
11/01/14 18:32:44 31TK4630_228
System
2012 TL
Page 229 of 650

The standard audio system has
many f eatures. This section
describes those f eatures and how to
use them. The climate control system in your
vehicle provides a comfortable
driving environment in all weather
conditions.
Your vehicle has an anti-theft audio
system that requires a code number
to enable it.
The security system helps to dis-
courage vandalism and thef t of your
vehicle................
Climate Control System . 226
Using Automatic Climate ...................................
Control .228 Dual Temperature and Mode
...................................
Control .232
..........
Climate Control Sensors . 234
................................
Audio System .235
................................
Audio System .236
..........
Playing the AM/FM Radio . 237
................
Playing the XM
Radio . 246
.................................
Playing Discs .253
...
Disc Changer Error Messages . 263
............................
PlayinganiPod
. 264
.................
iPod
Error Messages . 271
Playing a USB Flash Memory ........................................
Device .272
USB Flash Memory Device ........................
Error Messages .280
.............
Audio System . 281
................................
Audio System .285
..........
Playing the AM/FM Radio . 286
................
Playing the XM
Radio . 299
................................
Playing a Disc .307
.......
Disc Player Error Messages . 319
Playing Hard Disc Drive (HDD) ..........................................
Audio .320
............................
PlayinganiPod
. 354 .................
iPod
Error Messages . 363
Playing a USB Flash Memory ........................................
Device .364
USB Flash Memory Device ........................
Error Messages .375
.............
Audio System . 376
..................
Protecting Your Discs . 381
............
AM/FM Radio Reception . 385
................
Remote Audio Controls . 387
......................
Auxiliary Input Jack .389
.................
Radio Thef t Protection . 390
..........................
Setting the Clock .391
............................
Security System .395
.........................................
Compass .397
...............................
Cruise Control .401
HomeLink
Universal ................................
Transceiver .404
HandsFreeLink
(Models without navigation
..................................
system) .407
HandsFreeLink
(Models with navigation
..................................
system) .424
..
AcuraLink
(U.S. models only) . 449
...
Rearview Camera and Monitor . 465
Models without navigation system
BluetoothModels with navigation system Bluetooth
BluetoothBluetooth
Features
Features
225
11/01/14 18:32:53 31TK4630_230
2012 TL
Page 232 of 650

On models with navigation systemThe automatic climate control
system in your vehicle picks the
proper combination of air
conditioning, heating, and ventilation
to maintain the interior temperature
you select, and to remove moisture
from the air and make the interior
dry. The system also adjusts the f an
speed and airf low levels.The system automatically selects
the proper mix of conditioned
and/or heated air that will, as
quickly as possible, raise or lower
the interior temperature to your
pref erence. The system also
dehumidif ies the interior.
The driver’s side temperature and
the passenger’s side temperature can
be set separately. Push up the switch
of the appropriate temperature
control to increase the temperature
of airflow. Push down the switch to
decrease it. Each set temperature is
showninthedisplay(inthecenter
display on models with navigation
system).
Set the desired temperature with
the temperature control switch.
You can set the driver’s side
temperature and the passenger’s
side temperature separately. Press the Driver’s or Passenger’s
AUTO button. You will see AUTO
and the selected temperature on
the appropriate side of the display
(in the center display on models
with navigation system).
The climate control system f or your
vehicle can also be operated using
the voice control system. See the
navigation system manual f or
complete details.
When you unlock the doors with
your remote transmitter (keyless
access remote on models with
navigation system), the driver’s ID
(Driver 1 or Driver 2) is detected,
and the climate control settings are
turned to the respective mode
automatically with the ignition
switch in the ON (II) position, or the
power mode ON.
1.
2. Using A utomatic Climate Control
Voice Control System
Personalization Setting
Climate Control System
T emperat ure Cont rol
228
11/01/14 18:33:17 31TK4630_233
Features
2012 TL