2012.5 Peugeot 308 SW BL tow
[x] Cancel search: towPage 185 of 382

11
!
183
PRACTICAL INFORMATION
Beware of discharges of fl uid.
The expiry date of the fl uid is indi-
cated on the cartridge.
The sealant cartridge is designed
for single use; even if only partly
used, it must be replaced.
After use, do not discard the car-
tridge into the environment, take
it to an authorised waste disposal
site or a PEUGEOT dealer.
Do not forget to obtain a new sealant
cartridge, available from PEUGEOT
dealers or from a qualifi ed workshop.
Removing the cartridge
�)
Stow the black pipe.
�)
Detach the angled base from the
white pipe.
�)
Support the compressor vertically.
�)
Unscrew the cartridge from the bottom.
Checking tyre pressures /
inflating accessories
You can also use the compressor, with-
out injecting any product, to:
- check or adjust the pressure of your
tyres,
- infl ate other accessories (balls, bicycle
tyres...).
�)
Turn the selector A
to the
"Air" position.
�)
Uncoil the black pipe H
fully.
�)
Connect the black pipe to
the valve of the wheel or accessory.
If necessary, fi t one of the adaptors
supplied with the kit fi rst.
�)
Connect the compressor's electrical
connector to the vehicle's 12 V
socket.
�)
Start the vehicle and let the engine
run.
�)
Adjust the pressure using the
compressor (to infl ate: switch B
in
position "I"
; to defl ate: switch B
in
position "O"
and press button C
),
according to the vehicle's tyre pressure
label or the accessory's pressure
label.
�)
Remove the kit then stow it.
Page 186 of 382

11
184
PRACTICAL INFORMATION
It is designed to repair holes of a
maximum diameter of 6 mm, only
where located on the tyre tread or
shoulder. Avoid removing any for-
eign bodies which have penetrated
the tyre.
TEMPORARY PUNCTURE REPAIRKIT
Complete system consisting of a com-
pressor and a bottle of sealant which per-
mits temporary repair
of the tyre so that
you can drive to the nearest garage.
The kit is stowed in the boot storage
tray.
Using the kit
�)
Switch off the ignition.
�)
Tick the wheel to be repaired on the
speed limitation sticker enclosed
then affi x the sticker to the vehicle's
steering wheel to remind you that a
wheel is in temporary use.
�)
Clip the bottle 1
on the compressor 2
.
�)
Check that the switch A
is tilted to
position "0"
.
�)
Connect the pipe of the bottle 1
to
the valve of the tyre to be repaired.
�)
Unwind the pipe of the compressor 2
fully, then connect it to the bottle.
�)
Connect the compressor's electric
plug to the vehicle's 12 V socket.
�)
Start the vehicle and leave the
engine running.
Page 190 of 382
11
188
PRACTICAL INFORMATION
Fitting a steel spare wheel
If your vehicle is fi tted with alloy
wheels, it is normal to notice, when
tightening the bolts on fi tting, that
the washers do not come into con-
tact with the steel spare wheel. The
wheel is secured by the conical
contact of each bolt.
Access to the spare wheel
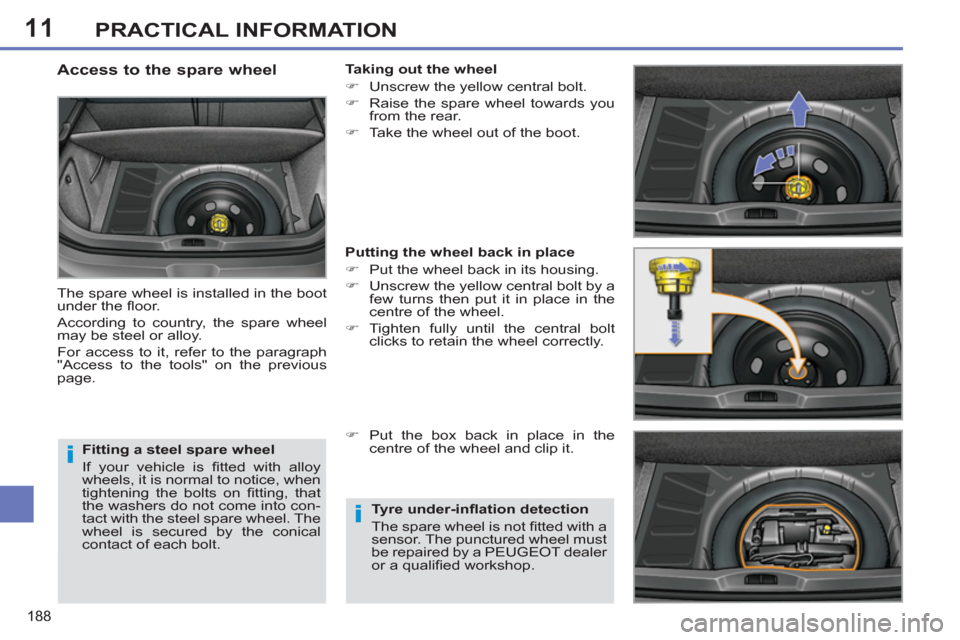
The spare wheel is installed in the boot
under the fl oor.
According to country, the spare wheel
may be steel or alloy.
For access to it, refer to the paragraph
"Access to the tools" on the previous
page.
Taking out the wheel
�)
Unscrew the yellow central bolt.
�)
Raise the spare wheel towards you
from the rear.
�)
Take the wheel out of the boot.
Putting the wheel back in place
�)
Put the wheel back in its housing.
�)
Unscrew the yellow central bolt by a
few turns then put it in place in the
centre of the wheel.
�)
Tighten fully until the central bolt
clicks to retain the wheel correctly.
�)
Put the box back in place in the
centre of the wheel and clip it.
Tyre under-infl ation detection
The spare wheel is not fi tted with a
sensor. The punctured wheel must
be repaired by a PEUGEOT dealer
or a qualifi ed workshop.
Page 191 of 382
11
189
PRACTICAL INFORMATION
CHANGING A WHEEL
Procedure for changing a
faulty wheel for the spare
wheel using the tools pro-
vided with the vehicle.
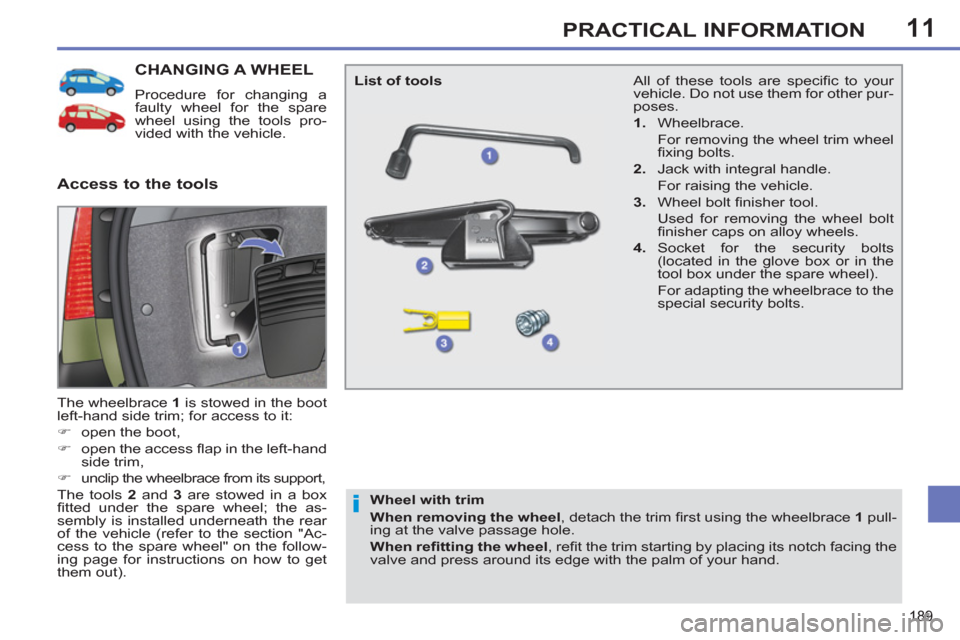
The wheelbrace 1
is stowed in the boot
left-hand side trim; for access to it:
�)
open the boot,
�)
open the access fl ap in the left-hand
side trim,
�)
unclip the wheelbrace from its support,
The tools 2
and 3
are stowed in a box
fi tted under the spare wheel; the as-
sembly is installed underneath the rear
of the vehicle (refer to the section "Ac-
cess to the spare wheel" on the follow-
ing page for instructions on how to get
them out).
Access to the tools
List of tools
Wheel with trim
When removing the wheel
, detach the trim fi rst using the wheelbrace 1
pull-
ing at the valve passage hole.
When refi tting the wheel
, refi t the trim starting by placing its notch facing the
valve and press around its edge with the palm of your hand.
All of these tools are specifi c to your
vehicle. Do not use them for other pur-
poses.
1.
Wheelbrace.
For removing the wheel trim wheel
fi xing bolts.
2.
Jack with integral handle.
For raising the vehicle.
3.
Wheel bolt fi nisher tool.
Used for removing the wheel bolt
fi nisher caps on alloy wheels.
4.
Socket for the security bolts
(located in the glove box or in the
tool box under the spare wheel).
For adapting the wheelbrace to the
special security bolts.
Page 196 of 382
11
194
PRACTICAL INFORMATION
Risk of electrocution
Xenon bulbs (D1S-35W) must be
replaced by a PEUGEOT dealer or
a qualifi ed workshop.
CHANGING A BULB
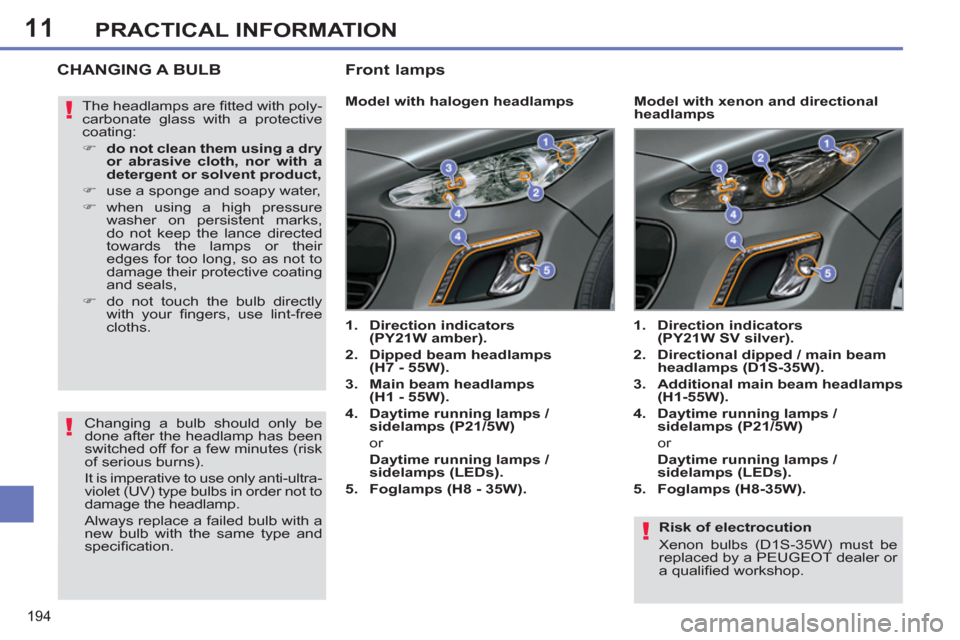
Model with halogen headlamps
1.
Direction indicators
(PY21W amber).
2.
Dipped beam headlamps
(H7 - 55W).
3.
Main beam headlamps
(H1 - 55W).
4.
Daytime running lamps /
sidelamps (P21/5W)
or
Daytime running lamps /
sidelamps (LEDs).
5.
Foglamps (H8 - 35W).
1.
Direction indicators
(PY21W SV silver).
2.
Directional dipped / main beam
headlamps (D1S-35W).
3.
Additional main beam headlamps
(H1-55W).
4.
Daytime running lamps /
sidelamps
(P21/5W)
or
Daytime running lamps /
sidelamps (LEDs).
5.
Foglamps (H8-35W).
Model with xenon and directional
headlamps The headlamps are fi tted with poly-
carbonate glass with a protective
coating:
�)
do not clean them using a dry
or abrasive cloth, nor with a
detergent or solvent product,
�)
use a sponge and soapy water,
�)
when using a high pressure
washer on persistent marks,
do not keep the lance directed
towards the lamps or their
edges for too long, so as not to
damage their protective coating
and seals,
�)
do not touch the bulb directly
with your fi
ngers, use lint-free
cloths.
Changing a bulb should only be
done after the headlamp has been
switched off for a few minutes (risk
of serious burns).
It is imperative to use only anti-ultra-
violet (UV) type bulbs in order not to
damage the headlamp.
Always replace a failed bulb with a
new bulb with the same type and
specifi cation.
Front lamps
Page 201 of 382
11
199
PRACTICAL INFORMATION
Rear lamps
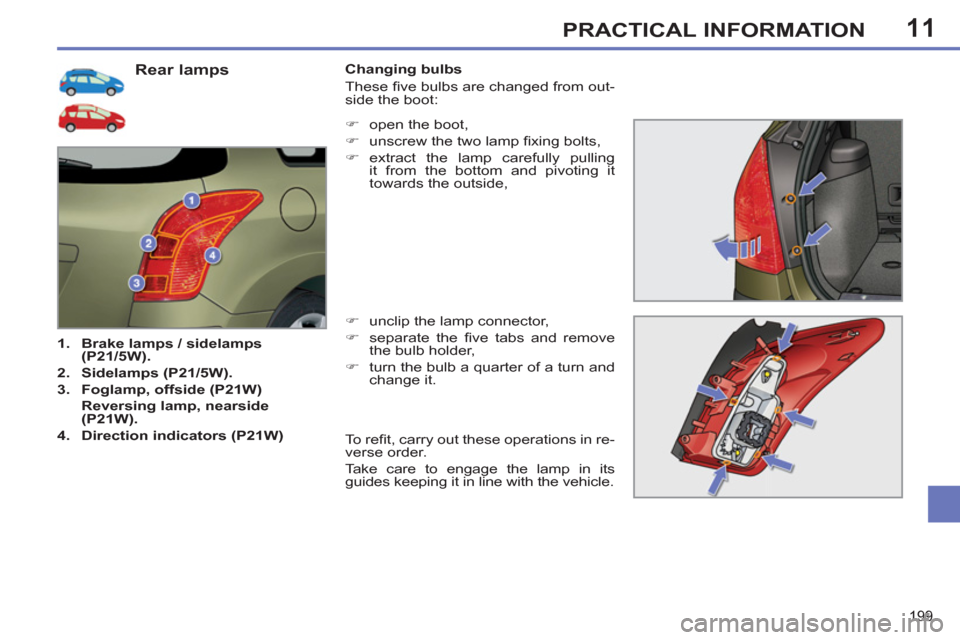
1.
Brake lamps / sidelamps
(P21/5W).
2.
Sidelamps (P21/5W).
3.
Foglamp, offside (P21W)
Reversing lamp, nearside
(P21W).
4.
Direction indicators (P21W)
Changing bulbs
These fi ve bulbs are changed from out-
side the boot:
�)
unclip the lamp connector,
�)
separate the fi ve tabs and remove
the bulb holder,
�)
turn the bulb a quarter of a turn and
change it.
�)
open the boot,
�)
unscrew the two lamp fi xing bolts,
�)
extract the lamp carefully pulling
it from the bottom and pivoting it
towards the outside,
To r efi t, carry out these operations in re-
verse order.
Take care to engage the lamp in its
guides keeping it in line with the vehicle.
Page 213 of 382
11
211
PRACTICAL INFORMATION
TOWING THE VEHICLE
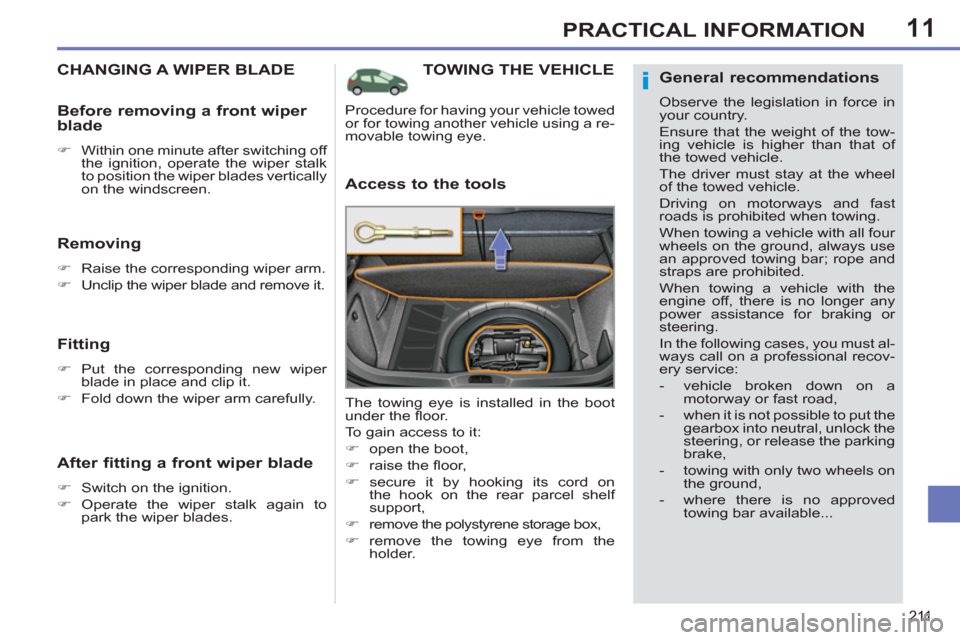
Access to the tools
The towing eye is installed in the boot
under the fl oor.
To gain access to it:
�)
open the boot,
�)
raise the fl oor,
�)
secure it by hooking its cord on
the hook on the rear parcel shelf
support,
�)
remove the polystyrene storage box,
�)
remove the towing eye from the
holder.
Procedure for having your vehicle towed
or for towing another vehicle using a re-
movable towing eye.
CHANGING A WIPER BLADE
Removing
�)
Raise the corresponding wiper arm.
�)
Unclip the wiper blade and remove it.
Fitting
�)
Put the corresponding new wiper
blade in place and clip it.
�)
Fold down the wiper arm carefully.
Before removing a front wiper
blade
�)
Within one minute after switching off
the ignition, operate the wiper stalk
to position the wiper blades vertically
on the windscreen.
After fitting a front wiper blade
�)
Switch on the ignition.
�)
Operate the wiper stalk again to
park the wiper blades.
General recommendations
Observe the legislation in force in
your country.
Ensure that the weight of the tow-
ing vehicle is higher than that of
the towed vehicle.
The driver must stay at the wheel
of the towed vehicle.
Driving on motorways and fast
roads is prohibited when towing.
When towing a vehicle with all four
wheels on the ground, always use
an approved towing bar; rope and
straps are prohibited.
When towing a vehicle with the
engine off, there is no longer any
power assistance for braking or
steering.
In the following cases, you must al-
ways call on a professional recov-
ery service:
- vehicle broken down on a
motorway or fast road,
- when it is not possible to put the
gearbox into neutral, unlock the
steering, or release the parking
brake,
- towing with only two wheels on
the ground,
- where there is no approved
towing bar available...
Page 214 of 382

11PRACTICAL INFORMATION
Towing your vehicle
�)
On the front bumper, unclip the
cover by pressing at the bottom.
�)
Screw the towing eye in fully.
�)
Install the towing bar.
�)
Place the gear lever in neutral
(position N
on the electronic gearbox
system or automatic gearbox).
�)
On the rear bumper, unclip the cover
by pressing at the bottom.
�)
Screw the towing eye in fully.
�)
Install the towing bar.
�)
Switch on the hazard warning lamps
on both vehicles.
�)
Move off gently and drive slowly for
a short distance only.
Towing another vehicle
Failure to observe this instruction
could result in damage to certain
components (braking, transmis-
sion...) and the absence of braking
assistance the next time the engine
is started.
�)
Unlock the steering by turning the
ignition key one notch and release
the parking brake.
�)
Switch on the hazard warning lamps
on both vehicles.
�)
Move off gently and drive slowly for
a short distance only.