2012.5 Peugeot 308 SW BL light
[x] Cancel search: lightPage 25 of 382

23
ECO-DRIVING
Eco-driving is a range of everyday practices that allow the motorist to optimise their fuel consumption and
CO
2 emissions.
Optimise the use of your
gearbox
With a manual gearbox, move off
gently, change up without waiting and
drive by changing up quite soon. If
your vehicle has the system, the gear
shift indicator invites you to change up;
it is displayed in the instrument panel,
follow its instructions.
With an automatic or electronic
gearbox, stay in Drive "D"
or Auto
"A"
, according to the type of gearbox,
without pressing the accelerator pedal
heavily or suddenly.
Drive smoothly
Maintain a safe distance between
vehicles, use engine braking rather
than the brake pedal, and press the
accelerator progressively. These
practices contribute towards a
reduction in fuel consumption and
CO
2 emissions and also helps reduce
the background traffi c noise.
If your vehicle has cruise control, make
use of the system at speeds above
25 mph (40 km/h) when the traffi c is
fl owing well.
Control the use of your
electrical equipment
Before moving off, if the passenger
compartment is too warm, ventilate it
by opening the windows and air vents
before using the air conditioning.
Above 30 mph (50 km/h), close the
windows and leave the air vents open.
Remember to make use of equipment
that can help keep the temperature
in the passenger compartment down
(sunroof and window blinds...).
Switch off the air conditioning, unless it
has automatic digital regulation, as soon
as the desired temperature is attained.
Switch off the demisting and defrosting
controls, if not automatic.
Switch off the heated seat as soon as
possible.
Switch off the headlamps and front
foglamps when the level of light does
not require their use.
Avoid running the engine before
moving off, particularly in winter; your
vehicle will warm up much faster while
driving.
As a passenger, if you avoid connecting
your multimedia devices (fi lm, music,
video game...), you will contribute
towards limiting the consumption of
electrical energy, and so of fuel.
Disconnect your portable devices
before leaving the vehicle.
Page 27 of 382
1
25
INSTRUMENTS and CONTROLS
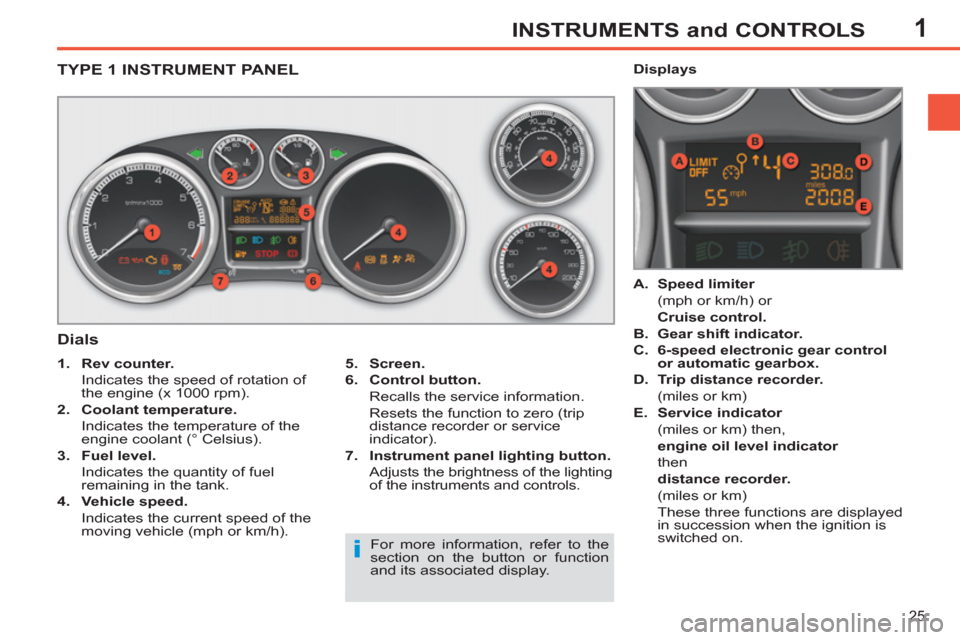
TYPE 1 INSTRUMENT PANEL
Dials
5.
Screen.
6.
Control button.
Recalls the service information.
Resets the function to zero (trip
distance recorder or service
indicator).
7.
Instrument panel lighting button.
Adjusts the brightness of the lighting
of the instruments and controls.
1.
Rev counter.
Indicates the speed of rotation of
the engine (x 1000 rpm).
2.
Coolant temperature.
Indicates the temperature of the
engine coolant (° Celsius).
3.
Fuel level.
Indicates the quantity of fuel
remaining in the tank.
4.
Vehicle speed.
Indicates the current speed of the
moving vehicle (mph or km/h).
A.
Speed limiter
(mph or km/h) or
Cruise control.
B.
Gear shift indicator.
C.
6-speed electronic gear control
or automatic gearbox.
D.
Trip distance recorder.
(miles or km)
E.
Service indicator
(miles or km) then,
engine oil level indicator
then
distance recorder.
(miles or km)
These three functions are displayed
in succession when the ignition is
switched on.
Displays
For more information, refer to the
section on the button or function
and its associated display.
Page 28 of 382
1INSTRUMENTS and CONTROLS
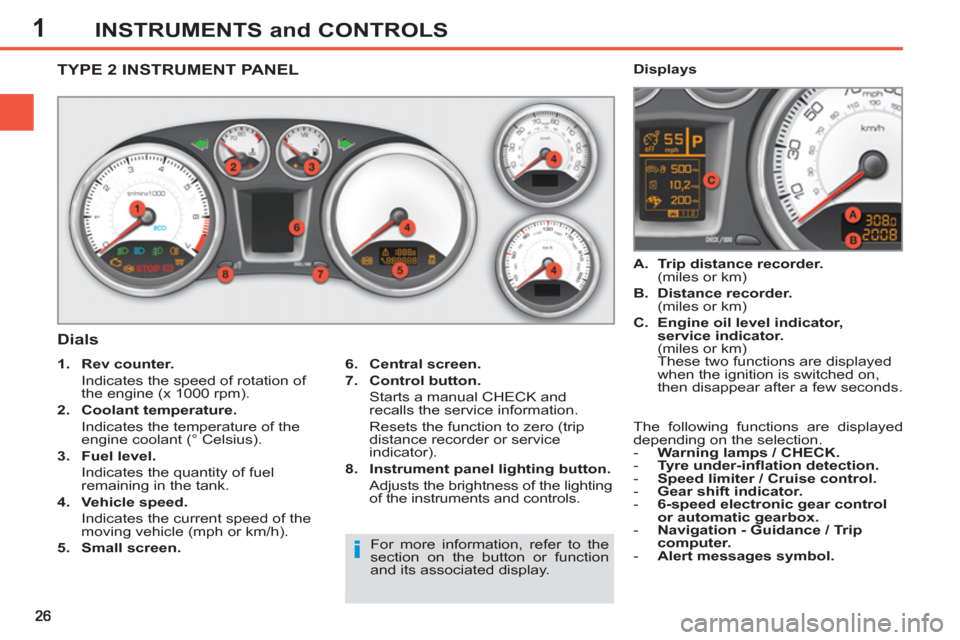
TYPE 2 INSTRUMENT PANEL
Dials
6.
Central screen.
7.
Control button.
Starts a manual CHECK and
recalls the service information.
Resets the function to zero (trip
distance recorder or service
indicator).
8.
Instrument panel lighting button.
Adjusts the brightness of the lighting
of the instruments and controls.
1.
Rev counter.
Indicates the speed of rotation of
the engine (x 1000 rpm).
2.
Coolant temperature.
Indicates the temperature of the
engine coolant (° Celsius).
3.
Fuel level.
Indicates the quantity of fuel
remaining in the tank.
4.
Vehicle speed.
Indicates the current speed of the
moving vehicle (mph or km/h).
5.
Small screen.
A.
Trip distance recorder.
(miles or km)
B.
Distance recorder.
(miles or km)
C.
Engine oil level indicator,
service indicator.
(miles or km)
These two functions are displayed
when the ignition is switched on,
then disappear after a few seconds.
Displays
For more information, refer to the
section on the button or function
and its associated display. The following functions are displayed
depending on the selection.
- Warning lamps / CHECK.
- Tyre under-infl ation detection.
- Speed limiter / Cruise control.
- Gear shift indicator.
- 6-speed electronic gear control
or automatic gearbox.
- Navigation - Guidance / Trip
computer.
- Alert messages symbol.
Page 29 of 382
1INSTRUMENTS and CONTROLS
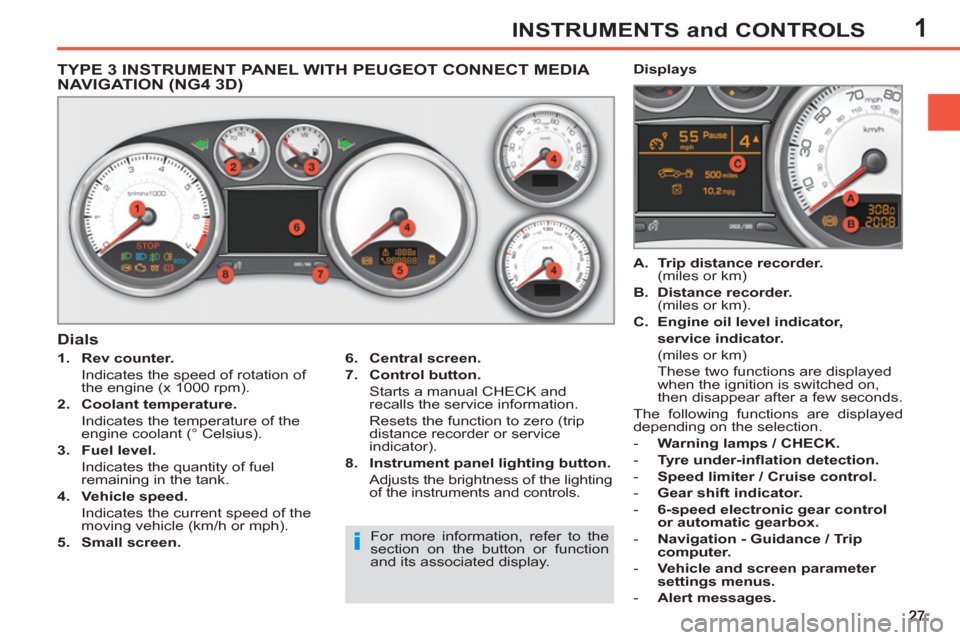
TYPE 3 INSTRUMENT PANEL WITH PEUGEOT CONNECT MEDIA
NAVIGATION (NG4 3D)
1.
Rev counter.
Indicates the speed of rotation of
the engine (x 1000 rpm).
2.
Coolant temperature.
Indicates the temperature of the
engine coolant (° Celsius).
3.
Fuel level.
Indicates the quantity of fuel
remaining in the tank.
4.
Vehicle speed.
Indicates the current speed of the
moving vehicle (km/h or mph).
5.
Small screen.
A.
Trip distance recorder.
(miles or km)
B.
Distance recorder.
(miles or km).
C.
Engine oil level indicator,
service indicator.
(miles or km)
These two functions are displayed
when the ignition is switched on,
then disappear after a few seconds.
The following functions are displayed
depending on the selection.
- Warning lamps / CHECK.
- Tyre under-infl ation detection.
- Speed limiter / Cruise control.
- Gear shift indicator.
- 6-speed electronic gear control
or automatic gearbox.
- Navigation - Guidance / Trip
computer.
- Vehicle and screen parameter
settings menus.
- Alert messages.
Dials
Displays
6.
Central screen.
7.
Control button.
Starts a manual CHECK and
recalls the service information.
Resets the function to zero (trip
distance recorder or service
indicator).
8.
Instrument panel lighting button.
Adjusts the brightness of the lighting
of the instruments and controls.
For more information, refer to the
section on the button or function
and its associated display.
Page 30 of 382
1INSTRUMENTS and CONTROLS
*
According to country.
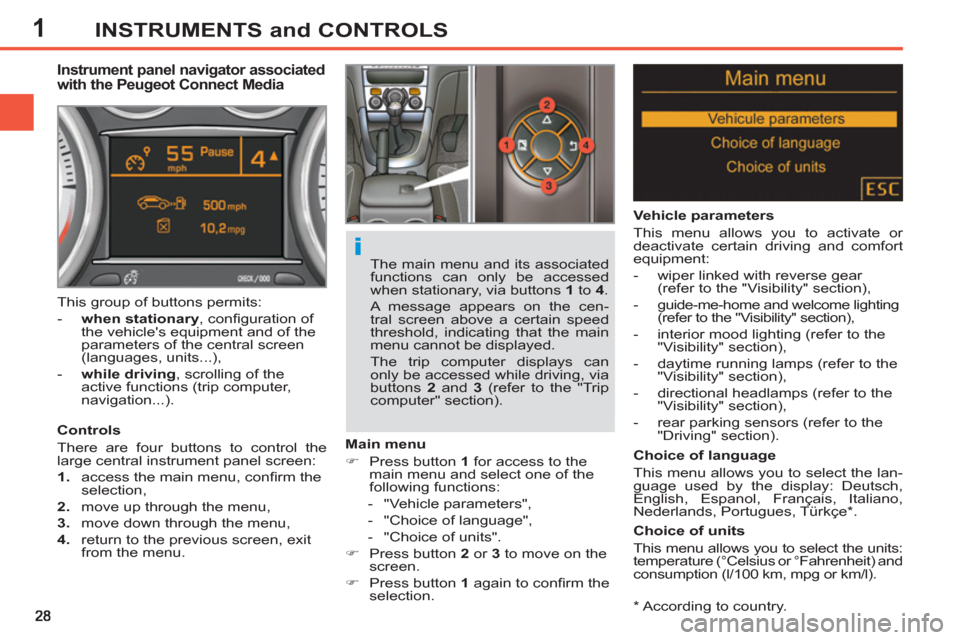
Instrument panel navigator associated
with the Peugeot Connect Media
Controls
There are four buttons to control the
large central instrument panel screen:
1.
access the main menu, confi rm the
selection,
2.
move up through the menu,
3.
move down through the menu,
4.
return to the previous screen, exit
from the menu.
Main menu
�)
Press button 1
for access to the
main menu and select one of the
following functions:
- "Vehicle parameters",
- "Choice of language",
- "Choice of units".
�)
Press button 2
or 3
to move on the
screen.
�)
Press button 1
again to confi rm the
selection.
The main menu and its associated
functions can only be accessed
when stationary, via buttons 1
to 4
.
A message appears on the cen-
tral screen above a certain speed
threshold, indicating that the main
menu cannot be displayed.
The trip computer displays can
only be accessed while driving, via
buttons 2
and 3
(refer to the "Trip
computer" section). This group of buttons permits:
- when stationary
, confi guration of
the vehicle's equipment and of the
parameters of the central screen
(languages, units...),
- while driving
, scrolling of the
active functions (trip computer,
navigation...).
Vehicle parameters
This menu allows you to activate or
deactivate certain driving and comfort
equipment:
- wiper linked with reverse gear
(refer to the "Visibility" section),
- guide-me-home and welcome lighting
(refer to the "Visibility" section),
- interior mood lighting (refer to the
"Visibility" section),
- daytime running lamps (refer to the
"Visibility" section),
- directional headlamps (refer to the
"Visibility" section),
- rear parking sensors (refer to the
"Driving" section).
Choice of language
This menu allows you to select the lan-
guage used by the display: Deutsch,
English, Espanol, Français, Italiano,
Nederlands, Portugues, Türkçe * .
Choice of units
This menu allows you to select the units:
temperature (°Celsius or °Fahrenheit) and
consumption (l/100 km, mpg or km/l).
Page 37 of 382
1INSTRUMENTS and CONTROLS
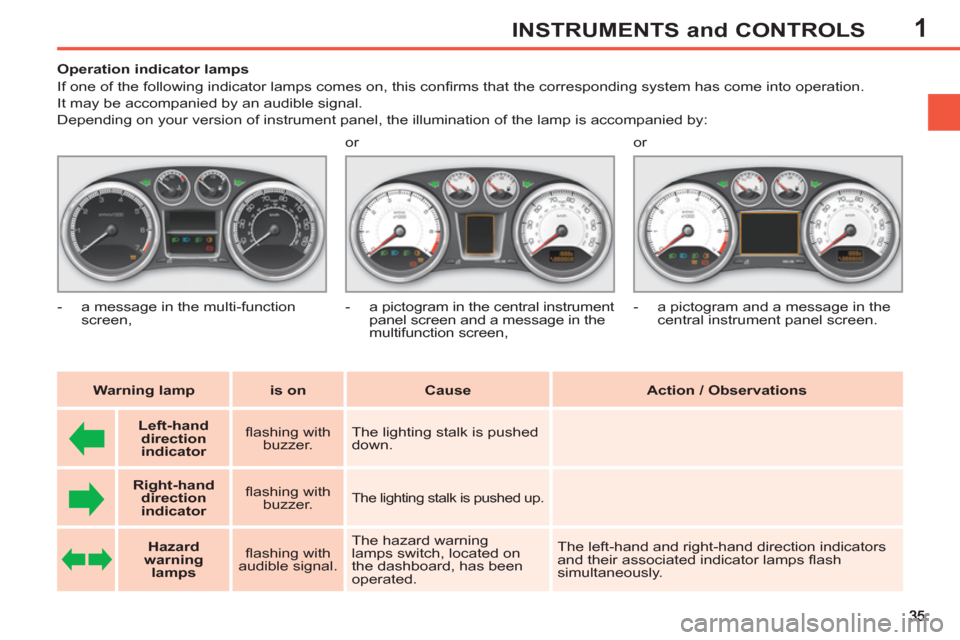
Operation indicator lamps
If one of the following indicator lamps comes on, this confi rms that the corresponding system has come into operation.
It may be accompanied by an audible signal.
Depending on your version of instrument panel, the illumination of the lamp is accompanied by:
Warning lamp
is on
Cause
Action / Observations
Left-hand
direction
indicato
r
fl ashing with
buzzer. The lighting stalk is pushed
down.
Right-hand
direction
indicator
fl ashing with
buzzer.
The lighting stalk is pushed up.
Hazard
warning
lamps
fl ashing with
audible signal. The hazard warning
lamps switch, located on
the dashboard, has been
operated. The left-hand and right-hand direction indicators
and their associated indicator lamps fl ash
simultaneously.
- a message in the multi-function
screen, or
- a pictogram in the central instrument
panel screen and a message in the
multifunction screen, or
- a pictogram and a message in the
central instrument panel screen.
Page 38 of 382

1
36
INSTRUMENTS and CONTROLS
Warning lamp
is on
Cause
Action / Observations
Front
foglamps
fi xed. The front foglamps are
switched on. Turn the ring on the stalk rearwards twice to
switch off the front foglamps.
Rear
foglamps
fi xed. The rear foglamps are
switched on. Turn the ring on the stalk rearwards to switch off
the rear foglamps.
Diesel engine
pre-heating
fi xed. The ignition switch is at the
2nd position (ignition on).
Wait until the warning lamp has switched off before starting.
The duration for which the warning lamp is on is
determined by the climatic conditions.
Parking brake
fi xed. The parking brake is applied
or not properly released. Release the parking brake to switch off the
warning lamp, keeping your foot on the brake
pedal.
Observe the safety recommendations.
For further information on the parking brake, refer
to the "Driving" section.
Dipped beam
headlamps
fi xed. The lighting stalk is in the
"Dipped beam headlamps"
position or in the "AUTO"
position in conditions of low
light.
Main beam
headlamps
fi xed. The lighting stalk is pulled
towards you. Pull the stalk again to return to dipped beam
headlamps.
Page 39 of 382

1
37
INSTRUMENTS and CONTROLS
Stop & Start
fi xed. When the vehicle stops (red
lights, traffi c jams, ...) the
Stop & Start system has
put the engine into STOP
mode. The warning lamp goes off and the engine
restarts automatically in START mode, as soon
as you want to move off.
fl ashes for a
few seconds,
then goes off. STOP mode is temporarily
unavailable.
or
START mode is invoked
automatically. Refer to "Driving - § Stop & Start" for special
cases with STOP mode and START mode.
Warning lamp
is on
Cause
Action / Observations
Passenger's
front airbag
fi xed on the
seat belt and
passenger's
front airbag
warning lamps
display. The control switch, located
on the passenger's side of
the dashboard, has been
placed in the "ON"
position.
The passenger's front
airbag is activated.
In this case, do not install a
"rear facing" child seat. While you do not have a rear-facing child
seat fi tted to the front passenger seat, it is
recommended that the passenger's front airbag
be activated.
On the other hand, before fi tting a rear-facing
child seat, you must turn the control switch to the
"OFF"
position.