2011 YAMAHA YZ450F oil pressure bolt
[x] Cancel search: oil pressure boltPage 23 of 230
1-13
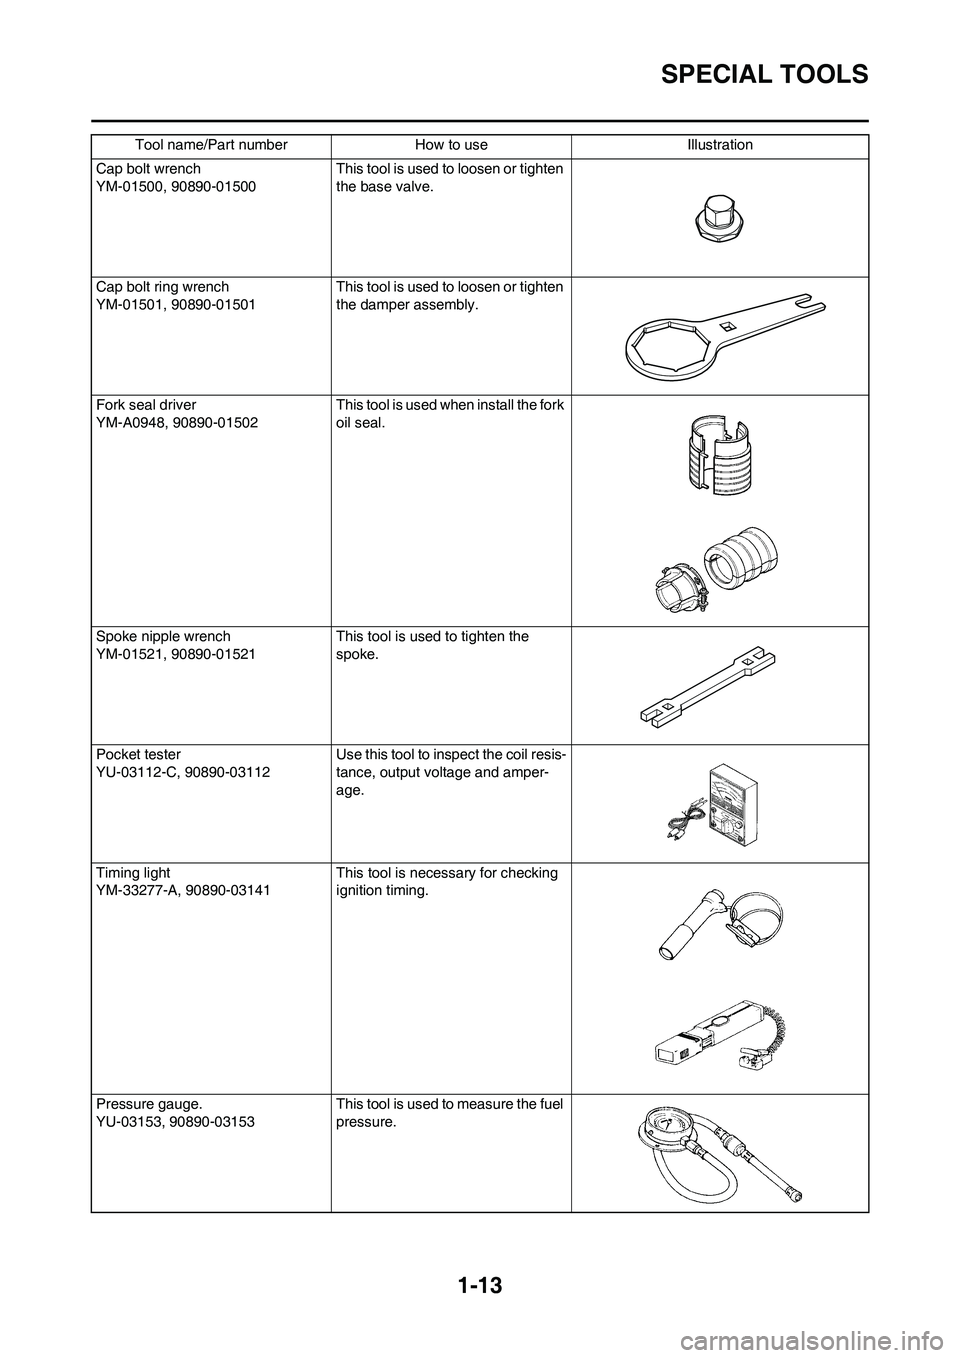
SPECIAL TOOLS
Cap bolt wrench
YM-01500, 90890-01500This tool is used to loosen or tighten
the base valve.
Cap bolt ring wrench
YM-01501, 90890-01501This tool is used to loosen or tighten
the damper assembly.
Fork seal driver
YM-A0948, 90890-01502 This tool is used when install the fork
oil seal.
Spoke nipple wrench
YM-01521, 90890-01521 This tool is used to tighten the
spoke.
Pocket tester
YU-03112-C, 90890-03112 Use this tool to inspect the coil resis-
tance, output voltage and amper-
age.
Timing light
YM-33277-A, 90890-03141 This tool is necessary for checking
ignition timing.
Pressure gauge.
YU-03153, 90890-03153 This tool is used to measure the fuel
pressure. Tool name/Part number How to use Illustration
Page 41 of 230

2-11
TIGHTENING TORQUES
TIGHTENING TORQUES
ENGINE
△- marked portion shall be checked for torque tightening after break-in or before each race.
Part to be tightened Thread size Q'tyTightening torque
Nm m•kg ft•lb
Spark plug M10S × 1.0 1 13 1.3 9.4
Camshaft cap M6 × 1.0 8 10 1.0 7.2
Cylinder head blind plug screw M12 × 1.0 2 28 2.8 20
Oil passage plug M8 × 1.25 1 15 1.5 11
Cylinder head (stud bolt) M6 × 1.0 3 7 0.7 5.1
Cylinder head (bolt) M10 × 1.25 4 Refer to TIP.
*1
Cylinder head (bolt) M6 × 1.0 2 10 1.0 7.2
Cylinder head cover M6 × 1.0 3 10 1.0 7.2
Cylinder M6 × 1.0 1 10 1.0 7.2
Timing chain tensioner M6 × 1.0 2 10 1.0 7.2
Timing chain tensioner cap bolt M6 × 1.0 1 7 0.7 5.1
Timing chain guide stopper plate (exhaust side) M6 × 1.0 2 10 1.0 7.2
Exhaust pipe (nut) M6 × 1.0 3 10 1.0 7.2
Exhaust pipe and frame M8 × 1.25 1 20 2.0 14
△Silencer M8 × 1.25 2 30 3.0 22
Silencer clamp (front) M8 × 1.25 1 12 1.2 8.7
Silencer clamp (rear) M8 × 1.25 1 16 1.6 11
Starter knob/Idle screw M12 × 1.0 1 2 0.2 1.4
Throttle body joint M6 × 1.0 2 10 1.0 7.2
Throttle body joint clamp M5 × 0.8 1 3 0.3 2.2
△Air filter case M6 × 1.0 3 7 0.7 5.1
Air filter case cover M5 × 0.8 2 5 0.5 3.6
Air filter joint clamp M4 × 0.7 1 4 0.4 2.2
Throttle cable adjust bolt and locknut M6 × 0.75 1 4 0.4 2.9
Throttle cable (pull) M10 × 1.25 1 7 0.7 5.1
Throttle cable (return) M10 × 1.25 1 7 0.7 5.1
Throttle cable cover M5 × 0.8 2 4 0.4 2.9
Air duct M6 × 1.0 3 7 0.7 5.1
Radiator M6 × 1.0 4 10 1.0 7.2
Radiator hose clamp M6 × 1.0 8 2 0.2 1.4
Radiator pipe 1 M6 × 1.0 1 10 1.0 7.2
Radiator pipe 2 M6 × 1.0 1 10 1.0 7.2
Impeller M8 × 1.25 1 14 1.4 10
Water pump housing cover M6 × 1.0 4 10 1.0 7.2
Coolant drain bolt M6 × 1.0 1 10 1.0 7.2
Oil pump cover M4 × 0.7 1 2 0.2 1.4
Oil pump M6 × 1.0 2 10 1.0 7.2
Oil pump drive gear shaft M6 × 1.0 1 10 1.0 7.2
Oil filter element cover M6 × 1.0 2 10 1.0 7.2
Oil pressure check bolt M6 × 1.0 2 10 1.0 7.2
Page 53 of 230

2-23
CABLE ROUTING DIAGRAM
1. Tension pipe
2. Coolant temperature sensor
coupler
3. Front engine bracket
4. Fuel pump coupler
5. Fuel pump
6. Intake air temperature sensor
coupler
7. Radiator hose 2
8. Radiator breather hose
9. Radiator hose 1
10. Radiator hose 4
11. Radiator pipe 2
12. Radiator hose 3
13. Cylinder head breather hose
14. Frame
15. ECU (electronic control unit)
16. ECU bracket
17. Main harness
18. AC magneto lead
19. Throttle position sensor lead
20. Condenser lead
21. Coolant temperature sensor
lead
22. Ignition coil lead
23. CondenserA. Fasten the wire harness at the
positioning tape to the ECU
bracket with a plastic locking tie.
Face the buckle of the plastic
locking tie downward, and then
cut off the excess end of the tie.
B. Install the cover onto the wire
harness coupler.
C. Route the condenser lead, throt-
tle position sensor lead, coolant
temperature sensor lead, igni-
tion coil lead, and AC magneto
lead under radiator hose 2.
D. Connect the vacuum hose to the
atmospheric pressure sensor,
and then fasten the hose with
the clamp. Make sure to face the
moving part of the sensor rear-
ward.
E. After connecting the condenser
coupler, install the coupler cover
onto the coupler.
F. After connecting the throttle po-
sition sensor coupler, install the
coupler cover onto the coupler.
G. Fasten the AC magneto lead,
condenser lead, throttle position
sensor lead, coolant tempera-
ture sensor lead, and ignition
coil lead to the frame with the
plastic band, making sure to po-
sition the band between the igni-
tion coil bracket and the tension
pipe. Face the buckle of the
plastic band to the right with the
end pointing rearward.
H. Point the end of the vacuum
hose rearward.
I. Fit the bracket into the hole in
the rubber portion of the con-
denser.
J. Fasten the radiator breather
hose to the frame with the plas-
tic band, making sure to position
the band above the front engine
bracket. Face the buckle of the
plastic band outward with the
end pointing rearward.
K. After connecting the coolant
temperature sensor coupler, in-
stall the coupler cover onto the
coupler.L. Route the radiator breather hose
between the down tubes.
M. Fasten the fuel hose and fuel
pump lead with the plastic band,
making sure to position the band
between the bend in the fuel
hose protector and the end of
the protector. Point the end of
the plastic band upward.
N. Insert the projection on the joint
coupler into the hole in the
bracket, and then install the cou-
pler cover onto the coupler.
O. Route the atmospheric pressure
sensor lead, intake air pressure
sensor lead, intake air tempera-
ture sensor lead, fuel injector
lead, and fuel pump lead above
radiator hose 2. Position the
joint coupler above radiator
hose 2.
P. Route the radiator breather hose
to the inside of radiator hose 1
and the front engine bracket.
Q. Hose installation position
(1.3–3.3 mm, 0.05–0.13 in)
R. Clip installation position (0–2.0
mm, 0–0.08 in)
S. Install the washer so that it con-
tacts the bolt head.
T. Install the collar so that the
flange on the collar contacts the
ECU bracket.
Page 60 of 230

3-4
MAINTENANCE INTERVALS
SWINGARM
Inspect, lube and retighten●●Molybdenum disulfide grease
RELAY ARM, CONNECTING
ROD
Inspect, lube and retighten●●Molybdenum disulfide grease
STEERING HEAD
Inspect free play and retighten●●
Clean and lube●Lithium base grease
Replace bearing●
TIRE, WHEELS
Inspect air pressure, wheel run-
out, tire wear and spoke loose-
ness●●
Retighten sprocket bolt●●
Inspect bearings●
Replace bearings●
Lubricate●Lithium base grease
THROTTLE, CONTROL CABLE
Check routing and connection●●Yamaha cable lube or SAE 10W-40
motor oil
Lubricate●● ItemAfter
break-
inEvery
race
(about
2.5
hours)
Every
third
(about
7.5
hours)Every
fifth
(about
12.5
hours)
As re-
quiredRemarks
Page 61 of 230

3-5
PRE-OPERATION INSPECTION AND MAINTENANCE
PRE-OPERATION INSPECTION AND MAINTENANCE
Before riding for break-in operation, practice or a race, make sure the machine is in good operating condition.
Before using this machine, check the following points.
GENERAL INSPECTION AND MAINTENANCE
Item Routine Page
CoolantCheck that coolant is filled up to the radiator cap. Check the cool-
ing system for leakage.P.3-6 – 7
FuelCheck that a fresh gasoline is filled in the fuel tank. Check the fuel
line for leakage.P.1-17
Engine oilCheck that the oil level is correct. Check the crankcase and oil line
for leakage.P.3-9 – 10
Gear shifter and clutchCheck that gears can be shifted correctly in order and that the
clutch operates smoothly.P.3-7
Throttle grip/HousingCheck that the throttle grip operation and free play are correctly
adjusted. Lubricate the throttle grip and housing, if necessary.P.3-8
Brakes Check the play of front brake and effect of front and rear brake. P.3-14 – 17
Drive chainCheck drive chain slack and alignment. Check that the drive chain
is lubricated properly.P.3-17 –18
WheelsCheck for excessive wear and tire pressure. Check for loose
spokes and have no excessive play.P.3-21
SteeringCheck that the handlebar can be turned smoothly and have no ex-
cessive play.P.3-21 – 22
Front forks and rear shock
absorberCheck that they operate smoothly and there is no oil leakage.
P.3-18 – 20
Cables (wires)Check that the clutch and throttle cables move smoothly. Check
that they are not caught when the handlebars are turned or when
the front forks travel up and down.—
Exhaust pipe Check that the exhaust pipe is tightly mounted and has no cracks. P.4-3 – 6
Rear wheel sprocket Check that the rear wheel sprocket tightening bolt is not loose. P.3-17
Lubrication Check for smooth operation. Lubricate if necessary. P.3-23
Bolts and nuts Check the chassis and engine for loose bolts and nuts. P.1-19
Lead connectorsCheck that the AC magneto, ECU and ignition coil are connected
tightly.P.1-10 – 11
SettingsIs the machine set suitably for the condition of the racing course
and weather or by taking into account the results of test runs be-
fore racing? Are inspection and maintenance completely done?P.8-1 – 5
Page 62 of 230

3-6
ENGINE
ENGINE
CHECKING THE COOLANT LEVEL
Do not remove the radiator cap
"1", drain bolt and hoses when the
engine and radiator are hot. Scald-
ing hot fluid and steam may be
blown out under pressure, which
could cause serious injury. When
the engine has cooled, place a
thick towel over the radiator cap,
slowly rotate the cap counter-
clockwise to the detent. This pro-
cedure allows any residual
pressure to escape. When the
hissing sound has stopped, press
down on the cap while turning
counterclockwise and remove it.
Hard water or salt water is harmful
to the engine parts. You may use
distilled water, if you can't get soft
water.
1. Place the machine on a level
place, and hold it in an upright po-
sition.
2. Remove:
• Radiator cap
3. Check:
• Coolant level "a"
Coolant level low→Add coolant.
1. RadiatorCHANGING THE COOLANT
Do not remove the radiator cap
when the engine is hot.
Take care so that coolant does not
splash on painted surfaces. If it
splashes, wash it away with water.
1. Place a container under the en-
gine.
2. Remove:
• Coolant drain bolt "1"
3. Remove:
• Radiator cap
Drain the coolant completely.
4. Clean:
• Cooling system
Thoroughly flush the cooling sys-
tem with clean tap water.
5. Install:
• Copper washer
• Coolant drain bolt
6. Fill:
• Radiator
•Engine
To specified level.
• Do not mix more than one type of
ethylene glycol antifreeze con-
taining corrosion inhibitors for
aluminum engine.
• Do not use water containing im-
purities or oil.
Handling notes of coolant:
The coolant is harmful so it should be
handled with special care.
• When coolant splashes to your
eye.
Thoroughly wash your eye with
water and see your doctor.
• When coolant splashes to your
clothes.
Quickly wash it away with water
and then with soap.
• When coolant is swallowed.
Quickly make him vomit and take
him to a doctor.
7. Install:
• Radiator cap
Start the engine and warm it up
for a several minutes.
8. Check:
• Coolant level
Coolant level low→Add coolant.
CHECKING THE RADIATOR CAP
1. Inspect:
• Seal (radiator cap) "1"
• Valve and valve seat "2"
Crack/damage→Replace.
Exist fur deposits "3" →Clean or
replace.
Coolant drain bolt:
10 Nm (1.0 m•kg, 7.2
ft•lb)
Recommended coolant:
High quality ethylene
glycol anti-freeze con-
taining anti-corrosion
for aluminum engine
Coolant "1" and water
(soft water) "2" mixing ra-
tio:
50%/50%
Coolant capacity:
1.13 L (0.99 Imp qt, 1.19
US qt)
Page 66 of 230

3-10
ENGINE
CHANGING THE ENGINE OIL
1. Start the engine and let it warm up for several minutes.
2. Stop the engine and place an oil pan under the drain bolt.
3. Remove: • Oil filler cap "1"
• Drain bolt (with gasket) "2"
• Drain bolt (with gasket) "3"Drain the engine oil.
4. If the oil filter is to be replaced dur- ing this oil change, remove the fol-
lowing parts and reinstall them.
Replacement steps:
a. Remove the oil filter element cov-er "1" and oil filter element "2".
b. Check the O-rings "3", if cracked or damaged, replace them with a
new one.
c. Install the oil filter element and oil filter element cover.
5. Install:• Gaskets
• Oil drain bolt (oil pan)
• Oil drain bolt (oil tank)
6. Fill: • Engine oil
7. Install: • Oil filler cap
8. Inspect:
• Engine (for oil leaks)
• Oil level CHECKING THE OIL PRESSURE
1. Check:
• Oil pressure
Checking steps:
a. Slightly loosen the oil pressure check bolt "1".
b. Start the engine and keep it idling until oil starts to seep from the oil
pressure check bolt. If no oil
comes out after one minute, turn
the engine off so it will not seize.
c. Check oil passages and oil pump
for damage or leakage.
d. Start the engine after solving the problem(s) and recheck the oil
pressure.
e. Tighten the oil pressure check bolt.
ADJUSTING THE ENGINE IDLING
SPEED
• Because the air pressure is lower at
high altitudes, the air-fuel mixture
will become richer. If the engine
idling speed is low, turn the starter
(choke) knob/idling screw a few
clicks counterclockwise to increase
the idling speed.
• Before adjusting the engine idling speed, make sure that the com-
pression pressure is within specifi-
cation and that the air filter element
is not clogged.
• Adjust the engine idling speed with
the starter (choke) knob/idling
screw pushed in completely.
1. Start the engine and warm it up until the engine oil has reached
the specified temperature.
2. Use a temperature probe tester "1" and contact it to the drain bolt
thread.
Recommended brand:
YAMALUBE
Recommended engine
oil type
SAE10W-30, SAE 10W-
40, SAE10W-50, SAE
15W-40, SAE 20W-40 or
SAE 20W-50
Recommended engine
oil grade
API service SG type or
higher, JASO standard
MA
Oil filter element cover:10 Nm (1.0 m•kg, 7.2
ft•lb)
Oil drain bolt (oil pan): 20 Nm (2.0 m•kg, 14
ft•lb)
Oil drain bolt (oil tank): 20 Nm (2.0 m•kg, 14
ft•lb)
Oil quantity: Periodic oil change:0.95 L (0.84 Imp qt,
1.00 US qt)
With oil filter replace-
ment: 1.0 L (0.88 Imp qt, 1.06
US qt)
Total amount: 1.2 L (1.06 Imp qt, 1.27
US qt)
Oil pressure check bolt:
10 Nm (1.0 m•kg, 7.2
ft•lb)
Oil temperature: 55.0–65.0 °C
(131–149°F)
Page 111 of 230

4-30
CLUTCH
INSTALLING THE CLUTCH
1. Install:
• Primary driven gear "1"
• Thrust washer "2"
• Clutch boss "3"
Apply the engine oil on the primary
driven gear inner circumference.
2. Install:
• Conical washer "1"
• Nut (clutch boss) "2"
Make sure to tighten to specifica-
tion; otherwise, it may damage the
other part that is fastened togeth-
er.
• Apply engine oil to the threads and
contact surface of the clutch boss
nut.
• Apply engine oil to the contact sur-
faces of the conical washer.
• Install the conical washer with its
convex surface "a" outward.
• Use the clutch holding tool "3" to
hold the clutch boss.
A. For USA and CDN
B. Except for USA and CDN3. Install:
• Friction plate "1"
• Clutch plate "2"
• Install the clutch plates and friction
plates alternately on the clutch
boss, starting with a friction plate
and ending with a friction plate.
• Apply the engine oil on the friction
plates and clutch plates.
4. Install:
•Bearing "1"
• Washer "2"
• Circlip "3"
To push rod 1 "4".
Apply the engine oil on the bearing
and washer.
5. Install:
• Push rod 2 "1"
• Ball "2"
• Push rod 1 "3"
Apply the engine oil on the push rod
1, 2 and ball.
6. Install:
• Pressure plate "1"7. Install:
• Clutch spring
• Bolt (clutch spring)
Tighten the bolts in stage, using a
crisscross pattern.
8. Install:
• O-ring (clutch cover) "1"
9. Install:
• Clutch cover "1"
• Bolt (clutch cover)
Tighten the bolts in stage, using a
crisscross pattern.
Nut (clutch boss):
75 Nm (7.5 m•kg, 54
ft•lb)
Clutch holding tool:
YM-91042/90890-04086
Bolt (clutch spring):
10 Nm (1.0 m•kg, 7.2
ft•lb)
Bolt (clutch cover):
10 Nm (1.0 m•kg, 7.2
ft•lb)