Page 91 of 138

8-11
8
TIPIf a torque wrench is not available when installing
the spark plug, a good estimate of the correct
torque is 1/4–1/2 turn past finger tight. However,
the spark plug should be tightened to the specified
torque as soon as possible.3. Install the spark plug cap.EBU2327DEngine oil and oil filter element The engine oil level should be checked before
each ride. In addition, the oil must be changed and
the oil filter element cleaned at the intervals speci-
fied in the periodic maintenance and lubrication
chart.
To check the engine oil level
1. Place the ATV on a level surface.
2. Check the engine oil level on a cold engine.
TIPIf the engine was started before checking the oil
level, be sure to warm up the engine sufficiently,
and then wait at least ten minutes until the oil set-
tles for an accurate reading.3. Remove the engine oil filler cap, and then
wipe the engine oil dipstick off with a clean
rag.
4. Insert the dipstick into the filler hole (without
screwing it in), and then remove it again to
check the oil level.TIPThe engine oil should be between the minimum
and maximum level marks.
Tightening torque:
Spark plug:
18 Nm (1.8 m·kgf, 13 ft·lbf)
U1BS61E0.book Page 11 Tuesday, April 13, 2010 10:25 AM
Page 98 of 138

8-18
8NOTICE: Make sure that the air filter ele-
ment is properly seated in the air filter
case. Never operate the engine with the air
filter element removed. This will allow un-
filtered air to enter the engine, causing rap-
id engine wear and possible engine
damage. Additionally, operation without
the air filter element will affect carburetor
jetting with subsequent poor performance
and possible engine overheating.
[ECB00461]
13. Install the seat.TIPThe air filter element should be cleaned every 20–
40 hours. It should be cleaned and lubricated more
often if the ATV is operated in extremely dusty ar-
eas. Each time the air filter element maintenance
is performed, check the air inlet of the air filter case
for obstructions. Check the air filter case rubber
joint to the carburetor fittings and the rubber joint
manifold fittings for an air-tight seal. Tighten all fit-
tings securely to avoid the possibility of unfiltered
air entering the engine.
EBU27702Cleaning the spark arrester Select a well-ventilated area free of combustible
materials and make sure the exhaust and muffler
are cool.
1. Remove the bolt.
2. Remove the tailpipe by pulling it out of the
muffler.
3. Tap the tailpipe lightly, and then use a wire
brush to remove any carbon deposits from the
spark arrester portion of the tailpipe and inside
of the tailpipe housing.1. Bolt
2. Tailpipe
1
2
U1BS61E0.book Page 18 Tuesday, April 13, 2010 10:25 AM
Page 99 of 138
8-19
8 4. Insert the tailpipe into the muffler and align the
bolt holes.
5. Install the bolt and tighten it to the specified
torque.
6. Remove the purging bolt and the gasket.7. Start the engine and rev it up approximately
twenty times while momentarily creating ex-
haust system back pressure by blocking the
end of the muffler with a shop towel.
8. Stop the engine and allow the exhaust pipe to
cool.
9. Check the gasket for damage, and replace it if
necessary.
10. Install the gasket and the purging bolt, and
then tighten the bolt to the specified torque.
1. Tailpipe
2. Spark arresterTightening torque:
Tailpipe bolt:
10 Nm (1.0 m·kgf, 7.2 ft·lbf)
1. Purging bolt
2. Gasket
12
U1BS61E0.book Page 19 Tuesday, April 13, 2010 10:25 AM
Page 100 of 138

8-20
8
WARNING
EWB02380Never run the engine in an enclosed area when
purging the spark arrester, otherwise it could
cause injury to the eyes, burns, carbon monox-
ide poisoning, possibly leading to death, and
start a fire.�Always let the exhaust system cool prior to
touching exhaust components.�Always wear eye protection, and make sure
no one is behind the ATV.�Make sure there are no combustible materi-
als in the area.EBU23940Adjusting the carburetor The carburetor should be checked and, if neces-
sary, adjusted at the intervals specified in the peri-
odic maintenance and lubrication chart. The
carburetor is an important part of the engine and
requires very sophisticated adjustment. Therefore,
most carburetor adjustments should be left to aYamaha dealer, who has the necessary profes-
sional knowledge and experience. The adjustment
described in the following section, however, may
be performed by the owner as part of routine main-
tenance.
NOTICEECB00480The carburetor has been set and extensively
tested at the Yamaha factory. Changing these
settings without sufficient technical knowl-
edge may result in poor performance of or
damage to the engine.EBU24000Adjusting the engine idling speed The engine idling speed must be checked and, if
necessary, adjusted as follows at the intervals
specified in the periodic maintenance and lubrica-
tion chart.TIPA diagnostic tachometer is needed to make this
adjustment.1. Start the engine and warm it up. Tightening torque:
Purging bolt:
27 Nm (2.7 m·kgf, 20 ft·lbf)
U1BS61E0.book Page 20 Tuesday, April 13, 2010 10:25 AM
Page 101 of 138
8-21
8
TIPThe engine is warm when it quickly responds to the
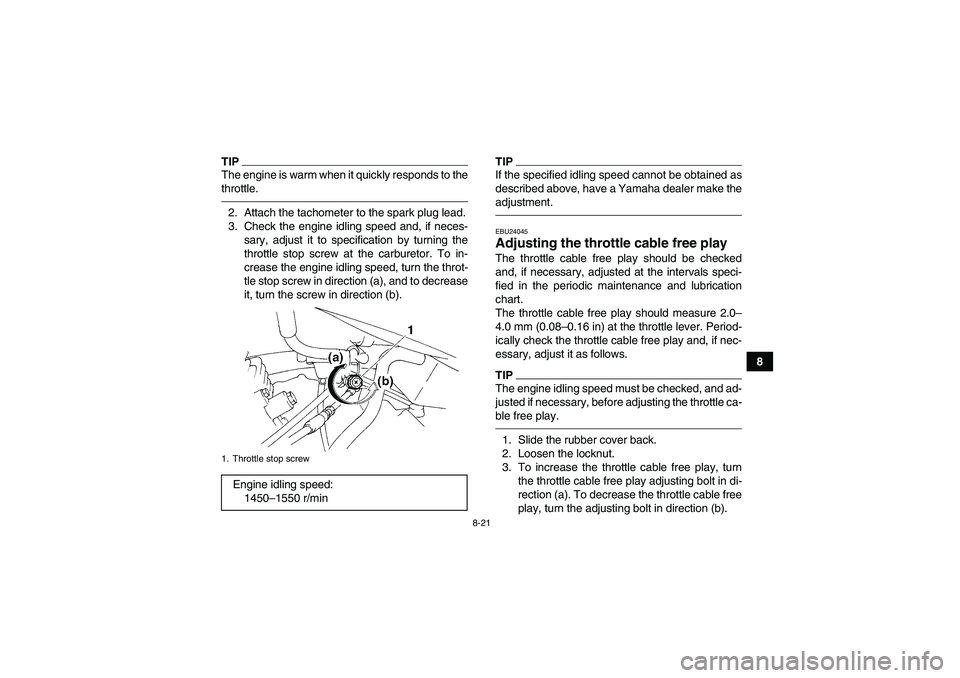
throttle.2. Attach the tachometer to the spark plug lead.
3. Check the engine idling speed and, if neces-
sary, adjust it to specification by turning the
throttle stop screw at the carburetor. To in-
crease the engine idling speed, turn the throt-
tle stop screw in direction (a), and to decrease
it, turn the screw in direction (b).
TIPIf the specified idling speed cannot be obtained as
described above, have a Yamaha dealer make the
adjustment.EBU24045Adjusting the throttle cable free play The throttle cable free play should be checked
and, if necessary, adjusted at the intervals speci-
fied in the periodic maintenance and lubrication
chart.
The throttle cable free play should measure 2.0–
4.0 mm (0.08–0.16 in) at the throttle lever. Period-
ically check the throttle cable free play and, if nec-
essary, adjust it as follows.TIPThe engine idling speed must be checked, and ad-
justed if necessary, before adjusting the throttle ca-
ble free play.1. Slide the rubber cover back.
2. Loosen the locknut.
3. To increase the throttle cable free play, turn
the throttle cable free play adjusting bolt in di-
rection (a). To decrease the throttle cable free
play, turn the adjusting bolt in direction (b).
1. Throttle stop screwEngine idling speed:
1450–1550 r/min
U1BS61E0.book Page 21 Tuesday, April 13, 2010 10:25 AM
Page 118 of 138

8-38
8Batteries produce explosive gases. Keep
sparks, flame, cigarettes or other sources of ig-
nition away. Ventilate when charging or using
in an enclosed space.
KEEP OUT OF REACH OF CHILDREN.
To remove the battery
1. Remove the seat. (See page 4-12.)
2. Unhook the band securing the owner’s tool kit,
and then remove the battery holding plate by
removing the bolts.
3. Disconnect the negative battery lead first,
then the positive battery lead by removing
their bolt. NOTICE: When removing the bat-
tery, the main switch must be off, and the
negative lead must be disconnected be-
fore the positive lead.
[ECB01001]
4. Pull the battery out of its compartment.
To charge the battery
Have a Yamaha dealer charge the battery as soon
as possible if it seems to have discharged. Keep in
mind that the battery tends to discharge more
quickly if the ATV is equipped with optional electri-
cal accessories.1. Battery holding plate
2. Bolt
3. Holding band
4. Negative battery lead (black)
5. Positive battery lead (red)
4
3
5
1
2
U1BS61E0.book Page 38 Tuesday, April 13, 2010 10:25 AM
Page 125 of 138
8-45
8
WARNING
EWB02280Do not smoke when checking the fuel system.
Fuel can ignite or explode, causing severe inju-
ry or property damage. Make sure there are no
open flames or sparks in the area, including pi-
lot lights from water heaters or furnaces.U1BS61E0.book Page 45 Tuesday, April 13, 2010 10:25 AM
Page 126 of 138
8-46
8
EBU25751Troubleshooting chart
Check the fuel level in
the fuel tank.1. Fuel
There is enough fuel.
There is no fuel.
Check the compression.
Supply fuel.
The engine does not start.
Check the compression.
Operate the electric starter.2. Compression
There is compression.
There is no compression.
Check the ignition.
Have a Yamaha dealer
check the ATV.
Remove the spark plug
and check the electrodes.3. Ignition
Wipe off with a dry cloth and correct the
spark plug gap, or replace the spark plug.
Have a Yamaha dealer check the ATV.
The engine does not start.
Have a Yamaha dealer
check the ATV.
The engine does not start.
Check the battery.
Operate the electric starter.4. Battery
The engine turns over
quickly.
The engine turns over
slowly.
The battery is good.Check the battery lead connections,
and charge the battery if necessary.
DryWet
Open the throttle halfway and operate
the electric starter.
U1BS61E0.book Page 46 Tuesday, April 13, 2010 10:25 AM


